
This Is, Without a Doubt, the Best Apple Pie Ever Made


Finding the perfect apple pie recipe is a journey that involves a lot of trial and error. If you’ve struggled with soggy crusts or over-spiced fillings, you’re not alone! This recipe, however, is a game-changer. With a vodka-infused, flaky crust and an apple filling that’s perfectly set, it’s the apple pie that will make your taste buds and even the most discerning pie lovers cheer.

Perfecting the classic apple pie has been one of those elusive kitchen quests that somehow manages to be both frustrating and delicious. You know, the kind of challenge that feels like it should be simple, but ends up testing your patience—and your marriage.
You see, I’m married to an apple pie connoisseur who has very specific tastes. Too much spice? A dealbreaker. A hint of lemon? Don’t even think about it. Soggy crust, curdled filling, overcooked, undercooked—you name it, we’ve experienced it. But after countless failed attempts, I can confidently say—this is the one. This recipe finally makes all my husband’s apple pie dreams come true. And trust me, that’s no small feat!
The Secret to a Flaky, Tender Pie Crust
If you’ve ever wrestled with a pie crust that’s more like cardboard than flaky heaven, then you’re in for a treat. This recipe is the answer to all your crust woes—whether you’re aiming for a sweet or savory masterpiece.
Here’s what you need for the ultimate pie crust:
- All-purpose flour
- Solid vegetable shortening
- Sugar
- Salt
- Egg
- Cold butter
- Vodka (Yes! Vodka)
- Ice-cold water
This dough makes the kind of crust that’s not only flaky and tender, but so versatile it works for any pie, sweet or savory. (Just skip the sugar for savory pies, and you’re golden!) Now, I know what you’re probably thinking: Vodka in a pie crust? Really?
Yes, really! Here’s why: Vodka is a game-changer when it comes to creating that perfect flakiness. It keeps the gluten in the flour from forming too much, so the crust remains light, tender, and—most importantly—flaky. Plus, the vodka cooks out in the oven, leaving no trace, so you can serve it with confidence to the whole family.
But here’s the catch: Follow every step, especially the “par-bake” step, to avoid the ultimate heartbreak—a soggy bottom. Trust me!
Apple Pie Filling: Simple, Pure, Perfect
I know what you’re probably thinking—Where’s the allspice? The nutmeg? The lemon? No tapioca, no cornstarch? Are we going rogue here? Yep, we sure are!
This filling is all about one thing: the apples. No distractions. The result? A perfectly set filling—no lumps, no thickness, just pure apple goodness that shines through.
Here’s what you need:
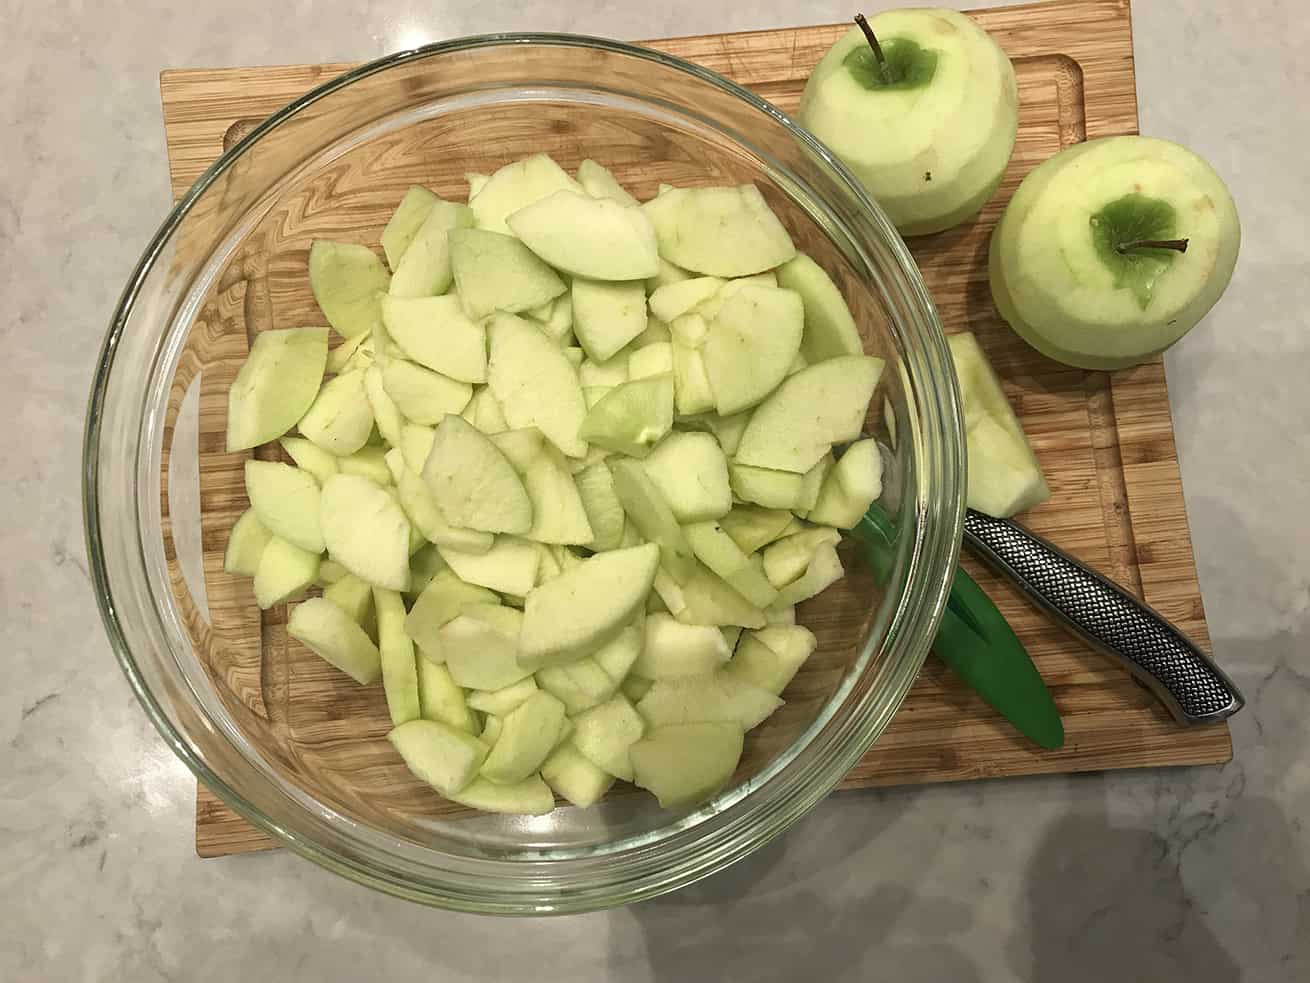
- Granny Smith apples (or your favorite variety)
- Sugar
- Cinnamon
- Butter
That’s it! Simple, pure, and absolutely right. Now, here’s the catch—this is a no-compromise, follow-the-steps kind of recipe. If you add the sugar too soon, the apples will release too much juice, making the filling too “saucy” and—yep, you guessed it—leading to that dreaded soggy bottom. So, stick with the plan for that picture-perfect filling that lets the apples take center stage. You won’t regret it!
How to Avoid a Soggy Bottom in Your Apple Pie
Ah, the soggy bottom. It’s the stuff of pie nightmares, isn’t it? All that hard work—perfect crust, delicious filling—and then you bite in and it’s soggy. Total heartbreak. But don’t worry, I’ve got your back. Here’s how to keep that crust crisp and golden all the way through.
The secret? Par-baking the crust. Yep, it’s a little extra step, but it’s absolutely worth it. Here’s why:
- Pre-bake the bottom crust before adding the filling. This step creates a barrier that keeps all the juices from soaking in, so your crust stays crisp. Just 10–15 minutes in the oven will do wonders.
- Don’t overdo the sugar in the filling. If you add the sugar too early, it draws out too much moisture from the apples, leading to a soupy filling and, you guessed it, a soggy crust. Be patient—wait until your apples are just about ready to go into the pie.
- Draining excess juice from your filling. After you mix the apples with sugar and cinnamon, let it sit for a few minutes, then drain off any extra liquid. This helps keep that crust dry and flaky.
Follow these simple tricks, and you’ll be biting into a perfect, crisp crust every time.
Baking Tips for the Perfect Apple Pie Every Time
The little things you do (or don’t do) in the baking process can make all the difference. These tips will ensure your apple pie turns out just the way it should—golden, flaky, and delicious.
Use the Right Pie Pan
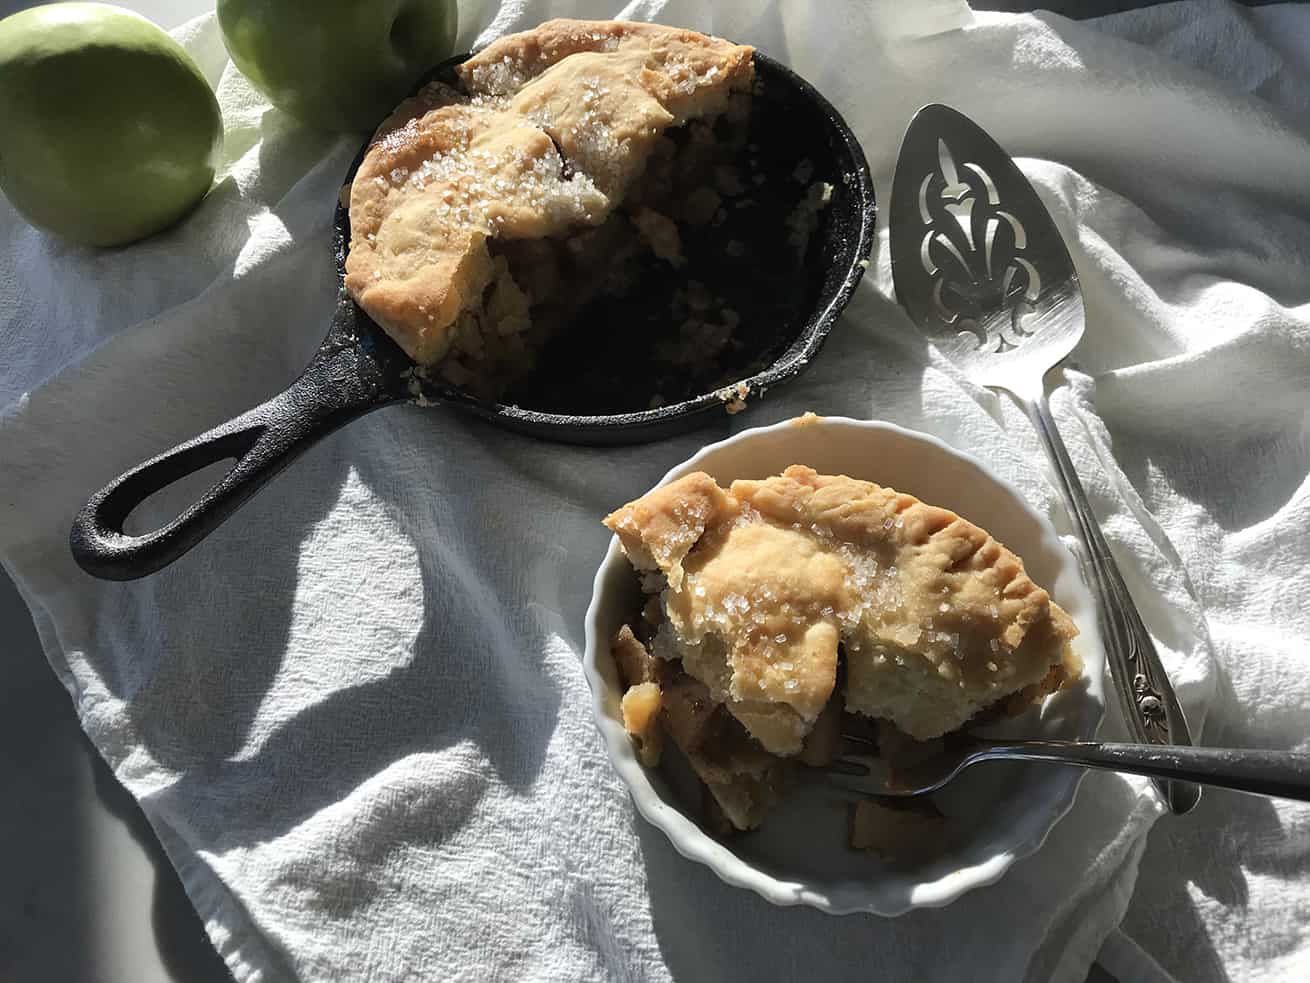
This apple pie calls for a 9-inch pie pan. But here’s the thing: not all 9-inch pie pans are created equal. My favorite is a deep dish, which really lets you pile on those apples—7 of them. That depth gives you a hearty slice, too.
Often, I’ll use this recipe to make two mini pies in 6-inch cast-iron skillets (you can see one of them in the picture above). It’s a great option if you want smaller, individual pies or if you’re baking for a crowd and want to offer a few extra servings. These skillets give the crust a nice, crisp edge while keeping the filling just the right texture.
Don’t Skip the Chilling Time
You’ve heard it before, but it’s worth repeating: chill your dough! The colder your dough, the flakier your crust will be. This step is key—wrap the dough and chill it in the fridge for at least 30 minutes before rolling it out. If you’re really into flaky crusts (and who isn’t?), pop the dough in the fridge between steps, too, after rolling it out and before baking.
Keep an Eye on the Oven
Every oven is a little different, so keep an eye on your pie as it bakes. You’ll want to look for that golden, bubbly, don’t-touch-me crust. If the edges start to get too dark before the pie is done, you can cover the edges with foil or a pie shield to prevent over-baking.
Let It Cool (If You Can Wait)
I know, it’s tempting, but don’t cut into your pie as soon as it comes out of the oven. Let it cool for at least an hour so the filling has time to set. This will help prevent any drippy, runny messes when you slice into it.
And most importantly, enjoy the process—because baking should be as fun as it is delicious!

Best Apple Pie in the World
Ingredients
For the Crust:
- 2 ½ cups all-purpose flour
- 1/2 cup solid vegetable shortening you can substitute all shortening for a buttery option
- 1/2 cup salted cold butter cut into small pieces
- 1 tbsp white granulated sugar omit for a savory crust
- 1 egg at room temperature
- 1/2 tsp salt
- 1 tbsp vodka
- 1/4 cup ice-cold water
- Coarse sugar for garnish optional
For the Filling:
- 6 - 7 Granny Smith apples peeled, cored, and thinly sliced (You can use any tart apple, but Granny Smith is my favorite for that perfect tang)
- 1 cup white granulated sugar or swap in brown sugar for a richer flavor
- 1 tsp ground cinnamon
- 2 tbsp butter cut into slices
Instructions
Make the Crust:
- In a large bowl, combine flour, sugar, and salt.
- Cut in the shortening and butter using a pastry blender or fork until it resembles coarse crumbs with pea-sized lumps.
- In a separate bowl, whisk together the egg, vodka, and water until combined. Pour into the flour mixture all at once. Mix gently with a fork until the dough comes together into a ball.
- Divide dough into two pieces, flatten into disks, and wrap in plastic wrap. Chill in the fridge for at least 1 hour, or overnight for best results.
Par-Bake the Bottom Crust:
- Preheat the oven to 450°F.
- Roll out one disk of dough and press it gently into your pie pan (glass, ceramic, or cast iron work best). Don’t prick the bottom of the crust—no holes allowed!
- Bake for 5-7 minutes, watching closely as the bottom starts to puff up and form little bubbles. Remove from the oven. Fill with the apple mixture (see below).
Make the Apple Filling:
- Peel, core, and slice apples into medium-thin pieces.
- In a small bowl, mix the sugar and cinnamon together.
- Pile the prepared apples into your par-baked pie shell, spreading them out evenly.
- Sprinkle the cinnamon-sugar mixture evenly over the apples. Top with butter slices.
Top It Off:
- Roll out the second disk of dough and cover the apples. Cut a few slits into the top to allow steam to escape. Fold the edge over the filling and crimp it together. Don’t worry if it doesn’t fully seal—it’ll meld as it bakes.
- Brush the top with a little water and sprinkle with coarse sugar if you like a sweet, sparkly finish.
- Bake the Pie:
- Bake at 450°F for 15 minutes. Then, reduce the heat to 375°F and bake for another 35 minutes, or until the crust is golden and the filling is bubbling.
- Let cool for at least 1 hour before slicing to let the filling set.
Notes
Nutrition
Question: What’s your secret ingredient for making the perfect apple pie? Do you add something special, or do you keep it classic? Let me know down below in the comments section.
EverydayCheapskate™ is reader-supported. We participate in the Amazon Services LLC Associates Program and other affiliate advertising programs, designed to provide a means for us to earn from qualifying purchases, at no cost to you.

More from Everyday Cheapskate
 https://www.everydaycheapskate.com/wp-content/uploads/20260707-creamy-whipped-frozen-coffee-drink-on-balcony-with-whipped-cream.png
800
1200
Mary Hunt
https://www.everydaycheapskate.com/wp-content/uploads/EC-Logo-by-Mary-Hunt-Tagline-Trimmed.png
Mary Hunt2026-07-07 10:09:112026-07-07 10:09:11I Stopped Buying $7 Frappuccinos. Here’s What I Make Now
https://www.everydaycheapskate.com/wp-content/uploads/20260707-creamy-whipped-frozen-coffee-drink-on-balcony-with-whipped-cream.png
800
1200
Mary Hunt
https://www.everydaycheapskate.com/wp-content/uploads/EC-Logo-by-Mary-Hunt-Tagline-Trimmed.png
Mary Hunt2026-07-07 10:09:112026-07-07 10:09:11I Stopped Buying $7 Frappuccinos. Here’s What I Make Now https://www.everydaycheapskate.com/wp-content/uploads/20260630-a-lit-sparkler-with-an-american-flag-in-the-background-4th-of-july-hacks-tips-and-recipes.png
800
1200
Mary Hunt
https://www.everydaycheapskate.com/wp-content/uploads/EC-Logo-by-Mary-Hunt-Tagline-Trimmed.png
Mary Hunt2026-06-30 21:44:502026-06-30 21:44:5034 Fourth of July Recipes and DIY Hacks for a Stress-Free Holiday
https://www.everydaycheapskate.com/wp-content/uploads/20260630-a-lit-sparkler-with-an-american-flag-in-the-background-4th-of-july-hacks-tips-and-recipes.png
800
1200
Mary Hunt
https://www.everydaycheapskate.com/wp-content/uploads/EC-Logo-by-Mary-Hunt-Tagline-Trimmed.png
Mary Hunt2026-06-30 21:44:502026-06-30 21:44:5034 Fourth of July Recipes and DIY Hacks for a Stress-Free Holiday https://www.everydaycheapskate.com/wp-content/uploads/20260628-Grilled-Peaches-with-Balsamic-and-Blue-Cheese-1.png
800
1200
Mary Hunt
https://www.everydaycheapskate.com/wp-content/uploads/EC-Logo-by-Mary-Hunt-Tagline-Trimmed.png
Mary Hunt2026-06-29 09:38:342026-06-29 09:38:34Summer Grilled Peaches with Balsamic and Blue Cheese
https://www.everydaycheapskate.com/wp-content/uploads/20260628-Grilled-Peaches-with-Balsamic-and-Blue-Cheese-1.png
800
1200
Mary Hunt
https://www.everydaycheapskate.com/wp-content/uploads/EC-Logo-by-Mary-Hunt-Tagline-Trimmed.png
Mary Hunt2026-06-29 09:38:342026-06-29 09:38:34Summer Grilled Peaches with Balsamic and Blue Cheese https://www.everydaycheapskate.com/wp-content/uploads/20260620-cheesey-chicken-and-rice-casserole-in-a-baking-dish.png
800
1200
Mary Hunt
https://www.everydaycheapskate.com/wp-content/uploads/EC-Logo-by-Mary-Hunt-Tagline-Trimmed.png
Mary Hunt2026-06-20 13:31:162026-06-20 13:31:16Cheesy Chicken & Rice Bake That Disappears at Family Dinners
https://www.everydaycheapskate.com/wp-content/uploads/20260620-cheesey-chicken-and-rice-casserole-in-a-baking-dish.png
800
1200
Mary Hunt
https://www.everydaycheapskate.com/wp-content/uploads/EC-Logo-by-Mary-Hunt-Tagline-Trimmed.png
Mary Hunt2026-06-20 13:31:162026-06-20 13:31:16Cheesy Chicken & Rice Bake That Disappears at Family Dinners https://www.everydaycheapskate.com/wp-content/uploads/20260619-delicious-creamy-no-churn-vanilla-ice-cream-scoop-and-loaf-pan.png
800
1200
Mary Hunt
https://www.everydaycheapskate.com/wp-content/uploads/EC-Logo-by-Mary-Hunt-Tagline-Trimmed.png
Mary Hunt2026-06-19 18:42:402026-06-19 18:42:413-Ingredient No-Churn Vanilla Ice Cream (No Machine Needed)
https://www.everydaycheapskate.com/wp-content/uploads/20260619-delicious-creamy-no-churn-vanilla-ice-cream-scoop-and-loaf-pan.png
800
1200
Mary Hunt
https://www.everydaycheapskate.com/wp-content/uploads/EC-Logo-by-Mary-Hunt-Tagline-Trimmed.png
Mary Hunt2026-06-19 18:42:402026-06-19 18:42:413-Ingredient No-Churn Vanilla Ice Cream (No Machine Needed) https://www.everydaycheapskate.com/wp-content/uploads/20260616-close-up-of-watermelon-feta-salad-with-mint-and-lime.png
800
1200
Mary Hunt
https://www.everydaycheapskate.com/wp-content/uploads/EC-Logo-by-Mary-Hunt-Tagline-Trimmed.png
Mary Hunt2026-06-16 17:44:142026-06-16 17:44:14Watermelon Feta Salad with Mint for Summer Cookouts
https://www.everydaycheapskate.com/wp-content/uploads/20260616-close-up-of-watermelon-feta-salad-with-mint-and-lime.png
800
1200
Mary Hunt
https://www.everydaycheapskate.com/wp-content/uploads/EC-Logo-by-Mary-Hunt-Tagline-Trimmed.png
Mary Hunt2026-06-16 17:44:142026-06-16 17:44:14Watermelon Feta Salad with Mint for Summer Cookouts https://www.everydaycheapskate.com/wp-content/uploads/20260613-chicken-a-lorange-recipe-in-roasting-pan-with-shallots-and-orange-marmalade.png
800
1200
Mary Hunt
https://www.everydaycheapskate.com/wp-content/uploads/EC-Logo-by-Mary-Hunt-Tagline-Trimmed.png
Mary Hunt2026-06-13 20:59:292026-06-13 20:59:29Duck à l’Orange Is Fancy. This Chicken Version Is Better.
https://www.everydaycheapskate.com/wp-content/uploads/20260613-chicken-a-lorange-recipe-in-roasting-pan-with-shallots-and-orange-marmalade.png
800
1200
Mary Hunt
https://www.everydaycheapskate.com/wp-content/uploads/EC-Logo-by-Mary-Hunt-Tagline-Trimmed.png
Mary Hunt2026-06-13 20:59:292026-06-13 20:59:29Duck à l’Orange Is Fancy. This Chicken Version Is Better. https://www.everydaycheapskate.com/wp-content/uploads/20260607-woman-grocery-shopping-pushing-cart-with-apples-and-cauliflower.png
800
1200
Mary Hunt
https://www.everydaycheapskate.com/wp-content/uploads/EC-Logo-by-Mary-Hunt-Tagline-Trimmed.png
Mary Hunt2026-06-09 23:20:292026-06-09 23:20:29How to Read a Grocery Store Sale Cycle (And Stop Overpaying)
https://www.everydaycheapskate.com/wp-content/uploads/20260607-woman-grocery-shopping-pushing-cart-with-apples-and-cauliflower.png
800
1200
Mary Hunt
https://www.everydaycheapskate.com/wp-content/uploads/EC-Logo-by-Mary-Hunt-Tagline-Trimmed.png
Mary Hunt2026-06-09 23:20:292026-06-09 23:20:29How to Read a Grocery Store Sale Cycle (And Stop Overpaying) https://www.everydaycheapskate.com/wp-content/uploads/20260608-copycat-hamburger-helper-pasta-recipe-in-a-cast-iron-skillet.png
800
1200
Mary Hunt
https://www.everydaycheapskate.com/wp-content/uploads/EC-Logo-by-Mary-Hunt-Tagline-Trimmed.png
Mary Hunt2026-06-08 23:02:072026-06-08 23:02:07Homemade Hamburger Helper: Cheesy One-Skillet Dinner
https://www.everydaycheapskate.com/wp-content/uploads/20260608-copycat-hamburger-helper-pasta-recipe-in-a-cast-iron-skillet.png
800
1200
Mary Hunt
https://www.everydaycheapskate.com/wp-content/uploads/EC-Logo-by-Mary-Hunt-Tagline-Trimmed.png
Mary Hunt2026-06-08 23:02:072026-06-08 23:02:07Homemade Hamburger Helper: Cheesy One-Skillet Dinner

Sounds wonderful, but I can’t eat eggs (except a very small amount in, for example, biscuits or cake. Not scrambled or fried egg, etc., or where the egg is a major ingredient in a recipe. Could I use an egg replacer instead?
If you can’t have chicken eggs you should try duck eggs, the protein is different. We have a friend that is allergic to chicken eggs and they can have duck eggs with no problem. That includes baked goods. Look it up! Also, duck eggs are excellent in baked goods!! Hope this helps you.
When I put the pie in the oven at 450° the top crust was brown in 5 minutes. I put a tent of foil over the entire pie for the rest of the bake time and when it finished it had a nice brown top with no burning.
Ps…Add a tablespoon of flour to the sugar mixture with the apples helps thicken a tad. And with the oil crust you can roll out right away..no refrigeration necessary. With just the top crust…no precooking necessary.
Will the iron skillet trick work on top of an electric burner? (Electric stove)
Yes, any stovetop
Well, after 45 years of baking apple pie I thought there was nothing left to learn. Wrong! This is hands down the best. Made early this am for dinner, but hubby HAD to have a slice sooner. Then I did. Then he had more. Can we eat a whole pie by bedtime? I sure hope not! The crust is perfect, and the filling sublime. Who but wise Mary knew that skillet trick? I only did two things differently — I subbed two sweet apples for two of the grannies (didn’t have enough) and reduced sugar just a tad. Maybe two tablespoons.
I generally use all butter except for two tablespoons of vegetable shortening, but decided to make as written. We did not taste the vodka at all. I was worried that the crust would stick to the pan, but that did not happen. Just yummy!
This recipe is almost identical to my Mom’s Apple Pie recipe. She does add a heaping tablespoon of flour to the sugar/cinnamon mixture to thicken the juices so it’s not too runny.
I can attest that this is the best apple pie. My husband, who doesn’t really like apple pie went crazy for it. It’s very easy as well.
While I think this recipe sounds delicious, we’ll have to agree to disagree on which one is the best. 😉 I found a recipe some years ago that beats every other apple pie in the universe. I always use the vodka pie crust recipe that I got from America’s Test Kitchen some years ago. I also make a little more of the sauce than the recipe calls for as I think it makes it even more amazing. It has a totally different process for the filling; “Sliced apples are mounded in a prepared pie shell, covered with a latticed crust, and just before slipping into the oven, doused with a sugary butter syrup.” I love apple pie, and making pie in cast iron does work amazingly well; I’ve tried it in the past with a recipe from ATK. I’ve thought about making my favorite apple pie in cast iron to see how it does, but totally forgot about that idea. I have some pie apples from our trees at home; I planned to make the pie when the weather cools off (below the 114 it’s supposed to hit this week!), but now that you’ve reminded me about cast iron, I think I’ll make it in that this time. Thanks!
My wife is a celiac, so I need to make it gluten free. Given the gluten is absent, do I still need to add the Vodka? Thank you
I’ve always been too intimidated by my mother’s excellent pie-making skills —and critiques of others’— to try baking a pie on my own. And I love to bake. But I finally decided to take the leap…and it was a hit!! Served it to a neighbour foodie snob to rave reviews, then tried it again with rhubarb (tart like Granny Smiths, right?) Attempt #2 was also a hit with the family and guests. This recipe is going to go on regular rotation. Thanks, Mary!!
I hereby crown you EC Official Pie Baking Expert!
Can vinegar be substituted for vodka?
Yes, you can do that. It’s not an exact substitute, but the purpose of the alcohol is to counteract the gluten in the flour. It won’t make your pastry gluten-free but it deactivates it so the pastry doesn’t puff up or become too elastic. Vinegar will act in a similar way.
I made this lucious pie tonight. I, mostly, followed the recipe as written. I used apples from the “pear tree” we had gotten from our friend. We don’t know what kind of apples they are – but they are crisp and have a slightly tart taste and make a delicious pie. It was very simple to make and came out great.
This is a great recipe and is a definite keeper. Thanks, Mary!
Do you think it would work in my Pampered Chef stonewear?
Is this a pan you’ve made pie in, in the past? If so … sure. If not, I don’t know but you could experiment!
Laurie- yes you can use a pampered chef pie plate. I did and it baked just fine.
My only issue was there was a lot of liquid in inside the pie. I don’t know what would’ve caused that.
The crust was delicious and turned out beautifully, but the liquidy interior was a disappointment.
Yes it is grt. I use gluten free/almond/w/w etc. No white flour. Coconut shortening. Great stuff.
Healthy for you.
I’ve made this pie several times, as instructed, and it’s the BEST pie, hands down. Mary made me a pie baker! I used her original instructions in a cast iron skillet. It’s phenomenal!
Yes! Thanks for your endorsement, Gina
The instructions do not say anything about adding the sugar when making the pie crust. Assuming you add to the flour with the salt?
Yes add with flour and salt.
Can you use a 10 inch skillet for this awesome sounding recipe?
Yes! Did I fail to say that? Whoops … for this recipe I use both my two six-inch cast-iron skillets, OR my 10-inch cast-iron skillet OR a regular pie pan. No particular reason, just whatever mood happens to strike 🙂
Vodka works wonders in a pie crust! I learned this trick a couple of years ago, replacing half of the water in my favorite crust recipe with vodka. Out of personal preference, I stopped using shortening many years ago in favor of all butter.
Great tip, Joanna!
I will try this recipe in a cast iron skillet, as shown. My “soggy bottom crust” has kept me from EVER baking pie for dessert. It’s a shame I can’t talk about… Dear God, let this be my time to shine! Thanks for giving me hope, Mary!
Gina … Cast iron skillet is an awesome way to do this. HINT: Instead of par-baking in the oven when using cast-iron, I set the skillet on a stovetop burner set to Low to Med-Low. Seriously! And I stand over it like a hovering mother bear. I wait until the pastry starts to turn white-ish and begins to puff. Also, my experience is that the bottom crust will not get “browner” or burnt during the baking process, even during the 15 mins. at 450F. That bottom pie crust is stubborn that way. Just make sure you don’t overdo it on the stovetop, but don’t under-do, either. It’s a bit of a learned skill perhaps? You want to give it a nice headstart. I cannot wait for you to try this!