DIY Tulip Muffin Liners: A Genius Hack for Perfect Muffins Every Time


An ingenious solution for a paper muffin liner shortage: crafting DIY tulip muffin liners. This is your ticket to flawless muffins every time. Get ready to roll up your sleeves and discover the secrets that will have you baking like a pro in no time (remember: just stick to the recipe).
Alright, so picture this: I’m about to spill all my muffin-making secrets that’ll have your friends and family dubbing you a baking genius. But before we dive into that, let me share a little Saturday morning mishap from when I was in the middle of making a fabulous—if I do say so myself—brunch.
I was all ready to fill the muffin cups with batter when I remembered that I’d used every last one of my cupcake paper liners. Now, heading to the store wasn’t on my agenda. And let me tell you, muffin batter is not the most patient companion. If you don’t hustle it into the oven right after stirring in those wet ingredients, it starts giving you the side-eye.
Frugal vs. Fancy: The Great Debate Over Tulip Muffin Papers
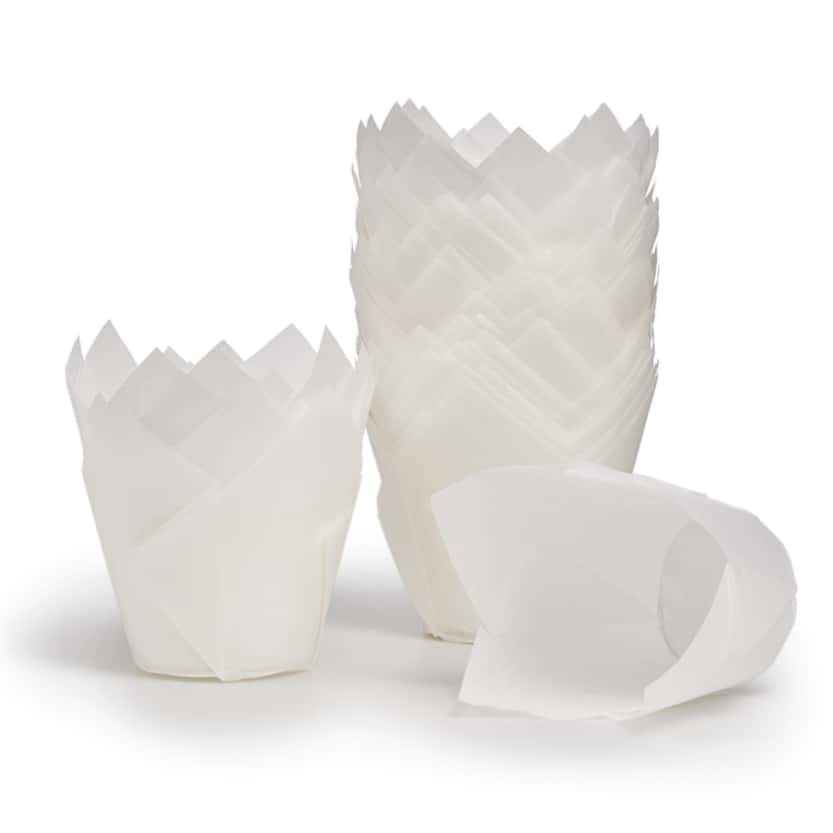 I wanted to kick myself because I’d planned to splurge and order these very nice Tulip Muffin Papers online, but at the last minute felt myself choking at the price: $29.95 plus tax and $9.95 shipping for 250 papers—about $.25 each. Seriously, who wants to spend as much on the liners as they do on the muffins themselves?
So there I was, torn between splurging and sticking to my frugal guns. Let’s just say, hindsight’s 20/20, and in that moment, I was really kicking myself for not hitting that “order” button.
Back to My Muffin Liner Dilemma
I really do not like to bake muffins in a muffin pan without paper liners. The batter tends to flow onto the pan as the muffins rise, making them unsightly and difficult to remove. And then once removed to cool, their poor little bodies are all exposed, which makes them get all dried out and crusty well before their time.
In that moment of frustration, a thought sparked: What if …

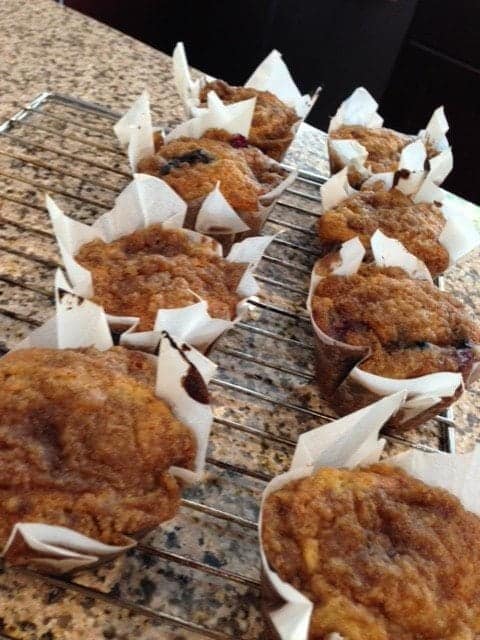
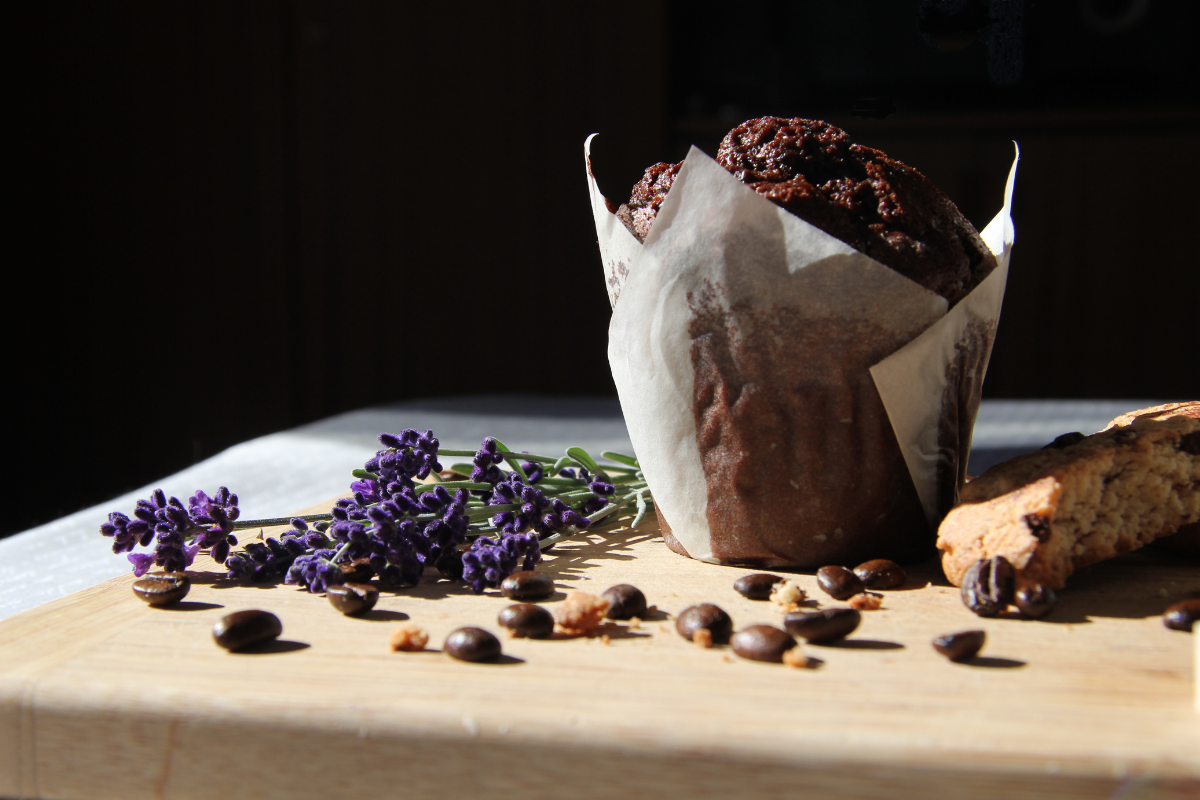
Now, I have to admit, my photography skills leave much to be desired, but trust me on this: this trick works like a charm. Say goodbye to pricey cupcake paper liners in my kitchen! My DIY tulip papers are in a league of their own—they keep every bit of the muffin snugly contained within the cup. Not even the muffin top dares to make an escape. Plus, let’s not forget the aesthetics—they give off major quaint French bakery vibes.
How to Make Tulip Muffin Liners
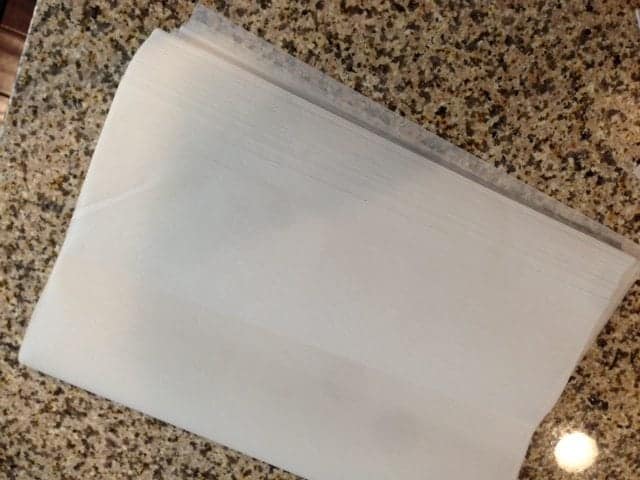
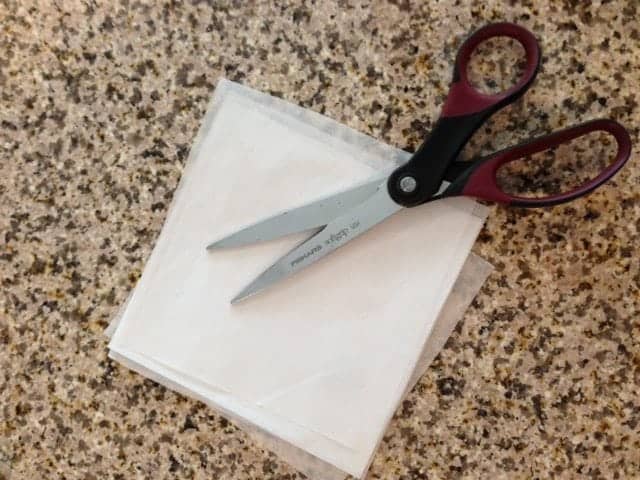
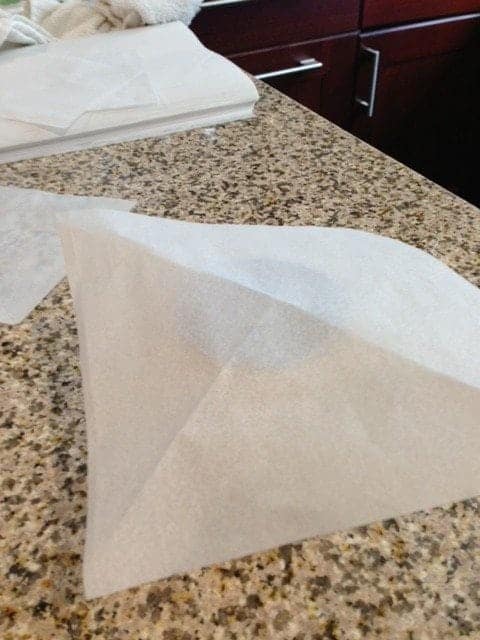
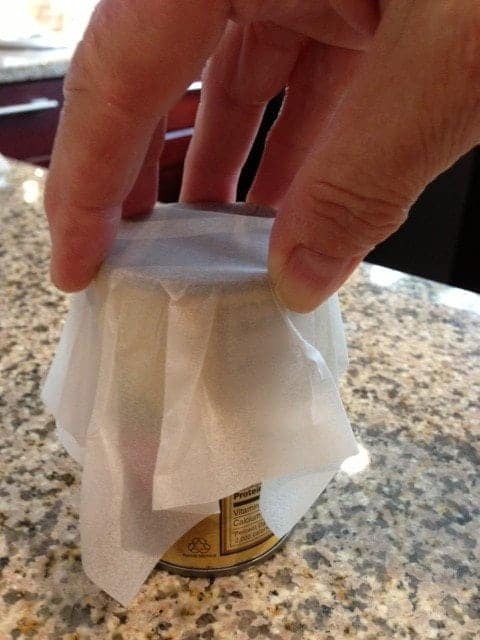
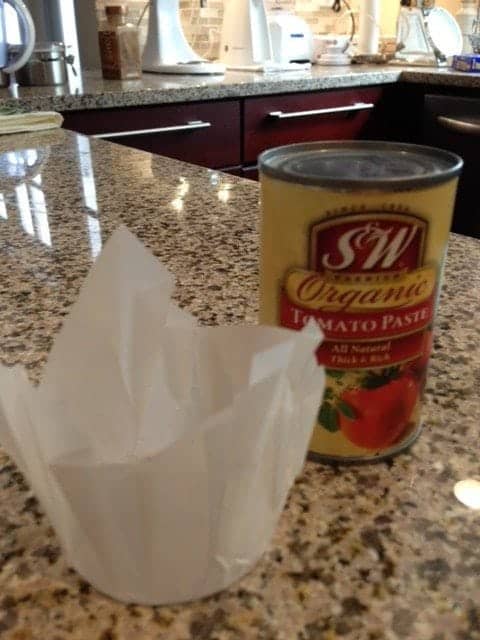
Let me walk you through the magic of creating your own tulip muffin liners—it’s simpler than you think! Start with parchment paper cut into 6-inch squares for standard-size muffins. Fold each square diagonally twice to find the center, then mold them over a small can (or a juice glass in a pinch), gently pleating the paper to fit. Because parchment paper is sturdy, it holds this shape very well.
Now, the trick to filling these tulip liners without any messy mishaps is to take it slow. I’ve found that using a disposable cake decorating bag or a gallon-size zip lock bag works wonders. Simply pour your batter in and pipe it into the cups, just like you’re decorating a cake—trust me, it’s a game-changer.
Once baked, these tulip papers make it a breeze to lift your muffins out of the pan. Just grab onto the “ears” and voila! Perfectly contained and ready to enjoy.
And for those who love a jumbo-sized treat, 7-inch squares of parchment do the trick beautifully. Oh, and did I mention the mini-muffin pan? Yes, I made adorable tiny tulip papers for it from 3 1/2-inch squares of parchment formed over an upside-down prescription bottle.
Best part? Parchment paper costs about $.10 per sheet, and you can get 6 regular-size tulip muffin papers from just one sheet, costing you about 1 1/2 cents each. Talk about affordable elegance!

How to Make Tulip Muffin Cups
Materials
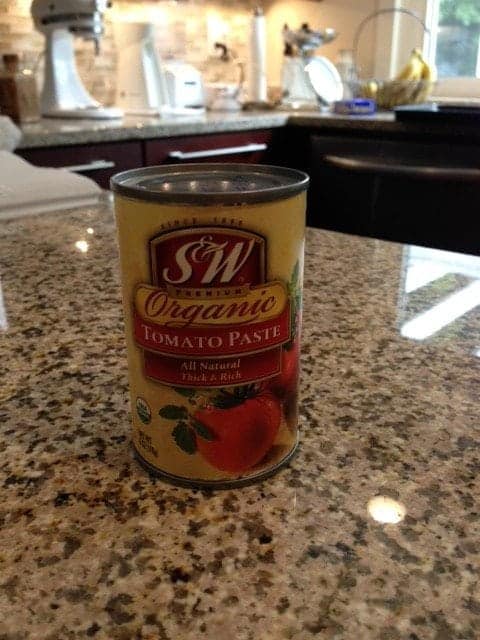
- 2 sheets 12" x 18" parchment paper
- 1 6-oz can (see Note 1)
Instructions
- With scissors, cut parchment paper in 12 (6-inch) squares, 6 per sheet parchment
- Form each 6-inch square piece parchment over a small can, sliding your hand down the sides of the can to "pleat" the paper as it conforms to the size of the can (see Note 2).
- To use: Place tulip muffin cups in a muffin pan, fill with batter (see Note 3).
Notes
And now for muffins …
You see, baking and I, well, we’ve had our fair share of ups and downs. I love to bake, however, baking has not always liked me. There was a time when I thought we’d never see eye to eye. But then, I had a revelation—I needed to start playing by the rules. That meant measuring ingredients precisely, following directions to a T, and realizing that “folding in” isn’t code for “beating it to death,” “one cup of flour” doesn’t mean, “that looks about right,” and “butter softened,” does not mean “boiling like a witch’s cauldron.”
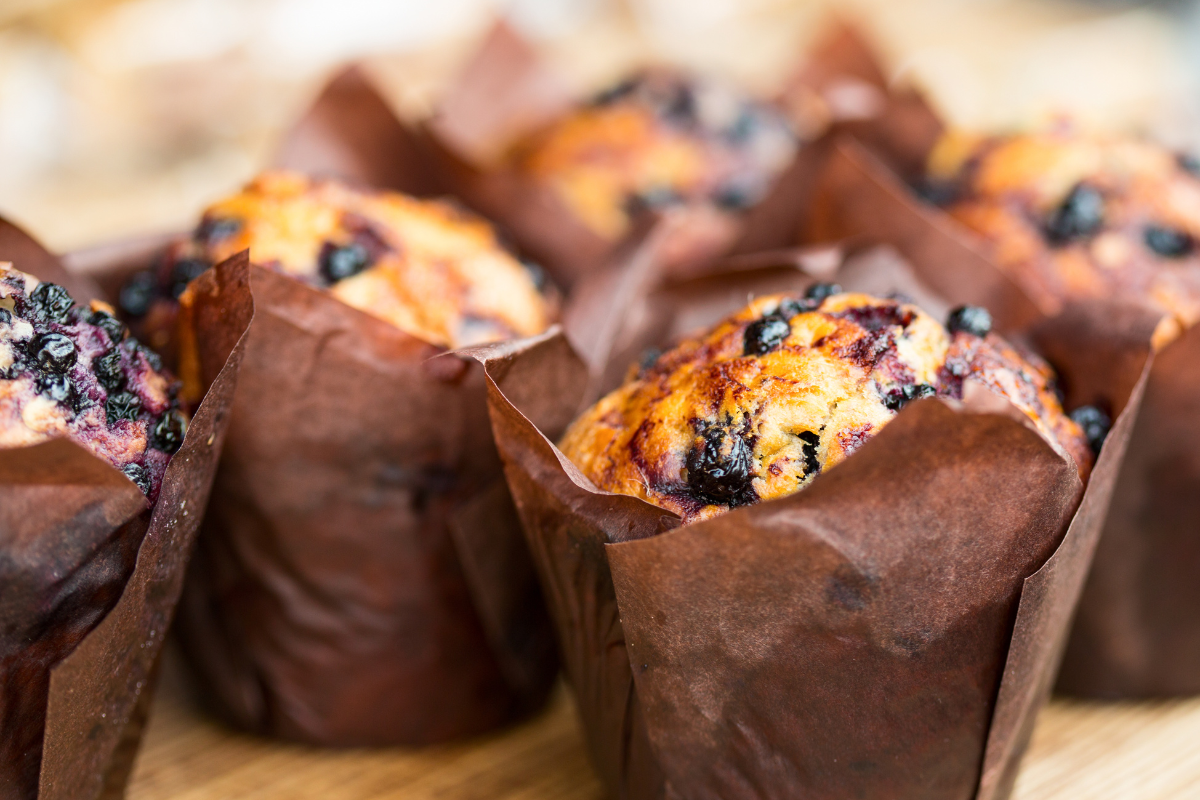
Einstein Blueberry Muffins
One day that I will not soon forget, I was reminded about how far I’ve come as a home baker when EC staffer, Max, could be heard throughout the office, “These blueberry muffins are insane!” Sure, he called them blueberry muffins, but I call them Einstein Muffins. That’s because every time I make them, I feel like a genius. And you can feel like a genius, too—provided you stick to the recipe exactly.

Einstein Blueberry Muffins
Ingredients
For the Muffins:
- 1½ cups all-purpose flour
- ¾ cup white granulated sugar
- ½ teaspoon salt
- 2 teaspoons baking powder
- ⅓ cup vegetable oil
- 1 egg
- ½ cup milk or any milk substitute like almond or oat milk
- 1 cup fresh blueberries frozen work too!
For the Crumb Topping:
- ½ cup white sugar
- ⅓ cup all-purpose flour
- ¼ cup butter diced
- 1 ½ teaspoons ground cinnamon
Instructions
- Preheat the oven. Set it to 400°F (200°C). Grease 12 muffin cups or line them with muffin liners.
- Mix dry ingredients. In a large bowl, whisk together the flour, sugar, salt, and baking powder.
- Prepare the wet ingredients. In a 1-cup measuring cup, pour in the vegetable oil. Add the egg and fill the rest of the cup with milk. Beat lightly with a fork.
- Combine wet and dry ingredients. Pour the wet ingredients into the dry mixture. Stir until fully combined. The batter will be thick—this is normal!
- Fold in blueberries. Gently fold in the fresh (or frozen) blueberries.
- Fill muffin cups. Spoon the thick batter into the muffin cups, filling them all the way to the top.
- Make the crumb topping. In a small bowl, combine sugar, flour, butter, and cinnamon. Use a fork to mix it until it looks like coarse, crumbly sand.
- Top the muffins. Generously sprinkle the crumb topping over each muffin before baking.
- Bake. Pop them into the oven and bake for 20-22 minutes. Test for doneness by inserting a toothpick—it should come out just barely clean (err on the side of underbaking for a moist result!).
- Let the muffins cool for a few minutes before devouring!
Notes
Nutrition
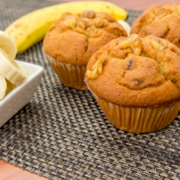
Best Banana Muffins, Ever!
And, what muffin post would be complete without this fabulous Banana Muffin recipe? Whether enjoyed as a morning treat or an afternoon pick-me-up, these muffins are guaranteed to leave you craving for more. And remember, when it comes to nuts or no nuts, it’s an age-old debate. Some say nuts add the perfect crunch, while others, like my son Jeremy, firmly believe that muffins are best-enjoyed without. But hey, the choice is yours—just be prepared for some serious family discussions over breakfast!
Best Banana Muffins, Ever!
Ingredients
Muffins
- 1 ½ cups all-purpose flour
- 1 teaspoon baking soda
- 1 teaspoon baking powder
- ½ teaspoon salt
- 3-4 ripe bananas (4 medium or 3 large), mashed
- ¾ cup granulated sugar
- 1 egg
- ⅓ cup butter, melted
Crumb topping
- ⅔ cup brown sugar, tightly packed
- 3 tablespoons all-purpose flour
- ¼ teaspoon ground cinnamon
- 2 tablespoons butter
- ½ cup chopped walnuts (optional)
Instructions
- Preheat oven to 375 F. Lightly grease 12 muffin cups or line with muffin papers.
- In a large bowl, mix together 1 1/2 cups flour, baking soda, baking powder, and salt.
- In another bowl, beat together bananas, sugar, egg, and melted butter.
- Stir the banana mixture and optional walnuts into the flour mixture just until all are moistened.
- Spoon batter into prepared muffin cups. Sprinkle crumb topping over the tops
- Bake in preheated oven for 18 to 20 minutes, until a toothpick inserted into the center of a muffin, comes out clean. Err on the side of underbaking, even if the centers appear to be a little sunken.
- To make crumb topping, in a small bowl, mix brown sugar, flour, and cinnamon.
- Cut in butter until mixture resembles coarse cornmeal.
Notes
Nutrition
Question: Have you ever had a baking mishap like running out of cupcake liners? Share your funniest baking fail stories with me!
EverydayCheapskate™ is reader-supported. We participate in the Amazon Services LLC Associates Program and other affiliate advertising programs, designed to provide a means for us to earn from qualifying purchases, at no cost to you.

More from Everyday Cheapskate
 https://www.everydaycheapskate.com/wp-content/uploads/20260724-ratatouille-recipe-served-over-white-rice.png
800
1200
Mary Hunt
https://www.everydaycheapskate.com/wp-content/uploads/EC-Logo-by-Mary-Hunt-Tagline-Trimmed.png
Mary Hunt2026-07-25 12:24:422026-07-25 12:24:42End-of-Summer Ratatouille (Uses Everything From the Garden)
https://www.everydaycheapskate.com/wp-content/uploads/20260724-ratatouille-recipe-served-over-white-rice.png
800
1200
Mary Hunt
https://www.everydaycheapskate.com/wp-content/uploads/EC-Logo-by-Mary-Hunt-Tagline-Trimmed.png
Mary Hunt2026-07-25 12:24:422026-07-25 12:24:42End-of-Summer Ratatouille (Uses Everything From the Garden) https://www.everydaycheapskate.com/wp-content/uploads/20260723-budget-homework-station-young-boy-studying-at-kitchen-dining-table.png
800
1200
Mary Hunt
https://www.everydaycheapskate.com/wp-content/uploads/EC-Logo-by-Mary-Hunt-Tagline-Trimmed.png
Mary Hunt2026-07-23 10:53:402026-07-23 10:53:41How to Set Up a Homework Station Your Kids Will Actually Use
https://www.everydaycheapskate.com/wp-content/uploads/20260723-budget-homework-station-young-boy-studying-at-kitchen-dining-table.png
800
1200
Mary Hunt
https://www.everydaycheapskate.com/wp-content/uploads/EC-Logo-by-Mary-Hunt-Tagline-Trimmed.png
Mary Hunt2026-07-23 10:53:402026-07-23 10:53:41How to Set Up a Homework Station Your Kids Will Actually Use https://www.everydaycheapskate.com/wp-content/uploads/20260722-easy-home-repairs-slow-sink-drain-squeaky-hinges-sticky-drawer.png
800
1200
Mary Hunt
https://www.everydaycheapskate.com/wp-content/uploads/EC-Logo-by-Mary-Hunt-Tagline-Trimmed.png
Mary Hunt2026-07-22 13:04:022026-07-22 13:04:0210 Small Home Annoyances You Can Fix in Under 15 Minutes Each
https://www.everydaycheapskate.com/wp-content/uploads/20260722-easy-home-repairs-slow-sink-drain-squeaky-hinges-sticky-drawer.png
800
1200
Mary Hunt
https://www.everydaycheapskate.com/wp-content/uploads/EC-Logo-by-Mary-Hunt-Tagline-Trimmed.png
Mary Hunt2026-07-22 13:04:022026-07-22 13:04:0210 Small Home Annoyances You Can Fix in Under 15 Minutes Each https://www.everydaycheapskate.com/wp-content/uploads/20260721-frozen-bags-of-produce-strawberries-raspberries-peas-peppers.png
800
1200
Mary Hunt
https://www.everydaycheapskate.com/wp-content/uploads/EC-Logo-by-Mary-Hunt-Tagline-Trimmed.png
Mary Hunt2026-07-21 12:14:122026-07-21 12:14:14Freeze Summer Produce Now to Taste It All Winter Long
https://www.everydaycheapskate.com/wp-content/uploads/20260721-frozen-bags-of-produce-strawberries-raspberries-peas-peppers.png
800
1200
Mary Hunt
https://www.everydaycheapskate.com/wp-content/uploads/EC-Logo-by-Mary-Hunt-Tagline-Trimmed.png
Mary Hunt2026-07-21 12:14:122026-07-21 12:14:14Freeze Summer Produce Now to Taste It All Winter Long https://www.everydaycheapskate.com/wp-content/uploads/20260720-slow-cooker-hot-weather-meals-salads-plus-pico-de-gallo-recipes.png
800
1200
Mary Hunt
https://www.everydaycheapskate.com/wp-content/uploads/EC-Logo-by-Mary-Hunt-Tagline-Trimmed.png
Mary Hunt2026-07-20 21:12:192026-07-20 21:15:463 Slow Cooker Summer Salads for Hot Weather Dinners
https://www.everydaycheapskate.com/wp-content/uploads/20260720-slow-cooker-hot-weather-meals-salads-plus-pico-de-gallo-recipes.png
800
1200
Mary Hunt
https://www.everydaycheapskate.com/wp-content/uploads/EC-Logo-by-Mary-Hunt-Tagline-Trimmed.png
Mary Hunt2026-07-20 21:12:192026-07-20 21:15:463 Slow Cooker Summer Salads for Hot Weather Dinners https://www.everydaycheapskate.com/wp-content/uploads/20260717-a-woman-holding-a-crate-of-cucumbers.png
800
1200
Mary Hunt
https://www.everydaycheapskate.com/wp-content/uploads/EC-Logo-by-Mary-Hunt-Tagline-Trimmed.png
Mary Hunt2026-07-17 10:11:072026-07-17 10:13:44Cucumbers Galore? Here’s What to Do With Every Single One
https://www.everydaycheapskate.com/wp-content/uploads/20260717-a-woman-holding-a-crate-of-cucumbers.png
800
1200
Mary Hunt
https://www.everydaycheapskate.com/wp-content/uploads/EC-Logo-by-Mary-Hunt-Tagline-Trimmed.png
Mary Hunt2026-07-17 10:11:072026-07-17 10:13:44Cucumbers Galore? Here’s What to Do With Every Single One https://www.everydaycheapskate.com/wp-content/uploads/20260714-car-dashboard-diy-car-interior-cleaning-wipes.png
800
1200
Mary Hunt
https://www.everydaycheapskate.com/wp-content/uploads/EC-Logo-by-Mary-Hunt-Tagline-Trimmed.png
Mary Hunt2026-07-14 13:45:172026-07-14 13:45:17DIY Car Interior Cleaning Wipes That Actually Work Well
https://www.everydaycheapskate.com/wp-content/uploads/20260714-car-dashboard-diy-car-interior-cleaning-wipes.png
800
1200
Mary Hunt
https://www.everydaycheapskate.com/wp-content/uploads/EC-Logo-by-Mary-Hunt-Tagline-Trimmed.png
Mary Hunt2026-07-14 13:45:172026-07-14 13:45:17DIY Car Interior Cleaning Wipes That Actually Work Well https://www.everydaycheapskate.com/wp-content/uploads/20260713-what-to-pack-for-kids-lunchboxes-young-boy-and-girl-eating-a-banana-and-a-sandwich.png
800
1200
Mary Hunt
https://www.everydaycheapskate.com/wp-content/uploads/EC-Logo-by-Mary-Hunt-Tagline-Trimmed.png
Mary Hunt2026-07-13 21:54:132026-07-13 21:54:13Back-to-School Lunch Ideas for a Week (No Boring Sandwiches)
https://www.everydaycheapskate.com/wp-content/uploads/20260713-what-to-pack-for-kids-lunchboxes-young-boy-and-girl-eating-a-banana-and-a-sandwich.png
800
1200
Mary Hunt
https://www.everydaycheapskate.com/wp-content/uploads/EC-Logo-by-Mary-Hunt-Tagline-Trimmed.png
Mary Hunt2026-07-13 21:54:132026-07-13 21:54:13Back-to-School Lunch Ideas for a Week (No Boring Sandwiches) https://www.everydaycheapskate.com/wp-content/uploads/20260609-refreshing-glasses-of-iced-tea-with-fresh-lemon-slices-and-ice-best-way-to-make-tea.png
800
1200
Mary Hunt
https://www.everydaycheapskate.com/wp-content/uploads/EC-Logo-by-Mary-Hunt-Tagline-Trimmed.png
Mary Hunt2026-07-09 18:30:102026-07-09 18:30:10The Best Way to Make Iced Tea? Depends What You’re After
https://www.everydaycheapskate.com/wp-content/uploads/20260609-refreshing-glasses-of-iced-tea-with-fresh-lemon-slices-and-ice-best-way-to-make-tea.png
800
1200
Mary Hunt
https://www.everydaycheapskate.com/wp-content/uploads/EC-Logo-by-Mary-Hunt-Tagline-Trimmed.png
Mary Hunt2026-07-09 18:30:102026-07-09 18:30:10The Best Way to Make Iced Tea? Depends What You’re After

Oh my god without this I don’t know what I would’ve done, thank you so much for this amazing post!
This is a brilliant idea. Why didn’t I think of this???? Thank you!
Those are cute. If I don’t have any paper liners on hand, I just grease the muffin tin well. Fill about two thirds full. Bake as directed and then cool slightly in the pan before running around the edge of each with a butter knife and removing to a cooling rack if not serving them warm. (They seem less likely to stick if they have a few extra minutes in the pan, but are removed before cooling completely.)
Mary, you are so clever!!