
How to Safelist an Email Address and Never Miss a Message

Ever wonder why the emails you actually want seem to vanish, while the junk shows up like clockwork? It’s not you. It’s your inbox trying to be “helpful.” The fix is simple: safelist email addresses for the senders you trust. This tells your email provider, “Hey, this sender stays.” Once you do, important messages stop wandering off into spam purgatory.

Email providers are getting more aggressive about filtering… sometimes a little too helpful. Even emails you asked for can end up sidelined without warning.
Safelisting is your way of telling your inbox that the Everyday Cheapskate daily email is welcome and wanted. Once you do, future emails land where they belong, consistently and reliably. Below, you’ll find simple, step-by-step instructions for the most common email providers so you can fix this once and stop wondering what you missed.
What “Safelist” Really Means (and Why It Works)
Safelisting simply means adding an email address to your contacts so your inbox knows it’s a trusted sender. Think of it as giving your email provider a clear instruction instead of letting it guess.
You may also hear this called an allowlist… same idea, different name. Either way, it’s a small, one-time step that tells your inbox, “This email is welcome here.” And once that message is received, your emails stop bouncing around behind the scenes and start showing up where you expect them.
How to Safelist an Email Address in Popular Email Providers
Email providers don’t all work the same way, but the goal is identical: tell your inbox that an email is trusted and should always be delivered. The good news is that once you know where to click, safelisting takes about a minute and it’s a one-and-done fix.
Below are step-by-step instructions for today’s most commonly used email providers, so you can jump straight to the one you use and move on with your day.
- Gmail
- Outlook (Outlook.com / Hotmail / Live)
- Apple Mail (iCloud Mail)
- Yahoo Mail
- AOL Mail
- Comcast (Xfinity Email)
- AT&T WebMail
- Cox.net
- Mail.com
- GMX
- Thunderbird
- Road Runner
The Fastest Way to Safelist an Email Address
Let’s cut to the chase: the quickest way to make sure emails you actually want don’t vanish into the junk abyss is simple… tell your email system that you trust the sender.
In most email services, this boils down to three actions:
- Mark it as “Not Spam” or “Not Junk.” If a message lands in your spam folder, open it and hit that button. It teaches your inbox to treat future messages from that sender like gold.
- Add the sender to your contacts. Saving the email address makes the system recognize it as familiar and friendly.
- Set a filter or rule. If your email provider allows it, create a simple rule that says, “Always deliver messages from this address straight to my inbox.”
Do this once, and your inbox will start cooperating. It’s fast, it’s reliable, and it spares you the frustration of hunting for important messages later.
Using Filters and Rules to Protect Important Emails
If you’ve ever missed an email that really mattered, you know the frustration… ours lost hunting through your inbox or, worse, discovering it too late.
You don’t have to leave it to chance. Filters and rules are your personal email bodyguards, quietly making sure that the messages you actually care about never get lost in the shuffle.
Most email services let you set simple rules: send emails from a specific address straight to your inbox, skip the spam folder, or even tag them with a label for easy spotting.
Start with the addresses you trust (i.e., family, important newsletters, work contacts) and create a filter. After that, your inbox stops being a wild jungle and starts working for you, letting you focus on the emails that matter instead of fighting the ones that don’t.
Gmail
Method #1: Add the Sender to Your Contacts
This is the easiest first step.
- Open Gmail in your browser and log in.
- Find an email from the sender you want to safelist.
- Hover over the sender’s name or email address at the top of the message.
- Click Add to contacts.
Saving a contact signals to Gmail that you want these messages delivered.
Pro Tip: If you don’t see it in your inbox, check the Spam folder first and mark the email as Not spam. That tells Gmail it’s important.M
Method #2: Create a Filter to Never Send to Spam
This is the most reliable way to safelist a sender.
- Click the gear icon in Gmail’s top right corner.
- Choose See all settings.
- Go to the Filters and Blocked Addresses tab.
- Click Create a new filter.
- In the From field, type the full email address you want to safelist (e.g., mary@everydaycheapskate.com).
- Click Create filter.
- Check Never send it to Spam.
- Click Create filter again to save it.
Once you’ve done this, Gmail will stop sending future messages from that sender to the spam folder and deliver them straight to your inbox.
Optional: Improve Where It Lands
Gmail sometimes sorts messages into tabs like Primary, Social, or Promotions. If an email lands in the wrong one:
- Drag it into your Primary tab.
- Gmail should ask if you want future messages from that sender in Primary. Click Yes to lock it in.
Outlook (Outlook.com / Hotmail / Live)
Method #1: Add the Sender to Your Safe Senders & Contacts
This method makes sure Outlook treats the sender as trusted.
- Open Outlook.com in your browser and log in.
- Click the Settings gear icon in the top right corner.
- At the bottom of the Settings sidebar, click View all Outlook settings.
- Choose Mail, then Junk email.
- Under Safe senders and domains, click Add safe sender.
- Type the full email address you want to safelist (e.g., mary@everydaycheapskate.com).
- Press Enter or click OK, then click Save.
Adding an address here tells Outlook never to send those emails to the Junk folder.
Pro Tip: Outlook also treats addresses in your Contacts as safe by default. So if you’ve saved the sender as a contact in Outlook, you’re already partway there.
Method #2: Check Junk & Blocked Lists
If messages still don’t show up where you want:
- Go back to Settings → Mail → Junk email.
- Look at your Blocked senders and domains list.
- If the address you want to receive is listed there, remove it.
- Save your changes.
Sometimes Outlook’s filters still hold old info. This clears the path.
Optional: Mark as “Not Junk”
If an important email already went to Junk:
- Open your Junk folder.
- Find the email you want.
- Right‑click it and choose Mark as not junk.
That trains Outlook that these messages belong in your inbox going forward.
Apple Mail (iCloud Mail)

Method #1: Mark an Email as “Not Junk”
This is the simplest move if a message you want lands in the Junk folder.
- Open Mail (either the Mail app on your device or iCloud.com).
- Go to your Junk folder.
- Find an email from the sender you want to safelist.
- Select it and click Not Junk or Move to Inbox.
When you move an email out of Junk, iCloud learns that future messages from the same sender should go straight into your inbox.
Pro Tip: On an iPhone/iPad, long‑press the email in Junk and choose Move to Inbox. Over time, Mail starts recognizing that sender as important.
Method #2: Add the Sender to Your Contacts
Adding someone as a contact tells iCloud Mail that you trust them.
- Open the email you want to keep.
- Tap or click the sender’s name or email address.
- Choose Add to Contacts or Create New Contact.
- Save the contact.
While Apple doesn’t call this a “safe sender list,” having a sender in your contacts does improve the chance their messages land in your inbox instead of spam.
Method #3: Create an iCloud Mail Rule (Web Only)
If you want a more reliable, automatic way, especially on the web, create a rule that directs certain mail to your inbox.
- Log in to iCloud.com and open Mail.
- Click the Settings gear icon (lower left) and choose Settings.
- Select Rules.
- Click Add to create a new rule.
- Enter a name (like “Always Inbox”).
- Set the rule so If a message is from the specific email address.
- Under Then, choose Move to Inbox.
- Click Add or Done to save.
Rules act like a safelist by telling iCloud Mail exactly what to do with messages you want to keep front and center.
Why this matters: iCloud Mail doesn’t have a traditional “safe senders” section like Gmail or Outlook, but training the filter and adding contacts works well. Moving messages out of Junk, saving the sender as a contact, or adding a rule takes just a couple of minutes and sharply reduces the odds of missing something important.
Yahoo Mail
Yahoo Mail doesn’t have a traditional “safe senders” box the way some mobile apps or older systems did, but you can still make sure the emails you want land in your inbox by teaching Yahoo what to recognize.
Method #1: Add the Sender to Your Contacts
This is the simplest first step.
- Log in to Yahoo Mail in your browser.
- Click the Contacts (address book) icon near the top of your inbox.
- Select New Contact.
- Enter the name and full email address of the sender you want to safelist (e.g., mary@everydaycheapskate.com).
- Click Save.
Adding a sender to your Yahoo contacts acts as a signal that you want their messages, which helps keep them out of spam.
Pro Tip: If you don’t see expected mail, check your Spam folder. If the message is there, mark it Not Spam. That tells Yahoo this sender belongs in your inbox.
Method #2: Create a Filter to Send to Inbox
If you want a more direct instruction, especially if you haven’t received mail from that address yet, set up a filter:
- Click the Settings gear icon in Yahoo Mail.
- Choose More Settings.
- Select Filters from the left‑side menu.
- Click Add new filters.
- Give your filter a name (like “Always Inbox”).
- In the field for From, enter the full email address you want to safelist.
- Choose Inbox as the destination folder.
- Click Save.
This tells Yahoo Mail exactly what you want it to do with mail from that sender.
AOL Mail
Method #1: Add the Sender to Your Contacts
This is the most effective and straightforward way to safelist in AOL Mail.
- Open AOL Mail in your browser and sign in.
- Click the Contacts icon in the left sidebar (sometimes labeled Address Book).
- Click New Contact at the top of the contacts list.
- Enter the full email address you want to safelist (e.g., mary@everydaycheapskate.com).
- Click Add Contact or Save.
Adding a sender to your contacts tells AOL Mail that you want messages from that address, which helps keep them out of spam and more likely to show up in your inbox.
Pro Tip: If you already see a message from that email in your Spam folder, open it and click Not Spam first. This trains AOL’s filters that the message belongs in your inbox next time.
Method #2: Use Spam Controls (If Available)
Some AOL Mail setups include a spam control option that lets you tighten things down so only contacts get through.
- Go to Settings → Security & privacy.
- Look for Block all senders except contacts.
- Turn that option on.
When you enable this, AOL will let only senders in your contacts reach your inbox. This isn’t for everyone, but it’s powerful if you want maximum control over what lands in your inbox.
Optional: Create a Filter (If You Don’t See Mail from Someone)
Some versions of AOL Mail let you create filters that move mail from specific senders directly into your inbox or another folder:
- Open Settings and choose Filters (if it’s shown).
- Click Create filter.
- Set the rule so messages From the email address go to Inbox.
- Save the filter.
This acts like a safelist by giving AOL an explicit instruction about where those messages belong. (Not all AOL accounts show this option, but it’s worth checking.)
Comcast (Xfinity Email)
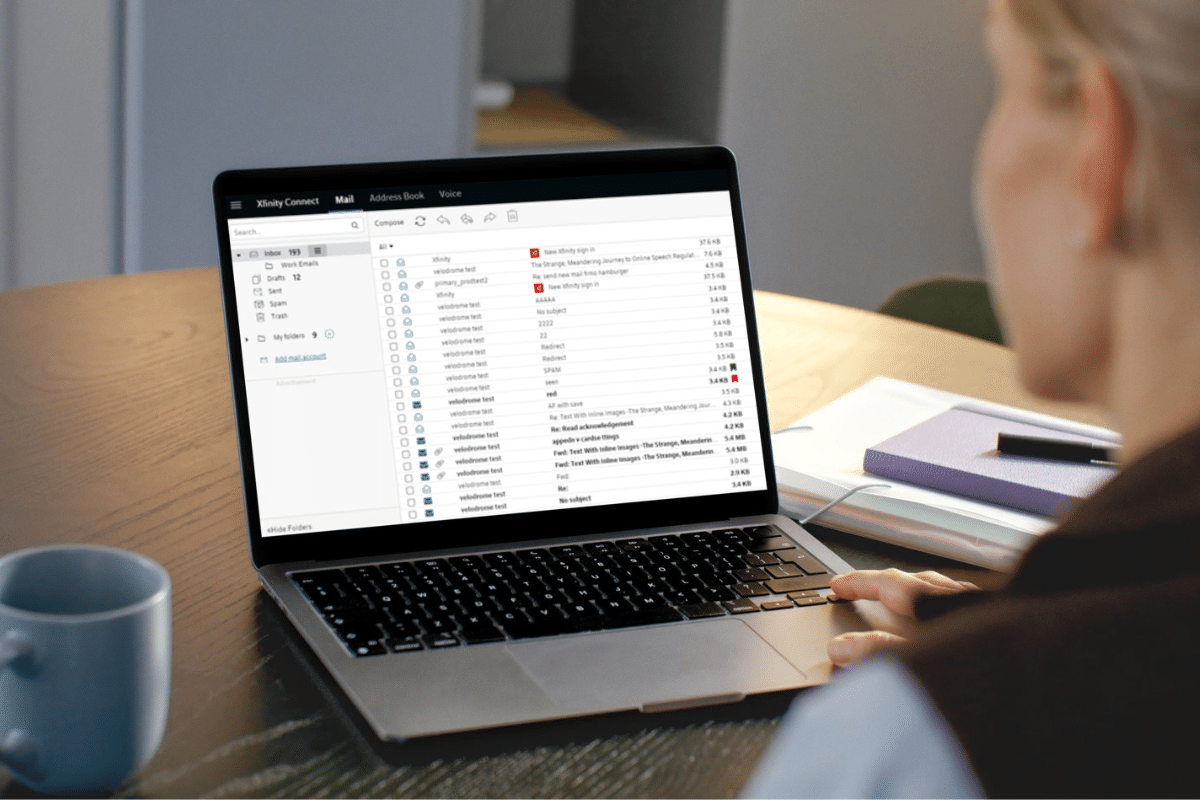
Method #1: Mark Messages as “Not Spam”
This is the easiest way to teach Comcast what you want.
- Log in to your Comcast / Xfinity Email account in a browser.
- Open the Spam folder.
- Select the message from the sender you want to safelist.
- Click the Not Spam button (or toolbar option).
Doing this signals to Comcast’s filters that future messages from that sender belong in your inbox.
Method #2: Add the Sender to Your Contacts
Saving a sender as a contact makes it much more likely their mail shows up where it should.
- While logged in to Comcast / Xfinity Email, click the Address Book or Contacts icon.
- Click New or New Contact.
- Enter the name and full email address you want to safelist (e.g., mary@everydaycheapskate.com).
- Click Save.
If you combine this with marking messages as Not Spam, Comcast gets a strong signal that the sender is trusted.
Method #3: Create a Filter Rule to Deliver to Inbox
Filters give you the most direct instruction Comcast can follow.
- In your Comcast webmail, click the Settings icon.
- Choose Filter Rules or similar mail filtering settings.
- Click Add new rule.
- Name the rule (like “Always Inbox”).
- Under Conditions, select Sender / From and enter the full email address.
- Under Actions, choose Move to folder → Inbox.
- Click Save.
This tells Xfinity exactly where to put messages from that sender.
Optional: Use the Email Safe List Carefully
Some Comcast accounts include an Email Safe List feature that only delivers mail from addresses you enter and rejects everything else. While that sounds appealing, it’s a scorched‑earth approach: any sender not on the list will be discarded entirely, even if it’s something you want later.
AT&T WebMail
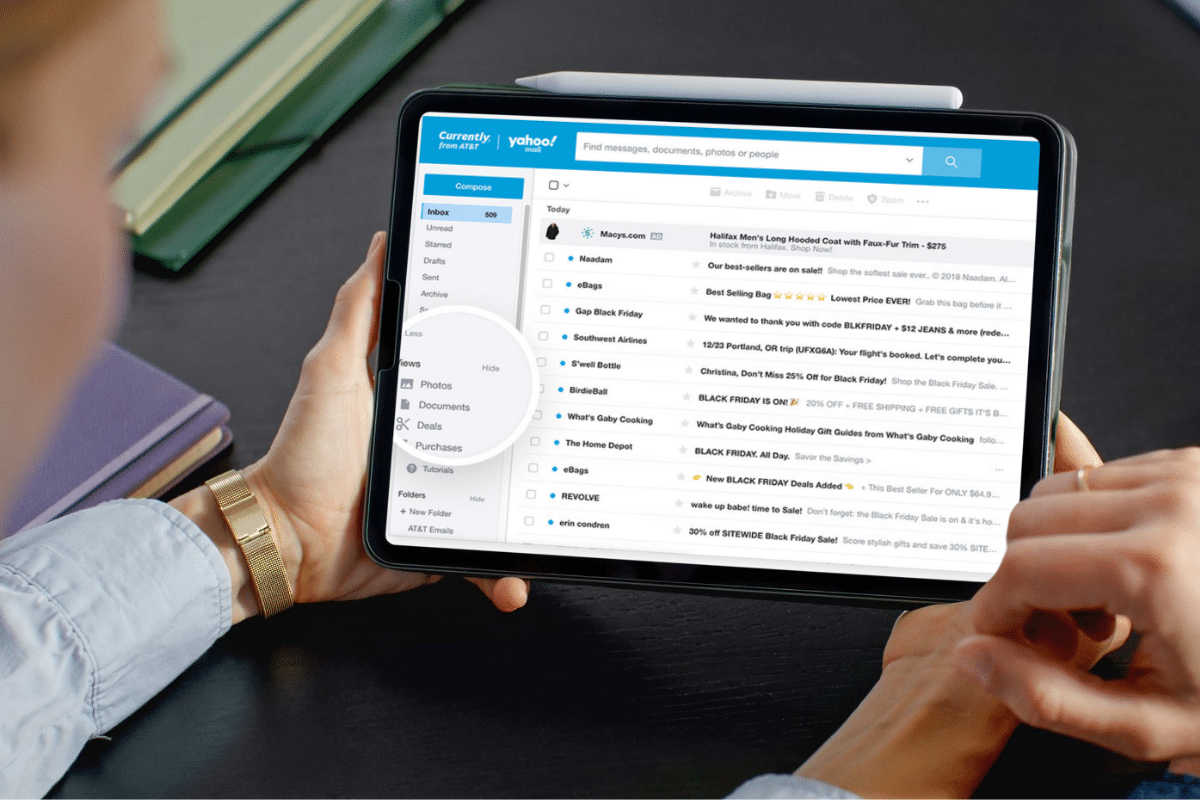
Method #1: Create a Filter to Always Deliver to Your Inbox
This is the most direct way to safelist a sender in AT&T WebMail.
- Log in to AT&T WebMail in your browser.
- Click Options (sometimes the gear icon).
- Choose Filters.
- Click Add Filter.
- In the top row labeled From Header, select contains from the drop‑down menu.
- Enter the full email address you want to safelist (e.g., mary@everydaycheapskate.com).
- Down where it says Move the message to, choose Inbox from the drop‑down menu.
- Click Add Filter again to save it.
This tells AT&T Mail: yes, these messages belong in my inbox. Plain and simple.
Method #2: Add the Sender to Your Address Book
Even if you don’t set a filter, saving a sender as a contact helps AT&T recognize that their mail should reach you.
- While logged in to AT&T WebMail, click your Address Book or Contacts.
- Click Add New Contact.
- Enter the sender’s name and full email address.
- Click Save.
When mail arrives from someone you’ve saved as a contact, most spam filters interpret that as a sign you want that mail.
Pro Tip: If you’re also using the newer Yahoo‑based AT&T interface, the Yahoo Mail safelisting steps (like filters and contacts) apply here too, so you can use whatever option seems easiest to you.
Optional: Mark Mail as “Not Spam”
If an expected message landed in your Spam or Bulk Mail folder first:
- Open the message.
- Look for a Not Spam or Move to Inbox button.
This tells the system that messages like this one belong in your inbox in the future.
Cox.net

While the Cox.net brand still exists in some email addresses, the service is now hosted through Yahoo Mail in 2026 for most users. That means many Cox.net email safelisting steps look a lot like Yahoo Mail safelisting, but there is a legacy webmail interface where you can set exceptions directly if you’re still using it. Below are the most reliable ways to make sure emails you want land in your inbox, whether you’re on the older Cox webmail setup or the newer Yahoo‑based system.
Method #1: Add the Sender to Your Cox/Yahoo Contacts
This works whether your Cox.net mail is in the legacy interface or in the Yahoo Mail interface:
- Open your Cox.net email (either at the Cox webmail or through Yahoo Mail).
- Go to your Contacts or Address Book.
- Click Add New Contact.
- Enter the sender’s name and full email address (e.g., mary@everydaycheapskate.com).
- Click Save.
When a sender is in your contacts, both Yahoo‑based and older Cox filters are more likely to let their emails land right in your inbox.
Pro Tip: If a message from a saved contact still ends up in Spam, open it and click Not Spam. That tells the system these messages are wanted and should be delivered to your inbox.
Method #2: Add an Exception in the Cox Webmail Interface
If you’re using the older Cox webmail interface (not the Yahoo Mail interface), you can add specific addresses or domains to the exceptions list:
- Open Cox.net WebMail in your browser.
- Click Preferences or Settings.
- Under General Email Preferences, select Blocked Senders (or similar).
- In the Exceptions List box, type the full email address you want to safelist (e.g., mary@everydaycheapskate.com).
- Click Add, then Save.
This doesn’t exactly call it a “safe list,” but adding an address here tells the filter not to treat that sender as blocked or junk.
Method #3: Use Yahoo Mail Safelisting if Your Cox.net Account Is Yahoo‑Hosted
If your Cox.net email has migrated into Yahoo Mail (very common as of 2026), you can use all the Yahoo Mail safelisting steps we cover elsewhere on this page, like creating a filter to send messages to your inbox or marking mail as Not Spam.
Mail.com

Method #1: Add the Sender to Your Allowlist
This is the most direct way to tell Mail.com that a sender should always bypass the spam filter.
- Log in to Mail.com in your browser.
- Click E‑mail at the top.
- Go to Settings (the wrench icon).
- Under Security, select Allowlist.
- Type the full email address you want to safelist (like mary@everydaycheapskate.com).
- Click Save.
Once added, emails from that address (or even the whole domain if you want) will go straight to your inbox.
Pro Tip: If you often receive emails from the same company but different addresses (like newsletters), you can enter the domain instead of a single address (e.g., everydaycheapskate.com).
Method #2: Add the Sender to Your Contacts
Saving someone as a contact also tells Mail.com they’re trusted.
- While logged in, click Contacts at the top.
- Click New Contact.
- Enter the name and full email address you want to safelist.
- Click Save.
Mail.com treats contacts as trusted senders, which helps future messages land in your inbox instead of spam.
Method #3: Train Your Personal Spam Filter
Mail.com’s spam filter learns over time based on how you sort mail.
- If a message you want lands in Spam, open it and click Not Spam.
- If a message you don’t want arrives in your inbox, click Spam.
Each time you move a message where it belongs, Mail.com’s filter gets better at recognizing what you want and what you don’t.
Pro Tip: If you make mistakes or things get jumbled, you can reset your personal spam filter in Spam Protection settings and retrain it from scratch.
GMX

Method #1: Add the Sender to Your Allowlist
This is the most direct way to safelist a sender in GMX. Emails from allowlisted addresses are not checked for spam and go straight to your inbox.
- Log in to GMX Mail in your browser.
- Click Settings (usually a gear icon).
- Select Allowlist under the spam or security settings.
- Type the full email address you want to safelist (e.g., mary@everydaycheapskate.com).
- Click Save.
Pro Tip: If you subscribe to newsletters from the same domain (like everydaycheapskate.com), you can allowlist the entire domain (just type everydaycheapskate.com). That catches all related addresses without typing each one.
Method #2: Save the Sender as a Contact
GMX treats contacts as trusted senders. Simply saving someone in your address book improves the odds that future mail goes to your inbox.
- Open the message from the sender you want to safelist.
- Click the sender’s name or email address.
- Choose Add to Contacts.
- Save the contact.
Once the sender is in your contacts, GMX weights messages from them as wanted mail.
Method #3: Train Your Personal Spam Filter
If an email you want shows up in Spam, manually correcting it helps the system learn your preferences over time.
- Go to your Spam folder.
- Select the message you want.
- Click Not Spam or Move to Inbox.
Every time you correct a misclassified message, GMX’s spam filter learns what you do and don’t want. If things get messy, you can reset your personal spam filter in Spam Protection settings and start fresh.
Thunderbird (Desktop Email Client)
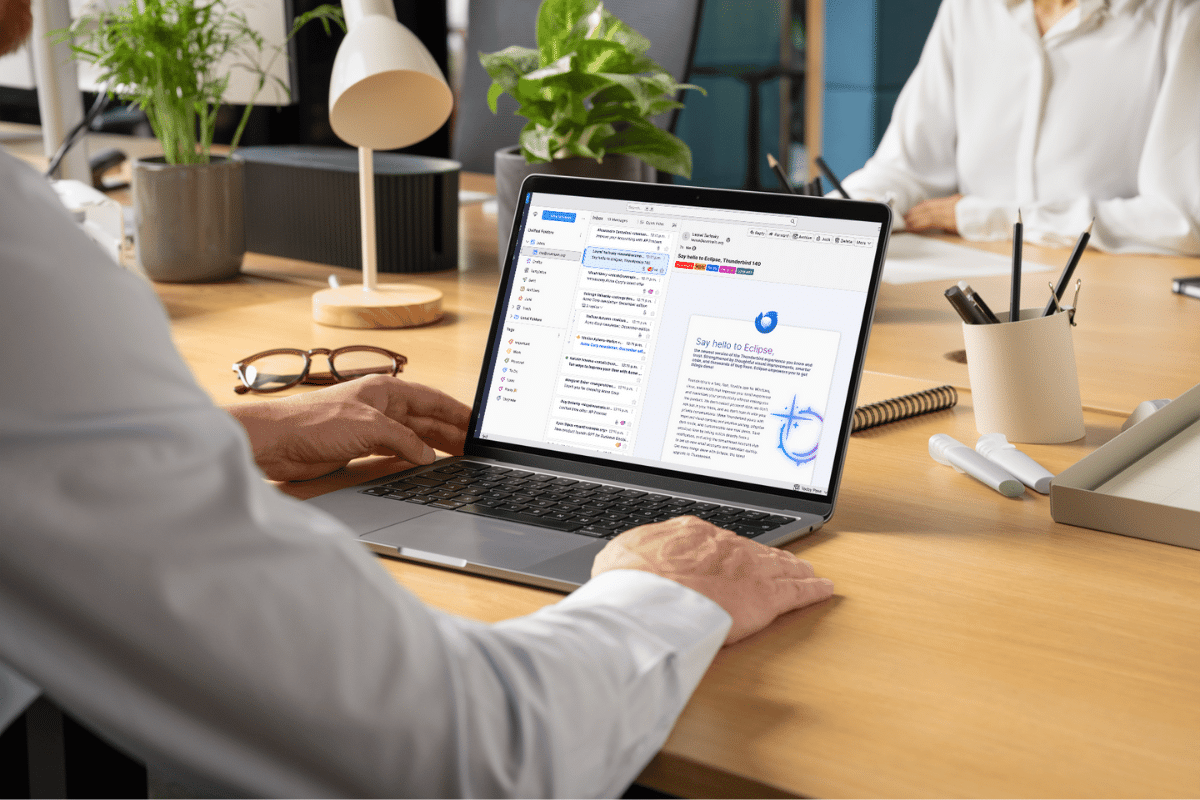
Thunderbird isn’t a webmail service like Gmail or Yahoo. It’s a desktop email program.
Method #1: Add the Sender to Your Address Book
Thunderbird treats people you’ve saved as trusted.
- Open Thunderbird on your computer.
- Open an email from the sender you want to safelist (e.g., your newsletter).
- Click the sender’s name or email address in the header.
- Choose Add to Address Book.
- Choose Personal Address Book and click OK.
When the sender is in your address book, Thunderbird’s junk tools are less likely to tag their messages as spam.
Method #2: Enable Whitelisting via Junk Settings
This step makes sure Thunderbird uses your contacts as its safelist.
- From the main window, click the menu button (☰).
- Go to Account Settings for the email account you’re working with.
- Choose Junk Settings under that account.
- Make sure Enable adaptive junk mail controls for this account is checked.
- For Do not automatically mark mail as junk if the sender is in: select an address book (like Personal Address Book).
- Click OK to save.
Now Thunderbird won’t mark mail from contacts in that address book as junk.
Method #3: Train the Junk Filter
Thunderbird learns what you want and don’t want by your actions.
- If a message you want lands in Junk, right‑click it and choose Mark → Not Junk (or use Shift + J after selecting it).
- If a message you don’t want lands in your inbox, mark it as Junk the same way.
Doing this regularly sharpens Thunderbird’s junk filter so it gets smarter over time.
Road Runner

Road Runner email still exists for legacy accounts, but in 2026 it’s accessed through Spectrum’s webmail platform rather than an old “roadrunner.com” interface. So if you’re trying to safelist a sender in Road Runner, you’re really working in the Spectrum webmail system, which behaves a lot like other webmail services when it comes to spam and safelisting.
Method #1: Mark as “Not Spam”
This is the easiest and most reliable way to tell Road Runner/Spectrum webmail that you want future messages from a sender.
- Open your Road Runner webmail (Spectrum Webmail) in your browser.
- Go to your Spam or Junk folder.
- Find an email from the sender you want to safelist.
- Select it and click Mark as Not Spam (or Not Junk).
That action moves the message back to your inbox and trains the system that similar mail should be delivered correctly next time.
Pro Tip: If you already have a filter option in your webmail settings (some Spectrum setups offer them), you can use it to make this permanent, but “Not Spam” alone teaches the system what you prefer.
Method #2: Add the Sender to Your Contacts
Saving someone as a contact is a classic safelisting habit that helps most inbox systems understand what you want:
- While logged in to your Road Runner/Spectrum inbox, open the message.
- Click on the sender’s name/email address.
- Choose Add to Contacts or Save Contact.
- Save the contact info.
Once a sender is in your contacts, future mail from them is much less likely to be treated as junk.
Quick reminder: If your Road Runner email hasn’t been accessed in a long while, it’s worth signing in regularly so it stays active and doesn’t get deactivated.
What to Do If Emails Still Go to Spam
Even with safelisting and filters, sometimes emails still sneak into the spam folder. Don’t panic… it happens. The trick is to train your inbox, step by step.
Start by checking your spam folder regularly. When you spot an email that shouldn’t be there, mark it as “Not Spam” or “Move to Inbox.” Most email systems learn from this and adjust over time. You can also double-check your filters and safelist settings to make sure nothing got missed.
If a particular sender keeps slipping through, consider creating a dedicated folder for them and a rule to send all their messages there. It’s a simple way to keep their emails visible, even if the spam filter insists on being overprotective.
Think of it as teaching your inbox how to behave. Patient, consistent nudges usually get results. Within a few days, those important emails should start landing exactly where they belong.

More from Everyday Cheapskate
 https://www.everydaycheapskate.com/wp-content/uploads/20260703-home-decor.png
800
1200
Mary Hunt
https://www.everydaycheapskate.com/wp-content/uploads/EC-Logo-by-Mary-Hunt-Tagline-Trimmed.png
Mary Hunt2026-07-03 20:46:552026-07-03 20:46:5510 Everyday Items You Never Think to Wash (But Should)
https://www.everydaycheapskate.com/wp-content/uploads/20260703-home-decor.png
800
1200
Mary Hunt
https://www.everydaycheapskate.com/wp-content/uploads/EC-Logo-by-Mary-Hunt-Tagline-Trimmed.png
Mary Hunt2026-07-03 20:46:552026-07-03 20:46:5510 Everyday Items You Never Think to Wash (But Should) https://www.everydaycheapskate.com/wp-content/uploads/20260630-a-lit-sparkler-with-an-american-flag-in-the-background-4th-of-july-hacks-tips-and-recipes.png
800
1200
Mary Hunt
https://www.everydaycheapskate.com/wp-content/uploads/EC-Logo-by-Mary-Hunt-Tagline-Trimmed.png
Mary Hunt2026-06-30 21:44:502026-06-30 21:44:5034 Fourth of July Recipes and DIY Hacks for a Stress-Free Holiday
https://www.everydaycheapskate.com/wp-content/uploads/20260630-a-lit-sparkler-with-an-american-flag-in-the-background-4th-of-july-hacks-tips-and-recipes.png
800
1200
Mary Hunt
https://www.everydaycheapskate.com/wp-content/uploads/EC-Logo-by-Mary-Hunt-Tagline-Trimmed.png
Mary Hunt2026-06-30 21:44:502026-06-30 21:44:5034 Fourth of July Recipes and DIY Hacks for a Stress-Free Holiday https://www.everydaycheapskate.com/wp-content/uploads/20260629-wooden-die-spell-july-with-patriotic-decor-in-background.png
800
1200
Mary Hunt
https://www.everydaycheapskate.com/wp-content/uploads/EC-Logo-by-Mary-Hunt-Tagline-Trimmed.png
Mary Hunt2026-06-29 21:07:092026-06-29 21:10:297 Best Things to Buy in July for Huge Summer Savings
https://www.everydaycheapskate.com/wp-content/uploads/20260629-wooden-die-spell-july-with-patriotic-decor-in-background.png
800
1200
Mary Hunt
https://www.everydaycheapskate.com/wp-content/uploads/EC-Logo-by-Mary-Hunt-Tagline-Trimmed.png
Mary Hunt2026-06-29 21:07:092026-06-29 21:10:297 Best Things to Buy in July for Huge Summer Savings https://www.everydaycheapskate.com/wp-content/uploads/20260628-Grilled-Peaches-with-Balsamic-and-Blue-Cheese-1.png
800
1200
Mary Hunt
https://www.everydaycheapskate.com/wp-content/uploads/EC-Logo-by-Mary-Hunt-Tagline-Trimmed.png
Mary Hunt2026-06-29 09:38:342026-06-29 09:38:34Summer Grilled Peaches with Balsamic and Blue Cheese
https://www.everydaycheapskate.com/wp-content/uploads/20260628-Grilled-Peaches-with-Balsamic-and-Blue-Cheese-1.png
800
1200
Mary Hunt
https://www.everydaycheapskate.com/wp-content/uploads/EC-Logo-by-Mary-Hunt-Tagline-Trimmed.png
Mary Hunt2026-06-29 09:38:342026-06-29 09:38:34Summer Grilled Peaches with Balsamic and Blue Cheese https://www.everydaycheapskate.com/wp-content/uploads/20260625-a-rustic-wooden-christmas-tree-in-the-sand-on-the-beach.png
800
1200
Mary Hunt
https://www.everydaycheapskate.com/wp-content/uploads/EC-Logo-by-Mary-Hunt-Tagline-Trimmed.png
Mary Hunt2026-06-26 11:34:132026-06-26 11:36:44Christmas in June? Try This Amazon Prime Day Gift Guide
https://www.everydaycheapskate.com/wp-content/uploads/20260625-a-rustic-wooden-christmas-tree-in-the-sand-on-the-beach.png
800
1200
Mary Hunt
https://www.everydaycheapskate.com/wp-content/uploads/EC-Logo-by-Mary-Hunt-Tagline-Trimmed.png
Mary Hunt2026-06-26 11:34:132026-06-26 11:36:44Christmas in June? Try This Amazon Prime Day Gift Guide https://www.everydaycheapskate.com/wp-content/uploads/20260624-why-does-my-ice-taste-weird-soda-tea-lemonade-juice.png
800
1200
Mary Hunt
https://www.everydaycheapskate.com/wp-content/uploads/EC-Logo-by-Mary-Hunt-Tagline-Trimmed.png
Mary Hunt2026-06-24 17:10:532026-06-24 17:10:53Why Does My Ice Taste Weird? Here’s the Answer
https://www.everydaycheapskate.com/wp-content/uploads/20260624-why-does-my-ice-taste-weird-soda-tea-lemonade-juice.png
800
1200
Mary Hunt
https://www.everydaycheapskate.com/wp-content/uploads/EC-Logo-by-Mary-Hunt-Tagline-Trimmed.png
Mary Hunt2026-06-24 17:10:532026-06-24 17:10:53Why Does My Ice Taste Weird? Here’s the Answer https://www.everydaycheapskate.com/wp-content/uploads/20260622-a-single-car-garaged-with-beautiful-flowers-along-landscape-beds-things-ruined-by-heat-in-the-garage.png
800
1200
Mary Hunt
https://www.everydaycheapskate.com/wp-content/uploads/EC-Logo-by-Mary-Hunt-Tagline-Trimmed.png
Mary Hunt2026-06-22 20:24:432026-06-22 20:24:4325 Things Summer Heat Can Ruin in Your Garage
https://www.everydaycheapskate.com/wp-content/uploads/20260622-a-single-car-garaged-with-beautiful-flowers-along-landscape-beds-things-ruined-by-heat-in-the-garage.png
800
1200
Mary Hunt
https://www.everydaycheapskate.com/wp-content/uploads/EC-Logo-by-Mary-Hunt-Tagline-Trimmed.png
Mary Hunt2026-06-22 20:24:432026-06-22 20:24:4325 Things Summer Heat Can Ruin in Your Garage https://www.everydaycheapskate.com/wp-content/uploads/20260621-amazon-prime-day-2026-is-coming-everyday-cheapskate-mary-hunt-guide-for-cheapskates.png
800
1200
Mary Hunt
https://www.everydaycheapskate.com/wp-content/uploads/EC-Logo-by-Mary-Hunt-Tagline-Trimmed.png
Mary Hunt2026-06-21 15:48:502026-06-21 15:48:50The Cheapskate’s Guide to Winning Prime Day 2026
https://www.everydaycheapskate.com/wp-content/uploads/20260621-amazon-prime-day-2026-is-coming-everyday-cheapskate-mary-hunt-guide-for-cheapskates.png
800
1200
Mary Hunt
https://www.everydaycheapskate.com/wp-content/uploads/EC-Logo-by-Mary-Hunt-Tagline-Trimmed.png
Mary Hunt2026-06-21 15:48:502026-06-21 15:48:50The Cheapskate’s Guide to Winning Prime Day 2026 https://www.everydaycheapskate.com/wp-content/uploads/20260622-prime-day-is-here-crockpot-steamer-blackstone-griddle.png
800
1200
Mary Hunt
https://www.everydaycheapskate.com/wp-content/uploads/EC-Logo-by-Mary-Hunt-Tagline-Trimmed.png
Mary Hunt2026-06-21 12:11:092026-06-26 16:46:21Your Guide to the Best Amazon Prime Day Deals of 2026
https://www.everydaycheapskate.com/wp-content/uploads/20260622-prime-day-is-here-crockpot-steamer-blackstone-griddle.png
800
1200
Mary Hunt
https://www.everydaycheapskate.com/wp-content/uploads/EC-Logo-by-Mary-Hunt-Tagline-Trimmed.png
Mary Hunt2026-06-21 12:11:092026-06-26 16:46:21Your Guide to the Best Amazon Prime Day Deals of 2026

i have mail.com and any time i get something that goes into spam, mail.com tells me i have 1 [or however many] unread emails in my spam folder. i just wish i could designate pocono record digital newspaper as not spam and everything else pocono record as spam. i am not interested in getting ‘breaking news’ or anything having to do with sports, yet they are constantly sticking their ‘daily briefing’ which is mostly about sports in my inbox. or, i can add another u ser to my subscription, but when i tried to do that, they badgered my friend to renew her own lapsed subscription. so i just go down the list and delete anything that isn’t today’s digital newspaper.
Linda, Mail.com’s filters really are the secret sauce here, especially when one sender insists on sending “helpful extras” you never asked for.
You can keep just the Pocono Record digital newspaper and quietly sideline everything else from them.
Here’s the least painful way to do it in Mail.com:
1. Open Mail.com on a computer (filters are much easier there than on a phone).
2. Click Settings (gear icon) → Rules.
3. Choose Add new rule.
Now you’ve got options, and this is where you get picky in a good way.
Option 1: Protect the digital newspaper.
1. Set the rule to look for emails where the subject contains something unique like
“Today’s Digital Edition” (or whatever the paper consistently uses).
2. Action: Move to Inbox (or a specific folder if you prefer).
3. Save.
Option 2: Send everything else from them to Spam or Trash
1. Create a second rule: If Sender contains @poconorecord.com AND Subject does NOT contain “Digital Edition”
2. Action: Move to Spam (or Trash, if you’re feeling decisive).
3. Save.
Mail.com runs rules top to bottom, so make sure the “keep the newspaper” rule is listed above the “send the rest away” rule. That’s the magic.
Once this is set, you shouldn’t have to babysit your inbox or play daily delete-the-sports-news anymore. The paper you want stays put. The rest politely disappears.
Here is Mail.com’s page with more info: https://www.mail.com/mail/filter-rules/
thank you, thank you, thank you!