
Budget DIY Kitchen Makeover for Under $400 That Wows


When I saw my friends Amy and Justin’s kitchen, I nearly dropped my coffee. Sleek, modern, and polished—and all for under $400? Yes, really. They didn’t hire a contractor or gut the place. With a little elbow grease and a few clever products, they pulled off a kitchen makeover that looks straight out of a design magazine. If you’ve got the sweat, I’ve got the how-to.

When I walked into Amy and Justin’s kitchen, my jaw just about hit the floor. It was like I’d wandered into the “after” shot of a home makeover show. The sleek cabinets, fresh countertops, and overall polished look made it feel like an entirely new space.
You could have knocked me over with a feather when they confessed: not a single cabinet was replaced, and those gleaming counters? Also original. They had pulled off the entire transformation themselves—for less than $400.
Now, if you’re thinking kitchen updates are best left to professionals with tool belts and hefty invoices, that’s totally fair—if you’ve got several thousand dollars and a few weeks to spare. But for those of us working with tighter budgets and tighter schedules, today’s DIY-friendly products make it entirely possible to give your kitchen a serious facelift without draining your savings.
The key is knowing where to put your energy, how to stretch your dollars, and which materials deliver the most bang for your buck. Amy and Justin’s makeover proves that with a little determination—and the right products—you can dramatically update your kitchen without hiring a single contractor.
The Secret to Refinishing Cabinets Without Sanding

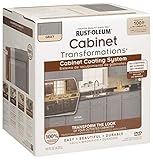
Rust-Oleum Cabinet Transformations Kit
Amy and Justin refinished their existing cabinets—the doors and face frames included—using the Rust-Oleum Cabinet Transformations Kit, which covers up to 102 square feet. It’s available online and at home improvement stores like Home Depot, and it’s designed for real-life DIYers who may not own a sander or know what “deglossing” means.
What gave them the courage (and frankly, the confidence to not run screaming halfway through) was Rust-Oleum’s big promise: no stripping, no sanding, no priming, and no special skills required. That’s a bold claim—but they found it to be absolutely true. This kit works on wood, melamine, metal, and laminate cabinetry, making it a versatile option for just about any kitchen.
They chose the espresso finish—one of three available colors (white, gray, and espresso). The result? Sleek, modern cabinets that look professionally installed. No one would guess this was a weekend warrior kind of project. It’s proof that with the right tools, even DIY first-timers can achieve stunning results.
Looking for an even more budget-friendly alternative? A high-quality coat of paint can also do wonders. For durability, coverage, and ease of use, it’s hard to beat Behr Premium Plus Ultra Satin Enamel, around $50 per gallon at Home Depot. It goes on smooth and holds up beautifully, even in busy kitchens where cabinet doors rarely get a day off.
Affordable Hardware That Instantly Updates Your Kitchen
One of the easiest, most affordable ways to give your kitchen an instant refresh is by swapping out the cabinet hardware. Even if you don’t touch the cabinets themselves—no sanding, no painting—new knobs and pulls can make the whole space feel more polished and intentional.
Think of hardware like jewelry for your cabinets. A dated, worn-out knob can drag the whole look down, while a simple, modern handle can elevate even the plainest doors.

Cosmas Oil Rubbed Bronze Cabinet Round Knob, 25 Pack
Amy and Justin chose Cosmas oil-rubbed bronze round knobs, which cost about $1 apiece when you buy a pack of 25. That’s a small price for a big visual upgrade. Depending on your style, you can find everything from sleek matte black to brushed gold finishes in similar price ranges.
A quick tip: before ordering, count your knobs and measure the spacing if you’re replacing pulls—you don’t want to find out too late that your new ones don’t line up. And if you’re drilling new holes, consider investing in a cabinet hardware jig to save time (and your sanity).
You might be surprised how a $25-$40 hardware update can breathe new life into your kitchen—and make it look like you hired a designer.
No products found.
DIY Countertop Kits That Look Like the Real Thing
Here’s something no one tells you until it’s too late: when you freshen up your cabinets, everything else around them suddenly looks… tired. Especially the countertops. But don’t worry—this doesn’t mean you need to start pricing out granite slabs.
There are now DIY countertop kits that make it possible to completely transform the look of old laminate, tile, or even cultured marble—without hauling in a demolition crew or draining your budget.

Rust-Oleum Countertop Transformations Kit
One popular option is the Rust-Oleum Countertop Transformations Kit, designed to mimic the look of natural stone. It works especially well on laminate and creates a durable, long-lasting finish that can stand up to everyday kitchen use. It’s not just a cosmetic fix—it’s a solid, practical solution for giving your counters a second chance.

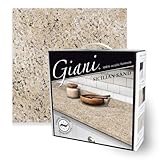
Giani Granite Countertop Paint Kit
Another reader-loved option is the Giani Granite Countertop Paint Kit, a water-based system that transforms laminate, ceramic tile, or cultured marble into the look of granite. It promises automotive-grade durability—and yes, that means it’s tough enough to handle your hot pans, clattering dishes, and occasional coffee spills. Plus, it comes in multiple color options so you can find a finish that matches your kitchen’s vibe.
These kits typically include everything you need: primer, paint, tools, and step-by-step instructions. Set aside a weekend, crank up your favorite playlist, and get ready to be amazed at what a little DIY magic can do.

Optional Flooring Upgrades That Don’t Break the Bank
While Amy and Justin’s floors were in great shape, let’s be honest—once your cabinets and countertops are looking brand new, that old floor might start whispering, “What about me?”

Lucida Surfaces Luxury Vinyl Flooring Tiles
If you’re tempted to go all-in, don’t panic. Affordable, DIY-friendly flooring options exist—and they’re a lot easier than you might think. Products like Lucida Surfaces Luxury Vinyl Flooring Tiles typically cost between $2 and $6 per square foot and are designed for homeowners, not professional installers.
The interlocking floating installation method means no glue, no nails, and no fancy tools required. The planks snap together over your existing floor (as long as it’s level), making it a relatively mess-free project you can knock out over a weekend.
Prefer something softer underfoot? Peel-and-stick luxury vinyl planks (LVP) are another budget-wise option with easy installation and a realistic wood look. Just be sure to prep your surface well—clean, level, and dry—for best results.

Final Thoughts: Sweat Equity Pays Off
A beautiful kitchen doesn’t have to cost a fortune or require a crew of contractors marching through your house. With the right products, a weekend or two, and a bit of sweat equity, you can breathe new life into your space—and keep your budget happily intact.
Start small, go at your own pace, and remember: progress, not perfection. Your kitchen doesn’t need to be showroom-worthy—it just needs to work for you. And if you can make it beautiful on a budget? Even better.
What’s one DIY project you’ve tackled that turned out better than you expected? Or… not so much? Let’s hear those makeover wins (and oopsies) in the comments below.
EverydayCheapskate™ is reader-supported. We participate in the Amazon Services LLC Associates Program and other affiliate advertising programs, designed to provide a means for us to earn from qualifying purchases, at no cost to you.

More from Everyday Cheapskate
 https://www.everydaycheapskate.com/wp-content/uploads/20260716-woman-on-phone-with-flat-tire-spare-roadside-car-emergency-kit.png
800
1200
Mary Hunt
https://www.everydaycheapskate.com/wp-content/uploads/EC-Logo-by-Mary-Hunt-Tagline-Trimmed.png
Mary Hunt2026-07-16 21:10:152026-07-16 21:10:15The 7-Item Emergency Car Kit Every Driver Needs (Cheaper Than One Tow)
https://www.everydaycheapskate.com/wp-content/uploads/20260716-woman-on-phone-with-flat-tire-spare-roadside-car-emergency-kit.png
800
1200
Mary Hunt
https://www.everydaycheapskate.com/wp-content/uploads/EC-Logo-by-Mary-Hunt-Tagline-Trimmed.png
Mary Hunt2026-07-16 21:10:152026-07-16 21:10:15The 7-Item Emergency Car Kit Every Driver Needs (Cheaper Than One Tow) https://www.everydaycheapskate.com/wp-content/uploads/20260714-car-dashboard-diy-car-interior-cleaning-wipes.png
800
1200
Mary Hunt
https://www.everydaycheapskate.com/wp-content/uploads/EC-Logo-by-Mary-Hunt-Tagline-Trimmed.png
Mary Hunt2026-07-14 13:45:172026-07-14 13:45:17DIY Car Interior Cleaning Wipes That Actually Work Well
https://www.everydaycheapskate.com/wp-content/uploads/20260714-car-dashboard-diy-car-interior-cleaning-wipes.png
800
1200
Mary Hunt
https://www.everydaycheapskate.com/wp-content/uploads/EC-Logo-by-Mary-Hunt-Tagline-Trimmed.png
Mary Hunt2026-07-14 13:45:172026-07-14 13:45:17DIY Car Interior Cleaning Wipes That Actually Work Well https://www.everydaycheapskate.com/wp-content/uploads/20260705-Best-Coolers-for-Camping-Road-Trips-and-Beach-Days.png
800
1200
Mary Hunt
https://www.everydaycheapskate.com/wp-content/uploads/EC-Logo-by-Mary-Hunt-Tagline-Trimmed.png
Mary Hunt2026-07-05 13:26:172026-07-05 13:26:17Best Coolers for Camping, Road Trips, and Beach Days
https://www.everydaycheapskate.com/wp-content/uploads/20260705-Best-Coolers-for-Camping-Road-Trips-and-Beach-Days.png
800
1200
Mary Hunt
https://www.everydaycheapskate.com/wp-content/uploads/EC-Logo-by-Mary-Hunt-Tagline-Trimmed.png
Mary Hunt2026-07-05 13:26:172026-07-05 13:26:17Best Coolers for Camping, Road Trips, and Beach Days https://www.everydaycheapskate.com/wp-content/uploads/20260705-how-to-keep-a-cooler-cold.png
800
1200
Mary Hunt
https://www.everydaycheapskate.com/wp-content/uploads/EC-Logo-by-Mary-Hunt-Tagline-Trimmed.png
Mary Hunt2026-07-05 13:19:502026-07-05 13:19:50How to Pack a Cooler That Stays Cold for 48 Hours
https://www.everydaycheapskate.com/wp-content/uploads/20260705-how-to-keep-a-cooler-cold.png
800
1200
Mary Hunt
https://www.everydaycheapskate.com/wp-content/uploads/EC-Logo-by-Mary-Hunt-Tagline-Trimmed.png
Mary Hunt2026-07-05 13:19:502026-07-05 13:19:50How to Pack a Cooler That Stays Cold for 48 Hours https://www.everydaycheapskate.com/wp-content/uploads/20260703-home-decor.png
800
1200
Mary Hunt
https://www.everydaycheapskate.com/wp-content/uploads/EC-Logo-by-Mary-Hunt-Tagline-Trimmed.png
Mary Hunt2026-07-03 20:46:552026-07-03 20:46:5510 Everyday Items You Never Think to Wash (But Should)
https://www.everydaycheapskate.com/wp-content/uploads/20260703-home-decor.png
800
1200
Mary Hunt
https://www.everydaycheapskate.com/wp-content/uploads/EC-Logo-by-Mary-Hunt-Tagline-Trimmed.png
Mary Hunt2026-07-03 20:46:552026-07-03 20:46:5510 Everyday Items You Never Think to Wash (But Should) https://www.everydaycheapskate.com/wp-content/uploads/20260630-a-lit-sparkler-with-an-american-flag-in-the-background-4th-of-july-hacks-tips-and-recipes.png
800
1200
Mary Hunt
https://www.everydaycheapskate.com/wp-content/uploads/EC-Logo-by-Mary-Hunt-Tagline-Trimmed.png
Mary Hunt2026-06-30 21:44:502026-06-30 21:44:5034 Fourth of July Recipes and DIY Hacks for a Stress-Free Holiday
https://www.everydaycheapskate.com/wp-content/uploads/20260630-a-lit-sparkler-with-an-american-flag-in-the-background-4th-of-july-hacks-tips-and-recipes.png
800
1200
Mary Hunt
https://www.everydaycheapskate.com/wp-content/uploads/EC-Logo-by-Mary-Hunt-Tagline-Trimmed.png
Mary Hunt2026-06-30 21:44:502026-06-30 21:44:5034 Fourth of July Recipes and DIY Hacks for a Stress-Free Holiday https://www.everydaycheapskate.com/wp-content/uploads/20260629-wooden-die-spell-july-with-patriotic-decor-in-background.png
800
1200
Mary Hunt
https://www.everydaycheapskate.com/wp-content/uploads/EC-Logo-by-Mary-Hunt-Tagline-Trimmed.png
Mary Hunt2026-06-29 21:07:092026-06-29 21:10:297 Best Things to Buy in July for Huge Summer Savings
https://www.everydaycheapskate.com/wp-content/uploads/20260629-wooden-die-spell-july-with-patriotic-decor-in-background.png
800
1200
Mary Hunt
https://www.everydaycheapskate.com/wp-content/uploads/EC-Logo-by-Mary-Hunt-Tagline-Trimmed.png
Mary Hunt2026-06-29 21:07:092026-06-29 21:10:297 Best Things to Buy in July for Huge Summer Savings https://www.everydaycheapskate.com/wp-content/uploads/20260628-Grilled-Peaches-with-Balsamic-and-Blue-Cheese-1.png
800
1200
Mary Hunt
https://www.everydaycheapskate.com/wp-content/uploads/EC-Logo-by-Mary-Hunt-Tagline-Trimmed.png
Mary Hunt2026-06-29 09:38:342026-06-29 09:38:34Summer Grilled Peaches with Balsamic and Blue Cheese
https://www.everydaycheapskate.com/wp-content/uploads/20260628-Grilled-Peaches-with-Balsamic-and-Blue-Cheese-1.png
800
1200
Mary Hunt
https://www.everydaycheapskate.com/wp-content/uploads/EC-Logo-by-Mary-Hunt-Tagline-Trimmed.png
Mary Hunt2026-06-29 09:38:342026-06-29 09:38:34Summer Grilled Peaches with Balsamic and Blue Cheese https://www.everydaycheapskate.com/wp-content/uploads/20260628-close-up-photo-a-woman-wearing-a-swimsuit-with-a-mild-sunburn.png
800
1200
Mary Hunt
https://www.everydaycheapskate.com/wp-content/uploads/EC-Logo-by-Mary-Hunt-Tagline-Trimmed.png
Mary Hunt2026-06-28 21:40:042026-06-28 21:40:04DIY After-Sun Spray That Cools and Soothes Skin
https://www.everydaycheapskate.com/wp-content/uploads/20260628-close-up-photo-a-woman-wearing-a-swimsuit-with-a-mild-sunburn.png
800
1200
Mary Hunt
https://www.everydaycheapskate.com/wp-content/uploads/EC-Logo-by-Mary-Hunt-Tagline-Trimmed.png
Mary Hunt2026-06-28 21:40:042026-06-28 21:40:04DIY After-Sun Spray That Cools and Soothes SkinPlease keep your comments positive, encouraging, helpful, brief,
and on-topic in keeping with EC Commenting Guidelines
Last update on 2026-07-21 / Affiliate links / Images from Amazon Product Advertising API


We used the rustoleum kit to do all the cabinets and wood accents in our house a few years ago (probably because of you!). We love it! We went from golden oak to espresso & it totally changed the whole house. Rustoleum also has a floor kit that we used to update the bathroom linoleum & it has held up so well the last 2 years that im getting ready to rip up the living room carpet & paint the floor. Its very easy & not expensive at all. Highly recommend!
Thanks for that feedback, Amanda!
our ‘new’ house had an ugly kitchen. beige wallpaper with maroon splotches. it looked like chicken pox. two coats of pale, powder blue and i was happy with it.
i’d love to see an after picture. you said they chose espresso, but your picture is white.
That is a stock photo and not the subject kitchen.
In the article, it mentions an espresso cabinets but the picture looks white. Could you post the before and after for Amy & Justin’s kitchen that you described?
That is a stock photo and not the subject kitchen.
We used the Giani granite on our laminate counters. It lasted for about 3 years before it started to break down. We followed exact prep and application processes but if you are an avid cook, be wary. It wore away at the sink from my husband’s belt buckle (yes, he does the dishes!).
What did they do for a backsplash?
I would love to see the before photo. It turned out beautiful!
I would love to see the before picture as well! They sure did a beautiful job. I have been wanting to do something like this, but I am not sure if the process would work for my laminate counters with tile on the curved front side. Love this post today!