
Kitchen Tool Alternatives Every Home Cook Should Know


Confession: I love a well-stocked kitchen. What I don’t love? Drawers full of single-use gadgets that promised to change my life and now just collect crumbs. Before you buy that specialty pan, stone, or brush, take a second look at what you already own. These kitchen tool substitutes deliver the same results, save serious money, and keep your cabinets from turning into a gadget graveyard.

Over the years, I’ve had the great privilege of learning from some of the best cooks in the world without ever leaving my kitchen. I’ve taken notes from Julia Child, Jacques Pépin, Martin Yan, and Christopher Kimball.
These days, my “appointments” also include Ina Garten, Ree Drummond, Molly Yeh, Alton Brown, and yes, sometimes Gordon Ramsay shouting at someone who forgot the salt. I’ve picked up tips from Guy Fieri on bold flavors, watched Prue Leith judge a perfect crumb, and even taken a few simple-food notes from Antoni Porowski.
They all “visit” through the television, my laptop, or my iPad perched next to the cutting board. Different styles. Different personalities. Same underlying lesson: technique matters more than toys.
Yes, they talk about quality equipment. But if you watch closely, the real pros don’t depend on a drawer full of single-purpose gadgets. They depend on skill, common sense, and knowing how to work with what’s in front of them.
It would be easy to look at a professionally styled kitchen and assume we need to replicate it to cook well. We don’t. In fact, chasing the “right” equipment can quietly drain both your budget and your cabinet space. A stainless steel double boiler looks lovely. So does a wall of specialty pans. But good cooking has never required a maxed-out credit card.
The late Julia Child was a master of what I call this-for-that cooking. Just check out the photos in her classic tome, The Way to Cook. She wasn’t precious about tools. Need a proofing environment? Improvise one. Need storage? Repurpose something. She understood something that still applies today: confidence in the kitchen comes from understanding the process, not from owning every gadget on the shelf.
When you choose smart kitchen tool substitutes, three things happen: You spend less. You store less. You rely more on skill than stuff.
And if we’re being honest, there’s a quiet satisfaction in knowing you didn’t fall for clever marketing. You looked at what you had, made it work, and turned out something delicious anyway.
How to Make a Double Boiler at Home
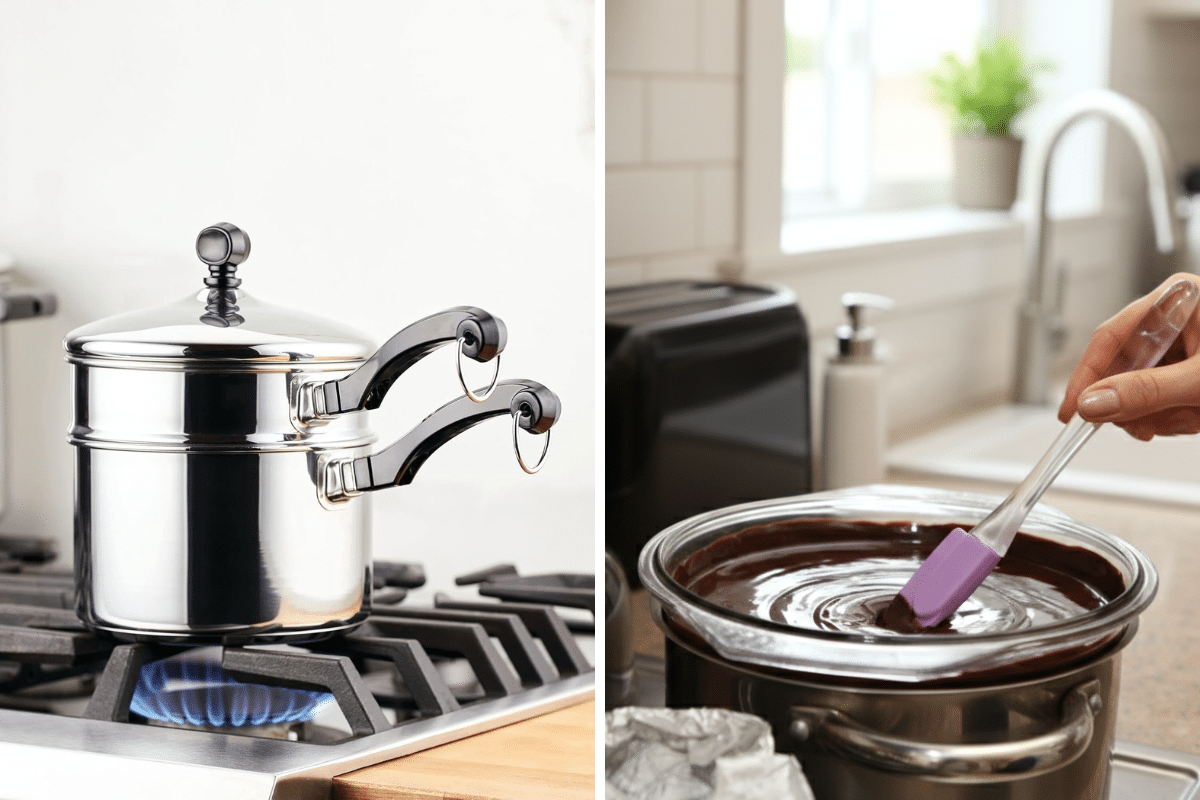
Also called a bain-marie, this technique simply means cooking over gently simmering water instead of direct heat. It’s the secret to melting chocolate without scorching it, whisking together a silky hollandaise, or gently heating egg-based sauces without turning them into scrambled eggs.
You can buy a beautiful copper double boiler for a several hundred dollars and admire it on the shelf. Or you can look in your cabinet.
This for That
Here’s the simple setup:
- Fill a small saucepan with about 1 inch of water.
- Bring it to a boil, then reduce to a gentle simmer.
- Place a heatproof glass or metal bowl on top.
- Make sure the bottom of the bowl does not touch the water.
That’s it. You’ve just created a double boiler.
Keep in mind that size matters. The bowl should sit snugly over the pot to trap steam but remain stable. No wobbling. Keep the heat low. A rolling boil defeats the purpose. Gentle steam is what you want. If steam builds up under the bowl lid or rim, wipe it occasionally so water doesn’t drip into your chocolate.
Why this works: steam heats more gently and evenly than direct flame. You’re controlling temperature without fancy equipment.
A Budget-Friendly Pizza Stone Alternative
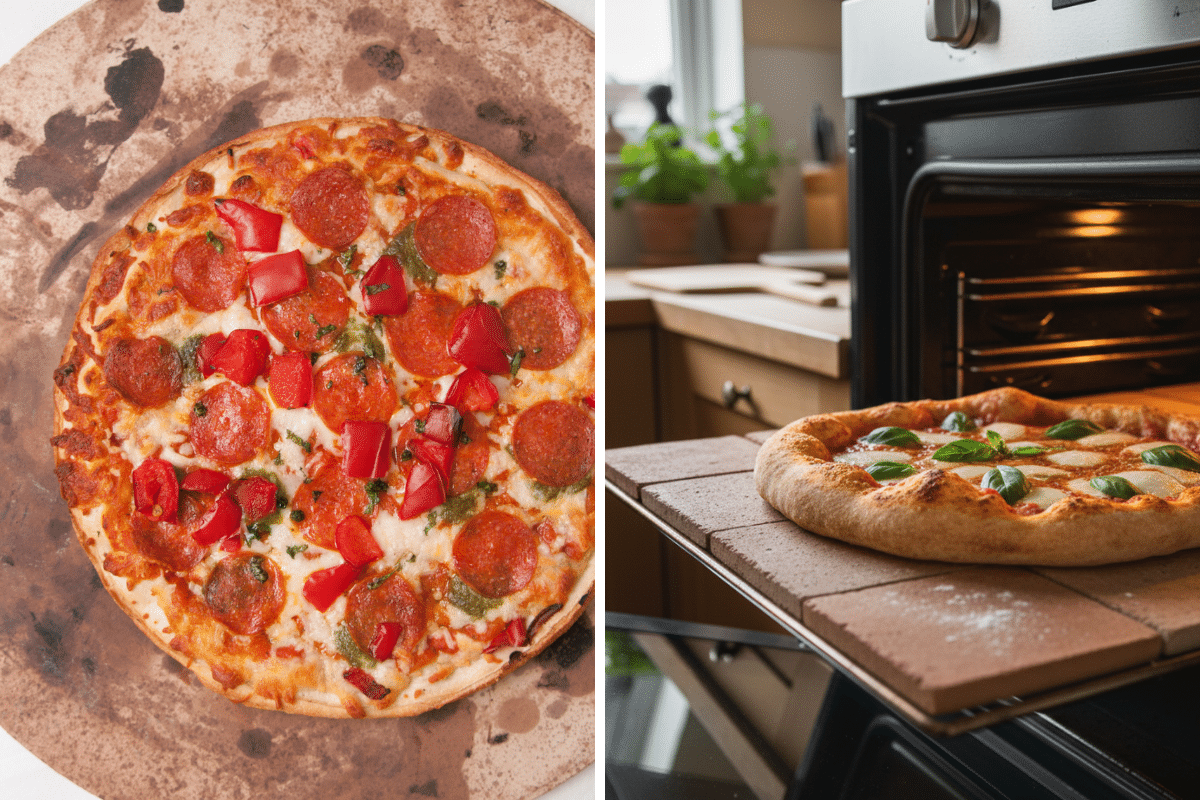
If you’ve ever baked pizza or artisan bread on a stone, you know the difference. Better rise. Crisper crust. That satisfying bakery-style bottom.
You can absolutely invest in a specialty baking stone like the FibraMent-D and enjoy excellent results. Or you can take a short drive to your local home improvement store and accomplish nearly the same thing for about the price of a fancy coffee.
This for That
Look for unglazed quarry or terracotta tiles at least ½-inch thick. That thickness helps retain and distribute heat evenly, which is the whole point of using a stone in the first place.
A few important guardrails:
- Choose tiles labeled with materials such as natural clay or shale.
- Avoid anything sealed, glazed, or treated.
- Skip concrete. It’s not food-safe for this purpose.
If you’re unsure about lead content, contact the manufacturer directly. A quick email is worth the peace of mind.
Some stores carry these as Saltillo tiles or pavers. There are also manufacturers known for producing lead-free options. Local suppliers can be a hidden gem, and sometimes even more affordable.
Here’s how to use them. You have two options:
- Full-oven approach: Line your oven rack with tiles and leave them in place. They help stabilize oven temperature for all baking.
- Single-tile method: Use one 16-inch square tile specifically for bread and pizza. Slide it onto the rack, preheat thoroughly (at least 30 minutes), and bake directly on top.
That preheat matters. You’re storing heat in the tile so it transfers quickly into your dough.
Pro Tip: Place the tile on a rack, not directly on the oven floor. You want airflow underneath for even heating.
Pastry Brush Alternatives That Actually Work
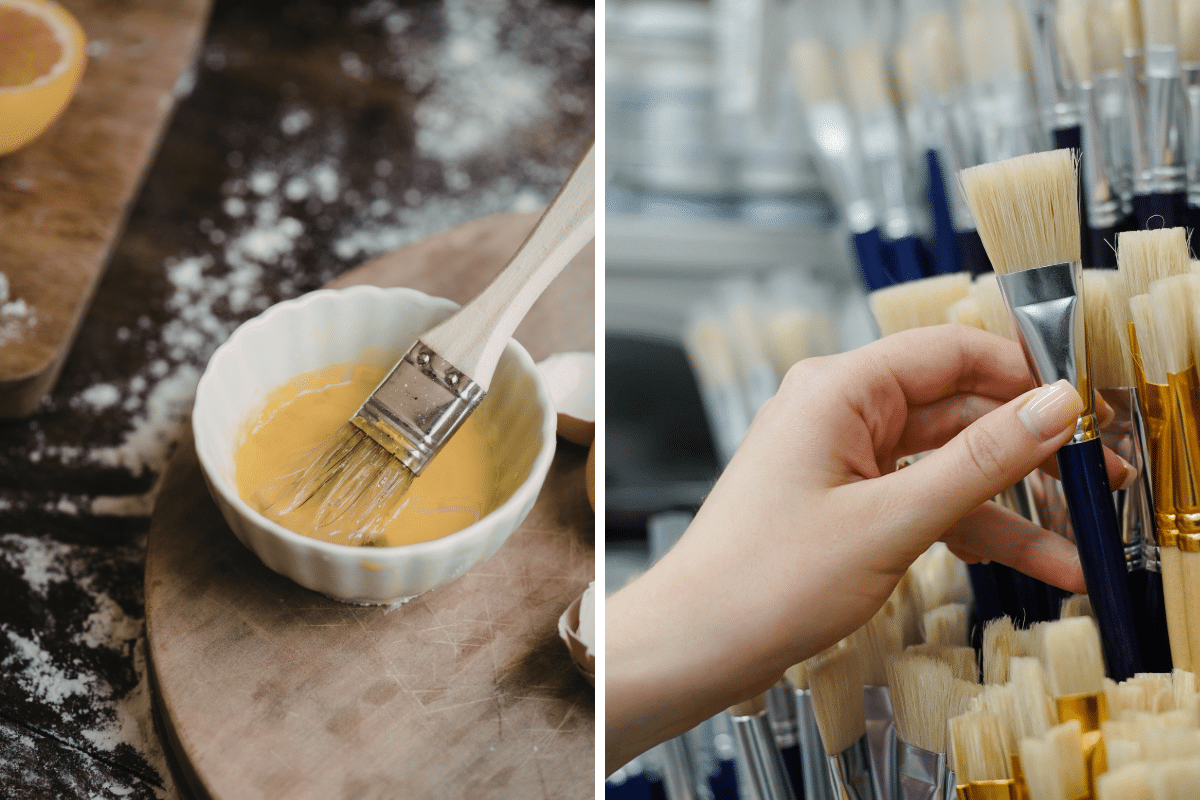
You can absolutely buy a four-piece pastry brush set from the kitchen aisle. It will likely come in a tidy package labeled “essential.”
Or you can walk down the paintbrush aisle and pick up a set of natural bristle artist brushes for half the price. Same basic construction. Same function. Different label.
This for That
Artist-style brushes are surprisingly versatile in the kitchen. Use them to:
- Brush egg wash onto pie crusts or rolls
- Glaze pastries before baking
- Coat bread with olive oil or melted butter
- Baste meat with pan juices or marinade
- Lightly oil a pan without overpouring
In fact, they often give you more control than bulky silicone brushes. The bristles spread thin, even layers which means no soggy puddles of butter or overly eggy crust edges.
A few practical guardrails:
- Choose natural, untreated bristles.
- Avoid anything labeled for use with solvents or chemicals.
- Wash thoroughly by hand and let air dry completely.
Pro Tip: Designate brushes for sweet or savory use. Even after a careful wash, garlic has a long memory. No one wants subtle herb notes in their cinnamon rolls.
How to Adjust Bakeware Sizes with Confidence
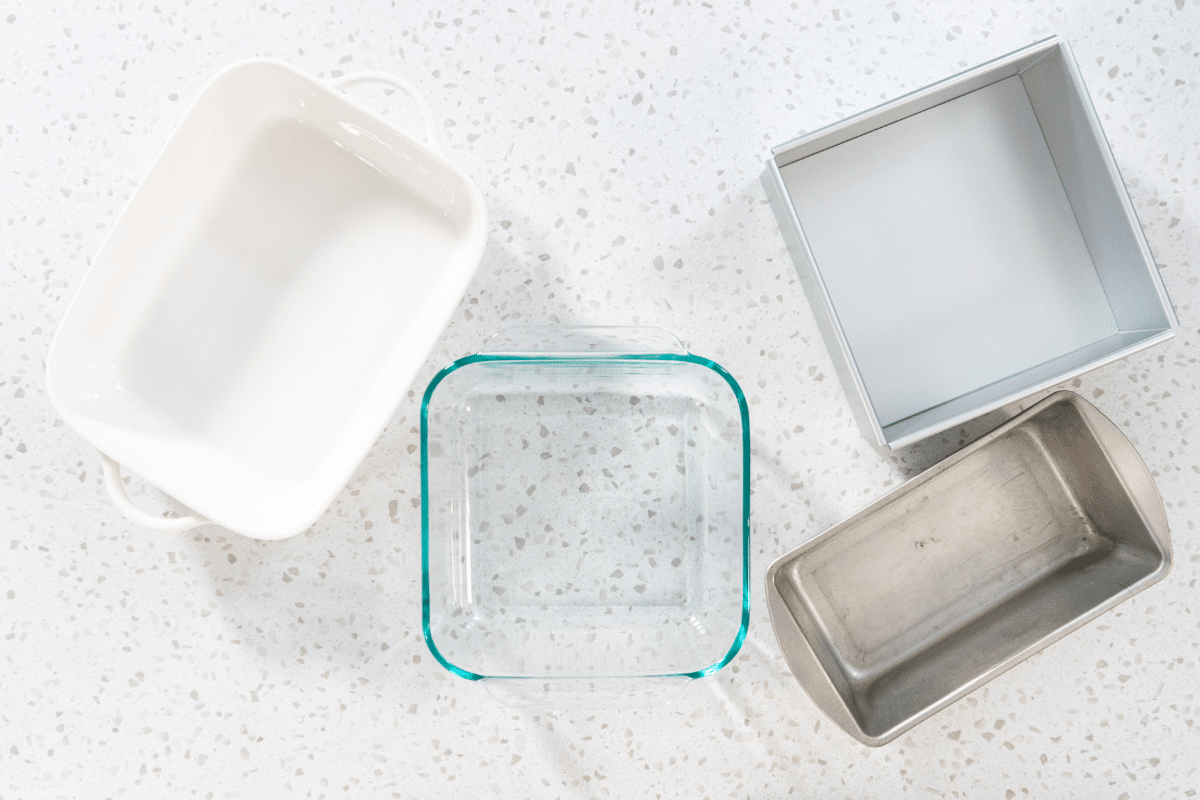
Before you convince yourself that you need an 8×8, a 9×9, a 9×13, and a 10×15, take a breath. You can usually make the pan you already own work just fine.
The key isn’t owning every size. It’s understanding how full to fill it and knowing what to watch for in the oven. Here are reliable filling guidelines that work regardless of pan size:
- Cakes and cupcakes: Fill no less than ½ full and no more than ⅔ full.
- Quick breads and muffins: About ⅔ full.
- Casseroles and soufflés: Stop ¾ to 1 inch below the rim.
- Pies: Nearly to the top (leave just enough room to prevent bubbling over).
If you want to be especially precise, you can measure your pan’s volume by filling it with water, then pouring that water into a measuring cup. Compare that volume to the pan size called for in the recipe.
If you like having the numbers to back you up, you’ll find a comprehensive Baking Pans Substitution Chart here.
Now let’s talk timing. Printed baking times are helpful, but they are not law. Ovens vary. Pan materials vary. Depth varies. When you change pan size, you change baking dynamics.
A few practical adjustments:
- Larger, shallower pan? Reduce baking time slightly and start checking early.
- Smaller, deeper pan? Increase baking time and lower the temperature by about 25 degrees if the top browns too quickly.
- Glass pan? Reduce oven temperature by 25 degrees to prevent over-browning.
And always rely on doneness cues, not just the clock. Insert a knife or toothpick into the center of cakes and quick breads. If it comes out clean or with a few moist crumbs, it’s done. Look for golden edges that just begin to pull away from the pan. For casseroles, watch for bubbling around the perimeter and a set center.
Question: What’s the one kitchen gadget you bought… and now wish you hadn’t? Share in the comments below.
EverydayCheapskate™ is reader-supported. We participate in the Amazon Services LLC Associates Program and other affiliate advertising programs, designed to provide a means for us to earn from qualifying purchases, at no cost to you.

More from Everyday Cheapskate
 https://www.everydaycheapskate.com/wp-content/uploads/20260720-slow-cooker-hot-weather-meals-salads-plus-pico-de-gallo-recipes.png
800
1200
Mary Hunt
https://www.everydaycheapskate.com/wp-content/uploads/EC-Logo-by-Mary-Hunt-Tagline-Trimmed.png
Mary Hunt2026-07-20 21:12:192026-07-20 21:15:463 Slow Cooker Summer Salads for Hot Weather Dinners
https://www.everydaycheapskate.com/wp-content/uploads/20260720-slow-cooker-hot-weather-meals-salads-plus-pico-de-gallo-recipes.png
800
1200
Mary Hunt
https://www.everydaycheapskate.com/wp-content/uploads/EC-Logo-by-Mary-Hunt-Tagline-Trimmed.png
Mary Hunt2026-07-20 21:12:192026-07-20 21:15:463 Slow Cooker Summer Salads for Hot Weather Dinners https://www.everydaycheapskate.com/wp-content/uploads/20260717-a-woman-holding-a-crate-of-cucumbers.png
800
1200
Mary Hunt
https://www.everydaycheapskate.com/wp-content/uploads/EC-Logo-by-Mary-Hunt-Tagline-Trimmed.png
Mary Hunt2026-07-17 10:11:072026-07-17 10:13:44Cucumbers Galore? Here’s What to Do With Every Single One
https://www.everydaycheapskate.com/wp-content/uploads/20260717-a-woman-holding-a-crate-of-cucumbers.png
800
1200
Mary Hunt
https://www.everydaycheapskate.com/wp-content/uploads/EC-Logo-by-Mary-Hunt-Tagline-Trimmed.png
Mary Hunt2026-07-17 10:11:072026-07-17 10:13:44Cucumbers Galore? Here’s What to Do With Every Single One https://www.everydaycheapskate.com/wp-content/uploads/20260714-car-dashboard-diy-car-interior-cleaning-wipes.png
800
1200
Mary Hunt
https://www.everydaycheapskate.com/wp-content/uploads/EC-Logo-by-Mary-Hunt-Tagline-Trimmed.png
Mary Hunt2026-07-14 13:45:172026-07-14 13:45:17DIY Car Interior Cleaning Wipes That Actually Work Well
https://www.everydaycheapskate.com/wp-content/uploads/20260714-car-dashboard-diy-car-interior-cleaning-wipes.png
800
1200
Mary Hunt
https://www.everydaycheapskate.com/wp-content/uploads/EC-Logo-by-Mary-Hunt-Tagline-Trimmed.png
Mary Hunt2026-07-14 13:45:172026-07-14 13:45:17DIY Car Interior Cleaning Wipes That Actually Work Well https://www.everydaycheapskate.com/wp-content/uploads/20260713-what-to-pack-for-kids-lunchboxes-young-boy-and-girl-eating-a-banana-and-a-sandwich.png
800
1200
Mary Hunt
https://www.everydaycheapskate.com/wp-content/uploads/EC-Logo-by-Mary-Hunt-Tagline-Trimmed.png
Mary Hunt2026-07-13 21:54:132026-07-13 21:54:13Back-to-School Lunch Ideas for a Week (No Boring Sandwiches)
https://www.everydaycheapskate.com/wp-content/uploads/20260713-what-to-pack-for-kids-lunchboxes-young-boy-and-girl-eating-a-banana-and-a-sandwich.png
800
1200
Mary Hunt
https://www.everydaycheapskate.com/wp-content/uploads/EC-Logo-by-Mary-Hunt-Tagline-Trimmed.png
Mary Hunt2026-07-13 21:54:132026-07-13 21:54:13Back-to-School Lunch Ideas for a Week (No Boring Sandwiches) https://www.everydaycheapskate.com/wp-content/uploads/20260609-refreshing-glasses-of-iced-tea-with-fresh-lemon-slices-and-ice-best-way-to-make-tea.png
800
1200
Mary Hunt
https://www.everydaycheapskate.com/wp-content/uploads/EC-Logo-by-Mary-Hunt-Tagline-Trimmed.png
Mary Hunt2026-07-09 18:30:102026-07-09 18:30:10The Best Way to Make Iced Tea? Depends What You’re After
https://www.everydaycheapskate.com/wp-content/uploads/20260609-refreshing-glasses-of-iced-tea-with-fresh-lemon-slices-and-ice-best-way-to-make-tea.png
800
1200
Mary Hunt
https://www.everydaycheapskate.com/wp-content/uploads/EC-Logo-by-Mary-Hunt-Tagline-Trimmed.png
Mary Hunt2026-07-09 18:30:102026-07-09 18:30:10The Best Way to Make Iced Tea? Depends What You’re After https://www.everydaycheapskate.com/wp-content/uploads/20260707-creamy-whipped-frozen-coffee-drink-on-balcony-with-whipped-cream.png
800
1200
Mary Hunt
https://www.everydaycheapskate.com/wp-content/uploads/EC-Logo-by-Mary-Hunt-Tagline-Trimmed.png
Mary Hunt2026-07-07 10:09:112026-07-07 10:09:11I Stopped Buying $7 Frappuccinos. Here’s What I Make Now
https://www.everydaycheapskate.com/wp-content/uploads/20260707-creamy-whipped-frozen-coffee-drink-on-balcony-with-whipped-cream.png
800
1200
Mary Hunt
https://www.everydaycheapskate.com/wp-content/uploads/EC-Logo-by-Mary-Hunt-Tagline-Trimmed.png
Mary Hunt2026-07-07 10:09:112026-07-07 10:09:11I Stopped Buying $7 Frappuccinos. Here’s What I Make Now https://www.everydaycheapskate.com/wp-content/uploads/20260705-Best-Coolers-for-Camping-Road-Trips-and-Beach-Days.png
800
1200
Mary Hunt
https://www.everydaycheapskate.com/wp-content/uploads/EC-Logo-by-Mary-Hunt-Tagline-Trimmed.png
Mary Hunt2026-07-05 13:26:172026-07-05 13:26:17Best Coolers for Camping, Road Trips, and Beach Days
https://www.everydaycheapskate.com/wp-content/uploads/20260705-Best-Coolers-for-Camping-Road-Trips-and-Beach-Days.png
800
1200
Mary Hunt
https://www.everydaycheapskate.com/wp-content/uploads/EC-Logo-by-Mary-Hunt-Tagline-Trimmed.png
Mary Hunt2026-07-05 13:26:172026-07-05 13:26:17Best Coolers for Camping, Road Trips, and Beach Days https://www.everydaycheapskate.com/wp-content/uploads/20260705-how-to-keep-a-cooler-cold.png
800
1200
Mary Hunt
https://www.everydaycheapskate.com/wp-content/uploads/EC-Logo-by-Mary-Hunt-Tagline-Trimmed.png
Mary Hunt2026-07-05 13:19:502026-07-05 13:19:50How to Pack a Cooler That Stays Cold for 48 Hours
https://www.everydaycheapskate.com/wp-content/uploads/20260705-how-to-keep-a-cooler-cold.png
800
1200
Mary Hunt
https://www.everydaycheapskate.com/wp-content/uploads/EC-Logo-by-Mary-Hunt-Tagline-Trimmed.png
Mary Hunt2026-07-05 13:19:502026-07-05 13:19:50How to Pack a Cooler That Stays Cold for 48 Hours https://www.everydaycheapskate.com/wp-content/uploads/20260703-home-decor.png
800
1200
Mary Hunt
https://www.everydaycheapskate.com/wp-content/uploads/EC-Logo-by-Mary-Hunt-Tagline-Trimmed.png
Mary Hunt2026-07-03 20:46:552026-07-03 20:46:5510 Everyday Items You Never Think to Wash (But Should)
https://www.everydaycheapskate.com/wp-content/uploads/20260703-home-decor.png
800
1200
Mary Hunt
https://www.everydaycheapskate.com/wp-content/uploads/EC-Logo-by-Mary-Hunt-Tagline-Trimmed.png
Mary Hunt2026-07-03 20:46:552026-07-03 20:46:5510 Everyday Items You Never Think to Wash (But Should)

my husband bought an ice cream scoop. it annoys me. what’s wrong with a spoon?
haha. i know what you mean but a good ice cream scoop will work better than a spoon. The scoop that is a large chunk of aluminum actually pulls the cold away from the ice cream and melts it a little on contact allowing for an easier time scooping harder ice cream. So in this instance, I’m going to agree with your husband!
A spoon can bend. A good sturdy ice cream scoop can last a lifetime.
I keep my round stone in the oven except when I make something like a turkey. I noticed that when I took it out and started pre heating the oven, it took a lot less time. Coincidence? or does it take more time to preheat when the stone is in there? I do love biscuits cooked on the stone. I ruined one trying to cook raw chicken. It always smelled bad after that. Even tho the chicken cooked until fully done.
Be careful if using a glass bowl for the double boiler swap, not all glass is tempered for heat resistance and can crack if heated. I know this from experience. If you use a glass bowl make sure it is ‘oven proof’. Most Pyrex is, check the stamp on the bottom of the bowl to confirm. Also from experience, don’t use a pan that is just slightly smaller that the pan with the water, it will form a vacuum that will ‘bond’ the pans together. Lost two pans that way. Finally found a nice little double boiler at a garage sale for $5. It works great.
fizzy water and frozen apple juice conc. makes sparkling juice. Also, use potato peeler to zest oranges and all citruses. Peel in sparkling water for flavor. …Or boil with sugar for syrup to make pop. Roll boiled peel in sugar and dry to make candy at same time!!!
Mary, we don’t care for the end slices on a loaf of bread so I cut them in small cubes and save in a zip bag – I can make cheese and/or garlic croutons or when I need crumbs for a recipe I can grind them in a blender or a food processor — so much cheaper than buying croutons or bread crumbs.
I’ve been reading and saving hints and recipes from your columns for around 20 years.
Thank you,
Donna Parcel
We use the side of a wine bottle as a rolling pin, and the bottom to pound out meats.
Request: Mary, could you or your readers come up with info to make flavors for the carbonated water used in Soda Stream devices? The flavors available are extremely expensive.
Finally: I’ve been following you for years, probably since you sent out your first blog! Thank you so much for your invaluable research and assistance to folks like me. Beyond strictly financial issues, we are all “indebted” to you for your marvelous advice and encouragement.
I don’t have a Soda Stream but I use a carbonated beverage maker that uses CO2 cartridges. To flavor, I buy the bulk packs for “True” crystalized fruits (lemon, orange, grapefruit, etc.). The bulk pack is 500 packets but the cost is under 5 cents each. I buy CO2 cartridges in bulk as well (from Red Rock Distributing in Minnesota) and the bulk pricing comes in at less than 10 cents/cartridge. So, my cost for making fizzy water is 15 cents for 2 large servings.
The metal CO2 cartridges are easily recyclable in my area.
Hope that helps!
fizzy water and frozen apple juice conc. makes sparkling juice. Also, use potato peeler to zest oranges and all citruses. Peel in sparkling water for flavor. …Or boil with sugar for syrup to make pop. Roll boiled peel in sugar and dry to make candy at same time!!!
I make lots of combination syrups. My most recent was organic hibiscus tea and organic elderberry that I placed in my instant pot for 5 mins. I then added honey and stored it in the refrigerator and add it to my SodaStream carbonated water.