

How to Roast a Cheap Cut of Beef for Perfect Results Every Time


Buying cheaper cuts of beef can be a great way to stretch your food budget, but only if they turn out tender and flavorful. Otherwise, it’s no deal at all! Thanks to research and testing by chef Christopher Kimball, I’ve found the best way to roast chuck, sirloin, or round cuts to perfection. Follow these precise steps for a succulent, juicy roast every time—without breaking the bank.

No matter how relatively inexpensive a chuck or round roast may appear, if it turns out so tough and flavorless it’s passed to the dog, that purchase was no bargain. That’s why everyone on a food budget needs to know how to roast cheaper cuts of beef.
Finally, thanks to very extensive research and experimentation by Christopher Kimball, as reported in Cooks Illustrated magazine*, we can confidently purchase those cheaper cuts and expect perfect results every time.
Why Cheaper Cuts of Beef Are Worth It
These days, with beef prices hitting all-time highs, buying the cheaper cuts of beef is one way to make our food dollars stretch as far as possible. Just know that what follows is for those of us with more time than money.
It was a kick to read all the endless details of Chef Kimball’s testing. To be quite honest he lost me somewhere between five chuck roasts, seven sirloins, eight rounds, and the endless descriptions of cooking methods, internal temperatures, standing times, and length of aging.
Curious as I am, I don’t care about meat fibers, enzymes, and moisture content. And that’s when I raced to the conclusion and learned exactly how to prepare a cheap cut of beef. And here it is:
Key Equipment for Roasting Cheap Beef
To get the perfect roast every time, you’ll need a few essential tools. These will ensure even cooking and help you hit the exact temperatures needed for a succulent result:
- Rimmed baking sheet with wire rack: Elevates the roast for even airflow.
- Meat thermometer: Not an instant-read but a probe-style thermometer that stays in place while cooking to monitor internal temps without opening the oven.
- Oven thermometer: Ovens can be finicky, so having this tool ensures you’re cooking at the exact temperature.
- Cooking twine: Tying the roast helps it cook more evenly and maintain its shape.


Best Cheap Roast Beef Cut
When looking for inexpensive cuts keep these three words in mind: chuck, sirloin, and round. These cuts might not look as glamorous as ribeye or tenderloin, but they can be just as flavorful when prepared the right way.
- Chuck roast: Known for its marbling, chuck is a fattier cut that is known for being rich and tender when cooked low and slow. Ideal for those who love rich, flavorful beef with more marbling.
- Round roast: The leanest and toughest of the three, round requires careful cooking to avoid dryness. Perfect for health-conscious eaters.
- Sirloin roast: This cut falls somewhere in the middle—less fatty than chuck but more tender than round. It offers a good balance of flavor and texture.
Step-by-Step: How to Roast a Cheap Cut of Beef
Here’s the foolproof method for turning inexpensive cuts like chuck, sirloin, or round into a tender, flavorful roast:
Ingredients
- 1 boneless beef chuck, sirloin, or round roast (3 to 4.5 lbs)
- 4 tsp kosher salt (or 2 tsp table salt, adjust for roast size)
- 2 tsp + 2 tbsp vegetable oil (divided)
- 2 tsp ground black pepper
Instructions
The following steps are for chuck, sirloin, and round cuts of varying size although 2- to 5-pound roasts are ideal and will produce the best results.
This process is tedious and you’ll need to start the day before you plan to serve. Just know that for the money you’ll save and the result you will achieve, it’s so worth it!
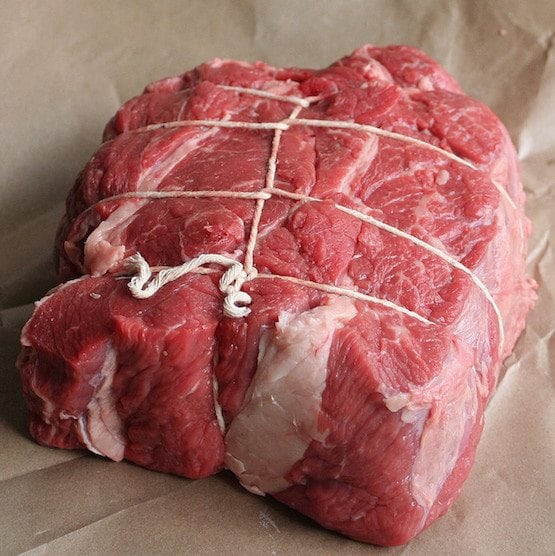
- Tie the roast: Use cooking twine to tie the roast at 1.5-inch intervals. This keeps the shape compact for even roasting.
- Season the roast: Pat it dry with paper towels, rub with 2 tsp oil, and generously season with salt and pepper.
- Refrigerate: Wrap the seasoned roast tightly in plastic wrap and refrigerate for at least 24 hours. This step helps the meat absorb the flavors and tenderize.
- Preheat the oven: Set your oven to 250°F and position a rack in the middle.
- Sear the roast: Heat 1 tbsp of oil in a large skillet over medium-high heat until it begins to smoke. Sear the roast on all sides until browned (about 3-4 minutes per side).
- Roast it: Place the roast on a wire rack set inside a rimmed baking sheet. Insert your meat thermometer into the thickest part of the roast. Roast uncovered at 250°F until the internal temperature reaches 115°F for rare or 130°F for medium (about 2 to 2¼ hours for a 3-4.5 lb roast).
- Turn the oven off: Without opening the door, turn off the oven and leave the roast inside. Let it continue cooking until the internal temperature hits 130°F for rare or 145°F for medium.
- Rest and slice: After 30 minutes, remove the roast and let it rest for 15 minutes. This allows the juices to redistribute. Then slice and serve!
At that moment, according to Kimball, the roast will be succulent, tender, juicy, and more flavorful than prepared using any other cooking method. My family and I agree!
Remember, exact temperatures are the secret to the best results. Interestingly, varying the oven temperature, internal temperature, and times even slightly produced, for Kimball, roasts that were all the way from slightly dry to so tough they could not be eaten! Exact temperatures, capiche?!
Tips for Achieving the Perfect Roast
Following these tips will help you achieve a roast that’s tender, juicy, and flavorful, even from the best cheap roast beef cut.
- Don’t skip the sear: It’s key to developing a rich, flavorful crust that adds depth to your roast.
- Monitor temperatures carefully: Guesswork leads to overcooked or undercooked beef. An oven thermometer ensures accuracy, and a meat thermometer prevents overcooking.
- Let it rest: After roasting, letting the meat sit for 15 minutes locks in the juices. This step is non-negotiable for a juicy roast.
- Time it right: The method involves low and slow cooking. Don’t rush it, or you might end up with a dry, tough roast.
Save Money, Savor Flavor
Roasting cheaper cuts of beef doesn’t mean compromising on flavor. With the right technique, tools, and a little patience, you can enjoy a succulent roast that rivals any expensive cut. Whether you’re cooking a chuck, sirloin, or round, you’ll save money while serving up a meal your family will love.
Next time you’re eyeing that expensive ribeye, remember—knowing how to roast a cheap cut of beef is your secret to getting the most bang for your buck, all while savoring every bite!
*Note:
Christopher Kimball and Cook’s Illustrated parted ways several years ago. Within days, Kimball founded a new publication, Christopher Kimball’s Milk Street. Legal battles ensued. I’m sure there were arguments over who owned legal rights for all of the intellectual properties Kimball created while at Cook’s Illustrated. All that to say, if you were to search Cook’s Illustrated for Kimball’s method I’ve referenced above, you’d find a very different version. I can only guess that Kimball retained rights to much that he created while at Cook’s Illustrated, which prompted Cook’s to replace it with something different.

Tender Roast Beef from Cheaper Cuts
Ingredients
- 1 boneless beef chuck sirloin, or round roast (3 to 4.5 lbs)
- 4 tsp kosher salt or 2 tsp table salt, adjust for roast size
- 2 tsp + 2 tbsp vegetable oil divided
- 2 tsp ground black pepper
Instructions
- Tie the roast: Use cooking twine to tie the roast at 1.5-inch intervals. This helps it cook evenly.
- Season the roast: Pat dry with paper towels, rub with 2 tsp of oil, and generously season with salt and pepper.
- Refrigerate: Wrap the roast tightly in plastic wrap and refrigerate for at least 24 hours to allow the meat to tenderize and absorb the flavors.
- Preheat the oven: Set your oven to 250°F and position a rack in the middle.
- Sear the roast: Heat 1 tbsp of oil in a large skillet over medium-high heat until it smokes. Sear the roast on all sides (about 3-4 minutes per side).
- Roast it: Place the roast on a wire rack inside a rimmed baking sheet. Insert a meat thermometer into the thickest part of the roast. Roast uncovered at 250°F until the internal temperature reaches 115°F for rare or 130°F for medium (about 2-2¼ hours for a 3-4.5 lb roast).
- Turn the oven off: Without opening the door, turn off the oven and let the roast continue cooking until it reaches 130°F for rare or 145°F for medium.
- Rest and slice: After 30 minutes, remove the roast and let it rest for 15 minutes before slicing.
Notes
Nutrition
Question: What’s your secret to cooking budget-friendly meals that taste gourmet? Let’s share some tips.
EverydayCheapskate™ is reader-supported. We participate in the Amazon Services LLC Associates Program and other affiliate advertising programs, designed to provide a means for us to earn from qualifying purchases, at no cost to you.

More from Everyday Cheapskate
 https://www.everydaycheapskate.com/wp-content/uploads/20261017-Woman-opening-refrigerator-stocked-with-fresh-food-and-condiments.png
800
1200
Mary Hunt
https://www.everydaycheapskate.com/wp-content/uploads/EC-Logo-by-Mary-Hunt-Tagline-Trimmed.png
Mary Hunt2026-10-17 12:16:242026-10-17 12:16:24What Temperature Should a Refrigerator and Freezer Be?
https://www.everydaycheapskate.com/wp-content/uploads/20261017-Woman-opening-refrigerator-stocked-with-fresh-food-and-condiments.png
800
1200
Mary Hunt
https://www.everydaycheapskate.com/wp-content/uploads/EC-Logo-by-Mary-Hunt-Tagline-Trimmed.png
Mary Hunt2026-10-17 12:16:242026-10-17 12:16:24What Temperature Should a Refrigerator and Freezer Be? https://www.everydaycheapskate.com/wp-content/uploads/20261016-Crispy-potato-cakes-made-with-leftover-mashed-potatoes.png
800
1200
Mary Hunt
https://www.everydaycheapskate.com/wp-content/uploads/EC-Logo-by-Mary-Hunt-Tagline-Trimmed.png
Mary Hunt2026-10-16 15:54:382026-10-16 15:54:38Got Leftover Mashed Potatoes? Try These 5 Smart Ideas
https://www.everydaycheapskate.com/wp-content/uploads/20261016-Crispy-potato-cakes-made-with-leftover-mashed-potatoes.png
800
1200
Mary Hunt
https://www.everydaycheapskate.com/wp-content/uploads/EC-Logo-by-Mary-Hunt-Tagline-Trimmed.png
Mary Hunt2026-10-16 15:54:382026-10-16 15:54:38Got Leftover Mashed Potatoes? Try These 5 Smart Ideas https://www.everydaycheapskate.com/wp-content/uploads/20261015-Sweet-pepper-and-onion-relish-in-a-white-bowl-with-crackers-and-fresh-red-bell-peppers.png
800
1200
Mary Hunt
https://www.everydaycheapskate.com/wp-content/uploads/EC-Logo-by-Mary-Hunt-Tagline-Trimmed.png
Mary Hunt2026-10-15 13:14:022026-10-15 13:14:02Sweet Pepper Onion Relish (Perfect Over Cream Cheese)
https://www.everydaycheapskate.com/wp-content/uploads/20261015-Sweet-pepper-and-onion-relish-in-a-white-bowl-with-crackers-and-fresh-red-bell-peppers.png
800
1200
Mary Hunt
https://www.everydaycheapskate.com/wp-content/uploads/EC-Logo-by-Mary-Hunt-Tagline-Trimmed.png
Mary Hunt2026-10-15 13:14:022026-10-15 13:14:02Sweet Pepper Onion Relish (Perfect Over Cream Cheese) https://www.everydaycheapskate.com/wp-content/uploads/20261002-cake-mix-chocolate-chip-cookies.png
800
1200
Mary Hunt
https://www.everydaycheapskate.com/wp-content/uploads/EC-Logo-by-Mary-Hunt-Tagline-Trimmed.png
Mary Hunt2026-10-02 19:44:302026-10-02 19:44:30Cake Mix Chocolate Chip Cookies That Taste Homemade
https://www.everydaycheapskate.com/wp-content/uploads/20261002-cake-mix-chocolate-chip-cookies.png
800
1200
Mary Hunt
https://www.everydaycheapskate.com/wp-content/uploads/EC-Logo-by-Mary-Hunt-Tagline-Trimmed.png
Mary Hunt2026-10-02 19:44:302026-10-02 19:44:30Cake Mix Chocolate Chip Cookies That Taste Homemade https://www.everydaycheapskate.com/wp-content/uploads/20260930-cheap-Halloween-party-snacks-for-kids-punch-bowl-mummy-dogs-ghost-bananas.png
800
1200
Mary Hunt
https://www.everydaycheapskate.com/wp-content/uploads/EC-Logo-by-Mary-Hunt-Tagline-Trimmed.png
Mary Hunt2026-10-01 11:08:582026-10-01 11:08:59These Cheap Halloween Snacks Are Almost Too Easy to Make
https://www.everydaycheapskate.com/wp-content/uploads/20260930-cheap-Halloween-party-snacks-for-kids-punch-bowl-mummy-dogs-ghost-bananas.png
800
1200
Mary Hunt
https://www.everydaycheapskate.com/wp-content/uploads/EC-Logo-by-Mary-Hunt-Tagline-Trimmed.png
Mary Hunt2026-10-01 11:08:582026-10-01 11:08:59These Cheap Halloween Snacks Are Almost Too Easy to Make https://www.everydaycheapskate.com/wp-content/uploads/20260927-impossible-lasagna-pie-recipe-with-wooden-serving-spoon-in-white-casserole-dish.png
800
1200
Mary Hunt
https://www.everydaycheapskate.com/wp-content/uploads/EC-Logo-by-Mary-Hunt-Tagline-Trimmed.png
Mary Hunt2026-09-28 09:38:592026-09-28 22:48:34Impossible Lasagna Pie: All the Flavor, None of the Noodles
https://www.everydaycheapskate.com/wp-content/uploads/20260927-impossible-lasagna-pie-recipe-with-wooden-serving-spoon-in-white-casserole-dish.png
800
1200
Mary Hunt
https://www.everydaycheapskate.com/wp-content/uploads/EC-Logo-by-Mary-Hunt-Tagline-Trimmed.png
Mary Hunt2026-09-28 09:38:592026-09-28 22:48:34Impossible Lasagna Pie: All the Flavor, None of the Noodles https://www.everydaycheapskate.com/wp-content/uploads/20260922-chinese-chicken-in-slow-cooker-with-white-rice-recipe-with-sesame-seeds-and-scallions.png
800
1200
Mary Hunt
https://www.everydaycheapskate.com/wp-content/uploads/EC-Logo-by-Mary-Hunt-Tagline-Trimmed.png
Mary Hunt2026-09-22 10:13:562026-09-28 22:48:39Slow Cooker Chinese Chicken That Beats Takeout
https://www.everydaycheapskate.com/wp-content/uploads/20260922-chinese-chicken-in-slow-cooker-with-white-rice-recipe-with-sesame-seeds-and-scallions.png
800
1200
Mary Hunt
https://www.everydaycheapskate.com/wp-content/uploads/EC-Logo-by-Mary-Hunt-Tagline-Trimmed.png
Mary Hunt2026-09-22 10:13:562026-09-28 22:48:39Slow Cooker Chinese Chicken That Beats Takeout https://www.everydaycheapskate.com/wp-content/uploads/20260916-oktoberfest-bratwurst-sausage-and-sauerkraut-cabbage-pie.png
800
1200
Mary Hunt
https://www.everydaycheapskate.com/wp-content/uploads/EC-Logo-by-Mary-Hunt-Tagline-Trimmed.png
Mary Hunt2026-09-16 21:28:232026-09-28 22:48:47Impossible Oktoberfest Pie: All the Beer Hall Flavor, None of the Fuss
https://www.everydaycheapskate.com/wp-content/uploads/20260916-oktoberfest-bratwurst-sausage-and-sauerkraut-cabbage-pie.png
800
1200
Mary Hunt
https://www.everydaycheapskate.com/wp-content/uploads/EC-Logo-by-Mary-Hunt-Tagline-Trimmed.png
Mary Hunt2026-09-16 21:28:232026-09-28 22:48:47Impossible Oktoberfest Pie: All the Beer Hall Flavor, None of the Fuss https://www.everydaycheapskate.com/wp-content/uploads/20260910-cooking-mistakes-and-how-to-avoid-them-woman-at-stovetop-with-steam-coming-from-pot.png
800
1200
Mary Hunt
https://www.everydaycheapskate.com/wp-content/uploads/EC-Logo-by-Mary-Hunt-Tagline-Trimmed.png
Mary Hunt2026-09-09 12:12:532026-09-28 22:49:005 Cooking Mistakes That Are Quietly Wrecking Your Dinner
https://www.everydaycheapskate.com/wp-content/uploads/20260910-cooking-mistakes-and-how-to-avoid-them-woman-at-stovetop-with-steam-coming-from-pot.png
800
1200
Mary Hunt
https://www.everydaycheapskate.com/wp-content/uploads/EC-Logo-by-Mary-Hunt-Tagline-Trimmed.png
Mary Hunt2026-09-09 12:12:532026-09-28 22:49:005 Cooking Mistakes That Are Quietly Wrecking Your DinnerPlease keep your comments positive, encouraging, helpful, brief,
and on-topic in keeping with EC Commenting Guidelines
Last update on 2026-10-20 / Affiliate links / Images from Amazon Product Advertising API


Hello Mary,
I had been following you for quite awhile. Was on active duty and moving so much , I lost track. So glad to be back to this wonderful site. I cook my chuck roast in my crockpot. I do sear it first. Tender every time and plenty drippings for my gravy.
Can this be frozen? If so, what’s the best way to reheat?
If using a convection oven, do you recommend setting it at a lower temperature?
Please follow the manufacturer instructions for your oven if you are unable to disable the convection feature.
I made this and my spouse is still talking about it. Thank-you! Also Thank-you, I read to the end of one of your informative stories and there was a download for how to make…. I lost these as single emails the year I had chemo brain. I am so happy to have access again.
Mary, somewhere in one of your tips you mentioned that cheese should be wrapped in plastic. Our local cheese factory says this is a no no! Cheese sweats in plastic so it should always be wrapped in waxed paper or butcher paper. I save the wax paper from cereal boxes and use it to wrap cheese blocks – works great and costs next to nothing.
Approx how long to sit after turning off oven the first time?
It depends on the size of your roast, but or sure it will be more than a few minutes. Plan on 30 mins or so, but again depends on your individual conditions.
How do you read the thermometer without opening the oven door?
Very judiciously! Of course this post assumes glass oven doors, but that should not preclude the process for an oven with a sold door. The point is to make sure you don’t allow a blast of cold air. The temp inside the oven needs to be kept as even as humanoy possible! Here’s what I would do: with a pair of tongs, remove the oven thermometer from the oven quickly, closing the door and then checking its temperature rather than opening the door while you check it. Then replace it as quickly using those tongs to quickly replace the thermometer. If you don’t linger and dawdle, that will work!
Interesting, and I’m sure it would work for those whose ovens have a door through which they can read a thermometer.
However, my oven is a solid door, so I’d err on the side of a quick look near the end of the roasting time to verify the temperature.
Any reason why that wouldn’t work?
Thanks for the tip!
Once again, Mary, thank you for all the very helpful information and tips to help us stretch our money!!
Merry Christmas and Happy New Year!!
Thank you Cecile! And the same to you ❣️