
Lemons in a Jar (Preserved Lemons Recipe You’ll Actually Use)

I’ll admit it. I got a little carried away with lemons on one California trip. What started as “I’ll bring a few home” turned into hauling back 35 pounds of beautiful Meyer lemons like I was preparing for a citrus emergency. Friends got lemons. My freezer got lemon juice. And my kitchen? Well, that’s when these preserved lemons started lining the shelves. If you’ve never made lemons in a jar before, you’re in for something surprisingly simple and incredibly useful. This is one of those quiet little kitchen upgrades that makes everyday meals taste like you tried a whole lot harder than you actually did.

Preserved lemons might sound fancy, but here’s the truth: most people say “yes” to them before they fully understand what they are… and then stand in the kitchen wondering, now what? I’ve been there.
They’re not like fresh lemons. They’re softer, saltier, and somehow more “lemony” at the same time. The peel becomes the star, and just a tiny bit can completely change a dish. Use them to:
- Wake up simple chicken dishes
- Add depth to soups and stews
- Toss into grain bowls or couscous
- Chop into salad dressings
- Serve alongside olives for an easy appetizer
If you’re unsure where to start, think of them less like fruit and more like a finishing touch… something you mince, mash, or sneak into a dish right at the end.
And here’s what I’ve learned the hard way: a little goes a long way. The first time I used them, I was generous… let’s just say that dish didn’t need extra salt for the rest of the week. But once you get the hang of it? These become one of those quiet little kitchen tricks you rely on. The kind that turns a basic dinner into something that makes people pause mid-bite and ask, “What did you put in this?”
Choosing the Best Lemons (Timing Matters)
If you’ve ever grabbed a lemon that felt light and dry, you already know: not all lemons are created equal. Here’s what I look for every single time:
- Heavy for their size (that means juicy, and juicy is what you want)
- Smooth, bright skin (dull or wrinkled = past their prime)
- A little give when you squeeze (not mushy, just not rock-hard)
Winter through early spring is when lemons really shine, especially if you can get your hands on Meyer lemons. That’s actually what kicked off my “35-pound lemon situation.” They’re slightly sweeter and less sharp.
That said, don’t overthink it. Good lemons are available year-round, so if you’ve got them now, you’re good to go.
Lemons in a Jar (Preserved Lemons Recipe)
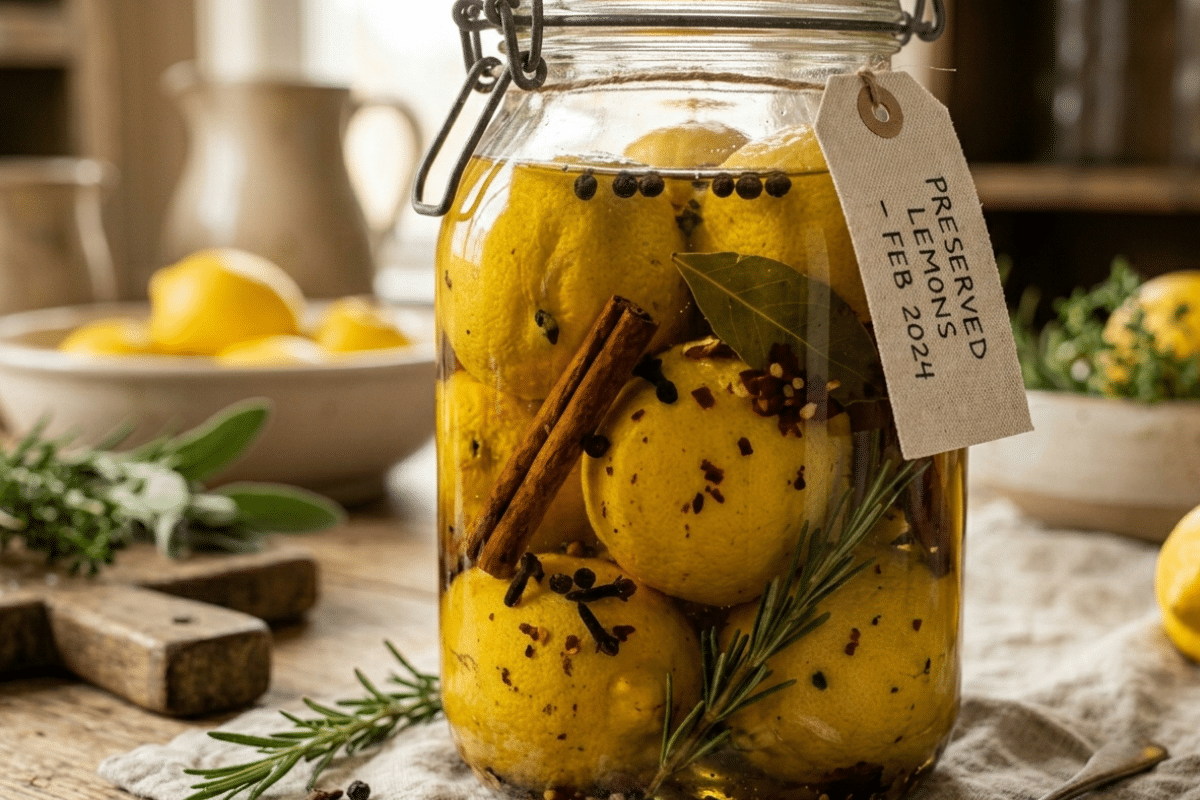
Before we get into the nitty-gritty, let me say this: this is one of those recipes that sounds more complicated than it actually is. You’re not doing anything fancy here. You’re just giving lemons a long, slow soak in a salty, spiced bath and letting time do the heavy lifting. No special skills required, just a little patience and a couple of jars.
What You’ll Need
- 2 (one-quart) glass canning jars with lids
- 4 1/2 quarts water
- 7 to 10 whole lemons
- 2/3 cup salt
- 2 (3-inch) cinnamon sticks
- 4 teaspoons coriander seeds
- 2 teaspoons black peppercorns
- 8 whole cloves
- 1 cup olive oil
If you’ve got slightly more or fewer lemons, don’t stress. This recipe is forgiving. The goal is simply to pack the jars snugly so everything stays tucked under the brine.
Step-by-Step Instructions
1. Prep the lemons
Give your lemons a really good wash. Since you’ll be using the peel, this is where clean actually matters. If I’m being honest, this is the step most people rush… and it’s the one you shouldn’t.
2. Blanch for better texture
Bring 3 quarts of water to a boil in a nonreactive pot (stainless steel is your friend here). Add the lemons and let them boil for about 3 minutes. This quick step softens the peel so you don’t end up waiting forever for them to mellow in the jar. Drain, then transfer to cold water until they’re cool enough to handle. Drain again and set aside.
3. Make the brine
In a saucepan, combine:
- 1 1/2 quarts water
- Salt
- Cinnamon sticks, coriander seeds, peppercorns, and cloves
Bring everything to a boil, then remove from heat and stir in the olive oil. Your kitchen will smell incredible at this point… like you’re doing something far more impressive than you actually are.
4. Pack the jars
Place the lemons into hot, sterilized jars, pressing them down gently so they fit snugly. If you happen to have lemon leaves, tuck a few in. Totally optional, but a nice little bonus if you’ve got access to them. Don’t be shy here. A tighter pack means the lemons stay submerged, which is exactly what you want.
5. Add the brine
Pour the hot brine over the lemons, leaving about 1/2 inch of space at the top. Make sure the lemons are fully covered. If one tries to float up (they love to do that), just press it back down before sealing. Seal with lids, and you’re done with the hands-on part.
And that’s it. The hardest part of this recipe isn’t making it… it’s waiting for it.
6. Let Them Do Their Thing
Store sealed jars in a cool, dark place for 2 months before using. The brine may darken slightly. That’s normal. Once opened, keep in the refrigerator and use within 6 months.
Once you’ve made this once, you can tweak it based on what you like. Try:
- Adding bay leaves for a deeper savory note
- Swapping coriander for mustard seeds
- Including garlic cloves for extra punch
- Using Meyer lemons for a softer, slightly sweet flavor
This is one of those recipes that rewards experimentation without punishing mistakes.
How to Use Preserved Lemons (Without Overthinking It)

This is usually the moment people pause. You’ve got this beautiful jar sitting in your fridge… and now you’re wondering if you need a whole new cooking style to use it. You don’t. Think of preserved lemons as the thing you reach for when a dish tastes “fine” but needs something to wake it up.
The biggest shift? You’re mostly using the peel, not the whole lemon. It softens over time and becomes the best part: salty, bright, and packed with flavor. Here are a few easy ways to start using them right away:
- Finely chop and stir into rice, quinoa, or couscous
- Add to roasted vegetables right before serving (especially carrots, potatoes, or anything a little sweet)
- Mix into olive oil for a quick dressing or drizzle (just chop, stir, and pour)
- Tuck into chicken dishes (under the skin, over the top, or mixed into a marinade)
- Add to a simple snack board (think olives, nuts, maybe a little cheese)
Start small. The first time I used preserved lemons, I treated them like fresh ones… and let’s just say that was a learning experience. A little truly goes a long way. If they taste too salty for your liking, give them a quick rinse or use a smaller amount. Easy fix. When in doubt, mince them finely. The smaller the pieces, the more evenly that flavor spreads through a dish.
Once you get comfortable, you’ll start spotting opportunities everywhere… soups, salads, leftovers that need help.
Storage, Safety, and Shelf Life
A little care here keeps everything safe and delicious:
- Always use clean, sterilized jars
- Make sure lemons stay submerged in brine
- Refrigerate after opening
- Discard if you notice off smells or mold
If you’re gifting these, add a simple note:
“Preserved lemons add a bright, salty flavor to soups, stews, salads, and grain dishes. Best used within 6 months. Refrigerate after opening.”
There’s something satisfying about opening your fridge and seeing a jar of something you made yourself, especially when it turns everyday meals into something a little more memorable.
And if you ever find yourself with more lemons than you know what to do with… well, now you’ve got a pretty great answer.
Frequently Asked Questions
How long do preserved lemons last?
Unopened jars can last several months in a cool, dark place. Once opened, store in the refrigerator and use within 6 months.
Can I use regular lemons instead of Meyer lemons?
Absolutely. Regular lemons work beautifully and are available year-round. Meyer lemons simply add a slightly sweeter flavor.
Why do I need to wait two months?
That time allows the salt and brine to soften the peel and develop the signature flavor. It’s hands-off time, but it makes all the difference.
Do preserved lemons go bad?
They can if not stored properly. Always keep them submerged in brine and refrigerated after opening.
What part of the lemon do you use?
Mostly the peel. It becomes tender and flavorful, while the pulp is typically used more sparingly.
Preserved Lemons
Ingredients
- 4 1/2 quarts water divided
- 7 to 10 whole lemons washed well
- 2/3 cup salt
- 2 3-inch cinnamon sticks
- 4 teaspoons coriander seeds
- 2 teaspoons black peppercorns
- 8 whole cloves
- 1 cup olive oil
Instructions
- Give your lemons a really good scrub. This matters more than it sounds since the peels are the star of the show.
- Bring 3 quarts of water to a boil in a nonreactive pot. Add lemons and boil for 3 minutes.
- Drain, then transfer to cold water until cool enough to handle. Drain again and set aside.
- In the same pot, combine the remaining 1 1/2 quarts water, salt, cinnamon sticks, coriander, peppercorns, and cloves.
- Bring to a boil, then remove from heat and stir in the olive oil.
- Place the lemons into hot, clean, sterilized jars. Don’t overthink the arrangement. Just fit them in snugly.
- Ladle the hot brine over the lemons, leaving about 1/2 inch of space at the top.
- Wipe rims if needed, seal with lids, and store in a cool, dark place.
- Let the lemons cure for 2 months before using.
Notes
- Chop finely into salads
- Stir into couscous or rice
- Add to soups and stews for a bright, salty kick
- Serve alongside olives and nuts for an easy appetizer
Nutrition
Question: Have you ever made something that sat in your fridge… and you weren’t quite sure how to use it? Share in the comments below.
EverydayCheapskate™ is reader-supported. We participate in the Amazon Services LLC Associates Program and other affiliate advertising programs, designed to provide a means for us to earn from qualifying purchases, at no cost to you.

More from Everyday Cheapskate
 https://www.everydaycheapskate.com/wp-content/uploads/20260703-home-decor.png
800
1200
Mary Hunt
https://www.everydaycheapskate.com/wp-content/uploads/EC-Logo-by-Mary-Hunt-Tagline-Trimmed.png
Mary Hunt2026-07-03 20:46:552026-07-03 20:46:5510 Everyday Items You Never Think to Wash (But Should)
https://www.everydaycheapskate.com/wp-content/uploads/20260703-home-decor.png
800
1200
Mary Hunt
https://www.everydaycheapskate.com/wp-content/uploads/EC-Logo-by-Mary-Hunt-Tagline-Trimmed.png
Mary Hunt2026-07-03 20:46:552026-07-03 20:46:5510 Everyday Items You Never Think to Wash (But Should) https://www.everydaycheapskate.com/wp-content/uploads/20260630-a-lit-sparkler-with-an-american-flag-in-the-background-4th-of-july-hacks-tips-and-recipes.png
800
1200
Mary Hunt
https://www.everydaycheapskate.com/wp-content/uploads/EC-Logo-by-Mary-Hunt-Tagline-Trimmed.png
Mary Hunt2026-06-30 21:44:502026-06-30 21:44:5034 Fourth of July Recipes and DIY Hacks for a Stress-Free Holiday
https://www.everydaycheapskate.com/wp-content/uploads/20260630-a-lit-sparkler-with-an-american-flag-in-the-background-4th-of-july-hacks-tips-and-recipes.png
800
1200
Mary Hunt
https://www.everydaycheapskate.com/wp-content/uploads/EC-Logo-by-Mary-Hunt-Tagline-Trimmed.png
Mary Hunt2026-06-30 21:44:502026-06-30 21:44:5034 Fourth of July Recipes and DIY Hacks for a Stress-Free Holiday https://www.everydaycheapskate.com/wp-content/uploads/20260629-wooden-die-spell-july-with-patriotic-decor-in-background.png
800
1200
Mary Hunt
https://www.everydaycheapskate.com/wp-content/uploads/EC-Logo-by-Mary-Hunt-Tagline-Trimmed.png
Mary Hunt2026-06-29 21:07:092026-06-29 21:10:297 Best Things to Buy in July for Huge Summer Savings
https://www.everydaycheapskate.com/wp-content/uploads/20260629-wooden-die-spell-july-with-patriotic-decor-in-background.png
800
1200
Mary Hunt
https://www.everydaycheapskate.com/wp-content/uploads/EC-Logo-by-Mary-Hunt-Tagline-Trimmed.png
Mary Hunt2026-06-29 21:07:092026-06-29 21:10:297 Best Things to Buy in July for Huge Summer Savings https://www.everydaycheapskate.com/wp-content/uploads/20260628-Grilled-Peaches-with-Balsamic-and-Blue-Cheese-1.png
800
1200
Mary Hunt
https://www.everydaycheapskate.com/wp-content/uploads/EC-Logo-by-Mary-Hunt-Tagline-Trimmed.png
Mary Hunt2026-06-29 09:38:342026-06-29 09:38:34Summer Grilled Peaches with Balsamic and Blue Cheese
https://www.everydaycheapskate.com/wp-content/uploads/20260628-Grilled-Peaches-with-Balsamic-and-Blue-Cheese-1.png
800
1200
Mary Hunt
https://www.everydaycheapskate.com/wp-content/uploads/EC-Logo-by-Mary-Hunt-Tagline-Trimmed.png
Mary Hunt2026-06-29 09:38:342026-06-29 09:38:34Summer Grilled Peaches with Balsamic and Blue Cheese https://www.everydaycheapskate.com/wp-content/uploads/20260625-a-rustic-wooden-christmas-tree-in-the-sand-on-the-beach.png
800
1200
Mary Hunt
https://www.everydaycheapskate.com/wp-content/uploads/EC-Logo-by-Mary-Hunt-Tagline-Trimmed.png
Mary Hunt2026-06-26 11:34:132026-06-26 11:36:44Christmas in June? Try This Amazon Prime Day Gift Guide
https://www.everydaycheapskate.com/wp-content/uploads/20260625-a-rustic-wooden-christmas-tree-in-the-sand-on-the-beach.png
800
1200
Mary Hunt
https://www.everydaycheapskate.com/wp-content/uploads/EC-Logo-by-Mary-Hunt-Tagline-Trimmed.png
Mary Hunt2026-06-26 11:34:132026-06-26 11:36:44Christmas in June? Try This Amazon Prime Day Gift Guide https://www.everydaycheapskate.com/wp-content/uploads/20260624-why-does-my-ice-taste-weird-soda-tea-lemonade-juice.png
800
1200
Mary Hunt
https://www.everydaycheapskate.com/wp-content/uploads/EC-Logo-by-Mary-Hunt-Tagline-Trimmed.png
Mary Hunt2026-06-24 17:10:532026-06-24 17:10:53Why Does My Ice Taste Weird? Here’s the Answer
https://www.everydaycheapskate.com/wp-content/uploads/20260624-why-does-my-ice-taste-weird-soda-tea-lemonade-juice.png
800
1200
Mary Hunt
https://www.everydaycheapskate.com/wp-content/uploads/EC-Logo-by-Mary-Hunt-Tagline-Trimmed.png
Mary Hunt2026-06-24 17:10:532026-06-24 17:10:53Why Does My Ice Taste Weird? Here’s the Answer https://www.everydaycheapskate.com/wp-content/uploads/20260622-a-single-car-garaged-with-beautiful-flowers-along-landscape-beds-things-ruined-by-heat-in-the-garage.png
800
1200
Mary Hunt
https://www.everydaycheapskate.com/wp-content/uploads/EC-Logo-by-Mary-Hunt-Tagline-Trimmed.png
Mary Hunt2026-06-22 20:24:432026-06-22 20:24:4325 Things Summer Heat Can Ruin in Your Garage
https://www.everydaycheapskate.com/wp-content/uploads/20260622-a-single-car-garaged-with-beautiful-flowers-along-landscape-beds-things-ruined-by-heat-in-the-garage.png
800
1200
Mary Hunt
https://www.everydaycheapskate.com/wp-content/uploads/EC-Logo-by-Mary-Hunt-Tagline-Trimmed.png
Mary Hunt2026-06-22 20:24:432026-06-22 20:24:4325 Things Summer Heat Can Ruin in Your Garage https://www.everydaycheapskate.com/wp-content/uploads/20260621-amazon-prime-day-2026-is-coming-everyday-cheapskate-mary-hunt-guide-for-cheapskates.png
800
1200
Mary Hunt
https://www.everydaycheapskate.com/wp-content/uploads/EC-Logo-by-Mary-Hunt-Tagline-Trimmed.png
Mary Hunt2026-06-21 15:48:502026-06-21 15:48:50The Cheapskate’s Guide to Winning Prime Day 2026
https://www.everydaycheapskate.com/wp-content/uploads/20260621-amazon-prime-day-2026-is-coming-everyday-cheapskate-mary-hunt-guide-for-cheapskates.png
800
1200
Mary Hunt
https://www.everydaycheapskate.com/wp-content/uploads/EC-Logo-by-Mary-Hunt-Tagline-Trimmed.png
Mary Hunt2026-06-21 15:48:502026-06-21 15:48:50The Cheapskate’s Guide to Winning Prime Day 2026 https://www.everydaycheapskate.com/wp-content/uploads/20260622-prime-day-is-here-crockpot-steamer-blackstone-griddle.png
800
1200
Mary Hunt
https://www.everydaycheapskate.com/wp-content/uploads/EC-Logo-by-Mary-Hunt-Tagline-Trimmed.png
Mary Hunt2026-06-21 12:11:092026-06-26 16:46:21Your Guide to the Best Amazon Prime Day Deals of 2026
https://www.everydaycheapskate.com/wp-content/uploads/20260622-prime-day-is-here-crockpot-steamer-blackstone-griddle.png
800
1200
Mary Hunt
https://www.everydaycheapskate.com/wp-content/uploads/EC-Logo-by-Mary-Hunt-Tagline-Trimmed.png
Mary Hunt2026-06-21 12:11:092026-06-26 16:46:21Your Guide to the Best Amazon Prime Day Deals of 2026

I freeze mine.