
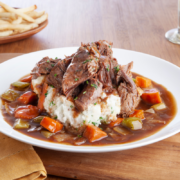
The Old-School Beef & Vegetable Braise That Tastes Like Home

Some recipes try to be everything. This one doesn’t. This Instant Pot Rustic Beef & Vegetable Braise leans on meat, time, and heat, the way home cooks did long before boxed broth showed up in every fridge. Chuck roast releases its own rich jus under pressure, tomato juice adds just enough brightness, and a quick oven finish brings everything together with real flavor. It’s not flashy. It’s reliable, affordable, and deeply satisfying, the kind of dinner that feels like you knew what you were doing all along.

This is the kind of dish you can smell before you see it. As the Instant Pot does its work, the chuck roast releases a surprising amount of liquid on its own, creating a rich, beefy jus that tastes earned, not poured from a box. It’s the same principle cooks relied on long before recipes came with a shopping list full of extras.
This dish likely comes out rich but not thick like gravy, more roasty than soupy, and deeply beefy, with vegetables that taste like themselves instead of broth. The carrots stay sweet, the celery holds its backbone, and the onions melt into the background where they belong.
This recipe leans on meat, time, and heat and trusts them to do what they’ve always done best. The pressure cooker tenderizes and concentrates, and the oven finish seals the deal, coaxing out caramelization and depth you simply can’t rush. This isn’t a brothy stew. It’s a rich, roast-style braise finished in the oven for flavor.
The result is a bowl you want to linger over. The kind you eat slowly, maybe with a piece of bread nearby, appreciating how uncomplicated food can still feel deeply satisfying. It doesn’t try to impress. It just delivers.
What You’ll Need
Chuck Roast
Chuck has enough fat and connective tissue to break down beautifully under pressure, turning tough cuts into fork-tender bites and releasing its own rich jus as it cooks. Trim the excess fat, but don’t get fussy. A little marbling is what gives this braise its depth. If chuck isn’t available, a bottom round or shoulder roast will work, though the texture will be slightly leaner.
Onion
Thinly sliced onion melts into the background, adding sweetness and body without announcing itself. Yellow onions are ideal, but white or sweet onions are fine.
Celery
Celery brings balance. It keeps the dish from tasting heavy and adds a subtle savory note that plays well with beef. Cutting it on the diagonal gives it enough presence to hold up through pressure cooking and the oven finish.
Carrots
Carrots add natural sweetness and structure. Thick, diagonal cuts keep them from disappearing into mush and give you something satisfying to sink your fork into.
Tomato Juice
Tomato juice adds acidity and a little sweetness without turning the dish into a tomato-forward braise. It’s lighter, softer, and very mid-century home-cooking in spirit. If you’re out, crushed tomatoes diluted with a bit of water will do in a pinch, but tomato juice keeps the balance just right.
Salt
Salt does more than season. It draws out moisture from the meat and vegetables, helping build that self-made beef jus as everything cooks. Start with what’s listed and adjust at the end.
Sugar
Just a small amount, but it earns its keep. Sugar rounds out the acidity from the tomato juice and helps with browning and caramelization during the oven finish. You won’t taste sweetness. You’ll notice depth. If you prefer, a drizzle of honey or a pinch of brown sugar works just as well.
Meat, Time, and Heat: The Old-School Method
1. Start With Everything in the Pot
This isn’t a layering exercise or a test of your knife skills. Everything goes into the Instant Pot at once, and that’s exactly the point. Under pressure, the chuck roast releases a surprising amount of liquid on its own, mingling with the vegetables and seasonings to create a rich, self-made jus.
2. Let Pressure Do What Time Used To
Thirty-five minutes at high pressure stands in for the long, slow simmer cooks once planned an afternoon around. Tough fibers soften, flavors concentrate, and the meat turns tender without losing its shape. When the timer ends, give it a short rest. Those few minutes matter. They let everything settle and come together instead of being rushed straight to the table.
3. Pause Before You Finish
At this point, the dish is cooked but it’s not finished. Transferring everything to a casserole or oven-safe dish isn’t about tradition for tradition’s sake. It’s about giving the surface a chance to change. Pressure cooking creates moisture; the oven balances it.
4. Finish With High Heat
A hot, uncovered oven does what the Instant Pot can’t. The top caramelizes, the flavors deepen, and the sauce tightens just enough… rich but not thick like gravy. The meat takes on color, the vegetables roast at the edges, and the whole dish shifts from “good” to something you’ll want to linger over.
How to Serve, Store, and Reheat Braised Beef
This braise doesn’t need much help. A simple bowl and a fork will do just fine. If you want to round things out, serve it with something that soaks up the juices. Think a slice of crusty bread, a spoonful of mashed potatoes, or even buttered noodles. Keep the sides simple and let the beef be the point. This is a sit-down, exhale kind of dinner.
Like most good braises, this one gets better after a night in the fridge. Let it cool, then store it in a covered container for up to three days. The flavors settle, the sauce tightens slightly, and tomorrow’s dinner becomes an even easier win. If you’re thinking ahead, it also freezes well for up to two months. Thaw overnight in the refrigerator for best results.
Reheat gently on the stovetop or in a covered dish in the oven until warmed through. If the sauce has thickened more than you’d like, a small splash of water or broth will bring it right back. Avoid high heat. You’re warming, not cooking all over again.
This instant pot rustic beef & vegetable braise is the kind of meal that rewards planning just enough to make life easier later. Cook once, eat well twice, and enjoy knowing you’ve got something solid waiting in the fridge.
Instant Pot Rustic Beef & Vegetable Braise
Ingredients
- 2 pounds beef chuck roast trimmed and cut into 1–2 inch chunks
- 1 medium onion thinly sliced
- 2 stalks celery sliced diagonally into thick pieces
- 6 carrots sliced diagonally into thick pieces
- ½ cup tomato juice
- 2 teaspoons salt
- 1 tablespoon sugar
Instructions
- Place the beef, onion, celery, carrots, tomato juice, salt, and sugar directly into the Instant Pot. Stir lightly to distribute ingredients.
- Secure the lid and select the Stew/Meat setting (or Manual/High Pressure). Set the timer for 35 minutes.
- When cooking is complete, allow the pressure to release naturally for 10 minutes, then carefully use quick release to vent remaining pressure.
- Preheat oven to 400°F. Transfer the beef, vegetables, and cooking liquid to an oven-safe casserole or baking dish, spreading everything into an even layer.
- Place the dish in the oven, uncovered, and bake for 10–20 minutes, until the top begins to caramelize and the sauce tightens slightly.
- Remove from oven and serve hot.
Notes
Nutrition
Question: Do you prefer recipes that rely on a long ingredient list or ones that trust meat, time, and heat to do the work? Share your preference in the comments below.
EverydayCheapskate™ is reader-supported. We participate in the Amazon Services LLC Associates Program and other affiliate advertising programs, designed to provide a means for us to earn from qualifying purchases, at no cost to you.

More from Everyday Cheapskate
 https://www.everydaycheapskate.com/wp-content/uploads/20260721-frozen-bags-of-produce-strawberries-raspberries-peas-peppers.png
800
1200
Mary Hunt
https://www.everydaycheapskate.com/wp-content/uploads/EC-Logo-by-Mary-Hunt-Tagline-Trimmed.png
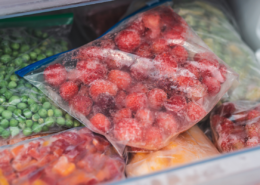
Mary Hunt2026-07-21 12:14:122026-07-21 12:14:14Freeze Summer Produce Now to Taste It All Winter Long
https://www.everydaycheapskate.com/wp-content/uploads/20260721-frozen-bags-of-produce-strawberries-raspberries-peas-peppers.png
800
1200
Mary Hunt
https://www.everydaycheapskate.com/wp-content/uploads/EC-Logo-by-Mary-Hunt-Tagline-Trimmed.png
Mary Hunt2026-07-21 12:14:122026-07-21 12:14:14Freeze Summer Produce Now to Taste It All Winter Long https://www.everydaycheapskate.com/wp-content/uploads/20260720-slow-cooker-hot-weather-meals-salads-plus-pico-de-gallo-recipes.png
800
1200
Mary Hunt
https://www.everydaycheapskate.com/wp-content/uploads/EC-Logo-by-Mary-Hunt-Tagline-Trimmed.png
Mary Hunt2026-07-20 21:12:192026-07-20 21:15:463 Slow Cooker Summer Salads for Hot Weather Dinners
https://www.everydaycheapskate.com/wp-content/uploads/20260720-slow-cooker-hot-weather-meals-salads-plus-pico-de-gallo-recipes.png
800
1200
Mary Hunt
https://www.everydaycheapskate.com/wp-content/uploads/EC-Logo-by-Mary-Hunt-Tagline-Trimmed.png
Mary Hunt2026-07-20 21:12:192026-07-20 21:15:463 Slow Cooker Summer Salads for Hot Weather Dinners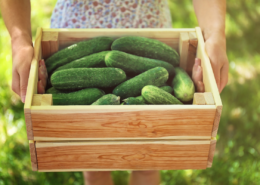 https://www.everydaycheapskate.com/wp-content/uploads/20260717-a-woman-holding-a-crate-of-cucumbers.png
800
1200
Mary Hunt
https://www.everydaycheapskate.com/wp-content/uploads/EC-Logo-by-Mary-Hunt-Tagline-Trimmed.png
Mary Hunt2026-07-17 10:11:072026-07-17 10:13:44Cucumbers Galore? Here’s What to Do With Every Single One
https://www.everydaycheapskate.com/wp-content/uploads/20260717-a-woman-holding-a-crate-of-cucumbers.png
800
1200
Mary Hunt
https://www.everydaycheapskate.com/wp-content/uploads/EC-Logo-by-Mary-Hunt-Tagline-Trimmed.png
Mary Hunt2026-07-17 10:11:072026-07-17 10:13:44Cucumbers Galore? Here’s What to Do With Every Single One https://www.everydaycheapskate.com/wp-content/uploads/20260713-what-to-pack-for-kids-lunchboxes-young-boy-and-girl-eating-a-banana-and-a-sandwich.png
800
1200
Mary Hunt
https://www.everydaycheapskate.com/wp-content/uploads/EC-Logo-by-Mary-Hunt-Tagline-Trimmed.png
Mary Hunt2026-07-13 21:54:132026-07-13 21:54:13Back-to-School Lunch Ideas for a Week (No Boring Sandwiches)
https://www.everydaycheapskate.com/wp-content/uploads/20260713-what-to-pack-for-kids-lunchboxes-young-boy-and-girl-eating-a-banana-and-a-sandwich.png
800
1200
Mary Hunt
https://www.everydaycheapskate.com/wp-content/uploads/EC-Logo-by-Mary-Hunt-Tagline-Trimmed.png
Mary Hunt2026-07-13 21:54:132026-07-13 21:54:13Back-to-School Lunch Ideas for a Week (No Boring Sandwiches) https://www.everydaycheapskate.com/wp-content/uploads/20260609-refreshing-glasses-of-iced-tea-with-fresh-lemon-slices-and-ice-best-way-to-make-tea.png
800
1200
Mary Hunt
https://www.everydaycheapskate.com/wp-content/uploads/EC-Logo-by-Mary-Hunt-Tagline-Trimmed.png
Mary Hunt2026-07-09 18:30:102026-07-09 18:30:10The Best Way to Make Iced Tea? Depends What You’re After
https://www.everydaycheapskate.com/wp-content/uploads/20260609-refreshing-glasses-of-iced-tea-with-fresh-lemon-slices-and-ice-best-way-to-make-tea.png
800
1200
Mary Hunt
https://www.everydaycheapskate.com/wp-content/uploads/EC-Logo-by-Mary-Hunt-Tagline-Trimmed.png
Mary Hunt2026-07-09 18:30:102026-07-09 18:30:10The Best Way to Make Iced Tea? Depends What You’re After https://www.everydaycheapskate.com/wp-content/uploads/20260707-creamy-whipped-frozen-coffee-drink-on-balcony-with-whipped-cream.png
800
1200
Mary Hunt
https://www.everydaycheapskate.com/wp-content/uploads/EC-Logo-by-Mary-Hunt-Tagline-Trimmed.png
Mary Hunt2026-07-07 10:09:112026-07-07 10:09:11I Stopped Buying $7 Frappuccinos. Here’s What I Make Now
https://www.everydaycheapskate.com/wp-content/uploads/20260707-creamy-whipped-frozen-coffee-drink-on-balcony-with-whipped-cream.png
800
1200
Mary Hunt
https://www.everydaycheapskate.com/wp-content/uploads/EC-Logo-by-Mary-Hunt-Tagline-Trimmed.png
Mary Hunt2026-07-07 10:09:112026-07-07 10:09:11I Stopped Buying $7 Frappuccinos. Here’s What I Make Now https://www.everydaycheapskate.com/wp-content/uploads/20260705-Best-Coolers-for-Camping-Road-Trips-and-Beach-Days.png
800
1200
Mary Hunt
https://www.everydaycheapskate.com/wp-content/uploads/EC-Logo-by-Mary-Hunt-Tagline-Trimmed.png
Mary Hunt2026-07-05 13:26:172026-07-05 13:26:17Best Coolers for Camping, Road Trips, and Beach Days
https://www.everydaycheapskate.com/wp-content/uploads/20260705-Best-Coolers-for-Camping-Road-Trips-and-Beach-Days.png
800
1200
Mary Hunt
https://www.everydaycheapskate.com/wp-content/uploads/EC-Logo-by-Mary-Hunt-Tagline-Trimmed.png
Mary Hunt2026-07-05 13:26:172026-07-05 13:26:17Best Coolers for Camping, Road Trips, and Beach Days https://www.everydaycheapskate.com/wp-content/uploads/20260703-home-decor.png
800
1200
Mary Hunt
https://www.everydaycheapskate.com/wp-content/uploads/EC-Logo-by-Mary-Hunt-Tagline-Trimmed.png
Mary Hunt2026-07-03 20:46:552026-07-03 20:46:5510 Everyday Items You Never Think to Wash (But Should)
https://www.everydaycheapskate.com/wp-content/uploads/20260703-home-decor.png
800
1200
Mary Hunt
https://www.everydaycheapskate.com/wp-content/uploads/EC-Logo-by-Mary-Hunt-Tagline-Trimmed.png
Mary Hunt2026-07-03 20:46:552026-07-03 20:46:5510 Everyday Items You Never Think to Wash (But Should) https://www.everydaycheapskate.com/wp-content/uploads/20260630-a-lit-sparkler-with-an-american-flag-in-the-background-4th-of-july-hacks-tips-and-recipes.png
800
1200
Mary Hunt
https://www.everydaycheapskate.com/wp-content/uploads/EC-Logo-by-Mary-Hunt-Tagline-Trimmed.png
Mary Hunt2026-06-30 21:44:502026-06-30 21:44:5034 Fourth of July Recipes and DIY Hacks for a Stress-Free Holiday
https://www.everydaycheapskate.com/wp-content/uploads/20260630-a-lit-sparkler-with-an-american-flag-in-the-background-4th-of-july-hacks-tips-and-recipes.png
800
1200
Mary Hunt
https://www.everydaycheapskate.com/wp-content/uploads/EC-Logo-by-Mary-Hunt-Tagline-Trimmed.png
Mary Hunt2026-06-30 21:44:502026-06-30 21:44:5034 Fourth of July Recipes and DIY Hacks for a Stress-Free Holiday

I’m all about fewer ingredients. I just can’t seem to get everything together for a recipe with a lot of ingredients…. especially if they’re not something I usually have on hand.
Is there enough liquid for this to be made using a traditional pressure cooker?
It should be fine. Let us know how it turns out!
Punch me in the face with flavor!!
The fewer or simpler the ingredients, the better.
Whole foods and spices preferably, NO processed packages/cans with preservatives or coloring.
Yes (100%) to instant pots, crock pots, roasting in the oven, or a stock pot bubbling away on the stove top!
This sounds so good. For those of us who don’t own an instant pot, can this be adapted to a slow cooker or stove top???
Yes, you’ll just have to cook it for a lot longer. Just doa. quick search for how long for the slow cooker and you’ll be able to easily adapt the times.
Can you give directions for using an oven or slow cooker?
Here are some general rules of thumb for using a slow cooker rather than an instapot:
Multiply the Instant Pot pressure cook time by 10, then divide by 60 to get the hours for a slow cooker. Example: 10 minutes on High Pressure = approx. 1.5 to 2 hours on High in a slow cooker.
Liquid Adjustment: Reduce liquids by about 20-25% compared to the Instant Pot recipe, unless it is a soup or stew.
Settings: Use the “Low” setting on a slow cooker for most recipes (usually 6–8 hours) or “High” for faster cooking (3–4 hours).
Dairy/Thickeners: Add dairy products (milk, cream, cheese) or thickeners (cornstarch slurry) during the last 30–60 minutes of cooking to prevent curdling or scorching.