
Better-Than-Takeout Crispy Orange Chicken Recipe


Got a craving for that sweet and tangy orange chicken from your favorite restaurant? This homemade version brings all the flavor—without the restaurant price! With tender chicken and a golden, crispy crust tossed in a rich orange glaze, this dish is easy to make and tastes just like takeout. Perfect for impressing family or just treating yourself on a budget!

Not long ago I got a desperate message from C. J. Coffman who lives in Michigan. He and his family were crazy about a certain item that mysteriously disappeared from Applebee’s® menu.
Coffman is not the first reader I’ve heard from about this turn of events. Early on, readers wanted to know how to make this entree at home, as it could become pricey to eat out as often as their cravings dictated. And then a couple of years ago, this hugely popular dish just up and disappeared from the menu!
Applebee’s response to my inquiry explained that they appreciate customers’ feedback, but that they make changes to their menus from time to time and “We never know when customer favorites will make a comeback.”
In the intervening years, and perhaps prompted by current events creating a new kind of eating out—curbside pickup—the popular dish made a brief return, but with a different name. Crispy Orange Chicken Bowl offered a much smaller portion size, and as we might have guessed, an even higher price. And that was short-lived. As of this update, my research reveals no more orange chicken by any name on any Applebee’s menu.
Coffman closed his letter by telling me what a big fan he is of Everyday Cheapskate, which was a good move on his part. I’m not above a little flattery from time to time.
So, for the C.J. Coffman family and all other Crispy Orange Chicken fans too, here’s a fabulous (more than reasonable) facsimile of their favorite dish. Enjoy!
Why You’ll Love This Crispy Orange Chicken Recipe
When C.J. Coffman first told me about Applebee’s beloved orange chicken disappearing, I knew exactly how he felt. There’s nothing quite like craving your favorite dish only to find it’s no longer on the menu! But here’s the beauty of making it yourself: not only can you bring that restaurant flavor home, but you also know exactly what’s going into it.
This crispy orange chicken is made with fresh, simple ingredients—no preservatives, no mystery sauces, and definitely no frozen shortcuts. The chicken is golden and tender, with a zesty orange glaze that’s balanced perfectly between sweet and tangy. You’ll love how easy it is to recreate this takeout favorite with a homemade twist, giving your family a fresh, delicious meal that’s even better than dining out—without the price tag.
Ingredients for Homemade Orange Chicken
Here’s a breakdown of what you’ll need—and some easy substitutions if you’re missing an ingredient or have dietary preferences.
- Chicken (Boneless, Skinless Breasts, Thighs, or Legs): Tender, juicy chicken is the base of this dish. You can use any cut you like—chicken breasts for leaner meat or thighs for a richer flavor.
- Egg: Used to help the coating stick to the chicken. If you’re avoiding eggs, you can easily swap in a “flax egg” (1 tablespoon ground flaxseed mixed with 3 tablespoons water.)
- Cornstarch: This is key for achieving that perfectly crispy crust. If you’re out of cornstarch, arrowroot powder works just as well as a gluten-free alternative. You can also use rice flour for an extra crispy texture.
- All-Purpose Flour: The flour combines with cornstarch to create the crispy coating. For a gluten-free version, feel free to use a 1:1 gluten-free flour blend, or even chickpea flour if you’re looking for a protein boost.
- Oil for Frying: I recommend a neutral oil with a high smoke point like vegetable oil, canola, or peanut oil. If you’re concerned about frying, you can bake the chicken instead—just coat it in the flour mixture and bake at 400°F for about 20-25 minutes until oven crispy.
- Orange Juice: Freshly squeezed is always best, but if you’re in a pinch, bottled orange juice works fine. You can also substitute with a combination of orange and lemon juice for a slightly tangier kick.
- Hoisin Sauce: This adds that delicious sweet and savory depth of flavor. If you don’t have hoisin, you can mix up a quick substitute with soy sauce, peanut butter, a little honey, and a splash of vinegar to mimic that signature taste.
- Garlic: Fresh garlic adds a punch of flavor to the sauce, but if you’re out, garlic powder will do in a pinch. Just use about 1/4 teaspoon of garlic powder for each clove of fresh garlic.
- Orange Zest: This fresh zest is the secret to that bold citrus punch. If you’re in a hurry or don’t have an orange, lemon zest will give you a similar bright, tangy flavor.
- Sugar: Granulated white sugar is what gives the glaze its sweetness. You can swap it for honey, maple syrup, or even coconut sugar if you’re aiming for a less refined alternative. Just keep in mind that these substitutes may alter the consistency of the sauce slightly, so adjust accordingly.
Step-by-Step Guide to Making Orange Chicken
Making this crispy orange chicken is easier than you might think—and it’s guaranteed to be the star of your dinner table. Here’s a step-by-step guide to walk you through it:
Step 1: Prep the Chicken
Start by cutting your chicken into bite-sized pieces. If you’re using chicken breasts, trim off any fat before slicing. Then, season the chicken with a little salt and pepper. This will help bring out the flavor before the crispy coating goes on.
Step 2: Make the Coating
In one bowl, whisk together the egg and a bit of water. In another bowl, combine the cornstarch and flour (plus a pinch of salt for seasoning). Dip each piece of chicken into the egg mixture first, then coat it in the flour mixture, pressing lightly to make sure it’s fully covered. This is where the crispy magic happens!
Step 3: Fry the Chicken
Heat up a few tablespoons of oil in a deep skillet over medium-high heat. Once the oil is hot (but not smoking!), add the chicken pieces in a single layer. Fry in batches if needed—this helps keep the chicken crispy. Cook for 3-4 minutes on each side, until golden and crunchy. Don’t crowd the pan, or it might steam instead of fry.
Step 4: Make the Orange Sauce
While the chicken is frying, it’s time to make that irresistible orange glaze. In a separate pan, combine your fresh orange juice, hoisin sauce, garlic, sugar, and a dash of orange zest. Let it simmer gently, stirring occasionally, until the sauce thickens into a glossy, syrupy perfection. If it’s too thick, just add a splash of water to reach your desired consistency.
Step 5: Combine and Coat
Once all the chicken is fried and crispy, pour the orange sauce over the chicken in the skillet. Toss everything together gently so each piece of chicken is beautifully coated in that sticky, sweet, and tangy goodness.
Step 6: Serve and Enjoy
Serve the orange chicken hot over a bed of steamed rice (or noodles, if that’s more your vibe). Garnish with a sprinkle of sesame seeds and green onions for a pop of color and extra flavor.
And just like that, you’ve got a homemade version of crispy orange chicken that’s better than takeout—no preservatives, no frozen food, just fresh, flavorful goodness!
Tips for Perfect Crispy Chicken Every Time
If you’ve ever made crispy chicken at home, you know that the perfect crunch can be elusive. Below are my best tips to ensure your chicken comes out golden, crunchy, and oh-so-delicious, every single time.
1. Use Cornstarch for Extra Crispiness
When mixed with flour, it helps the chicken develop a lighter, crispier crust that holds up beautifully in the sauce. Don’t skip it—it makes all the difference!
2. Don’t Overcrowd the Pan
I get it, you’re eager to fry everything at once, but trust me—this is a crucial step. When you overcrowd the pan, the chicken steams instead of crisps up. Fry in batches, giving each piece enough space to get golden and crisp. It might take a little longer, but it’s worth it!
3. Get the Oil Temperature Right
This one’s huge: the oil needs to be hot enough to instantly crisp up the chicken but not so hot that it burns. Aim for about 375°F (190°C). If you don’t have a thermometer, you can test it by dropping a small piece of bread into the oil—if it browns in about 60 seconds, you’re good to go!
4. Don’t Skip the Paper Towels
After frying, let the chicken rest on paper towels for a minute. This helps absorb any excess oil, leaving you with a crispy, not greasy, piece of chicken.
5. Coat the Chicken Just Before Serving
While the fried chicken stays crispy for a bit, it’s best to coat it in the sauce just before serving. If you add the sauce too early, the crispy coating may start to soften, and that crunch you’re aiming for will fade. Trust me, it’s worth the wait!
FAQ: Common Questions About Orange Chicken
Can I use chicken breast instead of thighs?
Absolutely! While I love using chicken thighs for extra juiciness, chicken breast works just as well. The key is to slice it into bite-sized pieces so it cooks evenly and stays tender. Just keep an eye on it as it cooks, as breast meat can dry out a little faster than thighs.
Can I make this dish gluten-free?
Yes! You can easily make this recipe gluten-free by swapping out the all-purpose flour and cornstarch for gluten-free flour blends. Be sure to double-check the label on your hoisin sauce and make sure it's gluten-free, as some brands may contain wheat. It’s an easy switch for anyone with dietary restrictions!
How can I make the glaze less sweet?
If you’re looking to tone down the sweetness of the glaze, simply reduce the amount of sugar you add. You can also balance it with a little extra soy sauce or rice vinegar for a more savory, tangy flavor. It’s all about adjusting to your taste!
Can I make this ahead of time?
You can! The chicken can be fried ahead of time and stored in the fridge. When you’re ready to serve, reheat it in a hot oven to crisp it up again, and toss with the sauce just before serving. While it’s best fresh, this method works if you need to plan ahead for a busy weeknight.
How do I store leftovers?
Store your leftovers in an airtight container in the fridge for up to 2-3 days. Keep the chicken and sauce separate if possible to prevent the crispy coating from getting soggy. Reheat the chicken in a 350°F oven for about 10 minutes to get it crispy again before adding the sauce.
Can I freeze this?
You can freeze the cooked, uncoated chicken for later use. Just fry it up, let it cool completely, freeze in a single layer on a baking sheet, then store it in a freezer-safe bag or container. When you’re ready to eat, bake it in the oven to crisp it up and then toss with the glaze. It's a great make-ahead option!

Better-Than-Takeout Crispy Orange Chicken
Ingredients
For the Chicken:
- 2 lbs boneless skinless chicken (breast, thighs, or a mix)
- 1 large egg
- 1 tbsp oil
- 1 ½ tsp salt
- ¼ tsp pepper or to taste
- ½ cup + 1 tbsp cornstarch
- ¼ cup all-purpose flour
- Oil for frying
For the Sweet 'n Spicy Orange Glaze:
- 2 tbsp oil from the skillet
- 1 tsp minced garlic
- 1 ½ tsp grated orange zest only the orange part, avoid the bitter white pith
- 1 cup fresh orange juice
- ½ cup hoisin sauce see note
- 1 pinch cayenne pepper optional, for added spice
- ¼ cup white granulated sugar
- Salt and pepper to taste
Instructions
Prepare the Chicken:
- Cut the chicken into 1 ½ to 2-inch bite-sized pieces and place them in a large bowl.
- In a separate bowl, lightly beat the egg, oil, salt, and pepper together. Pour the egg mixture over the chicken and toss to coat. Set aside.
- In another bowl, combine the cornstarch and flour. Stir well, then toss the chicken pieces in the flour mixture until evenly coated.
Fry the Chicken:
- Pour enough oil into a wok or heavy skillet to create a ½-inch deep layer. Heat the oil over high heat until it reaches 375°F (hot!).
- Carefully add the chicken in small batches and fry for 3–4 minutes per batch, turning to ensure the chicken is golden and crispy. Avoid overcrowding the pan to ensure a crispy texture.
- Use a slotted spoon to remove the chicken from the oil and drain on paper towels. Repeat until all the chicken is fried and crispy. Set aside.
Make the Orange Glaze:
- Once the chicken is cooked, reduce the heat under the skillet. Leave about 2 tablespoons of oil in the pan and discard the rest.
- Add the minced garlic and sauté for 1 minute, ensuring the garlic doesn’t burn.
- Add the orange zest, orange juice, hoisin sauce, cayenne pepper (if using), and sugar to the skillet. Stir to combine, then bring to a boil.
- Let the sauce boil for 3 minutes, stirring constantly. Once it thickens to your desired consistency, reduce the heat and simmer for a few more minutes. Taste and adjust seasoning with salt and pepper as needed.
Combine the Chicken and Glaze:
- Pour the glaze over the crispy chicken and toss to coat each piece well.
- Serve the chicken on a bed of freshly cooked white rice. For extra flair, garnish with slivered almonds, crispy noodles, sesame seeds, and stir-fried veggies like broccoli, snow peas, and red peppers. Enjoy!
Notes
Nutrition
Question: What’s your go-to takeout dish you’d love to learn to make at home? Tell us in the comments.
EverydayCheapskate™ is reader-supported. We participate in the Amazon Services LLC Associates Program and other affiliate advertising programs, designed to provide a means for us to earn from qualifying purchases, at no cost to you.

More from Everyday Cheapskate
 https://www.everydaycheapskate.com/wp-content/uploads/20260724-ratatouille-recipe-served-over-white-rice.png
800
1200
Mary Hunt
https://www.everydaycheapskate.com/wp-content/uploads/EC-Logo-by-Mary-Hunt-Tagline-Trimmed.png
Mary Hunt2026-07-25 12:24:422026-07-25 12:24:42End-of-Summer Ratatouille (Uses Everything From the Garden)
https://www.everydaycheapskate.com/wp-content/uploads/20260724-ratatouille-recipe-served-over-white-rice.png
800
1200
Mary Hunt
https://www.everydaycheapskate.com/wp-content/uploads/EC-Logo-by-Mary-Hunt-Tagline-Trimmed.png
Mary Hunt2026-07-25 12:24:422026-07-25 12:24:42End-of-Summer Ratatouille (Uses Everything From the Garden)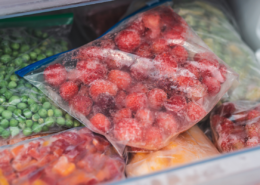 https://www.everydaycheapskate.com/wp-content/uploads/20260721-frozen-bags-of-produce-strawberries-raspberries-peas-peppers.png
800
1200
Mary Hunt
https://www.everydaycheapskate.com/wp-content/uploads/EC-Logo-by-Mary-Hunt-Tagline-Trimmed.png
Mary Hunt2026-07-21 12:14:122026-07-21 12:14:14Freeze Summer Produce Now to Taste It All Winter Long
https://www.everydaycheapskate.com/wp-content/uploads/20260721-frozen-bags-of-produce-strawberries-raspberries-peas-peppers.png
800
1200
Mary Hunt
https://www.everydaycheapskate.com/wp-content/uploads/EC-Logo-by-Mary-Hunt-Tagline-Trimmed.png
Mary Hunt2026-07-21 12:14:122026-07-21 12:14:14Freeze Summer Produce Now to Taste It All Winter Long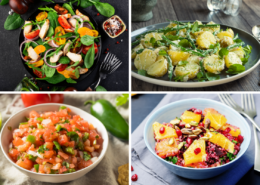 https://www.everydaycheapskate.com/wp-content/uploads/20260720-slow-cooker-hot-weather-meals-salads-plus-pico-de-gallo-recipes.png
800
1200
Mary Hunt
https://www.everydaycheapskate.com/wp-content/uploads/EC-Logo-by-Mary-Hunt-Tagline-Trimmed.png
Mary Hunt2026-07-20 21:12:192026-07-20 21:15:463 Slow Cooker Summer Salads for Hot Weather Dinners
https://www.everydaycheapskate.com/wp-content/uploads/20260720-slow-cooker-hot-weather-meals-salads-plus-pico-de-gallo-recipes.png
800
1200
Mary Hunt
https://www.everydaycheapskate.com/wp-content/uploads/EC-Logo-by-Mary-Hunt-Tagline-Trimmed.png
Mary Hunt2026-07-20 21:12:192026-07-20 21:15:463 Slow Cooker Summer Salads for Hot Weather Dinners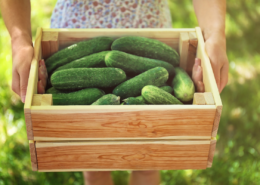 https://www.everydaycheapskate.com/wp-content/uploads/20260717-a-woman-holding-a-crate-of-cucumbers.png
800
1200
Mary Hunt
https://www.everydaycheapskate.com/wp-content/uploads/EC-Logo-by-Mary-Hunt-Tagline-Trimmed.png
Mary Hunt2026-07-17 10:11:072026-07-17 10:13:44Cucumbers Galore? Here’s What to Do With Every Single One
https://www.everydaycheapskate.com/wp-content/uploads/20260717-a-woman-holding-a-crate-of-cucumbers.png
800
1200
Mary Hunt
https://www.everydaycheapskate.com/wp-content/uploads/EC-Logo-by-Mary-Hunt-Tagline-Trimmed.png
Mary Hunt2026-07-17 10:11:072026-07-17 10:13:44Cucumbers Galore? Here’s What to Do With Every Single One https://www.everydaycheapskate.com/wp-content/uploads/20260713-what-to-pack-for-kids-lunchboxes-young-boy-and-girl-eating-a-banana-and-a-sandwich.png
800
1200
Mary Hunt
https://www.everydaycheapskate.com/wp-content/uploads/EC-Logo-by-Mary-Hunt-Tagline-Trimmed.png
Mary Hunt2026-07-13 21:54:132026-07-13 21:54:13Back-to-School Lunch Ideas for a Week (No Boring Sandwiches)
https://www.everydaycheapskate.com/wp-content/uploads/20260713-what-to-pack-for-kids-lunchboxes-young-boy-and-girl-eating-a-banana-and-a-sandwich.png
800
1200
Mary Hunt
https://www.everydaycheapskate.com/wp-content/uploads/EC-Logo-by-Mary-Hunt-Tagline-Trimmed.png
Mary Hunt2026-07-13 21:54:132026-07-13 21:54:13Back-to-School Lunch Ideas for a Week (No Boring Sandwiches) https://www.everydaycheapskate.com/wp-content/uploads/20260609-refreshing-glasses-of-iced-tea-with-fresh-lemon-slices-and-ice-best-way-to-make-tea.png
800
1200
Mary Hunt
https://www.everydaycheapskate.com/wp-content/uploads/EC-Logo-by-Mary-Hunt-Tagline-Trimmed.png
Mary Hunt2026-07-09 18:30:102026-07-09 18:30:10The Best Way to Make Iced Tea? Depends What You’re After
https://www.everydaycheapskate.com/wp-content/uploads/20260609-refreshing-glasses-of-iced-tea-with-fresh-lemon-slices-and-ice-best-way-to-make-tea.png
800
1200
Mary Hunt
https://www.everydaycheapskate.com/wp-content/uploads/EC-Logo-by-Mary-Hunt-Tagline-Trimmed.png
Mary Hunt2026-07-09 18:30:102026-07-09 18:30:10The Best Way to Make Iced Tea? Depends What You’re After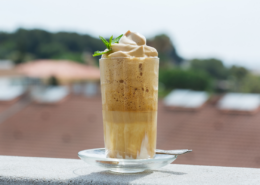 https://www.everydaycheapskate.com/wp-content/uploads/20260707-creamy-whipped-frozen-coffee-drink-on-balcony-with-whipped-cream.png
800
1200
Mary Hunt
https://www.everydaycheapskate.com/wp-content/uploads/EC-Logo-by-Mary-Hunt-Tagline-Trimmed.png
Mary Hunt2026-07-07 10:09:112026-07-07 10:09:11I Stopped Buying $7 Frappuccinos. Here’s What I Make Now
https://www.everydaycheapskate.com/wp-content/uploads/20260707-creamy-whipped-frozen-coffee-drink-on-balcony-with-whipped-cream.png
800
1200
Mary Hunt
https://www.everydaycheapskate.com/wp-content/uploads/EC-Logo-by-Mary-Hunt-Tagline-Trimmed.png
Mary Hunt2026-07-07 10:09:112026-07-07 10:09:11I Stopped Buying $7 Frappuccinos. Here’s What I Make Now https://www.everydaycheapskate.com/wp-content/uploads/20260630-a-lit-sparkler-with-an-american-flag-in-the-background-4th-of-july-hacks-tips-and-recipes.png
800
1200
Mary Hunt
https://www.everydaycheapskate.com/wp-content/uploads/EC-Logo-by-Mary-Hunt-Tagline-Trimmed.png
Mary Hunt2026-06-30 21:44:502026-06-30 21:44:5034 Fourth of July Recipes and DIY Hacks for a Stress-Free Holiday
https://www.everydaycheapskate.com/wp-content/uploads/20260630-a-lit-sparkler-with-an-american-flag-in-the-background-4th-of-july-hacks-tips-and-recipes.png
800
1200
Mary Hunt
https://www.everydaycheapskate.com/wp-content/uploads/EC-Logo-by-Mary-Hunt-Tagline-Trimmed.png
Mary Hunt2026-06-30 21:44:502026-06-30 21:44:5034 Fourth of July Recipes and DIY Hacks for a Stress-Free Holiday https://www.everydaycheapskate.com/wp-content/uploads/20260628-Grilled-Peaches-with-Balsamic-and-Blue-Cheese-1.png
800
1200
Mary Hunt
https://www.everydaycheapskate.com/wp-content/uploads/EC-Logo-by-Mary-Hunt-Tagline-Trimmed.png
Mary Hunt2026-06-29 09:38:342026-06-29 09:38:34Summer Grilled Peaches with Balsamic and Blue Cheese
https://www.everydaycheapskate.com/wp-content/uploads/20260628-Grilled-Peaches-with-Balsamic-and-Blue-Cheese-1.png
800
1200
Mary Hunt
https://www.everydaycheapskate.com/wp-content/uploads/EC-Logo-by-Mary-Hunt-Tagline-Trimmed.png
Mary Hunt2026-06-29 09:38:342026-06-29 09:38:34Summer Grilled Peaches with Balsamic and Blue Cheese

does this turn out crispy?
It does.
I’m hoping I can prepare this recipe with gluten free flour so I can eat it! It sounds wonderful!
How deep of a frying pan do I need?
Mine is about 2 inches. Doesn’t have to be exact.
Five Stars, Mary! This recipe is so easy to follow and it’s packed full of flavor. It will be added to my electronic recipe file folder. THANKS!
That recipe really looks good. Mary, would you be willing to scare up another? This was on the 2/20 menu. It was the chicken, quinoa, rice dish. I think there was a slight citrus touch and possibly cranberries. Oh it was nummy!
it was called cedar grilled lemon chicken I think. Here’s a pic: http://media-cdn.tripadvisor.com/media/photo-s/07/db/76/56/grilled-cedar-lemon-chicken.jpg
This article is great! Thank you