
How to Clean a Shark Vacuum and Why You Should


I’m pretty sure you know by now just how much I love my Shark vacuum cleaner. And given my readers’ letters and comments, I know many of you have Shark Vacuums, too. It’s super important that you know how to clean any vacuum, especially a Shark, to ensure it keeps performing at top efficiency both now and for many years to come!
I love your messages. They make me smile because I understand the range of emotions that comes with using a Shark vacuum for the first time—from amazement to flat-out embarrassment.
Where on earth did all of this dirt and debris come from? I can’t believe what’s been lurking in my carpet!
With all the miles I’ve put on my numerous Shark vacs over the years, I’ve never had one fail. And while the manufacturer boasts that Sharks never lose suction, that is predicated on common sense and regularly cleaning Sharky’s canister, filters, rotating brush, and handle hose.
Here’s a current offering from Amazon for a top of the line Shark Navigator Professional Apex Powered Lift-Away model (there are many!)

Contents
Step 4: Shark vacuum filter cleaning
Step 5: Untangle the roller brush
Signs a Shark vacuum needs cleaning
- Loss of suction: It happens. A big fat hairy fuzzball or a venerable filter that’s stopped filtering can clog a vacuum and cut off suction. Whatever the cause, a loss of suction is the first sign that someone needs a good cleaning.
- Visible dirt left behind: When working at peak performance, a Shark vacuum will never leave behind a trail of crumbs and debris. If it does, it clearly indicates it needs to be cleaned.
- Weird sound: You’ll know it’s bathtime for sure if your Shark sounds like it is gasping for air. That’s because it is. And that can be very hard on the vacuum’s motor.
- Unpleasant odor: A Shark vacuum should never give off a stinky, dirty odor. If it does, consider that a clear sign this vacuum is overdue for a good cleaning.
How to clean a Shark vacuum
In the more than 12 years I’ve been using Shark vacuums, the company has come out with a crazy number of models. However, my experience is that all Shark vacuums have the same basic parts and operate similarly.
What follows are general instructions. Your particular Shark model may vary. If you get stuck, ask in the comment area below, or refer to your owner’s manual.
What you’ll need
✅ warm water
✅ dishwashing liquid
✅ cleaning cloth
✅ wood skewer or similar
✅ flashlight
✅ soft brush like a bottle brush
✅ scissors
Step 1: Disassemble
Make sure the vacuum is disconnected from power, then take it apart. Don’t go crazy here. We’re not talking about removing screws or detaching wires. Remove the dust canister, the foam/felt filters, the HEPA filter and its cover, and the handle hose.
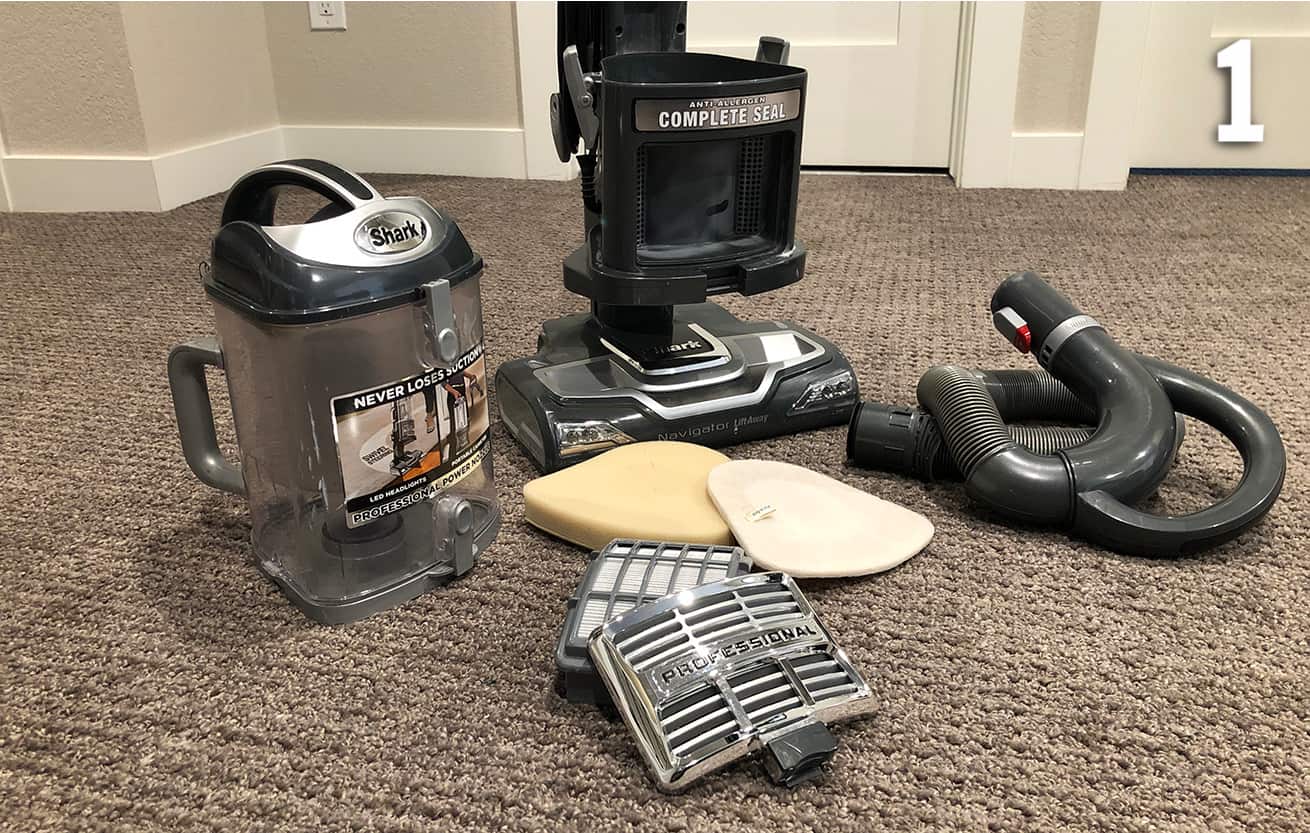
Take note of the placement of the filters so that you can replace them in the same proper order. It’s not difficult. Just pay attention.
Step 2: Check for and clear obstructions
Check every opening. You’re likely to see fuzz, hairballs, and clinging dust. You may find other things like a Lego brick or maybe even a sock!
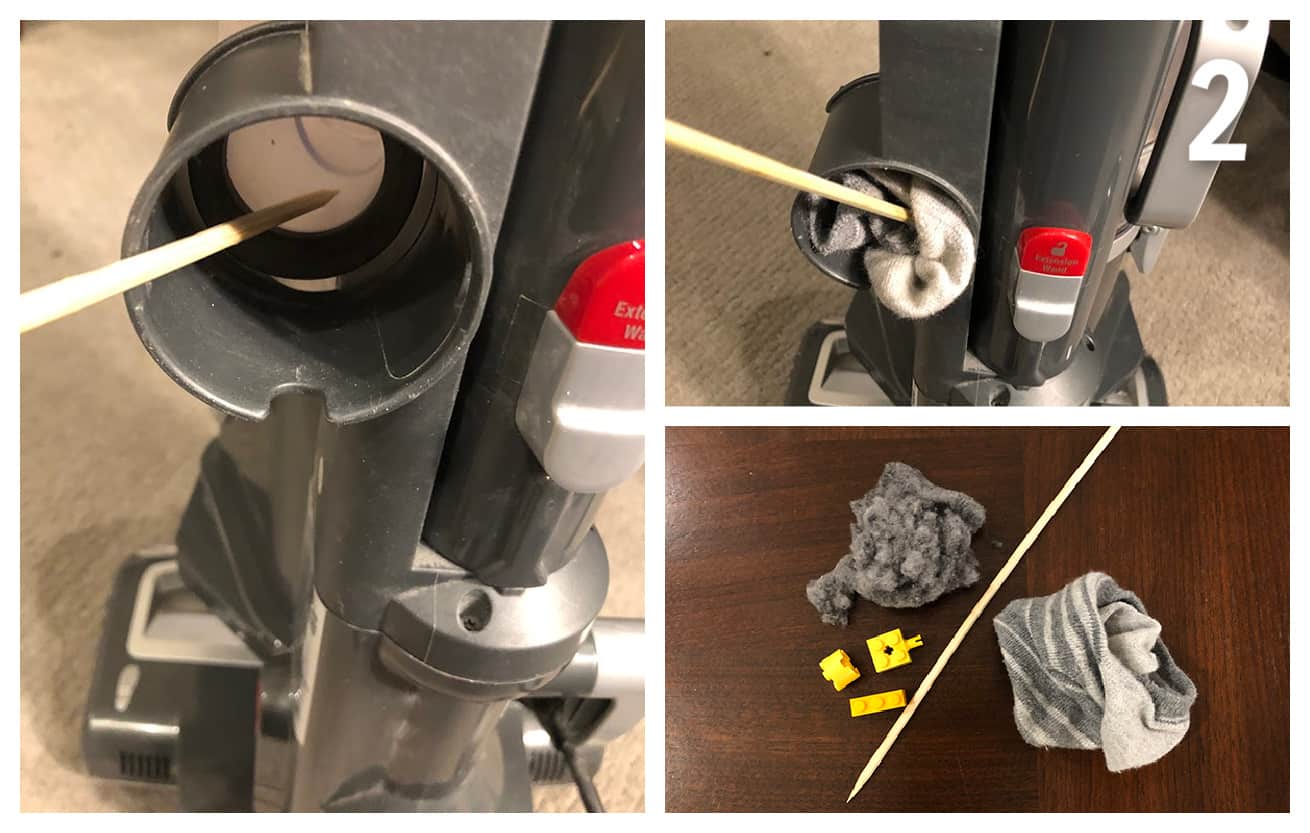
Remove all obstructions using your hand or a damp microfiber cloth. Can’t reach it? A wooden skewer works well to fish out or release any weird accumulation.
Pro Tip
Step 3: Empty and clean the dirt canister
Open both ends of the dirt canister over a trash can and dump out whatever is in there. Now take the canister to a sink of warm soapy water.
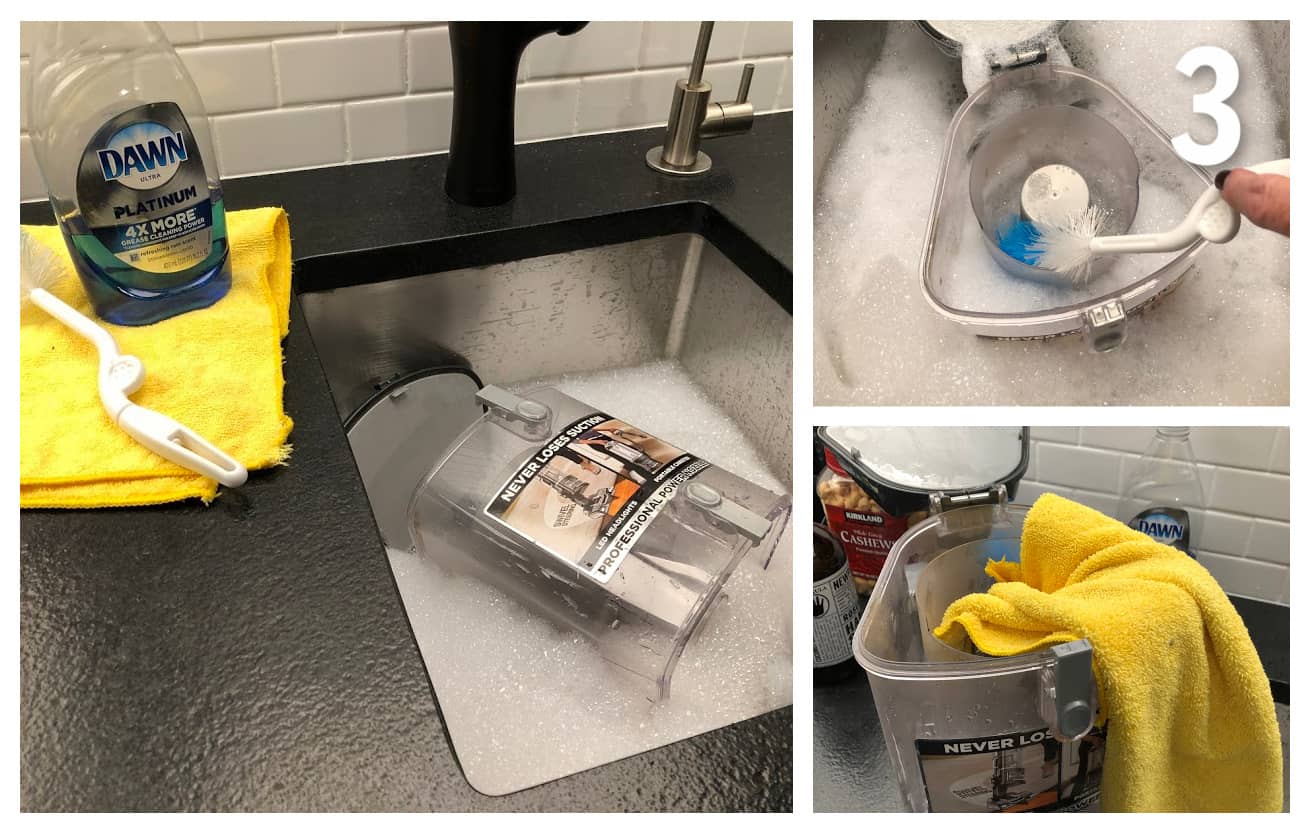
Open both ends of the dust canister and put it right into that warm bath. Using a long-handled brush or a rag, get inside that canister and scrub it clean. Once rinsed, dry it thoroughly with a good microfiber cloth.
Step 4: Shark vacuum filter cleaning
Shark vacuums have an excellent filter system consisting of one or two (depending on the model) thick foam filters plus one made of felt; and a HEPA filter.
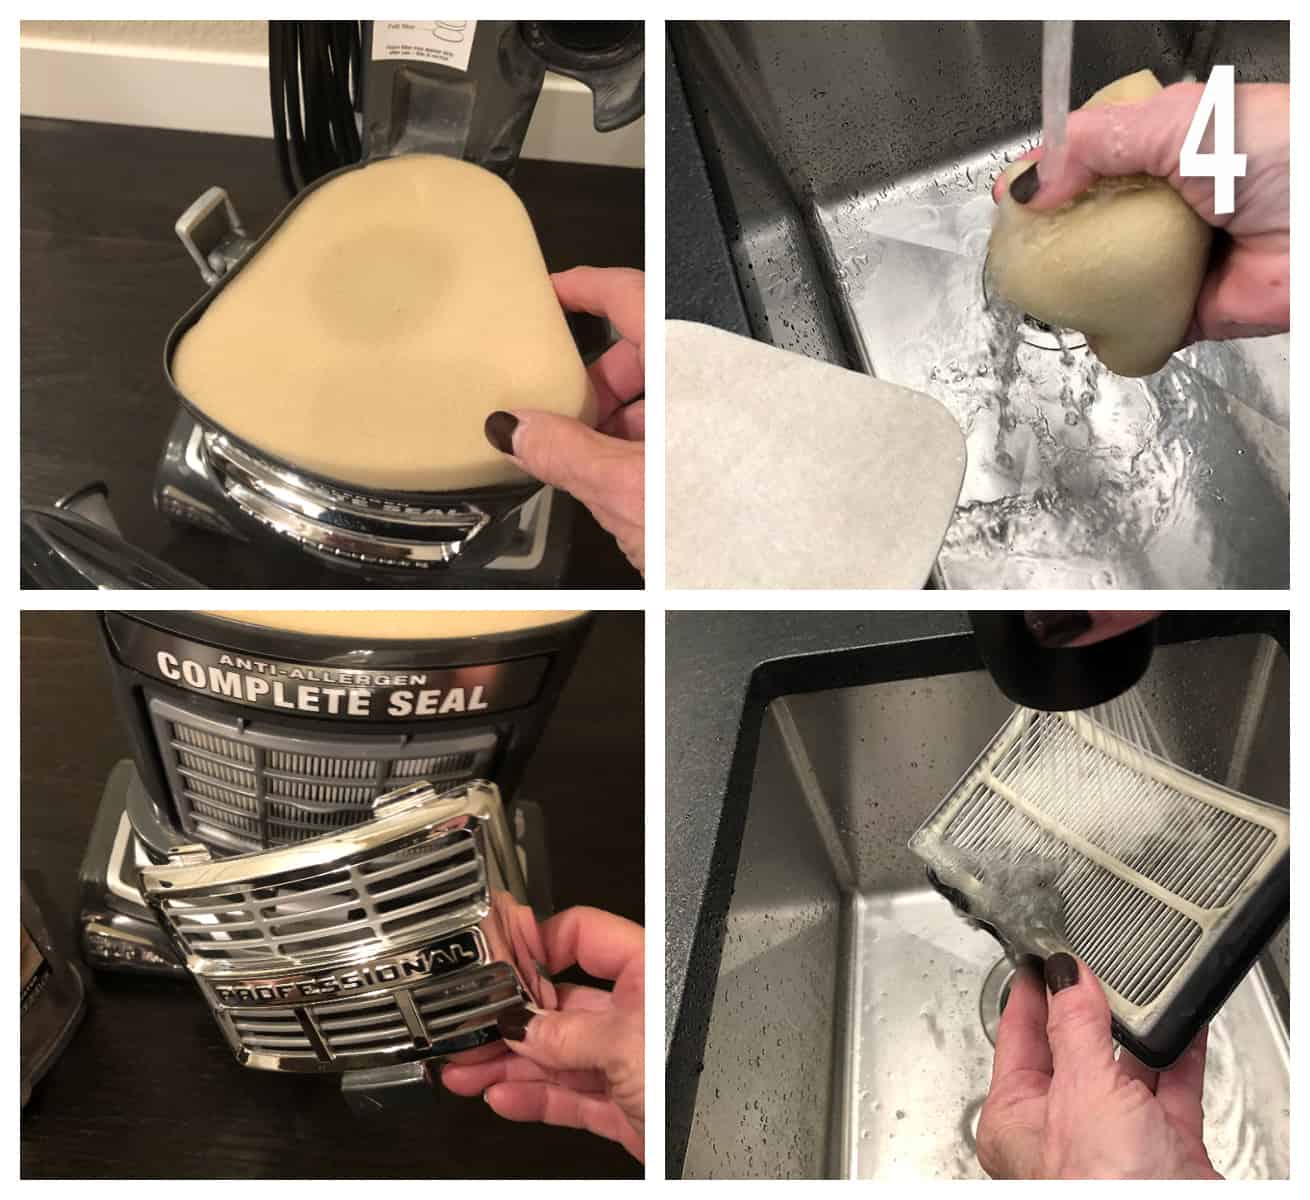
Foam/Felt Filters
Rinse the foam and felt filters in cool, clear water (manufacturer recommends no soap), being especially careful not to damage them.
It takes a good amount of squeezy and scrubbing of the foam filter to get it clean. Once cleaned and rinsed well, the filter(s) may or may not return to their new white appearance. But don’t worry. As long as they are not torn, broken, or otherwise disintegrated, they’ll be just fine, even if they remain stained.
NOTE: The manufacturer does not recommend washing the felt filter. I’m not too fond of dirty felt, so I carefully hand wash and have done so many times with no problem. Do this at your own risk.
HEPA Filter
Most Shark vacuum models have an additional filter—a HEPA filter. This is located on the lower front of the machine behind the filter grill (door). Firmly pull the door off to reveal the HEPA filter and pull out the filter. Rinse the filter well in clear water and allow it to dry fully.
Do not return the filter(s) to the vacuum at this point. They must be completely dry first or prepare for mildew and mold—the last thing you ever want growing inside a vacuum. Set the still-wet filter(s) on the counter so they can air dry. This may require an overnight stay.
Step 5: Clean the rotating brush head
Next, lay the vacuum on the floor to see the rotating brush. You may want to place a bag or towel underneath to catch the debris and dirt you’re about to release.
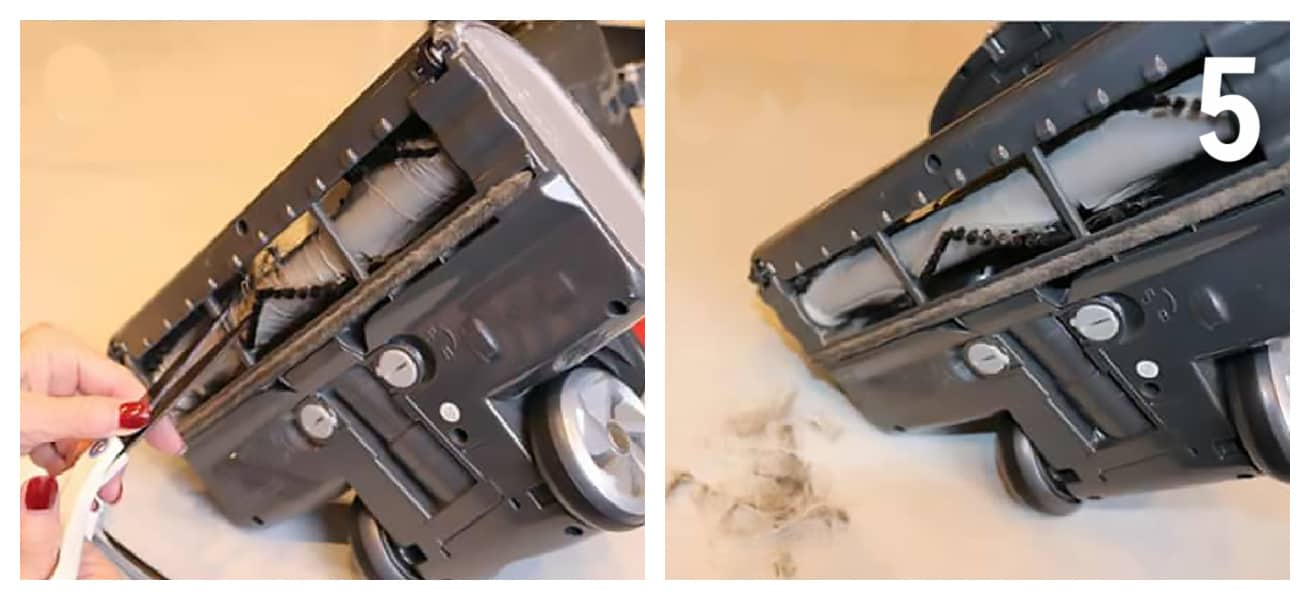
You will likely see strings, hair, and other material wrapped around the brush. This is normal. I use scissors to cut through whatever has wound itself around the brush. That makes it easy to clean up the brush. You may have to pull and tug a bit, but it will come off. You want to return the rotating brush to its nice-and-clean condition.
Step 6: Clean the handle hose
Again, since I am not privy to every Shark model, please check your owner’s manual before cleaning the vacuum handle hose. You want to make sure the hose on your model has no electrical components. None of my Shark vacuums ever have, but let’s make sure.
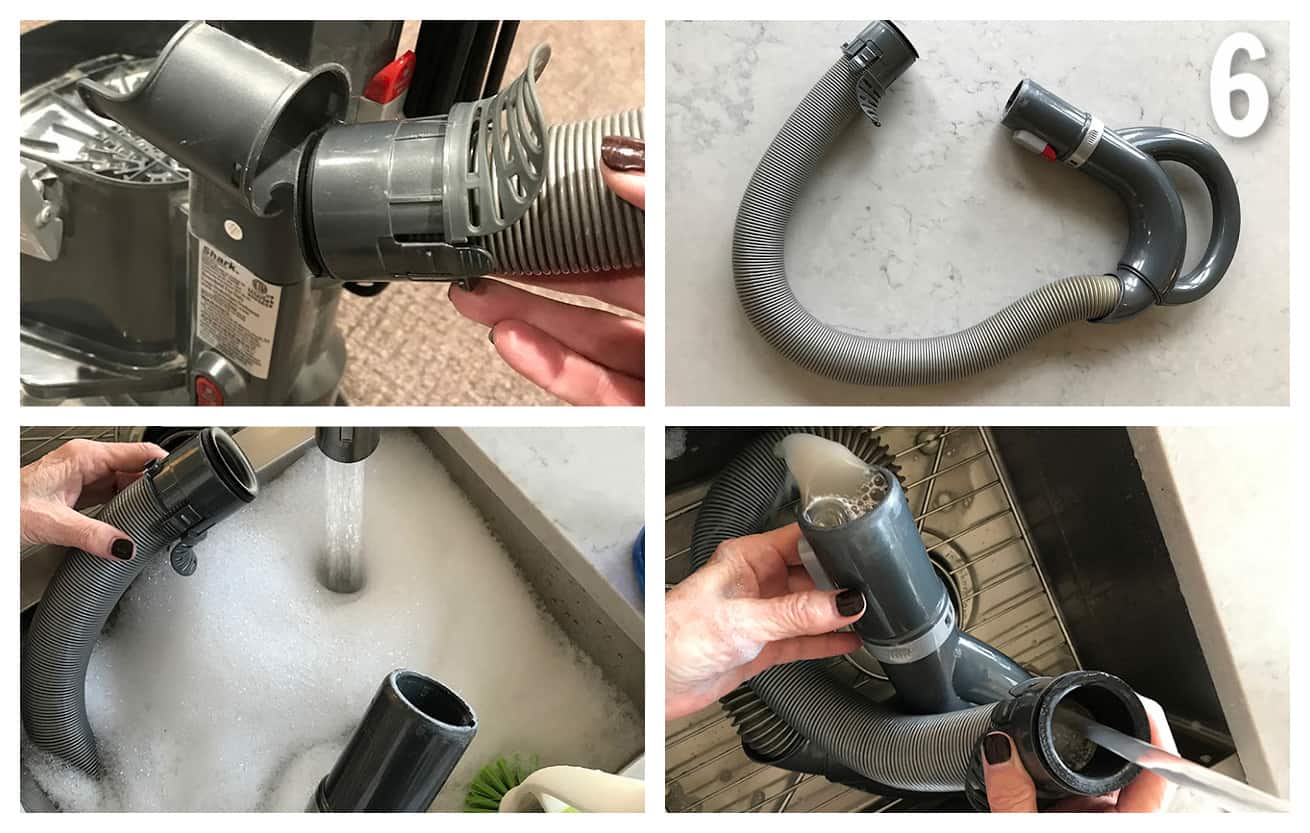
The handle hose on a Shark disconnects easily. When you do this and look inside, you’ll see that it is laden with sticky dust and grime. Removing all of that will help your Sharky to continue to perform smoothly.
Take the hose to your sink or tub of soapy water and drop it in so it can fill with water. Using a brush or rag, reach into the ends to clean it. Warning! Don’t get anything get stuck, especially in that bendy part.
Allow the hose to sit and soak for a while to loosen the grime in the areas you cannot reach easily. Finish by running clean water from a faucet through the hose until it comes out clean and clear from the other end. Find a place to hang the hose vertically so it can drip dry.
Step 7: Reassemble the vacuum
Once the filters and handle hose are completely dry, reassemble your Shark vacuum.
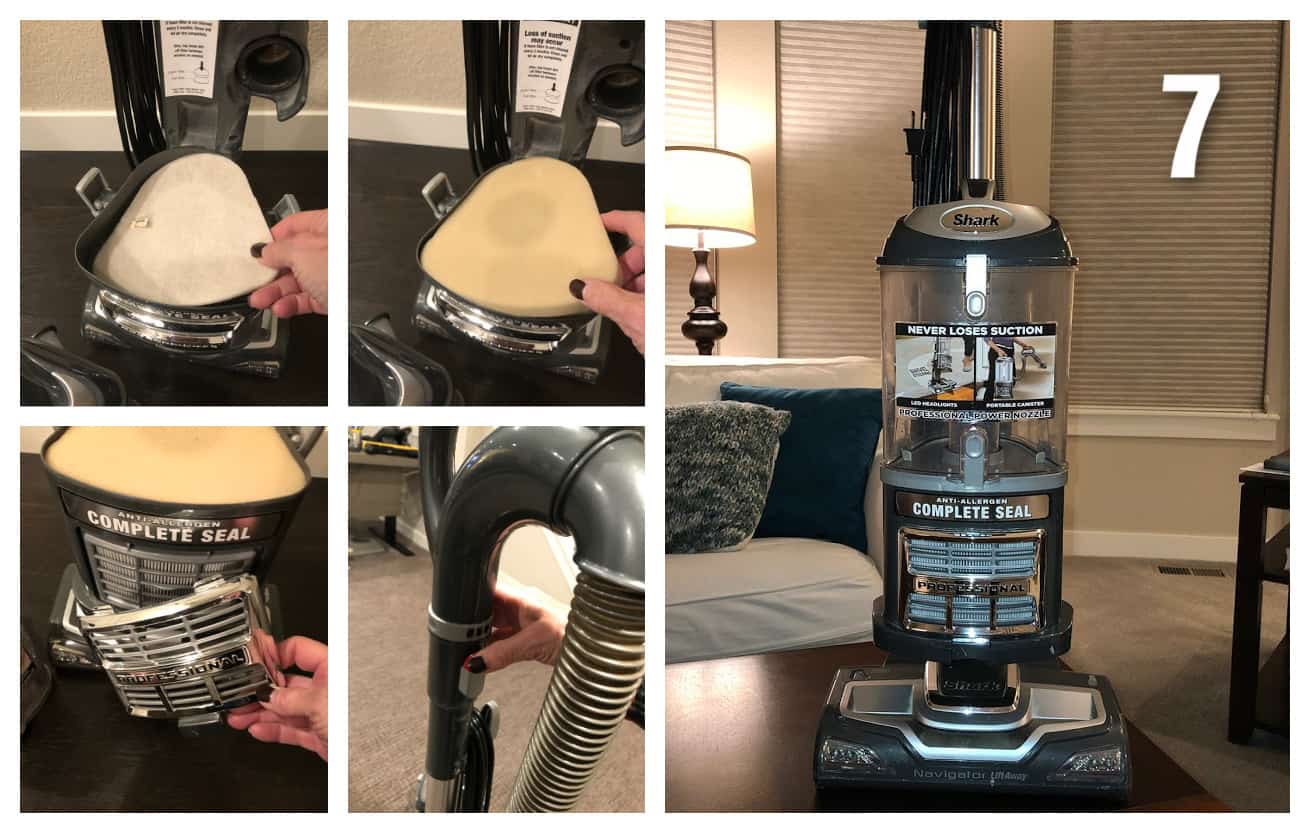
Replace the felt filter first. Next, replace the clean foam filter on top of the felt filter. Replace the HEPA filter and then the “grill” cover. Reattach the handle hose. Close both ends of the dirt canister and lock it into place.
Enjoy your nice clean, fresh Shark Vac!
FAQs
Why does my vacuum smell?
More than likely, you are not emptying the dirt canister frequently enough. Just think about what goes inside that dirt canister and gets trapped in the filters. It’s dirt and debris from the outdoors, bits of food, and other organic matter. Allowing that debris to remain in the dirt canister creates a breeding ground for bacteria and mold and the potential for a stinky situation.
How often should I clean a Shark vacuum and filters?
- Each use: Empty the dirt container after every use.
- Monthly: Shark vacuum owner manuals generally instruct that the foam/felt filters should be cleaned monthly.
- Quarterly: Every three months, take the vacuum apart (see above), give the dust canister, brush roll, and hose a good cleaning.
- Annually: Clean the HEPA filter once each year.
When should I replace Shark vacuum filters?
Your owner manual will most likely advise the foam/felt and HEPA filters to be replaced once you notice the machine is losing suction, even after cleaning the filters mentioned above. That’s a strong sign that the filters are no longer effective.
To be on the safe side and since they are not expensive, my practice is to replace the foam/felt filters annually and the HEPA filter as needed.
Where can I get filters and replacement parts for my Shark products?
SharkClean.com carries just about every possible replacement part or accessory you can imagine and for many Shark models, even those that are no longer in production. As for filters, I compare prices at SharkClean with Amazon, where the filters for my Sharks are usually a bit less expensive. You can also find owner manuals for hundreds of models and exceptional support at SharkClean.
There are so many models of Shark vacuums. Do you have a recommendation?
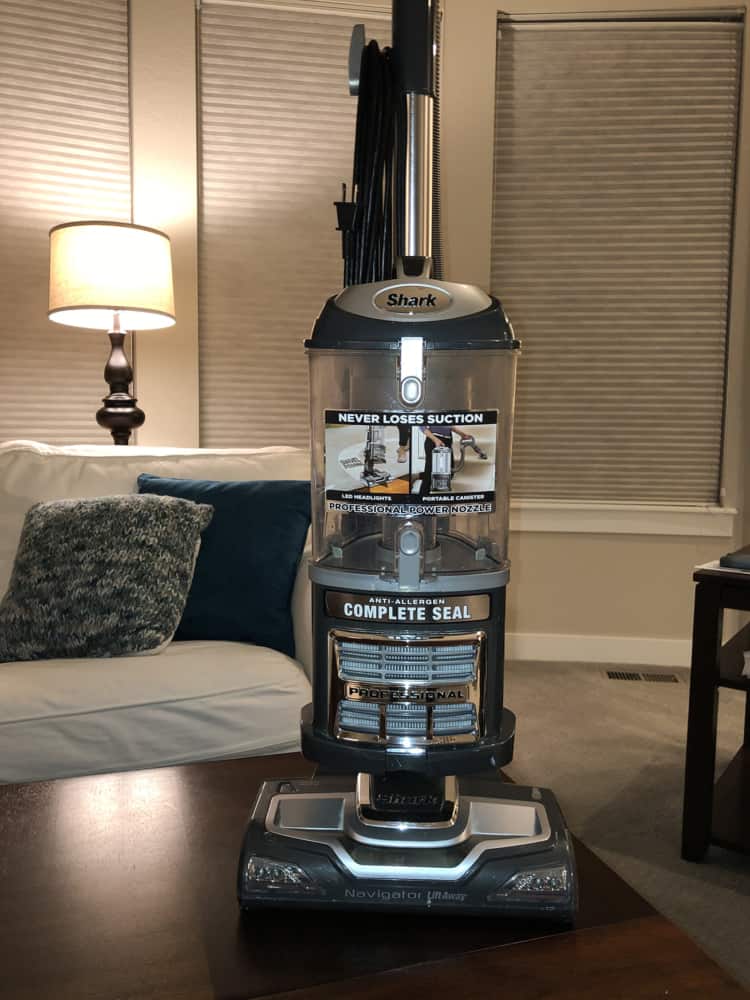
You’re right, there are many models to choose from! I am partial to the models with the Lift-Away feature, making it easy and efficient to vacuum a staircase. And I prefer the Navigator line of Shark vacuums because they maneuver so well.
I purchased the vacuum in the photo tutorial above in 2015. You wouldn’t believe how many miles I have on it; it still looks and operates as if new.
My current recommendation is this Shark Navigator Pro Lift-Away. It comes with several accessories, including a pet power brush and crevice tool. It weighs in at just 13.7 lbs., which is just one more thing to love.

Updated 11-16-22
Everyday Cheapskate participates in the Amazon Services LLC Associates Program, an affiliate advertising program designed to provide a means for us to earn from qualifying purchases, at no cost to you.
Original: 12-30-15; Republished with updated photos 3 -21-22

More from Everyday Cheapskate
 https://www.everydaycheapskate.com/wp-content/uploads/20260705-Best-Coolers-for-Camping-Road-Trips-and-Beach-Days.png
800
1200
Mary Hunt
https://www.everydaycheapskate.com/wp-content/uploads/EC-Logo-by-Mary-Hunt-Tagline-Trimmed.png
Mary Hunt2026-07-05 13:26:172026-07-05 13:26:17Best Coolers for Camping, Road Trips, and Beach Days
https://www.everydaycheapskate.com/wp-content/uploads/20260705-Best-Coolers-for-Camping-Road-Trips-and-Beach-Days.png
800
1200
Mary Hunt
https://www.everydaycheapskate.com/wp-content/uploads/EC-Logo-by-Mary-Hunt-Tagline-Trimmed.png
Mary Hunt2026-07-05 13:26:172026-07-05 13:26:17Best Coolers for Camping, Road Trips, and Beach Days https://www.everydaycheapskate.com/wp-content/uploads/20260703-home-decor.png
800
1200
Mary Hunt
https://www.everydaycheapskate.com/wp-content/uploads/EC-Logo-by-Mary-Hunt-Tagline-Trimmed.png
Mary Hunt2026-07-03 20:46:552026-07-03 20:46:5510 Everyday Items You Never Think to Wash (But Should)
https://www.everydaycheapskate.com/wp-content/uploads/20260703-home-decor.png
800
1200
Mary Hunt
https://www.everydaycheapskate.com/wp-content/uploads/EC-Logo-by-Mary-Hunt-Tagline-Trimmed.png
Mary Hunt2026-07-03 20:46:552026-07-03 20:46:5510 Everyday Items You Never Think to Wash (But Should) https://www.everydaycheapskate.com/wp-content/uploads/20260630-a-lit-sparkler-with-an-american-flag-in-the-background-4th-of-july-hacks-tips-and-recipes.png
800
1200
Mary Hunt
https://www.everydaycheapskate.com/wp-content/uploads/EC-Logo-by-Mary-Hunt-Tagline-Trimmed.png
Mary Hunt2026-06-30 21:44:502026-06-30 21:44:5034 Fourth of July Recipes and DIY Hacks for a Stress-Free Holiday
https://www.everydaycheapskate.com/wp-content/uploads/20260630-a-lit-sparkler-with-an-american-flag-in-the-background-4th-of-july-hacks-tips-and-recipes.png
800
1200
Mary Hunt
https://www.everydaycheapskate.com/wp-content/uploads/EC-Logo-by-Mary-Hunt-Tagline-Trimmed.png
Mary Hunt2026-06-30 21:44:502026-06-30 21:44:5034 Fourth of July Recipes and DIY Hacks for a Stress-Free Holiday https://www.everydaycheapskate.com/wp-content/uploads/20260629-wooden-die-spell-july-with-patriotic-decor-in-background.png
800
1200
Mary Hunt
https://www.everydaycheapskate.com/wp-content/uploads/EC-Logo-by-Mary-Hunt-Tagline-Trimmed.png
Mary Hunt2026-06-29 21:07:092026-06-29 21:10:297 Best Things to Buy in July for Huge Summer Savings
https://www.everydaycheapskate.com/wp-content/uploads/20260629-wooden-die-spell-july-with-patriotic-decor-in-background.png
800
1200
Mary Hunt
https://www.everydaycheapskate.com/wp-content/uploads/EC-Logo-by-Mary-Hunt-Tagline-Trimmed.png
Mary Hunt2026-06-29 21:07:092026-06-29 21:10:297 Best Things to Buy in July for Huge Summer Savings https://www.everydaycheapskate.com/wp-content/uploads/20260628-Grilled-Peaches-with-Balsamic-and-Blue-Cheese-1.png
800
1200
Mary Hunt
https://www.everydaycheapskate.com/wp-content/uploads/EC-Logo-by-Mary-Hunt-Tagline-Trimmed.png
Mary Hunt2026-06-29 09:38:342026-06-29 09:38:34Summer Grilled Peaches with Balsamic and Blue Cheese
https://www.everydaycheapskate.com/wp-content/uploads/20260628-Grilled-Peaches-with-Balsamic-and-Blue-Cheese-1.png
800
1200
Mary Hunt
https://www.everydaycheapskate.com/wp-content/uploads/EC-Logo-by-Mary-Hunt-Tagline-Trimmed.png
Mary Hunt2026-06-29 09:38:342026-06-29 09:38:34Summer Grilled Peaches with Balsamic and Blue Cheese https://www.everydaycheapskate.com/wp-content/uploads/20260626-homemade-stain-paste-sitting-on-wooden-countertop-in-laundry-room-with-washer-and-dryer.png
800
1200
Mary Hunt
https://www.everydaycheapskate.com/wp-content/uploads/EC-Logo-by-Mary-Hunt-Tagline-Trimmed.png
Mary Hunt2026-06-26 17:41:192026-06-26 17:41:19Homemade Laundry Stain Paste That Works for Pennies
https://www.everydaycheapskate.com/wp-content/uploads/20260626-homemade-stain-paste-sitting-on-wooden-countertop-in-laundry-room-with-washer-and-dryer.png
800
1200
Mary Hunt
https://www.everydaycheapskate.com/wp-content/uploads/EC-Logo-by-Mary-Hunt-Tagline-Trimmed.png
Mary Hunt2026-06-26 17:41:192026-06-26 17:41:19Homemade Laundry Stain Paste That Works for Pennies https://www.everydaycheapskate.com/wp-content/uploads/20260625-a-rustic-wooden-christmas-tree-in-the-sand-on-the-beach.png
800
1200
Mary Hunt
https://www.everydaycheapskate.com/wp-content/uploads/EC-Logo-by-Mary-Hunt-Tagline-Trimmed.png
Mary Hunt2026-06-26 11:34:132026-06-26 11:36:44Christmas in June? Try This Amazon Prime Day Gift Guide
https://www.everydaycheapskate.com/wp-content/uploads/20260625-a-rustic-wooden-christmas-tree-in-the-sand-on-the-beach.png
800
1200
Mary Hunt
https://www.everydaycheapskate.com/wp-content/uploads/EC-Logo-by-Mary-Hunt-Tagline-Trimmed.png
Mary Hunt2026-06-26 11:34:132026-06-26 11:36:44Christmas in June? Try This Amazon Prime Day Gift Guide https://www.everydaycheapskate.com/wp-content/uploads/20260624-why-does-my-ice-taste-weird-soda-tea-lemonade-juice.png
800
1200
Mary Hunt
https://www.everydaycheapskate.com/wp-content/uploads/EC-Logo-by-Mary-Hunt-Tagline-Trimmed.png
Mary Hunt2026-06-24 17:10:532026-06-24 17:10:53Why Does My Ice Taste Weird? Here’s the Answer
https://www.everydaycheapskate.com/wp-content/uploads/20260624-why-does-my-ice-taste-weird-soda-tea-lemonade-juice.png
800
1200
Mary Hunt
https://www.everydaycheapskate.com/wp-content/uploads/EC-Logo-by-Mary-Hunt-Tagline-Trimmed.png
Mary Hunt2026-06-24 17:10:532026-06-24 17:10:53Why Does My Ice Taste Weird? Here’s the Answer https://www.everydaycheapskate.com/wp-content/uploads/20260622-a-single-car-garaged-with-beautiful-flowers-along-landscape-beds-things-ruined-by-heat-in-the-garage.png
800
1200
Mary Hunt
https://www.everydaycheapskate.com/wp-content/uploads/EC-Logo-by-Mary-Hunt-Tagline-Trimmed.png
Mary Hunt2026-06-22 20:24:432026-06-22 20:24:4325 Things Summer Heat Can Ruin in Your Garage
https://www.everydaycheapskate.com/wp-content/uploads/20260622-a-single-car-garaged-with-beautiful-flowers-along-landscape-beds-things-ruined-by-heat-in-the-garage.png
800
1200
Mary Hunt
https://www.everydaycheapskate.com/wp-content/uploads/EC-Logo-by-Mary-Hunt-Tagline-Trimmed.png
Mary Hunt2026-06-22 20:24:432026-06-22 20:24:4325 Things Summer Heat Can Ruin in Your GaragePlease keep your comments positive, encouraging, helpful, brief,
and on-topic in keeping with EC Commenting Guidelines
Last update on 2026-07-24 / Affiliate links / Images from Amazon Product Advertising API


How do I clean hair out of the tiny wheels on either side, the ones the whole vacuum rides on? They get clogged with hair until the vacuum won’t roll, making it pure labor to vacuum. They look like they have little pins on each side and should pop out, but I don’t know how. Any ideas?
I would use a sharp pair of scissors to cut the hair away from the rollers.
Is there a way to remove the mesh filter inside the canister there is a tube in there that is caked with dirt and take if the sprayer to the outside doesn’t get it loose.
There are many models of Shark vacuums. What you describe is not familiar to me, so I suggest you read the owner manual for your specific model. If you don’t have it, you should be able to find it online. I’m going to assume that being a Shark it can be disassembled and cleaned, but please do check the manual!
Use an old tooth brush with dish soap and warm water, preferably doing this in the tube. Clean to your satisfaction and rinse well and air dry. Reassemble and your ready to vacuum.
I have the Shark Rotator and it is make a strange noise like it has something impacting it. I have gone thru many of the areas and see this rather large piece in the handle, is this supposed to be there?
Without seeing or hearing, pretty hard to tell, Lori! But no it should not make strange loud noises.
I see that this thread is pretty old but I’m going to post anyway and hope someone sees it and can pass along the word. I saw it today on Amazon that there was a $200 shark vacuum for $99. Quite a deal.
I have a Shark Professional vacuum cleaner. I bought it use on eBay and I cleaned it up real good and it works great! I have carpet in my frontroom. The downstairs bathroom is right by it. So, cat litter and it vacuums it up beautifully! I am really pleased with Shark’s vacuums.
Great timing — I just took my Shark apart yesterday and cleaned everything but I missed the HEPA filter. Thank you for such a detailed article.
I’ve had a shark vac for 15 years and the only reason the canister is full every week is from eating my carpet up one layer at a time. It has fraud and chewed up our carpet terribly. I would not recommend it for short shag carpet.
Shark vacs have been highly improved since your 15-year old model.
My previous post should have read: New look equals two thumbs up.
Love the new look, Mary. And thanks to you, my sharky has been nice and clean for years now.
Love your new look Mary! I think the new additions are great!
Love my sharky so much. My daughter and mom also have their own. This was just because I kept telling them how great it works. Thank you Mary for sharing info on great products. Super helpful.
Mary, On Step 6 why don’t you say or show how to remove the bottom plate to get to the roller more easily? Its easy to do with a quarter. I keep a quarter, and a small comb next to the scissors for this cleaning process.
I think I put my filters back too soon after washing them. They were still a little damp. I used it for less than a minute, realized they weren’t entirely dry, and took them back out. I’m worried I ruined the motor! I was absent minded when I put them back. Any ideas of how I could ensure it’s ok?
I wouldn’t worry about this Hannah. The effect of damp filters at the worst would be the smell and presence of mildew forming in the filter. That you stopped using the machine and removed the filters quickly is good! Carry on ..
Excellent information. Thanks very much. I also bought duplicate filters. Regarding those filters on Amazon that are cheaper, I don’t think those are made by Shark so I was worried about buying them. The shark filters are expensive.
My felt filter is stuck/ melted how do I get it out?
This is new for me, Kaz. Not sure how this happened or which filter you are talking about. More info or even a photo?
I washed and dried everything according to directions. When I started it again, soap shot out of the Hepa filter. Do you think there is more soap in the hose? Everything looked clear.
Hard to say, but something’s not right!! I’m guessing the filter did not get thoroughly rinsed and dry.
My problem with my Shark vacuum is not how well it works on floors (it’s awesome!), or how easy it is to clean (love it!). My issue is with the hose – which will probably keep me from buying another. The hose is so stiff! If I pull it further than than a foot, it pulls the whole vacuum over. This has resulted in breakage of some of the hard plastic when it topples over onto the floor! I’ve glued and patched with Sugru 2-3 times. My vacuum is now six years old and I’d love another, but won’t risk having the same problem.
Is HEPA filter washable?
Yes … clear water. No soap. See the Steps above.
I love my shark! I clean the filters regularly, well, beat them on the porch railing. We live on dirt roads so the amount of dirt I get from the carpets would mean I would have to give it a bath after every use. This vacuum is sure a work horse! It keeps our home clean even with several dogs and people who track in lots of things from outside!
Wish you had posted this a week ago! I broke the clip on the dust bin on one side. Of course this resulted in a decreased suction. I just ordered a new Shark that will be here tomorrow. I see a new dust bin is less than $40. Hoping I can return the one on its way.
Hi Michelle … If you ordered it from Amazon, you can return it for a refund. Sorry my timing was a little “off!”
I have owned several Sharks and love them, but the reason I have had to get new ones is the hose splits up by the top. Is there anyway to repair it?
Hi Diane … Have you contacted Shark about this? I’m pretty sure they would send you a new hose, depending on the age of the vacuum! I have never had this happen and I’ve had numerous Sharks! You can buy replacement parts for every Shark product at SharkClean.com. Hope that helps!
Hi,
Can anyone tell me what the thin, black round rubber seal around the bottom of the dirt cup in Photo #8 is called? Mine tore, and I would like to get a replacement.
Thank you.
Excellent way of explaining, and pleasant paragraph to get facts regarding
my presentation subject matter, which i am going to deliver
in institution of higher education.
Can the HEPA filter be washed/rinsed? We have a lab and 3 kids, so we vacuum daily. We’ve had this HEPA filter since January, and its definitely gross, but I’m not sure if I can at least rinse it with water or not.
I am still not understanding how to clean my Rotator Shark vacuum “HEPA” filter. It’s incased in a gray plastic, looks like a permanent, container/enclosure. The instructions I read, said this filter could be rinsed with water and to then squeeze excess water from it. What I’m not understanding, is how to squeeze that gray plastic container that is encased around the HEPA filter.
Am i just overlooking the answer I need?!?!?!?!?! What i want to know is can you rinse out the hose on the newer type sharks that have electrical connections????!!! There is nothing that says DO NOT RINSE OUT HOSES on any article I’ve read nor does it say that in the manual for my Shark Duo/LiftAway…just to be SPECIFIC it has 2 metal connection between each disconnection point on the hose as does the solid plastic tubing that is between the hose disconnection and the bottom of the vacuum..so CAN you or CAN YOU NOT!!!!! clean these with let’s say a water hose or warm sink water or anything of that nature like just sending water down the inners of them along with known cleaning methods like you would have normally done with old style hoses that dont have connections without damaging the connections and this seems to be common sense to me but with allot of people these days that lack any sense at all…of coarse let any and all parts that connect to something that your going to have electricity running through it DRY before reconnecting….for whatever reason I’ve just not been able to find any info on this and I’d really love to know thanks…
Hi!
How do I clean one of the brush attachments that has become really dirty? Thanks
Does anyone know how to clean the hose? My shark has been loved and used almost daily for over a year. However its in an almost abusive manner. Vacuuming food and mildly damp floors the inside of the hose is like thick, wet dirt. The main body came beautifully clean. The hose however is a problem. Can it be removed from electronics somehow?
I’ve used a Shark for years and love it. One thing missing from the cleaning information though – the very front filter (lower center of vacumn – my has the model written across it) also pops off and it can also be cleaned and should be cleaned. I discovered this pops off too by happenstance when I was taking everything else apart to clean.
I simply bought my initial Shark, supported this text. It’s an incredible machine. It works even as publicised . I bought a refurbished machine off of Groupon and solely paid $88, as well as tax and shipping. check up on refurbished items–they’re cheaper and are all repaired for no matter reason they were came back.
My round filter gets covered in dirt after just one use. It never used to do that. What could be wrong?
I have the Shark Rotator Professional. The Canister has a Metal Cone permanently fixed inside. There is a plastic collar molded inside the cone and not accessible to clean any accumulated dirt out of. Any suggestions.
I similarly had a issue I believe you had, if you are referring to the dust bin, my model is the Navigator Upright Vacuum, I washed it normally but also soaked it with isopropyl and warm water and shook it around over my sink to get some stains off the metal cone inside that plastic collar sleeve. Not perfect but sure to help a bit.
Can you clean the hose??
I would love to find out if there is anyway to clean the hoses
my shopvac has an option to blow rather than suck, i blow out the hoses (outdoors!) really well. 🙂
The two filters one is foam the other is fla, which foes in first.?
I have a Shark Rotator Lift-Away and I love, love, love it. After going through many supposedly good vacuums, including an Oreck that turned out to be a piece of junk and for which the company would not stand behind, I noticed my daughter-in-law had a Shark and she loved it. I buy Shark irons because I sew a lot and they are very dependable, but I hadn’t tried one of their vacuums. I bought one and am in love. I love the lift-away part and the ease of going from floor to carpet and the suction regulator. I have a Cocker Spaniel who sheds hair to the point I can’t understand why she has any left, and this vacuum is the best. It never gets clogged and I love the ease of emptying. But I do tend to forget that these new vacuums need their own housekeeping so when my vacuum sounded “strange”, I started looking for the reason. Oops! I hadn’t been cleaning the filters. Fortunately I hadn’t bought it that long ago or used it that much (no comment) so while it was bad, it wasn’t dreadful. I pulled out the foam filter and took it to the sink and just started running warm water over it. I was afraid to use soap for fear I wouldn’t get it rinsed good enough. Sour soap is not a good smell. After much running of water and squeezing, my filter actually came out white again. And I’m here because I wasn’t sure how to wash the felt filter. I’m going to chance washing it also. Also, I got dust under where the filters go and worried about that, then I remembered I have a portable mini-vac I use in my sewing room and so I got that and vacuumed all the dust out. Clean as a whistle.
I had an Oreck and liked it a lot but when I started to hear all the Shark reviews, especially Mary’s, I made my leap to the Shark. It is heavier than my Oreck but not hard to handle. The heft to me means quality and this vacuum has it in spades. I vacuumed an area rug that I was thinking it was time to shampoo because it just looked dingy. After the first time of vacuuming it I was shocked at how much dirt the Shark extracted, the rug looked amazingly bright. I’m sold. I love the step by step on the cleaning of Sharkie. I folloed your instructions on the cleaning of my Eufy and it still works like a charm. My broom has been relegated to the porch for sweeping of steps… lol! Thank you Mary!
I just bought my first Shark, based on this article. It’s an amazing machine. It works just as advertised . I bought a refurbished machine off of Groupon and only paid $88, including tax and shipping. Check out refurbished items–they’re cheaper and have been totally repaired for whatever reason they were returned.
Whenever I clean or disassemble something I take pictures with my phone of the items laid out in the order they come off, saves a lot of frustration.
Hi there, I have had my Shark Navigator for a few years and didn’t realize I needed to clean the HEPA filter. I know, terrible! I have washed it, per the owners manual. It is still black. Do I have any options here, or do I need to replace it? I have noticed you can order them for about $10 from amazon or Walmart, but I am not sure if these will work as well as the ones that are Shark brand (3x the cost). Do you have any experience with this?
My daughter dumped a bag of BBQ potato chips on the carpet. I was lazy and used my Shark wand to suck up the mess. Not my best idea. Dirt and hair clogged it up after that. I ended up taking the whole vacuum apart and cleaning all the hoses and tubes in soapy water in the bathtub. My Shark still works!
I bought this vacuum almost 5 years ago per your recommendation and I have loved it! Though the button on the extension want recently broke, making it impossible to pull the vacuum back towards me. I just got off the phone with customer support, and for $8, I’ll be back in operation 🙂 perhaps I should give my Shark a good deep clean while I wait for the part to be shipped to me. Then it’ll be ready to suck up all of the extra dirt that has accumulated while it and my Eufy robot vacuum have both been inoperable.
Thank You! I love my Shark, and I want to clean it, but I was intimidated by the thought of getting the parts wet. Now that I know I can safely clean them with soap and water I look forward to a newly efficient machine.
I haven’t found anything but if I try something that doesn’t break the vacuum cleaner I will post it. I’m thinking I can just run soapy water through it separate from the cleaner itself and let the hose air dry.
remove the hose with handle but it is really hard to dry. I just ordered a new one
Run water through the metal cone from the outside of the canister (reverse flow) For extra cleaning use a de-greasing detergent inside the canister first.
hepa filter???
In the front of the vacuum where the vents are. You can pop off the vent and the HEPA filter is behind it.
My canister locks keep coming loose. Suction seems to be maintaining, but the latches keep coming undone. Shark Navigator Lift Away, model nv360. Thoughts?
Can you wash the attachments also like the hoses just rinseing they hold dirt in their . so can i just rinse them or no?
My shark navigator has a foul odor. The bottom air filter keeps popping off when I turn the vacuum on. I have cleaned the filter but still has a bad odor. What do I do? Also I bought this used and it did not come with the filter that is placed under the canister.
If you’re referring to the HEPA filter where the air exits, I don’t think that’s supposed to be washed.
Great question – what really bugs me is the cleaning instructions show that metal cone as coming apart….and it really s/h been so designed. Negative on Shark for this one.
Hi! Do you have any tips on how to clean the inside of the hose? Thanks.
Did you get an answer i need to know this also!
If you are talking about removing a clog, take the hose off the vacuum and gently push a broom handle (or something similar) through the hose to push the clog. To clean the internal part of the hose. Leave end of the hose where it goes into the machine attached so that the hose still has suction through and remove the other end. Turn the machine on. Extend each section of the stretch hose apart starting farthest from the vacuum and working towards the machine.
Great question!!! I would like to know too… I did – thought I had dried – but it sure is ugly in there right now. Ready to go back with bleach/vinegar/tea-tree/baking soda, TSP or whatever the hell else is needed!
What I use is a telescopic pole duster. I found mine at Home Depot. Im sure other stores like Walmart
will have them also. I turn on the vacuum and just push the duster up and down. It did remove a lot of the dirt but again, that’s the only way I thought would be best. Maybe someone else can give us another easier method. Good luck Crabpaws, I’ll be looking at me email to hopefully see someone else gives us another idea.
Yes! See Step 6 above …
I use a short length of chain. Make sure it fits through both ends before dropping in hose. Heavy chain works best, drop in hose, then shake it a bit to help remove dirt and hair stuck along sides, then drop chain out the opposite end into a bucket. I find repeating this a couple times clears out most of the funk and the hose is ready to use right away.
yay 🙂 Cleaning that foam filter under the canister was really bugging me. Nothing in my manual, well that I could find, and it needed it. Thank you very much for this post. It looked like a thin sheet of foam glued on. Didn’t realize it was a thick pad that could be removed without tearing it.
Just wish you’d included photos of the filters and how to remove them. But I got it figured out 🙂
Can I put the filters in the dryer?
no. they have to air dry. the dryer will deteriorate the foam.
Thank you
Thank you so much! Our Shark had started overheating, and my mom didn’t know what to do. I printed off these instructions, and she washed everything out, and it’s working perfectly now! The article was very timely for us.
I do love my shark lift away but after washing my canister like you suggested I ended up with water in the top of the canister. Mine is different than the one you have showing, mine is completely sealed. I am still trying to get the water out.
I wld just take windex & a paper towel to it! Wouldn’t get it too submerged in water. Hope this helps!
I currently have this same situation – water trapped in the top of the dust canister and I can’t figure out how to get it out.
There should be a latch to open the top (latches top and bottom)
One additional important thing! Check, check, check that receipt before you leave the store! OFTEN I find I was charged the wrong amount, not charged the posted, lesser amount, or charged twice for an item. It means at trip to Customer Service to correct it and get a refund, but this adds up over time!
I have a complete set of extra filters for my vacuum cleaner. This allows me to clean and dry the hard pieces and immediately insert clean filters. Then I thoroughly clean the dirty set. Living in Oklahoma we have high humidity most of the year, thus taking longer for things to dry. By having the extra set I can allow a couple of weeks to dry all the way through. I want to mention I only dry filter pieces outside for 1 day, only in direct sunlight (naturally killing bacteria) and then place the pieces on an airy shelf to finish drying in the house. They are ready to use for the next cleaning. It also allows the filters to last longer.
Hi, can anyone PLZ help me!!? I took my filters out for the first time to wash & forgot how & where they go back in!! & can’t find the owner’s manauel either!! PLZ help me!! Ty!!
Check YouTube. You can learn anything from that site. Felt filter closet to the motor. Foam filter just above that. HEPA filter where the air exhausts from the vacuum.
The felt filter goes in first. The foam filter goes on top of the felt. Or think of it this way: Felt is last one out, first one in. Hope that helps!
I also have an extra set for the same purpose
I purchased the Shark Navigator Lift Away Pro last spring & was very impressed, however it died within a few months. The company did send me a replacement within 2 weeks.
Shark Navigator absolutely love it. Especially since I got almost free…for doing surveys.