
Prevent Costly Water Damage with Critical Washing Machine Maintenance


A washing machine is a household essential, but it can also be a hidden hazard. Annual check-ups and timely hose replacements are crucial parts of washing machine maintenance to prevent water damage. Ignoring these tasks can lead to catastrophic damage and costly repairs. Follow our guide on how to replace washing machine hoses to ensure your machine stays in top shape and your home remains safe.
Did you know that washing machines cause more than $150 million in damage to homes across the U.S. each year? It’s true! Picture this: a river flowing from your laundry room, with hundreds of gallons of water per hour pouring over your floors, soaking your furniture, and ruining your cherished keepsakes. Scary, right? Unfortunately, it happens more often than you’d think.
Washing machine hoses are the most neglected maintenance item in a home, and that’s a big problem. In 2020 alone, State Farm shelled out nearly $30 million in homeowner claims for damage caused by washing machine hose failures. It’s not the cost of repairing the machine itself that racks up the bills—it’s the extensive water damage that follows.
Here’s a staggering fact: a washing machine hose holds about 70 pounds of pressure, and if it fails, it can unleash an average of 650 gallons of water per hour. Imagine being away for a weekend and coming home to find your house filled with nearly 31,000 gallons of water. That’s like having an in-ground pool’s worth of water inside your home! The damage to floors, drywall, and personal items can be devastating, and you might even have to move out temporarily.
Understanding Washing Machine Maintenance
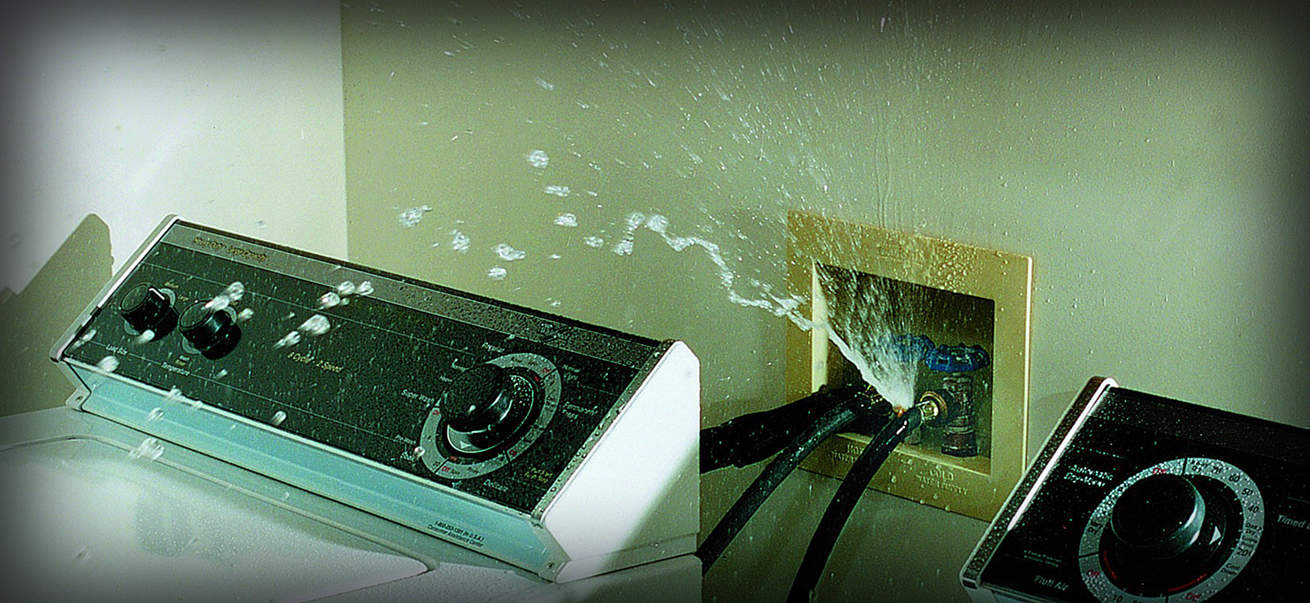 When it comes to washing machine maintenance, the biggest culprit behind water damage is a failed supply hose. In fact, more than 50% of all washing machine water damage claims are due to this issue. Here’s why it happens:
- Pinched Hose: Sometimes the hose gets pinched during installation or when the machine is moved, creating a tiny hairline break.
- Faulty Connection: A loose or faulty connection at either end of the hose can lead to leaks.
- Aging Hose: Over time, hoses can become brittle and prone to cracking.
It’s these small issues that can lead to major problems. But the good news is, with regular washing machine maintenance and knowing how to replace washing machine hoses, you can catch these issues before they turn into a flood.
The Importance of an Annual Washing Machine Check-Up
If you own a washing machine, it’s crucial to check the water inlet or “water-fill” hoses at least once a year. Think of this washing machine maintenance like checking the oil in your car. Everything seems fine until suddenly it’s not, and you find yourself watching your sofa float down the front walkway.
Just a quick annual check-up can save you from a lot of stress and expensive repairs. Regular maintenance helps you spot potential issues early, preventing those unexpected and disastrous floods.
How to Inspect Your Washing Machine Hoses
Inspecting your washing machine hoses is a simple yet essential part of washing machine maintenance. Here’s how to do it:
- Locate the Hoses: There are two inlet hoses connecting your washing machine to the hot and cold water faucets. They’re usually at the back of your machine.
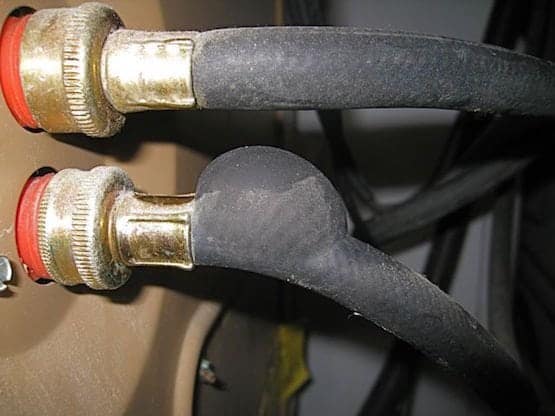
- Visual Check: Just looking at the hoses won’t always reveal issues. Age, water chemicals, and calcium deposits can degrade the rubber over time, making them prone to failure. Even a “new” hose might have aged in a warehouse.
- Blisters and Cracks: If you spot any small blisters in the rubber or feel that the hose is brittle, consider it a red flag. These are signs of imminent failure. Replace the hose immediately if you notice any cracks.
- Routine Replacement: If you can’t remember the last time you replaced your hoses, it’s time to put it on your to-do list. Both manufacturers and insurance companies recommend replacing washing machine hoses every three to five years, regardless of their condition. Better safe than sorry!
Regularly inspecting and replacing your washing machine hoses can prevent a minor issue from turning into a major disaster. Make it a part of your annual washing machine maintenance routine, and you’ll save yourself a lot of hassle and potential water damage.
Choosing the Right Hose: Rubber vs. Stainless Steel
When it comes to washing machine hoses, you have two main options: rubber or braided stainless steel. Here’s the lowdown:
- Rubber Hoses: These are the budget-friendly choice at about $5 each. They’re simple and get the job done, but they’re more prone to wear and tear over time.
- Stainless Steel Hoses: Priced around $15 each, these hoses feature a braided stainless steel mesh that offers added durability. However, they’re not entirely foolproof. The connectors can still break loose, and the rubber interior can deteriorate. Despite this, they typically offer better protection against bursts than rubber hoses.
While the flexible mesh hoses are a bit more expensive, the added safety and peace of mind are well worth the extra cost. The stainless steel braid encases a rubber hose, providing a burst-resistant measure that significantly reduces the failure rate when properly installed.
No matter which type you choose, remember that regular washing machine maintenance includes replacing these hoses every three years. This simple step can prevent a minor inconvenience from turning into a major disaster.
DIY vs. Hiring a Pro
DIY: Learning how to replace washing machine hoses yourself can be a budget-friendly option. You’ll spend about $10 for rubber hoses or $20 for stainless steel ones. If you don’t have channel pliers, they’re around $5 to $15. With a bit of elbow grease and a simple installation guide, you can handle this yourself and save on labor costs.
Hiring a Pro: Plumbers typically charge $45 to $200 per hour. You may end up paying for the full hour, even if the job only takes a few minutes. If you’re worried about moving the washer or turning off the water source, hiring a professional might be worth it for the added convenience and peace of mind.
Step-by-Step Guide to Replacing Washing Machine Hoses
Replacing your washing machine hoses is simpler than finding the matching sock for that lonely one in your laundry pile. Here’s how to do it:
Step 1: Turn Off the Water
Start by turning off the water supply to the washing machine. Look for the cold and hot water handles near the wall. For rectangular handles, turn them 90 degrees; for round handles, turn clockwise until they stop.
Step 2: Unplug the Washer
Unplug the washing machine and slide it a couple of feet away from the wall. Place a towel and a bucket under the hoses to catch any drips. Trust me, a little prep now saves a lot of cleanup later!
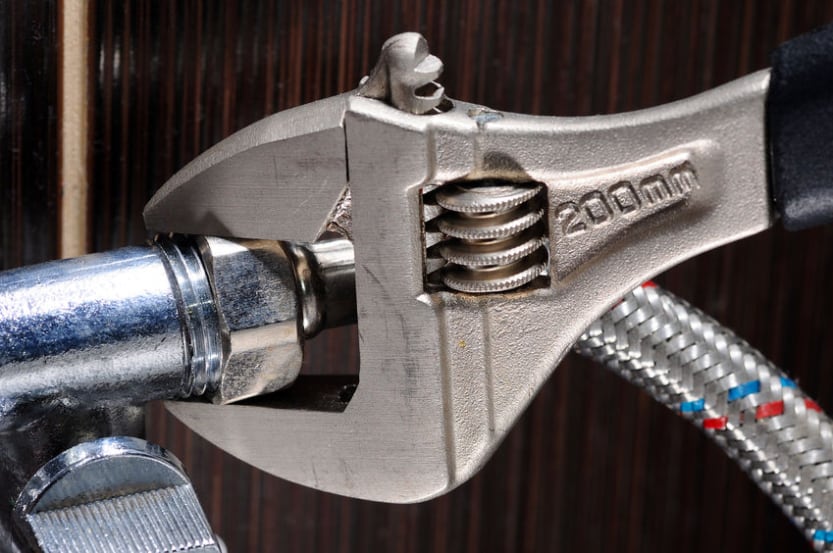
Step 3: Disconnect the Old Hoses
Using your channel pliers, loosen and remove the hoses, starting at the washer and then the water supply. Be gentle to avoid bending the fittings—this isn’t a tug-of-war!
Step 4: Connect the New Hoses
Attach the new hoses to the washer and water supply connectors. Tighten them securely with the pliers. Remember to match cold to cold and hot to hot, or your laundry might get an unexpected sauna treatment.
Step 5: Turn On the Water
Slowly turn the water supply back on and check for leaks. If you see any, turn off the water and re-tighten the hoses. Once you’re leak-free, turn the water on fully and keep an eye on the connections during the first wash.
And there you go—no more leaks, and you’re back to folding laundry (and hunting for those missing socks)!
Preventing Installation Errors
Installation errors are the biggest culprits behind premature hose failures. Sharp kinks or bends can weaken the hose or compromise the seal at the connector, leading to leaks and potential water damage.
To avoid this, ensure there’s a gap of 3 to 4 inches between the back of your washing machine and the wall. If you’re dealing with a tight space, like an old shallow laundry closet, consider using hoses with right-angle connectors. These special hoses allow the machine to sit closer to the wall without compromising the hose’s integrity. You might need to special order them, but they’re worth the extra effort for peace of mind.
If you’re unsure about performing a washing machine check-up or figuring out which hoses you need, head over to RepairClinic.com. They offer diagnosis tools, repair instructions, and maintenance tips for all your household appliances, making washing machine maintenance a breeze.
Question: Have you ever experienced a washing machine hose failure? What tips do you have for preventing water damage at home?

More from Everyday Cheapskate
 https://www.everydaycheapskate.com/wp-content/uploads/20260703-home-decor.png
800
1200
Mary Hunt
https://www.everydaycheapskate.com/wp-content/uploads/EC-Logo-by-Mary-Hunt-Tagline-Trimmed.png
Mary Hunt2026-07-03 20:46:552026-07-03 20:46:5510 Everyday Items You Never Think to Wash (But Should)
https://www.everydaycheapskate.com/wp-content/uploads/20260703-home-decor.png
800
1200
Mary Hunt
https://www.everydaycheapskate.com/wp-content/uploads/EC-Logo-by-Mary-Hunt-Tagline-Trimmed.png
Mary Hunt2026-07-03 20:46:552026-07-03 20:46:5510 Everyday Items You Never Think to Wash (But Should) https://www.everydaycheapskate.com/wp-content/uploads/20260630-a-lit-sparkler-with-an-american-flag-in-the-background-4th-of-july-hacks-tips-and-recipes.png
800
1200
Mary Hunt
https://www.everydaycheapskate.com/wp-content/uploads/EC-Logo-by-Mary-Hunt-Tagline-Trimmed.png
Mary Hunt2026-06-30 21:44:502026-06-30 21:44:5034 Fourth of July Recipes and DIY Hacks for a Stress-Free Holiday
https://www.everydaycheapskate.com/wp-content/uploads/20260630-a-lit-sparkler-with-an-american-flag-in-the-background-4th-of-july-hacks-tips-and-recipes.png
800
1200
Mary Hunt
https://www.everydaycheapskate.com/wp-content/uploads/EC-Logo-by-Mary-Hunt-Tagline-Trimmed.png
Mary Hunt2026-06-30 21:44:502026-06-30 21:44:5034 Fourth of July Recipes and DIY Hacks for a Stress-Free Holiday https://www.everydaycheapskate.com/wp-content/uploads/20260629-wooden-die-spell-july-with-patriotic-decor-in-background.png
800
1200
Mary Hunt
https://www.everydaycheapskate.com/wp-content/uploads/EC-Logo-by-Mary-Hunt-Tagline-Trimmed.png
Mary Hunt2026-06-29 21:07:092026-06-29 21:10:297 Best Things to Buy in July for Huge Summer Savings
https://www.everydaycheapskate.com/wp-content/uploads/20260629-wooden-die-spell-july-with-patriotic-decor-in-background.png
800
1200
Mary Hunt
https://www.everydaycheapskate.com/wp-content/uploads/EC-Logo-by-Mary-Hunt-Tagline-Trimmed.png
Mary Hunt2026-06-29 21:07:092026-06-29 21:10:297 Best Things to Buy in July for Huge Summer Savings https://www.everydaycheapskate.com/wp-content/uploads/20260628-Grilled-Peaches-with-Balsamic-and-Blue-Cheese-1.png
800
1200
Mary Hunt
https://www.everydaycheapskate.com/wp-content/uploads/EC-Logo-by-Mary-Hunt-Tagline-Trimmed.png
Mary Hunt2026-06-29 09:38:342026-06-29 09:38:34Summer Grilled Peaches with Balsamic and Blue Cheese
https://www.everydaycheapskate.com/wp-content/uploads/20260628-Grilled-Peaches-with-Balsamic-and-Blue-Cheese-1.png
800
1200
Mary Hunt
https://www.everydaycheapskate.com/wp-content/uploads/EC-Logo-by-Mary-Hunt-Tagline-Trimmed.png
Mary Hunt2026-06-29 09:38:342026-06-29 09:38:34Summer Grilled Peaches with Balsamic and Blue Cheese https://www.everydaycheapskate.com/wp-content/uploads/20260626-homemade-stain-paste-sitting-on-wooden-countertop-in-laundry-room-with-washer-and-dryer.png
800
1200
Mary Hunt
https://www.everydaycheapskate.com/wp-content/uploads/EC-Logo-by-Mary-Hunt-Tagline-Trimmed.png
Mary Hunt2026-06-26 17:41:192026-06-26 17:41:19Homemade Laundry Stain Paste That Works for Pennies
https://www.everydaycheapskate.com/wp-content/uploads/20260626-homemade-stain-paste-sitting-on-wooden-countertop-in-laundry-room-with-washer-and-dryer.png
800
1200
Mary Hunt
https://www.everydaycheapskate.com/wp-content/uploads/EC-Logo-by-Mary-Hunt-Tagline-Trimmed.png
Mary Hunt2026-06-26 17:41:192026-06-26 17:41:19Homemade Laundry Stain Paste That Works for Pennies https://www.everydaycheapskate.com/wp-content/uploads/20260625-a-rustic-wooden-christmas-tree-in-the-sand-on-the-beach.png
800
1200
Mary Hunt
https://www.everydaycheapskate.com/wp-content/uploads/EC-Logo-by-Mary-Hunt-Tagline-Trimmed.png
Mary Hunt2026-06-26 11:34:132026-06-26 11:36:44Christmas in June? Try This Amazon Prime Day Gift Guide
https://www.everydaycheapskate.com/wp-content/uploads/20260625-a-rustic-wooden-christmas-tree-in-the-sand-on-the-beach.png
800
1200
Mary Hunt
https://www.everydaycheapskate.com/wp-content/uploads/EC-Logo-by-Mary-Hunt-Tagline-Trimmed.png
Mary Hunt2026-06-26 11:34:132026-06-26 11:36:44Christmas in June? Try This Amazon Prime Day Gift Guide https://www.everydaycheapskate.com/wp-content/uploads/20260624-why-does-my-ice-taste-weird-soda-tea-lemonade-juice.png
800
1200
Mary Hunt
https://www.everydaycheapskate.com/wp-content/uploads/EC-Logo-by-Mary-Hunt-Tagline-Trimmed.png
Mary Hunt2026-06-24 17:10:532026-06-24 17:10:53Why Does My Ice Taste Weird? Here’s the Answer
https://www.everydaycheapskate.com/wp-content/uploads/20260624-why-does-my-ice-taste-weird-soda-tea-lemonade-juice.png
800
1200
Mary Hunt
https://www.everydaycheapskate.com/wp-content/uploads/EC-Logo-by-Mary-Hunt-Tagline-Trimmed.png
Mary Hunt2026-06-24 17:10:532026-06-24 17:10:53Why Does My Ice Taste Weird? Here’s the Answer https://www.everydaycheapskate.com/wp-content/uploads/20260622-a-single-car-garaged-with-beautiful-flowers-along-landscape-beds-things-ruined-by-heat-in-the-garage.png
800
1200
Mary Hunt
https://www.everydaycheapskate.com/wp-content/uploads/EC-Logo-by-Mary-Hunt-Tagline-Trimmed.png
Mary Hunt2026-06-22 20:24:432026-06-22 20:24:4325 Things Summer Heat Can Ruin in Your Garage
https://www.everydaycheapskate.com/wp-content/uploads/20260622-a-single-car-garaged-with-beautiful-flowers-along-landscape-beds-things-ruined-by-heat-in-the-garage.png
800
1200
Mary Hunt
https://www.everydaycheapskate.com/wp-content/uploads/EC-Logo-by-Mary-Hunt-Tagline-Trimmed.png
Mary Hunt2026-06-22 20:24:432026-06-22 20:24:4325 Things Summer Heat Can Ruin in Your Garage https://www.everydaycheapskate.com/wp-content/uploads/20260621-amazon-prime-day-2026-is-coming-everyday-cheapskate-mary-hunt-guide-for-cheapskates.png
800
1200
Mary Hunt
https://www.everydaycheapskate.com/wp-content/uploads/EC-Logo-by-Mary-Hunt-Tagline-Trimmed.png
Mary Hunt2026-06-21 15:48:502026-06-21 15:48:50The Cheapskate’s Guide to Winning Prime Day 2026
https://www.everydaycheapskate.com/wp-content/uploads/20260621-amazon-prime-day-2026-is-coming-everyday-cheapskate-mary-hunt-guide-for-cheapskates.png
800
1200
Mary Hunt
https://www.everydaycheapskate.com/wp-content/uploads/EC-Logo-by-Mary-Hunt-Tagline-Trimmed.png
Mary Hunt2026-06-21 15:48:502026-06-21 15:48:50The Cheapskate’s Guide to Winning Prime Day 2026

The other thing you need to watch out for is the drain hose. Every year I have my son pull out washer to clean behind it. This one time the drain hose popped out and we did not notice it. This also is a rubber hose. Two days later I did a load of wash. I had a flood in my cellar. Always check that drain hose.
Not only can they rupture, the screen next to the gasket can get full of sediment, it can take forever for the washer to fill.
Better yet, get into the habit of shutting off the main water valve to the house when you leave for more than one day. I also like to depressurize the pipes, but that’s not needed. If I leave pressure, when I turn valve on, there should be no water flow. This also lets you know if you have a leak.
The washing machine hoses come with a rubber gasket/seal in each end of the hoses brass screw ons. Make sure your hoses have them and when installing the hoses make sure they are sealed properly.
I am lucky my brothers are handy and can usually figure out how to fix things by looking it up online. I buy used because they are usually easier to work on. There is a guy in town that used to have an appliance repair shop and my brothers asked him questions the last time we had a problem. He told him the two things to check and where to go to get the parts. I paid $20 for my dryer and got my washer free on freecycle and they have been going strong for 10 years so I got my money’s worth. I can’t afford the quality washer and dryers. The companies told me they only last 3 years now (that is forever they told me) and I want one that lasts like my parents did. I want my monies worth I guess. I believe in quality products that last besides I am saving them from the landfills so I feel good about it. I only use my dryer if I have to. I use the clothes line weather permitting.
I got my dryer from Good Will about 25/30 yrs ago, and it was old then! It is still working just fine. Like you, I hang as many clothes as I can on racks in the garage. Works well in hot Bakersfield Our appliances used to last forever when I was a kid, too. My current washer is now 5 yrs old, so glad to see this!
Will have it looked at asap!
I had a plumber install a single lever shut off valve between the two supply lines. I flip it down to wash clothes and then flip it back up when I am done, eliminating any chance of a ruptured hose or flood.
And when you replace the hoses, for heaven’s sake, make sure that you don’t mix up the hot and cold! The installer did that when I bought my new washer and I shrunk a load of cotton shorts and capris which I thought I was washing in Cold water but was actually washing in straight HOT water.
While you are back there, check your dryer vent hoses. Dryer lint from defective hoses, can cause fires. Clogged vents can make your dryer stop drying.
Yeah, I had a washing machine hose break about 35 years ago. Fortunately it was located in the garage, but it was still a mess and I didn’t forget the lesson. I occasionally check the hoses and replace them after several years.