
How to Make Spreadable Butter: Cheaper, Better, Faster


Are you fed up with the daily battle of trying to spread rock-hard butter straight from the fridge? Trust me, you’re not alone in this struggle! Those convenient little tubs of store-bought spreadable butter might seem like the perfect solution, but they often come with a price tag that makes you think twice. Here’s the good news: You can make your own spreadable butter at home in just minutes and for a fraction of the cost. Let’s jump into this quick, money-saving DIY that’ll keep your butter perfectly soft and ready to spread whenever you need it.
You’ve likely spotted those “spreadable butter” tubs sitting in the dairy aisle, and maybe you’ve even grabbed a few because, let’s face it, they’re incredibly convenient. But if you’re anything like me, you’ve noticed that these spreadables can almost be classified as luxury items when you look at the price tag.
Most of these store-bought options are a mix of real butter and oils like canola or olive oil, designed to stay soft even when refrigerated. The concept is brilliant, but the cost? Not so much.
Here’s the best part: Making your own spreadable butter at home is so easy, you’ll wonder why you haven’t tried it sooner. With just two ingredients—real butter and your preferred oil—you can whip up a batch that’s just as smooth and spreadable as the store-bought kind, but at half the price. Let’s get started!
Why Make Your Own Spreadable Butter?
So, why bother making your own spreadable butter when you can just grab a tub at the store? Well, for starters, making your own is a real money-saver. Those little tubs can be surprisingly pricey, especially when you realize that you’re paying for the convenience of something you can easily whip up at home.
But it’s not just about the savings. When you make your own, you get to control the ingredients. No mystery additives or unnecessary fillers—just pure, simple ingredients you can trust. Plus, you can customize it to suit your taste. Prefer olive oil? Want a touch of sea salt or a dash of honey? You’re the boss of your butter!
And let’s not forget the sheer satisfaction of knowing you’ve made something yourself. Trust me, once you’ve tried it, you’ll never look at store-bought spreadable butter the same way again.
Cost Comparison: Homemade vs. Store-Bought Spreadable Butter
Let’s break down the numbers, because when it comes to saving money, every penny counts! A typical 8-ounce tub of store-bought spreadable butter is about the same as two sticks of butter. Depending on the brand, you’re looking at anywhere from $0.35 to $0.45 per ounce for those convenient tubs.
Now, here’s where it gets interesting: regular butter itself costs about the same, roughly $0.30 to $0.50 per ounce, depending on the brand and whether you’re snagging it on sale. Add in canola oil, which typically runs between $0.08 and $0.12 per ounce, and you’ve got a recipe for some serious savings.
The magic ratio for a good homemade spreadable butter is two parts butter to one part oil. With that mix, you can get your cost down to about $0.22 per ounce. And if you’re like me—always hunting for the best deals and stocking up when groceries go on sale—you can make your own spreadable butter for as low as $0.15 per ounce. Of course, prices might vary a bit depending on where you shop, but the savings are clear. Why pay more when you can make it at home for less?
Step-by-Step Guide: How to Make Spreadable Butter

Ready to whip up your own spreadable butter? It’s so easy, you might wonder why you didn’t start sooner!
- Start with the Basics: Grab two sticks (1 cup) of room-temperature butter and place them in the bowl of your stand mixer. Don’t have a stand mixer? No worries—a regular bowl and a hand mixer will work just fine. Using the whip attachment, whip the butter on medium speed until it’s smooth and creamy. This should take about a minute.
- Add the Oil: Now, it’s time to add the magic ingredient—oil. Pour in 1/2 cup of your oil of choice. I personally love canola oil for its light flavor and smooth texture, but feel free to experiment with others like olive or avocado oil. Whip the mixture on medium-high for another minute until everything is well combined.
- Store and Enjoy: Transfer your freshly made spreadable butter into a clean container with a lid—those old store-bought butter tubs work perfectly for this! Pop it in the fridge, and you’re all set. Your butter will stay perfectly soft and spreadable, ready for whenever you need it.
Not only is this DIY spreadable butter incredibly easy to make, but it’s also a fantastic way to save money. If you snag both ingredients on sale, you can make your own spreadable butter for about half the cost of the commercial brands. Plus, there’s something satisfying about knowing exactly what’s in your food—no hidden ingredients, just pure, simple goodness.
Tips for Storing Your Homemade Spreadable Butter
Keeping your homemade spreadable butter fresh and ready to use is a breeze with these simple storage tips:
- Choose the Right Container: Use a clean, airtight container with a secure lid. Those empty store-bought butter tubs work perfectly and help reduce waste.
- Keep It Cool: Store your spreadable butter in the refrigerator to maintain its smooth, spreadable consistency.
- Label and Date: Don’t forget to label your container with the date you made the butter. This helps you keep track of its freshness and ensures you enjoy it at its best.
An Alternative for Time-Savers: The Butter Bell

If you’re someone who loves the idea of spreadable butter but would rather skip the DIY process altogether, there’s a convenient tool you might want to try: the butter bell. This clever little device keeps your butter soft and spreadable without needing to refrigerate it. How? The butter bell features a two-part design: a top container that holds your butter and a base filled with water. The butter is placed in the top container, which is then inverted into the water-filled base, creating an airtight seal that keeps the butter fresh and soft at room temperature.
This setup is ideal for those who prefer to avoid the hassle of making their own spreadable butter, as it maintains your butter’s perfect consistency for easy spreading every time. Plus, it’s a great way to avoid cluttering your fridge with yet another jar! The butter bell ensures your butter stays fresh, soft, and ready to use, making it the perfect tool for anyone who enjoys butter without the wait.
Below are some our favorites:


Frequently Asked Questions About Spreadable Butter
Can I use any type of oil to make spreadable butter?
Absolutely! While I prefer canola oil for its light flavor and smooth texture, you can experiment with olive oil, avocado oil, or even a blend. Just keep in mind that the type of oil you choose may slightly affect the flavor and consistency of your butter.
How long does homemade spreadable butter last?
When stored properly in an airtight container in the fridge, your homemade spreadable butter should stay fresh for up to two weeks. If you’re making a larger batch, consider freezing portions to extend its shelf life.
Can I make spreadable butter with salted butter?
Yes, you can! Whether you use salted or unsalted butter is entirely up to your taste preference. Just remember that if you’re using salted butter, you may want to adjust the amount of salt you add to any recipes you use it in.
What’s the best way to soften butter quickly?
If you’re in a rush, cut your butter into small pieces and let it sit at room temperature for about 10-15 minutes. This will soften it up faster, making it easier to whip into spreadable butter.
Is homemade spreadable butter healthier than store-bought?
Making your own spreadable butter lets you control the ingredients, which means no mystery additives or preservatives. Plus, you can choose healthier oils if you prefer, making it a better option overall.

Homemade Spreadable Butter Recipe
Ingredients
- 2 sticks unsalted butter, room temperature (equal to 1 cup)
- 1/2 cup canola oil or oil of your choice: olive oil, avocado oil, etc.
Instructions
- Place the room-temperature butter in the bowl of a stand mixer. Using the whip attachment, whip the butter on medium speed until it’s smooth and creamy, about 1 minute. If you’re using a hand mixer, any bowl will work.
- Slowly pour in the canola oil while continuing to whip the butter on medium-high speed. Whip for another minute until the butter and oil are fully combined and the mixture is smooth.
- Transfer the spreadable butter into a clean, airtight container with a lid. Store it in the refrigerator, where it will stay perfectly soft and spreadable for up to two weeks.
Notes
Tips:
- Flavor Variations: Try using different oils for a unique flavor profile. Olive oil adds a fruity richness, while avocado oil offers a mild, buttery taste.
- Portioning: If making a large batch, consider dividing the butter into smaller containers to keep it fresher longer.
- Room Temperature Shortcut: To soften butter quickly, cut it into small pieces and let it sit at room temperature for 10-15 minutes before whipping.
Nutrition
Question: What’s your favorite way to use spreadable butter? Do you make your own or stick with store-bought?

More from Everyday Cheapskate
 https://www.everydaycheapskate.com/wp-content/uploads/20260628-Grilled-Peaches-with-Balsamic-and-Blue-Cheese-1.png
800
1200
Mary Hunt
https://www.everydaycheapskate.com/wp-content/uploads/EC-Logo-by-Mary-Hunt-Tagline-Trimmed.png
Mary Hunt2026-06-29 09:38:342026-06-29 09:38:34Summer Grilled Peaches with Balsamic and Blue Cheese
https://www.everydaycheapskate.com/wp-content/uploads/20260628-Grilled-Peaches-with-Balsamic-and-Blue-Cheese-1.png
800
1200
Mary Hunt
https://www.everydaycheapskate.com/wp-content/uploads/EC-Logo-by-Mary-Hunt-Tagline-Trimmed.png
Mary Hunt2026-06-29 09:38:342026-06-29 09:38:34Summer Grilled Peaches with Balsamic and Blue Cheese https://www.everydaycheapskate.com/wp-content/uploads/20260628-close-up-photo-a-woman-wearing-a-swimsuit-with-a-mild-sunburn.png
800
1200
Mary Hunt
https://www.everydaycheapskate.com/wp-content/uploads/EC-Logo-by-Mary-Hunt-Tagline-Trimmed.png
Mary Hunt2026-06-28 21:40:042026-06-28 21:40:04DIY After-Sun Spray That Cools and Soothes Skin
https://www.everydaycheapskate.com/wp-content/uploads/20260628-close-up-photo-a-woman-wearing-a-swimsuit-with-a-mild-sunburn.png
800
1200
Mary Hunt
https://www.everydaycheapskate.com/wp-content/uploads/EC-Logo-by-Mary-Hunt-Tagline-Trimmed.png
Mary Hunt2026-06-28 21:40:042026-06-28 21:40:04DIY After-Sun Spray That Cools and Soothes Skin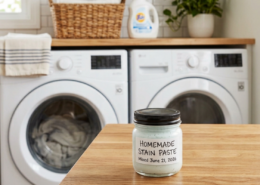 https://www.everydaycheapskate.com/wp-content/uploads/20260626-homemade-stain-paste-sitting-on-wooden-countertop-in-laundry-room-with-washer-and-dryer.png
800
1200
Mary Hunt
https://www.everydaycheapskate.com/wp-content/uploads/EC-Logo-by-Mary-Hunt-Tagline-Trimmed.png
Mary Hunt2026-06-26 17:41:192026-06-26 17:41:19Homemade Laundry Stain Paste That Works for Pennies
https://www.everydaycheapskate.com/wp-content/uploads/20260626-homemade-stain-paste-sitting-on-wooden-countertop-in-laundry-room-with-washer-and-dryer.png
800
1200
Mary Hunt
https://www.everydaycheapskate.com/wp-content/uploads/EC-Logo-by-Mary-Hunt-Tagline-Trimmed.png
Mary Hunt2026-06-26 17:41:192026-06-26 17:41:19Homemade Laundry Stain Paste That Works for Pennies https://www.everydaycheapskate.com/wp-content/uploads/20260620-cheesey-chicken-and-rice-casserole-in-a-baking-dish.png
800
1200
Mary Hunt
https://www.everydaycheapskate.com/wp-content/uploads/EC-Logo-by-Mary-Hunt-Tagline-Trimmed.png
Mary Hunt2026-06-20 13:31:162026-06-20 13:31:16Cheesy Chicken & Rice Bake That Disappears at Family Dinners
https://www.everydaycheapskate.com/wp-content/uploads/20260620-cheesey-chicken-and-rice-casserole-in-a-baking-dish.png
800
1200
Mary Hunt
https://www.everydaycheapskate.com/wp-content/uploads/EC-Logo-by-Mary-Hunt-Tagline-Trimmed.png
Mary Hunt2026-06-20 13:31:162026-06-20 13:31:16Cheesy Chicken & Rice Bake That Disappears at Family Dinners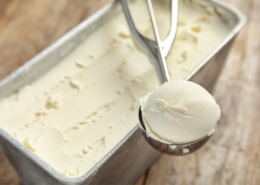 https://www.everydaycheapskate.com/wp-content/uploads/20260619-delicious-creamy-no-churn-vanilla-ice-cream-scoop-and-loaf-pan.png
800
1200
Mary Hunt
https://www.everydaycheapskate.com/wp-content/uploads/EC-Logo-by-Mary-Hunt-Tagline-Trimmed.png
Mary Hunt2026-06-19 18:42:402026-06-19 18:42:413-Ingredient No-Churn Vanilla Ice Cream (No Machine Needed)
https://www.everydaycheapskate.com/wp-content/uploads/20260619-delicious-creamy-no-churn-vanilla-ice-cream-scoop-and-loaf-pan.png
800
1200
Mary Hunt
https://www.everydaycheapskate.com/wp-content/uploads/EC-Logo-by-Mary-Hunt-Tagline-Trimmed.png
Mary Hunt2026-06-19 18:42:402026-06-19 18:42:413-Ingredient No-Churn Vanilla Ice Cream (No Machine Needed) https://www.everydaycheapskate.com/wp-content/uploads/20260618-retriever-labrador-on-white-rug-in-bright-contemporary-living-room-pet-stains-and-odors.png
800
1200
Mary Hunt
https://www.everydaycheapskate.com/wp-content/uploads/EC-Logo-by-Mary-Hunt-Tagline-Trimmed.png
Mary Hunt2026-06-18 23:08:332026-06-18 23:08:33Homemade Pet Stain Remover That Stops Repeat Accidents
https://www.everydaycheapskate.com/wp-content/uploads/20260618-retriever-labrador-on-white-rug-in-bright-contemporary-living-room-pet-stains-and-odors.png
800
1200
Mary Hunt
https://www.everydaycheapskate.com/wp-content/uploads/EC-Logo-by-Mary-Hunt-Tagline-Trimmed.png
Mary Hunt2026-06-18 23:08:332026-06-18 23:08:33Homemade Pet Stain Remover That Stops Repeat Accidents https://www.everydaycheapskate.com/wp-content/uploads/20260616-close-up-of-watermelon-feta-salad-with-mint-and-lime.png
800
1200
Mary Hunt
https://www.everydaycheapskate.com/wp-content/uploads/EC-Logo-by-Mary-Hunt-Tagline-Trimmed.png
Mary Hunt2026-06-16 17:44:142026-06-16 17:44:14Watermelon Feta Salad with Mint for Summer Cookouts
https://www.everydaycheapskate.com/wp-content/uploads/20260616-close-up-of-watermelon-feta-salad-with-mint-and-lime.png
800
1200
Mary Hunt
https://www.everydaycheapskate.com/wp-content/uploads/EC-Logo-by-Mary-Hunt-Tagline-Trimmed.png
Mary Hunt2026-06-16 17:44:142026-06-16 17:44:14Watermelon Feta Salad with Mint for Summer Cookouts https://www.everydaycheapskate.com/wp-content/uploads/20260615-how-to-get-rid-of-the-smell-in-the-ice-cooler-chest.png
800
1200
Mary Hunt
https://www.everydaycheapskate.com/wp-content/uploads/EC-Logo-by-Mary-Hunt-Tagline-Trimmed.png
Mary Hunt2026-06-15 20:59:282026-06-15 20:59:28How to Clean and Deodorize Your Cooler So It Doesn’t Stink
https://www.everydaycheapskate.com/wp-content/uploads/20260615-how-to-get-rid-of-the-smell-in-the-ice-cooler-chest.png
800
1200
Mary Hunt
https://www.everydaycheapskate.com/wp-content/uploads/EC-Logo-by-Mary-Hunt-Tagline-Trimmed.png
Mary Hunt2026-06-15 20:59:282026-06-15 20:59:28How to Clean and Deodorize Your Cooler So It Doesn’t Stink https://www.everydaycheapskate.com/wp-content/uploads/20260613-chicken-a-lorange-recipe-in-roasting-pan-with-shallots-and-orange-marmalade.png
800
1200
Mary Hunt
https://www.everydaycheapskate.com/wp-content/uploads/EC-Logo-by-Mary-Hunt-Tagline-Trimmed.png
Mary Hunt2026-06-13 20:59:292026-06-13 20:59:29Duck à l’Orange Is Fancy. This Chicken Version Is Better.
https://www.everydaycheapskate.com/wp-content/uploads/20260613-chicken-a-lorange-recipe-in-roasting-pan-with-shallots-and-orange-marmalade.png
800
1200
Mary Hunt
https://www.everydaycheapskate.com/wp-content/uploads/EC-Logo-by-Mary-Hunt-Tagline-Trimmed.png
Mary Hunt2026-06-13 20:59:292026-06-13 20:59:29Duck à l’Orange Is Fancy. This Chicken Version Is Better.Please keep your comments positive, encouraging, helpful, brief,
and on-topic in keeping with EC Commenting Guidelines
Last update on 2026-07-01 / Affiliate links / Images from Amazon Product Advertising API


the whipped butter and the stick butter cost the same for the same number of ounces in the store where i shop, so i’ve been buying whipped butter for years and left it on the counter so it would stay soft-ish. my house is cold enough that it was still somewhat hard but not as bad as if i put it in the fridge. but i may try using your recipe with olive oil because it’s healthier.
I regularly use this spreadable butter recipe. I use salted butter and canola oil and add a little bit of salt. I find that I can taste the butter taste more with salt and I end up using less spreadable butter at a time whether on toast or in some other recipe.
Mary I read somewhere that you couldnt freeze butter that has olive oil in it – is that right? I buy the land o lakes w/olive oil, expensive and we go thru a lot. if I can make and freeze it…wonderful! thanks!
While freezing can alter the quality of olive oil, it doesn’t necessarily shorten its shelf life if consumed within a reasonable timeframe. Given this fact, try it! You have very little to lose and a lot to gain! And let us know …
I use a butter bell – put in fresh cold water daily, no oil needed!
It’s a great invention! Here’s a link for fellow readers who are not familiar with the classic Butter Bell
I have a butter crock that is perfect! You soften the 1/4 cube of butter, place it into the crock top, put cold water in the crock container VOLIA! Always have soft butter. No need to oil…which does not sound good to me! Change the cold water out every two-three days to keep the butter fresh. I am so glad I found this butter crock! It rocks! If you want one, you can get them at Amazon. The one I have is the Norpro Glazed Stoneware Butter Keeper, but there are other choices there.
Good Luck!
Yes, butter crock is also known as a Butter Bell.
the butter went moldy after 3 days
I can only imagine the ingredients were bad going in.
the butter was realy good in fact.
How much salt do you add to your recipe? I tried it using unsalted butter & it’s perfect. Just needs salt.
To taste. I can’t specify an amount as every taste is different. Using unsalted butter does allow you to control your sodium, which many people do.
When I refrigerated it, my definitely was not spreadable. Keeping the butter on the counter in the winter is not an option, as we must keep our house too cool and the counter is on the north side of the house.
Using your recipe, what the maximum time of fridge storage. “How long will it last in the fridge?” Only one person using it here…Thank you.
I treat it the same as butter.
I made this but I used a regular mixer. I did it for 1 minute like it said. It turned out hard after being in the refrigerator. Did I not do it long enough? How long with a regular mixer? I used canola.
Don’t make it to complicated. You can do there method but I melt the butter the next or at end of day once the water has dried a little. I mix the oil well in the melted butter and then let it cool. Also if you remove and filter out the foamy suds from top of melted butter it will make butter shelf stable as well so you can keep in refrigerator or keep on table. Also known as Ghee/clarified butter. I use avocado or olive oil for health but each to there own, use what ever oil you prefer.
I used to make highly spreadable butter with my KGN kids by shaking a jar of 1 cup of whipping cream vigorously by passing the jar around the circle of 24 kids as we sang a song. The results were delicious and we used it for the corn bread we ate for Thanksgiving. Pure delight!
How did you store it?
and the liquid that was left behind was REAL buttermilk, not that nasty cultured stuff they sell. sometimes i make my own butter just to get the buttermilk.
I tried this because I want to buy less plastic. So I whipped the butter in the mixer and it was already pretty soft so I poured the oil in slowly and just used 1/4 cup… that seemed to be plenty… and it was. I didn’t even try the 1/2 cup of oil. It seems like that would make it absolutely runny. Does it?
Not when stored in the refrigerator. But if you prefer the 1/4 cup of oil option, that’s awesome!
My mixture was very runny upon mixing, practically a liquid. However it firmed up perfectly when placed in the refrigerator. This is a great solution for us because (1) it taste good, (2) I know the exact ingredients in my food, and (3) it is economical without wasting refrigerator space. We previously purchased large tubs for economy, but they required more refrigerator space. We have always purchased butter at the warehouse club and kept a supply in the freezer.
I’ve been making my own spreadable butter for over 25 years, but I use a 1 to 1 ratio of oil to butter because it reduces the percentage of saturated fat vs. the healthier fats in the oils. I’ve used various oils – olive, canola, safflower – but currently use a mix of olive oil and avocado oil. I use it in place of regular butter for everything except baking.
Mary, would real stick butter mixed with virgin olive oil or maybe coconut oil & have the same effects???
Btw…love the “everyday cheapskate tips” I receive in my inbox from you daily!
I would use olive oil or avocado oil for health. Not so much on coconut oil it’s really only healthy when you get it raw which is solid at room temperature which wouldn’t make it so spreadable.
Just leave the butter out and covered. It is then spreadable, nutritious, and delicious.
Refrigeration slows down the process of oxidation, which will eventually cause butter to go rancid.
So true that’s why it’s better to turn it into clarified butter/ghee
Perhaps from a cooking standpoint, but this method of separating the fat and then discarding the milk solids to end up with “ghee” removes the flavor and makes already-expensive butter even more so. For my purposes in this post, turning butter into ghee is not practical or recommended. It may cook well, but tastes flat spread on toast.
we leave ours on the counter too, in a covered container. we go through it quickly enough we’ve never had it go rancid.
I remember doing this in the 70s. It was called Better Butter.