How to Keep a Keurig Coffee Maker Making Coffee (Even if You Think It’s Broken)

If you own a Keurig coffee maker and if it started out brewing a full cup of coffee then turned to a half cup and is now on its way to the landfill—you are not alone. There are many disgruntled Keurig owners out there.
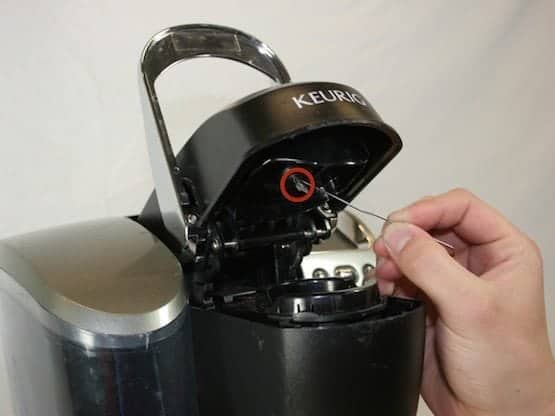
photo credit: IFixIt.com
That makes me wonder how many people have actually tossed a perfectly good Keurig coffee maker into the trash, when 30 minutes of their time, a slosh of white vinegar and a paperclip could have put that thing back into tip-top shape.
Hopefully, if you have a Keurig that’s giving you fits because the thing just will not work, you haven’t given it the ol’ heave-ho. I’m pretty sure it will be worth your time to get it back up and working.
Before I go on, let’s cover some disclosures: I do not use a Keurig. I roast my own coffee (the freshest, best coffee in the world) and brew it in this Bunn Coffee Brewer. I find the Keurig machines to be inadequate due to the single-serving feature and the disposable K-cups required to make the thing work are quite pricey.
With that out of the way, let’s get down to Keurig business.
Every Keurig coffee maker comes with instructions that it must be de-scaled routinely, and only Keurig Descaling Solution should be used. You do not need this product to get your Keurig coffee maker up and working. That’s because the biggest problem a Keurig has is getting clogged up with minerals from the water and from tiny bits of coffee grounds.
I’m no engineer, but it does seem to me that there is a design flaw somewhere in the Keurig empire. Older Keurig machines are notorious for giving a message that the machine needs to be descaled when in fact, the thing is hopelessly clogged.
Here is what you will need to fix and clean your Keurig machine: warm soapy water, a paperclip, a drinking straw, a soft cloth and about 30 minutes.
- Unplug the machine. Do not skip this step.
- Take the thing apart. First, remove the water tank and lid, then the stand that the cup rests on. Open the top to remove the K-cup holder.
- Wash all of these parts you took off the machine in warm soapy water, then dry them thoroughly.
- Partially unbend the paper clip.
- Keeping the top of the machine open, very carefully insert the free end of the paperclip into each of the three tiny holes that pierce the K-cup. This will be evident as you hold the thing up and look in that area. Those little holes are likely clogged with mineral build-up and debris, even though that may not be able to see that. Wiggle the paperclip while inserted in each of the holes. You won’t break anything because these are not working parts—only holes through which the water is dispensed that get clogged up.
- Turn the machine upside down. Smack it a few times with the palm of your hand to dislodge any other debris and scale.
- While the machine is still upside down, locate the spout. Place the drinking straw over it, grasp it tightly to seal the straw to the spout and blow into it. Blow hard! You want to force air through Keurig to clear the waterline. You guessed it: debris and scale in the line.
- With a cloth, clean the cup holder and the outside of the machine. Make it shiny like new.
- Put the thing back together, including the parts you washed and dried in Step 3.
- Fill the water tank with half water and half white vinegar. Run the machine without a K-cup until you’ve run through the entire reservoir of 50-50 water vinegar mix. Toss the hot smelly water down the sink (it will clean your drain pipes as well).
- Refill the reservoir with just water and repeat the process. Do it a couple of times until there is no trace of vinegar.
- Repeat Steps 10 and 11 once each month to maintain your Keurig.
If the machine ever begins to make less than a full cup or gets sluggish or stops altogether, repeat from Step 1.
By the way, if you are a Keurig owner, check out this refillable single-cup for most Keurig K-cup brewers (not compatible with Keurig 2.0). You can use your own coffee and save a bundle over the cost of individual K-cups.

More from Everyday Cheapskate
 https://www.everydaycheapskate.com/wp-content/uploads/20260703-home-decor.png
800
1200
Mary Hunt
https://www.everydaycheapskate.com/wp-content/uploads/EC-Logo-by-Mary-Hunt-Tagline-Trimmed.png
Mary Hunt2026-07-03 20:46:552026-07-03 20:46:5510 Everyday Items You Never Think to Wash (But Should)
https://www.everydaycheapskate.com/wp-content/uploads/20260703-home-decor.png
800
1200
Mary Hunt
https://www.everydaycheapskate.com/wp-content/uploads/EC-Logo-by-Mary-Hunt-Tagline-Trimmed.png
Mary Hunt2026-07-03 20:46:552026-07-03 20:46:5510 Everyday Items You Never Think to Wash (But Should) https://www.everydaycheapskate.com/wp-content/uploads/20260630-a-lit-sparkler-with-an-american-flag-in-the-background-4th-of-july-hacks-tips-and-recipes.png
800
1200
Mary Hunt
https://www.everydaycheapskate.com/wp-content/uploads/EC-Logo-by-Mary-Hunt-Tagline-Trimmed.png
Mary Hunt2026-06-30 21:44:502026-06-30 21:44:5034 Fourth of July Recipes and DIY Hacks for a Stress-Free Holiday
https://www.everydaycheapskate.com/wp-content/uploads/20260630-a-lit-sparkler-with-an-american-flag-in-the-background-4th-of-july-hacks-tips-and-recipes.png
800
1200
Mary Hunt
https://www.everydaycheapskate.com/wp-content/uploads/EC-Logo-by-Mary-Hunt-Tagline-Trimmed.png
Mary Hunt2026-06-30 21:44:502026-06-30 21:44:5034 Fourth of July Recipes and DIY Hacks for a Stress-Free Holiday https://www.everydaycheapskate.com/wp-content/uploads/20260629-wooden-die-spell-july-with-patriotic-decor-in-background.png
800
1200
Mary Hunt
https://www.everydaycheapskate.com/wp-content/uploads/EC-Logo-by-Mary-Hunt-Tagline-Trimmed.png
Mary Hunt2026-06-29 21:07:092026-06-29 21:10:297 Best Things to Buy in July for Huge Summer Savings
https://www.everydaycheapskate.com/wp-content/uploads/20260629-wooden-die-spell-july-with-patriotic-decor-in-background.png
800
1200
Mary Hunt
https://www.everydaycheapskate.com/wp-content/uploads/EC-Logo-by-Mary-Hunt-Tagline-Trimmed.png
Mary Hunt2026-06-29 21:07:092026-06-29 21:10:297 Best Things to Buy in July for Huge Summer Savings https://www.everydaycheapskate.com/wp-content/uploads/20260628-Grilled-Peaches-with-Balsamic-and-Blue-Cheese-1.png
800
1200
Mary Hunt
https://www.everydaycheapskate.com/wp-content/uploads/EC-Logo-by-Mary-Hunt-Tagline-Trimmed.png
Mary Hunt2026-06-29 09:38:342026-06-29 09:38:34Summer Grilled Peaches with Balsamic and Blue Cheese
https://www.everydaycheapskate.com/wp-content/uploads/20260628-Grilled-Peaches-with-Balsamic-and-Blue-Cheese-1.png
800
1200
Mary Hunt
https://www.everydaycheapskate.com/wp-content/uploads/EC-Logo-by-Mary-Hunt-Tagline-Trimmed.png
Mary Hunt2026-06-29 09:38:342026-06-29 09:38:34Summer Grilled Peaches with Balsamic and Blue Cheese https://www.everydaycheapskate.com/wp-content/uploads/20260625-a-rustic-wooden-christmas-tree-in-the-sand-on-the-beach.png
800
1200
Mary Hunt
https://www.everydaycheapskate.com/wp-content/uploads/EC-Logo-by-Mary-Hunt-Tagline-Trimmed.png
Mary Hunt2026-06-26 11:34:132026-06-26 11:36:44Christmas in June? Try This Amazon Prime Day Gift Guide
https://www.everydaycheapskate.com/wp-content/uploads/20260625-a-rustic-wooden-christmas-tree-in-the-sand-on-the-beach.png
800
1200
Mary Hunt
https://www.everydaycheapskate.com/wp-content/uploads/EC-Logo-by-Mary-Hunt-Tagline-Trimmed.png
Mary Hunt2026-06-26 11:34:132026-06-26 11:36:44Christmas in June? Try This Amazon Prime Day Gift Guide https://www.everydaycheapskate.com/wp-content/uploads/20260624-why-does-my-ice-taste-weird-soda-tea-lemonade-juice.png
800
1200
Mary Hunt
https://www.everydaycheapskate.com/wp-content/uploads/EC-Logo-by-Mary-Hunt-Tagline-Trimmed.png
Mary Hunt2026-06-24 17:10:532026-06-24 17:10:53Why Does My Ice Taste Weird? Here’s the Answer
https://www.everydaycheapskate.com/wp-content/uploads/20260624-why-does-my-ice-taste-weird-soda-tea-lemonade-juice.png
800
1200
Mary Hunt
https://www.everydaycheapskate.com/wp-content/uploads/EC-Logo-by-Mary-Hunt-Tagline-Trimmed.png
Mary Hunt2026-06-24 17:10:532026-06-24 17:10:53Why Does My Ice Taste Weird? Here’s the Answer https://www.everydaycheapskate.com/wp-content/uploads/20260622-a-single-car-garaged-with-beautiful-flowers-along-landscape-beds-things-ruined-by-heat-in-the-garage.png
800
1200
Mary Hunt
https://www.everydaycheapskate.com/wp-content/uploads/EC-Logo-by-Mary-Hunt-Tagline-Trimmed.png
Mary Hunt2026-06-22 20:24:432026-06-22 20:24:4325 Things Summer Heat Can Ruin in Your Garage
https://www.everydaycheapskate.com/wp-content/uploads/20260622-a-single-car-garaged-with-beautiful-flowers-along-landscape-beds-things-ruined-by-heat-in-the-garage.png
800
1200
Mary Hunt
https://www.everydaycheapskate.com/wp-content/uploads/EC-Logo-by-Mary-Hunt-Tagline-Trimmed.png
Mary Hunt2026-06-22 20:24:432026-06-22 20:24:4325 Things Summer Heat Can Ruin in Your Garage https://www.everydaycheapskate.com/wp-content/uploads/20260621-amazon-prime-day-2026-is-coming-everyday-cheapskate-mary-hunt-guide-for-cheapskates.png
800
1200
Mary Hunt
https://www.everydaycheapskate.com/wp-content/uploads/EC-Logo-by-Mary-Hunt-Tagline-Trimmed.png
Mary Hunt2026-06-21 15:48:502026-06-21 15:48:50The Cheapskate’s Guide to Winning Prime Day 2026
https://www.everydaycheapskate.com/wp-content/uploads/20260621-amazon-prime-day-2026-is-coming-everyday-cheapskate-mary-hunt-guide-for-cheapskates.png
800
1200
Mary Hunt
https://www.everydaycheapskate.com/wp-content/uploads/EC-Logo-by-Mary-Hunt-Tagline-Trimmed.png
Mary Hunt2026-06-21 15:48:502026-06-21 15:48:50The Cheapskate’s Guide to Winning Prime Day 2026 https://www.everydaycheapskate.com/wp-content/uploads/20260622-prime-day-is-here-crockpot-steamer-blackstone-griddle.png
800
1200
Mary Hunt
https://www.everydaycheapskate.com/wp-content/uploads/EC-Logo-by-Mary-Hunt-Tagline-Trimmed.png
Mary Hunt2026-06-21 12:11:092026-06-26 16:46:21Your Guide to the Best Amazon Prime Day Deals of 2026
https://www.everydaycheapskate.com/wp-content/uploads/20260622-prime-day-is-here-crockpot-steamer-blackstone-griddle.png
800
1200
Mary Hunt
https://www.everydaycheapskate.com/wp-content/uploads/EC-Logo-by-Mary-Hunt-Tagline-Trimmed.png
Mary Hunt2026-06-21 12:11:092026-06-26 16:46:21Your Guide to the Best Amazon Prime Day Deals of 2026

I tried everything to try and fix our brand new Keurig that my daughter destroyed using milk. I swear the upside down whack made it work again. Thank you!!!
I used filtered water, but now seeing green at the bottom of the water dispenser and no way to clean it. Will the vinegar solution clean it?
I tried your instructions and it doesn’t work and/or do anything anymore. A piece of expensive junk!
Whether you want to make coffee for yourself every morning, host a small gathering or keep your employees happy, a Keurig coffee maker does the trick for you.
Do not use vinegar. Use citric acid which can be found with canning supplies at Walmart. Google the process. This is real cheap and is the same as buying the expensive descaling solution from Keurig. No lingering vinegar smell or taste. Cleans better as well.
Thank you so much, for your great help!.It was very very helpful,I’m so happy ! It was great to see my Keurig working again thanks
Thank you very much! This simple explanation on how to address the little to no drip is has been resolved. I was ready toss it out but after following the instructions my machine is working great! Thank you once again.
What a great article! Coffee is my daily drink every morning. Iḿ crazy about it . I have owned this machine for a period of time. It ‘s really useful for me to start a new day exciting. This is some great info, and I really appreciate it! Thanks a lot.
detected
Follow the directions and it did not work for me. It flashes “add water” though the reservoir is full.
It sometimes flashes “heating” at the same time the mug symbol is lit. I press the mug symbol and nothing comes out! I did use the paper clip & straw.
I am frustratted and called a local appliance center to see if they could repair it and they said Keurig does not provide any parts that might be needed. It is only a year old and hasn’t been used much.
Appreciate any additional help. TIA
Oh sorry to hear this. Clearly you have a problem beyond this DIY trick to fix. Did it come with warranty from Keurig? If it’s only a year old, I’d go directly to Keurig and complain loudly!
My keurig stop working.. no power at all.. any diy here?
Now I admit to being somewhat extreme and abusive of the equipment – for instance, using a My-K Cup to make an extra large cup by using the coffee 2X(to get a 16 oz mug of coffee). Also modifying the K-Cup, eliminating the inner basket and using a filter and filling up the whole thing to make a potent mug of coffee.
So having said this, and as I write I’m giving myself the dumbass award, I suspect the mechanism is subject to excessive problems from using My K-Cup, especially the way I use it. I tend to overthink things to the point of causing problems; to wit: Well, gee, the My-K-Cup is BELOW the injector, so why should it cause problems? But it does….it DEFINITELY does……please post if you can corroborate my story. Thanks!
I found a refillable cup on amazon that works fine in my 2.0. http://www.amazon.com/gp/product/B00PBF3T3E?psc=1&redirect=true&ref_=oh_aui_detailpage_o04_s00
I use it for coffee, tea (with a paper liner made for refillable cups I found at Target), and even for the K-cups that supposedly work but really don’t. I also love Gary and you for turning me on to the San Francisco Bay coffee company that has a “freedom clip” that I got free with a sample pack ($1.99) that covers the ink reader keeping the 2.0 from using non-approved cups in the machine. Bless you for all you do, and the Rogers company that runs the San Francisco Bay Coffee Company is very sweet and has wonderful employees. I highly recommend their pumpkin spice coffee, and the cups are 97% biodegradeable. http://www.gourmet-coffee.com/onecup-french-roast-3ct.html
This blog saved us $150. We were at our wits end with our three year old Keurig. I’ve never had the descale light come on & I clean it using the Keurig instructions that came with it. It was hit and miss on the amount of coffee we were getting per cup. I was literally ready to toss it out and go buy a new one when you posted this fix. I followed your directions yesterday and wala! The cups of coffee we had this morning were full & delicious. I’ve been reading your blog for years and have not been compelled to post until now. Thanks so much!
I have a keurig, and my instruction booklet from Keurig says to use full strength vinegar in the reservoir. Fill it, run it down until it says to add water. Let the brewer sit for 4 hours while still on. Then, rinse the water reservoir thoroughly, fill with fresh water. Run the water through into a mug, until it says to add water. You may need to repeat the water running through if you notice any residual taste. —I’ve never had any issues with mine, and one thing I always do is use filtered water in it. I have never had the descale light come on, not even once in 4 years.
Actually, you CAN use the refillable single cup gadget with a Keurig 2.0. All you have to do is carefully cut off the top of a used K cup and press it onto the top of the gadget. The 2.0 has a scanner built in that reads the K cup code, and is easy to fool. Thank you for the cleaning tip. We have well water that passes through a whole house water filter in the basement, but I know we’ll need to clean the machine sooner or later.
I purchased one of those reusable K Cups. It didn’t work…..the water went straight down the middle, the rest of the coffee was dry…..lousy cup of coffee.
We have had our Keurig for years and have never had anything less than a full cup of coffee. With an occasional vinegar & water cleaning about every six months, it’s so easy. Seattle has good clean water right from the tap so I guess that helps.
I don’t know why I read this since I don’t own one, nor even make coffee all that often. But, I love a good diy story. Brava for extending the life of these machines. Two thoughts: I like to reuse my vinegar if it isn’t too messy. There’s always some other thing that I can use some slightly used vinegar to clean (though this would be diluted vinegar). Maybe adding a bit of sparkle to chrome faucets. The other is the concept of the reusable K cup. The statistics on the number of K cups being manufactured and discarded are staggering. I’m all for avoiding filling the landfill with plastic used once. But it begs the question, isn’t the point of the K cup to avoid the messy clean up? Why not stick with a more traditional, less expensive coffeemaker that uses a disposable filter, or even a style that uses a basket to be washed and reused? That said, as a former secretary who had to make coffee for meetings, I wish I had had a Keurig for the office. I threw many pots of coffee away, and had to deal with cleaning out the filters, etc. I give the Keurig credit for allowing for limiting waste while making coffee very quickly and easily, and giving everyone the opportunity to choose their hot beverage of choice.
I am looking for the Charcoal filter that sits in the water resivour.
I get mine from amazon…
I have had my Keurig for 3 yrs. No problems. Cleaned it once 5 months ago. My refrigerator has a filter water dispenser.
That Bonavita coffee maker is a beauty! I broke down & bought a Keurig & K cups late last year from Kohls (on sale & w/ a coupon). I don’t drink coffee. I am doing more entertaining this year. Everyone today has their own kind of hot drink and it was easier to be able to make individual hot drinks for the adults and hot chocolate for the kids. Aldis now carries K-Cups (which I haven’t tried yet).
The refillable k-cups are great, but I recommend going with one that’s made of stronger stuff than the plastic ones you link to above. I used the plastic refillable k-cup that came with my Keurig (10 years ago) and it started chipping around the edges after about a month. Since then, I bought a stainless steel version that is a little pricey, but works well and is so easy to clean.
http://www.amazon.com/gp/product/B00859FH7O/ref=oh_aui_detailpage_o02_s00?ie=UTF8&psc=1
THANK YOU THANK YOU THANK YOU! My Keurig drives me crazy, as it seems to fluctuate between full and half cups with no pattern. I’m off to follow your steps and then enjoy my morning coffee without daily frustration.
before you dump the hot vinegar water down the drain but 3 Tbsp of baking soda in drain first. Then you clean the sink drain as well.
Excellent! Great tip …