23 Genius Gardening Hacks I Wish I’d Known Sooner, Approved by Experts

So, gardening on a budget. That may sound like an oxymoron—either you garden, or you live on a budget. But don’t believe it. It doesn’t have to cost a fortune to grow a garden that pumps out tasty vegetables. There are many simple ways to have a lush, bountiful garden without emptying your wallet. Whether it’s recycling stuff, mixing up your own soil boosters, or scoring cheap seeds and starter plants, I’ve got you covered with gardening hacks, tips, and tricks to save cash while honing your gardening skills.
My first attempt at growing a vegetable garden was surprisingly successful. And a colossal failure. By the time I added up what I’d spent on plants, tools, fertilizer, supplies, more plants, and different types of fertilizer, I harvested what turned out to be the most expensive tomatoes, peppers, onions, and garlic on the planet! While my tiny salsa garden was bountiful, it was a financial train wreck.
That entire expensive, labor-intensive effort left a bad taste in my mouth. What’s the point? It ended up costing many times more than the cost of buying the same produce at any grocery store or farmer’s market. With every return trip to Home Depot’s garden center, my enthusiasm waned in direct proportion to the numbers on the receipt. And in the end, I vowed never to do that again.
But things have changed. Over the years since that experience, I’ve mellowed, and determined to learn from gardening experts who actually know what they’re doing. I’ve discovered that gardening on a budget can be a lot of fun, and it’s not difficult when you keep a load of frugal tips and tricks handy for how to garden on the cheap.
Here, for your enjoyment and in no particular order, genius gardening hacks for gardening on a budget that I wish I’d known sooner.
1. Borrow, Share Tools
If you’re new to this idea of gardening, rather than pouring money into a bunch of gardening tools you’re not sure you’ll ever use again, let friends and neighbors know what you’re up to. Chances are good they’ll have items you can borrow. And don’t be surprised if you receive a few gifts of tools others want to get rid of. It’s worth a shot and will keep your costs down to the bare minimum as you set out to see if gardening is an activity you enjoy and find success.
With some experience under your belt, you’ll be better positioned to decide the tools you need to own. And when that time comes? Shop garage sales, thrift stores, and Facebook Marketplace. Apparently, I’m not the only person who has purchased garden tools with abandon. And then abandoned the whole idea!
2. Forget Seedlings
It’s tempting! Those pony packs and endless trays of seedling “starts” in the garden center are all planted, sprouted, thriving, adorable, and ready to hit the ground. You could have your garden planted before dinner. And you’ll pay dearly if you choose to go that route. They’re not cheap! Better? DIY.
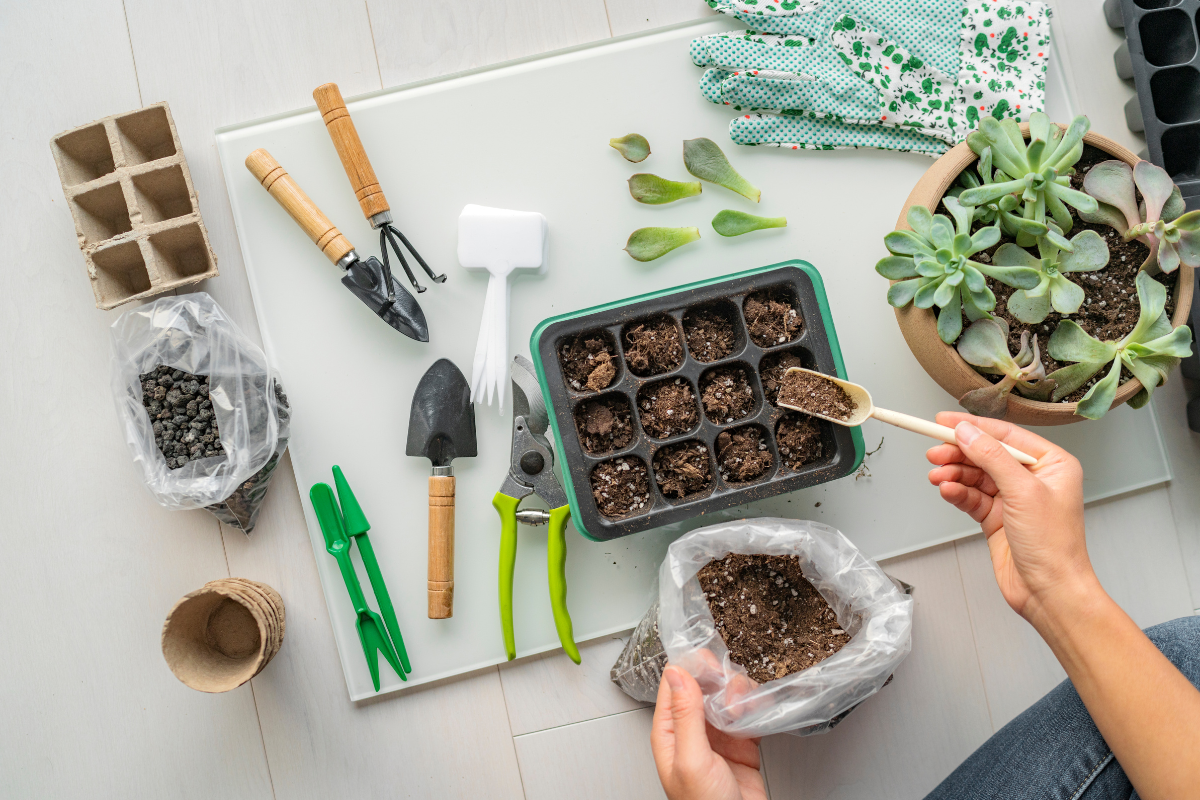
3. Seed Starting
It’s easy to grow your own starter seedlings. Walk away from the pony packs and head to the rack of seed packets. Look at all the choices. You’ll have to wait a bit to get your garden thriving, but I can tell you that nurturing plants from germination to maturity is such a rewarding experience. It allows you to witness the entire growth process firsthand.
Make sure you read the necessary information on the back of the seed packets. Don’t know your zone? Check this color-coded plant hardiness zone map of the United States to find which hardiness zone you live in. At that site, you’ll be able to type in your zip code to find your exact zone.
You will need some potting soil, but that’s all—don’t buy starting kits or special containers. Get creative with what you have at home. Egg cartons, toilet paper rolls, yogurt cups, paper coffee cups, and fast food containers, can be repurposed into seed-starting containers. Just be sure to poke drainage holes in the bottom and then fill them with potting soil.
4. Use Toilet Paper Tubes to Make Seed Pods
This from our friends at Family Handyman is so clever. Take an empty toilet paper tube and make a series of cuts approximately 1 to 1 1/2 inches in length and spaced about 1/2 inch apart around one end of the roll.
Fold the cut sections inward toward the center of the roll to form the base of your seed pod. Don’t use any tape here, as this cute growing container will eventually be planted into the ground along with its seedlings. Once planted, the cardboard will naturally break down, become part of the soil, and nourish that plant.
Repeat with as many tubes as you have, then stand them on a tray or plate. If they seem unsteady, secure them by loosely wrapping twine around the cluster of seed pods to keep them stable.
Fill the tiny pods with moistened potting mix, and then sow your seeds following the instructions on the seed packet. Water as instructed, then set in a sunny window. Typically, it will take a few weeks until you’re ready to transplant the seedlings and paper pods into the garden.
5. Greenhouse from the Salad Bar
The next time you enjoy a salad bar lunch, don’t toss out the plastic clamshell container! Instead, give it a second life as a mini greenhouse for spring seed-starting. After cleaning the container, add airflow by punching small holes in the top with the tip of scissors, a knife, or an awl and hammer.
Fill the bottom half with potting mix or your preferred seed-starting soil, then plant your seeds according to seed packet instructions. Water lightly, close the lid, and place in a sunny spot. Watch as your seeds sprout in this cool little greenhouse, which traps warmth and moisture while letting in sunlight.
6. Get Free Seeds
Keep an eye out for companies that occasionally offer free seeds, either through direct requests or promotional campaigns. One way to stay updated on these offers is by following your preferred seed companies on social media. Burpee is a good one. Be quick to respond to promotions for the best chance of snagging some complimentary seeds.
Another tip for scoring free seeds is to request seed catalogs. Many companies include free seeds in their catalogs, providing inspiration and practical resources for planning your garden. So, when you spot these catalogs, don’t hesitate to request them—it’s a great way to get both ideas and seeds for your gardening endeavors.
7. Join a Seed Library
A seed library is like borrowing books from a library, but instead of books, you borrow seeds. After growing your plants, you return the same amount or more seeds than you borrowed. It’s similar to a seed exchange but without the requirement to offer seeds initially, making it especially beneficial for novice gardeners.
This article at LifeHacker would be a great starting point for discovering and connecting with seed libraries in your area.
8. DIY Potting Soil
Instead of buying pre-packaged potting soil, consider making your own using a combination of compost, vermiculite, and peat moss. Don’t worry; those are common ingredients found at any garden center at stores like Walmart, Target, Home Depot, and online.
Homemade potting soil is not only cost-effective but also allows you to tailor the mix to suit the specific needs of your plants. Expert gardener, Amy Andrychowicz offers seven potting soil recipes to mix your own, at GetBusyGardening.com.
9. Moving Seedlings Outdoors
Two weeks before outdoor planting, gradually introduce your seedlings to weather conditions in their future garden home, say experts at Univ. of Minnesota Extension. Begin by placing them outside for a few hours in the afternoon shade, shielded from wind. Return them indoors before nighttime temperatures decrease.
Each day, extend their outdoor visit gradually and expose them to increasing amounts of direct sunlight. By the end of the two weeks, unless freezing temperatures are expected, the seedlings can remain outdoors in a sunny location until you’re prepared to transplant them into the garden.
10. Propagate from Cuttings
You don’t always have to purchase seeds or “seedling starts” to grow new plants—many can be grown from cuttings from friends, neighbors, or even plants from your own garden. Jade, lavender, chrysanthemum, and butterfly bush are just a few examples of plants that readily propagate from cuttings.
Do this: Trim a 6 to 8-inch section of healthy green growth, leaving a few leaves at the top, and insert it into the soil either directly into the ground or in a pot. With proper care, the cutting should take root within a couple of weeks and become well-established by the following season.
11. Sweet Potato Slips
Imagine harvesting garden-fresh, homegrown sweet potatoes. It sounds easy enough. But hold on. Unlike potatoes, which are tubers grown from planting seed potatoes, sweet potatoes are propagated via a “slip.” Store-bought, organic sweet potato slips can be pricey—$1.50 each—which brings up the idea of DIY potato slips. This is so easy and quite remarkable.
A single organic sweet potato (you want to make sure your starter sweet potato is as pure and free of chemicals as possible so that it will reproduce willingly) can grow around 15 slips, which, in turn, equals 15 plants that will produce about 60 sweet potatoes. How’s that for a bargain?
It’s super easy to grow slips. Cut the end off that organic sweet potato. Next, stick a few toothpicks in a line around the circumference of the potato. Fill a glass jar (mason jar, recycled pickle jar, you get the idea) with tap water and rest the sweet potato cut side down in the jar on the toothpicks so it’s half in and half out of the water. Put your jar in a sunny, warm window and watch the magic happen!
In a few days, the slips (resembling sprouts) will start growing out of the top of the sweet potato. Once they reach a height of 4 to 5 inches, cut them from the sweet potato and root them in a different container and their own water.
When the roots have reached 4 inches (10 cm), it’s time to plant. Space the slips 12 to 18 inches (31-46 cm) apart and 4 inches (10 cm) deep so the roots are well below the soil line. Water the plants well and feed with a phosphorous-rich fertilizer, such as bone meal.
12. Make a Rain Barrel
Okay, this may be beyond basic gardening, but such a great hack that I must include it. You can save on water bills by harvesting rainwater with a DIY rain barrel. All you need is a large barrel or container, a gutter system to collect rainwater, and a spigot for easy access. Rainwater is free, but even more than that, it is naturally rich in nutrients, making it ideal for watering your garden! Your plants will thrive. If you’re at all interested, follow this link for how to make a rain barrel from a garbage can in 5 easy steps.
13. Use Homemade Fertilizers
Instead of buying expensive commercial fertilizers, consider making your own using household ingredients such as compost tea, fish emulsion, or bone meal. These natural fertilizers are not only cost-effective but also gentler on the environment.
14. Free Mulch
Mulching is essential for conserving moisture, suppressing weeds, and improving soil health. It protects the roots of tender plants by shielding them from harsh wind and other climate events. Instead of buying bags of mulch from the garden center, look for free sources like grass clippings, leaves, or perhaps wood chips from local arborists or municipal composting programs. Check with your city services. Ours often announces on the city website access to mulch that is free to pick up.
Once you get into the mulch frame of mind, you’ll be surprised by what might turn up for free where you live.
15. Make Dirt!
Composting is a simple and effective way to recycle food scraps and yard waste into nutrient-rich soil for your garden. Not only will you reduce waste, but you’ll also save money because you won’t be buying commercial fertilizers.
Composting at Home is an excellent free resource for learning how to compost using food scraps and yard cuttings to reduce waste, and improve soil health. Learn what materials to add which to avoid, and how to build and maintain your compost pile.
16. Epsom Salt Fertilizer Trick
You probably know of Epsom salt (hydrated magnesium sulfate) for its home remedy uses, but the garden might be the place where it shines the most. Like store-bought fertilizers, Epsom salt (nothing even close to table salt, which would definitely KILL your garden plants) contains magnesium, which helps with seed germination, chlorophyll production, and absorption of vital nutrients like nitrogen and phosphorus.
Most plants grow better with a ratio of two teaspoons of Epsom salt to one gallon of water per month. You can also dilute the Epsom salt with water in a bottle and apply it as a leaf spray. Misting a plant significantly increases its growth. This works exceptionally well on vegetables and roses.
17. Protect the Young
Even after you’ve toughened up your young seedlings, subjecting them to constant outdoor conditions can be rough. For extra shelter from the elements until they settle in, grab a 4-inch PVC pipe and slice it into 5-inch bits. Then, carefully plant the pipe into the soil, making sure it stays upright to shield your delicate plants.
Or, if you don’t have PVC pipe lying around, you can accomplish something similar with plastic water bottles by cutting off both the top and bottom sections. Just make sure to remove these protectors once your seedlings have taken root and become strong.
18. Cardboard for Tomatoes
Tomato plants have shallow roots, making them susceptible to damage when weeding. To prevent injury, consider covering the soil around tomato plants with large sections of primarily unprinted, corrugated brown cardboard. This suppresses weed growth, preserves soil moisture, and simplifies fall cleanup. At the end of the season, just roll up the cardboard with any plant debris and dispose of it.
19. DIY Drip Irrigation
Keeping your plants sufficiently hydrated during the scorching summer days can feel like a never-ending task. But you can remove some of that drudgery with this handy trick from Bob Vila, of household repair and maintenance fame. Mimicking the functionality of a drip irrigation system, this method channels water directly to the roots with just an empty plastic water bottle and a spare sock.
Simply puncture holes along the bottle’s sides, then insert the sock—the material acts as a sponge, absorbing and gradually releasing water to your plants. Now, sink it into the ground so that only the neck of the bottle and cap are visible. When it’s time to water, unscrew the cap and refill the bottle.
20. Protect Plants with Plastic Forks
Plastic forks have more uses than just serving up fast food. They can also be a handy tool in the garden. If you’ve noticed unwelcome visitors like stray cats, rabbits, or mice in your outdoor space, simply insert a few forks into the ground, tines up, around their frequent haunts. The pointed prongs act as a deterrent for most small animals, safeguarding delicate young plants from harm.
21. DIY Insecticide
Insecticidal soap offers a safe and natural solution for plants plagued by pests. Simply combine 1-2 drops of lemon essential oil with 1 tablespoon of pure liquid soap, such as castile soap, per quart of water, and transfer the mixture into a spray bottle. Keep the spray bottle within reach and apply as needed to safeguard your garden from unwanted pests.
22. Slugs, Ugh!
Once they settle into your garden, those slimy creatures wreak havoc by feasting on your homegrown veggies, demolishing seedlings, and leaving your plant leaves resembling Swiss cheese. To bid them farewell for good, haul out the beer.
Create your own trap by pouring some beer into a shallow container, such as a tuna can or pie plate. Bury it so that it’s level with the soil—like a swimming pool. Slugs (snails, too!) are drawn to the aroma of a cold brew. They take a dip, get drunk, can’t get out, and that means a slug-free garden in no time.
23. Start Slow, Enjoy
Finally, remember that gardening is a journey, not a race. Start small, go slow, and experiment. Learn from your successes and failures along the way. Gardening is more than mere plant cultivation. It is also about connecting with nature, learning new skills, and discovering the joys of a bountiful harvest. It’s confidence knowing you can grow your own food. Embrace the opportunity to participate in a growing movement known as field-to-table.
Learn all you can, get your hands dirty; teach the kids, watch your garden thrive, and be ready to share the bounty!
- MORE: Natural Pest Control: Companion Planting Strategies for Your Frugal Garden
- MORE: Hands Down the Best Way to Kill Weeds and It’s Not Roundup
Question: Do you have a favorite budget-friendly gardening tip or tool? We’d love for you to share it in the comments below!
EverydayCheapskate™ is reader-supported. We participate in the Amazon Services LLC Associates Program and other affiliate advertising programs, designed to provide a means for us to earn from qualifying purchases, at no cost to you.

More from Everyday Cheapskate
 https://www.everydaycheapskate.com/wp-content/uploads/20260714-car-dashboard-diy-car-interior-cleaning-wipes.png
800
1200
Mary Hunt
https://www.everydaycheapskate.com/wp-content/uploads/EC-Logo-by-Mary-Hunt-Tagline-Trimmed.png
Mary Hunt2026-07-14 13:45:172026-07-14 13:45:17DIY Car Interior Cleaning Wipes That Actually Work Well
https://www.everydaycheapskate.com/wp-content/uploads/20260714-car-dashboard-diy-car-interior-cleaning-wipes.png
800
1200
Mary Hunt
https://www.everydaycheapskate.com/wp-content/uploads/EC-Logo-by-Mary-Hunt-Tagline-Trimmed.png
Mary Hunt2026-07-14 13:45:172026-07-14 13:45:17DIY Car Interior Cleaning Wipes That Actually Work Well https://www.everydaycheapskate.com/wp-content/uploads/20260711-estate-sale-what-to-buy-used-and-what-to-avoid.png
800
1200
Mary Hunt
https://www.everydaycheapskate.com/wp-content/uploads/EC-Logo-by-Mary-Hunt-Tagline-Trimmed.png
Mary Hunt2026-07-11 22:54:052026-07-11 22:54:057 Things to Always Buy Used (And 5 You Never Should)
https://www.everydaycheapskate.com/wp-content/uploads/20260711-estate-sale-what-to-buy-used-and-what-to-avoid.png
800
1200
Mary Hunt
https://www.everydaycheapskate.com/wp-content/uploads/EC-Logo-by-Mary-Hunt-Tagline-Trimmed.png
Mary Hunt2026-07-11 22:54:052026-07-11 22:54:057 Things to Always Buy Used (And 5 You Never Should) https://www.everydaycheapskate.com/wp-content/uploads/20260710-luxury-car-driving-down-mountain-highway-how-to-lower-car-insurance-premium-.png
800
1200
Mary Hunt
https://www.everydaycheapskate.com/wp-content/uploads/EC-Logo-by-Mary-Hunt-Tagline-Trimmed.png
Mary Hunt2026-07-10 17:46:132026-07-10 17:46:13How to Knock $200+ Off Your Car Insurance Bill (Without Switching Companies)
https://www.everydaycheapskate.com/wp-content/uploads/20260710-luxury-car-driving-down-mountain-highway-how-to-lower-car-insurance-premium-.png
800
1200
Mary Hunt
https://www.everydaycheapskate.com/wp-content/uploads/EC-Logo-by-Mary-Hunt-Tagline-Trimmed.png
Mary Hunt2026-07-10 17:46:132026-07-10 17:46:13How to Knock $200+ Off Your Car Insurance Bill (Without Switching Companies) https://www.everydaycheapskate.com/wp-content/uploads/20260706-negotiate-medical-bills-female-nurse-with-calculator-and-ipad-negotiating-a-bill.png
800
1200
Mary Hunt
https://www.everydaycheapskate.com/wp-content/uploads/EC-Logo-by-Mary-Hunt-Tagline-Trimmed.png
Mary Hunt2026-07-06 21:19:252026-07-06 21:19:25How to Negotiate Medical Bills and Cut Costs 30-50%
https://www.everydaycheapskate.com/wp-content/uploads/20260706-negotiate-medical-bills-female-nurse-with-calculator-and-ipad-negotiating-a-bill.png
800
1200
Mary Hunt
https://www.everydaycheapskate.com/wp-content/uploads/EC-Logo-by-Mary-Hunt-Tagline-Trimmed.png
Mary Hunt2026-07-06 21:19:252026-07-06 21:19:25How to Negotiate Medical Bills and Cut Costs 30-50% https://www.everydaycheapskate.com/wp-content/uploads/20260705-Best-Coolers-for-Camping-Road-Trips-and-Beach-Days.png
800
1200
Mary Hunt
https://www.everydaycheapskate.com/wp-content/uploads/EC-Logo-by-Mary-Hunt-Tagline-Trimmed.png
Mary Hunt2026-07-05 13:26:172026-07-05 13:26:17Best Coolers for Camping, Road Trips, and Beach Days
https://www.everydaycheapskate.com/wp-content/uploads/20260705-Best-Coolers-for-Camping-Road-Trips-and-Beach-Days.png
800
1200
Mary Hunt
https://www.everydaycheapskate.com/wp-content/uploads/EC-Logo-by-Mary-Hunt-Tagline-Trimmed.png
Mary Hunt2026-07-05 13:26:172026-07-05 13:26:17Best Coolers for Camping, Road Trips, and Beach Days https://www.everydaycheapskate.com/wp-content/uploads/20260705-how-to-keep-a-cooler-cold.png
800
1200
Mary Hunt
https://www.everydaycheapskate.com/wp-content/uploads/EC-Logo-by-Mary-Hunt-Tagline-Trimmed.png
Mary Hunt2026-07-05 13:19:502026-07-05 13:19:50How to Pack a Cooler That Stays Cold for 48 Hours
https://www.everydaycheapskate.com/wp-content/uploads/20260705-how-to-keep-a-cooler-cold.png
800
1200
Mary Hunt
https://www.everydaycheapskate.com/wp-content/uploads/EC-Logo-by-Mary-Hunt-Tagline-Trimmed.png
Mary Hunt2026-07-05 13:19:502026-07-05 13:19:50How to Pack a Cooler That Stays Cold for 48 Hours https://www.everydaycheapskate.com/wp-content/uploads/20260704-financial-independence-sparkler-and-american-flag-in-night-sky.png
800
1200
Mary Hunt
https://www.everydaycheapskate.com/wp-content/uploads/EC-Logo-by-Mary-Hunt-Tagline-Trimmed.png
Mary Hunt2026-07-04 11:57:492026-07-04 11:57:49What My Debt Taught Me About Real Freedom
https://www.everydaycheapskate.com/wp-content/uploads/20260704-financial-independence-sparkler-and-american-flag-in-night-sky.png
800
1200
Mary Hunt
https://www.everydaycheapskate.com/wp-content/uploads/EC-Logo-by-Mary-Hunt-Tagline-Trimmed.png
Mary Hunt2026-07-04 11:57:492026-07-04 11:57:49What My Debt Taught Me About Real Freedom https://www.everydaycheapskate.com/wp-content/uploads/20260630-a-lit-sparkler-with-an-american-flag-in-the-background-4th-of-july-hacks-tips-and-recipes.png
800
1200
Mary Hunt
https://www.everydaycheapskate.com/wp-content/uploads/EC-Logo-by-Mary-Hunt-Tagline-Trimmed.png
Mary Hunt2026-06-30 21:44:502026-06-30 21:44:5034 Fourth of July Recipes and DIY Hacks for a Stress-Free Holiday
https://www.everydaycheapskate.com/wp-content/uploads/20260630-a-lit-sparkler-with-an-american-flag-in-the-background-4th-of-july-hacks-tips-and-recipes.png
800
1200
Mary Hunt
https://www.everydaycheapskate.com/wp-content/uploads/EC-Logo-by-Mary-Hunt-Tagline-Trimmed.png
Mary Hunt2026-06-30 21:44:502026-06-30 21:44:5034 Fourth of July Recipes and DIY Hacks for a Stress-Free Holiday https://www.everydaycheapskate.com/wp-content/uploads/20260628-close-up-photo-a-woman-wearing-a-swimsuit-with-a-mild-sunburn.png
800
1200
Mary Hunt
https://www.everydaycheapskate.com/wp-content/uploads/EC-Logo-by-Mary-Hunt-Tagline-Trimmed.png
Mary Hunt2026-06-28 21:40:042026-06-28 21:40:04DIY After-Sun Spray That Cools and Soothes Skin
https://www.everydaycheapskate.com/wp-content/uploads/20260628-close-up-photo-a-woman-wearing-a-swimsuit-with-a-mild-sunburn.png
800
1200
Mary Hunt
https://www.everydaycheapskate.com/wp-content/uploads/EC-Logo-by-Mary-Hunt-Tagline-Trimmed.png
Mary Hunt2026-06-28 21:40:042026-06-28 21:40:04DIY After-Sun Spray That Cools and Soothes Skin

Crushed eggshells are gold in the garden, especially around tomatoes. They add needed calcium while slicing (and ultimately killing) slugs.
I still use finely ground eggshells spread around the house to kill beetles and other invaders.
I’ve been using the same Burpee starter system for at least 15 years. I just carefully clean all the components at the end of the season and use again the next year. I did find a used grow light on line.
many libraries will loan tools – everything from shovels and rakes to power tools like saws and lawn mowers – call to ask or go on line. All you need is a library card!
coffee grounds spread around hostas keeps the slugs at bay. I have tried this as my hostas were being chewed to bits, and last year, practically no chewing.
Thank you for all these wonderful cost conscious ideas.