
DIY Wood Cabinet Cleaner That Removes Sticky Grease


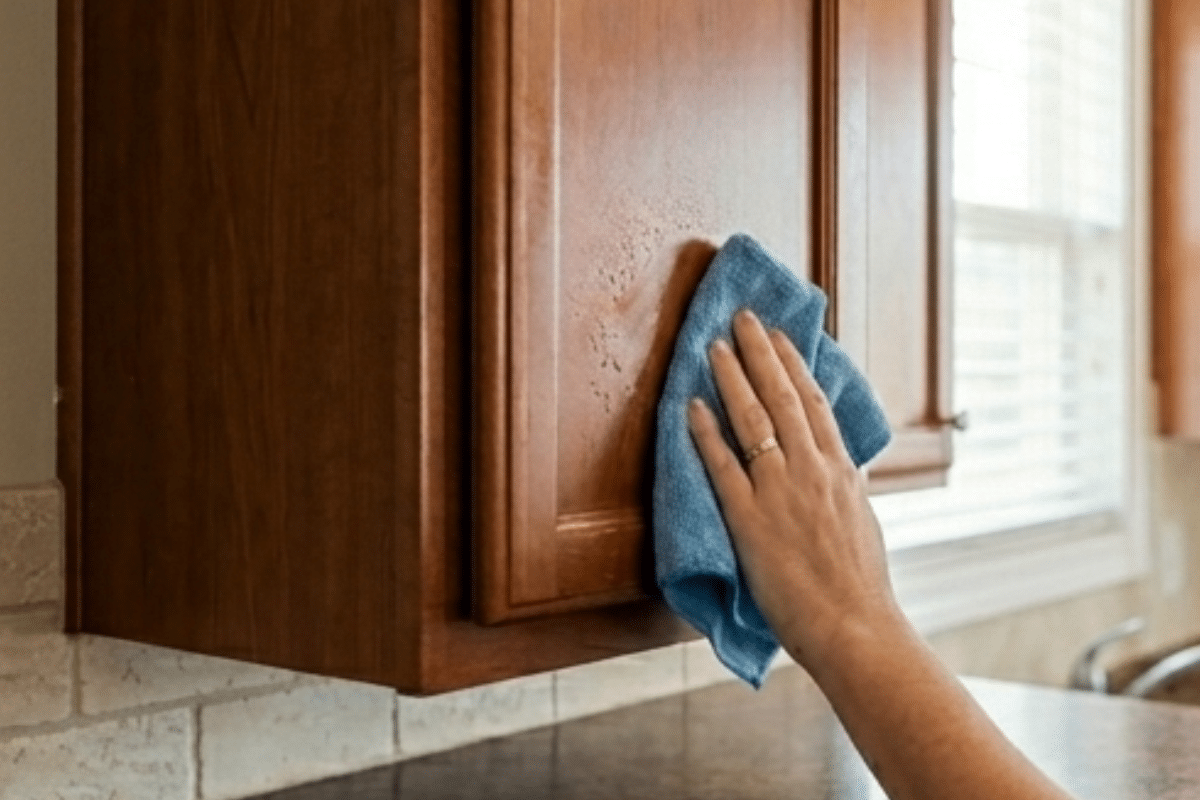
Kitchen cabinets have a quiet way of telling on us. One day they’re fine… and the next you notice that slightly sticky feel around the handles and a dull film that no quick wipe seems to fix. It’s usually just years of cooking oils, fingerprints, and everyday life layering up in the background. The good news is you don’t need harsh chemicals or a major weekend project to fix it. A simple DIY wood cabinet cleaner and a few smart habits can lift away built-up grime while protecting the finish underneath.

If you’ve ever reached for a coffee mug and felt your hand stick slightly to the cabinet handle, you already know how this story goes. It doesn’t happen all at once. It builds quietly in the background while you’re just living life, cooking dinner, and wiping things down in passing.
What most people don’t realize is that this isn’t just “dirt.” It’s a mix of cooking oils, steam, and everyday residue that slowly layers into that stubborn film you can feel before you really see it. And once it gets to that point, a regular wipe doesn’t do much. It just moves it around. The good news is you don’t have to scrub harder or risk the finish. You just need the right kind of gentle breakdown so that buildup actually lets go.
Before You Start: Know Your Cabinet Finish
Before you start spraying anything, take a quick second to look at what you’re actually working with. This step saves a lot of guesswork and prevents damage later. Not all cabinets are created equal, and what works beautifully on one finish can be too strong for another.
Most kitchens fall into a few common finishes, and the way you clean them matters more than people think:
- Sealed or natural wood (most common): Usually the most forgiving. These can handle a gentle oil-and-vinegar style cleaner when used lightly.
- Painted cabinets: Think “softer touch.” These don’t need much scrubbing. Just a light cleaner and a soft cloth.
- Unfinished, worn, or older wood: Go easy here. Minimal moisture and always test in a hidden spot first.
You might also run into stained, glazed, or glossy finishes… basically different ways of sealing and styling wood so it looks beautiful and holds up in a busy kitchen. Some are more durable than others, but none of them love being soaked or scrubbed aggressively.
Here’s my simple rule of thumb: if you’re unsure, always test your cleaner behind a door or inside an edge. It’s a small step that prevents big regrets.
What You’ll Need to Make This DIY Wood Cabinet Cleaner
This is still one of the easiest, most effective everyday cabinet cleaners you can make at home. It cuts through grease while leaving a soft, refreshed finish.
This cleaner works because each ingredient has a simple job to do:
- White vinegar: Helps break down that sticky, greasy film that builds up from cooking oils and steam. Think of it as loosening the grip of the residue so it’s easier to wipe away.
- Olive oil: Sounds counterintuitive, but this is what helps gently lift and condition the finish so the surface doesn’t look dull or stripped afterward.
- Dawn dish soap: This is your grease-cutter. It helps emulsify oil and grime so they rinse off instead of smearing around.
- Warm water: Helps everything blend evenly and makes the solution gentler on finishes.
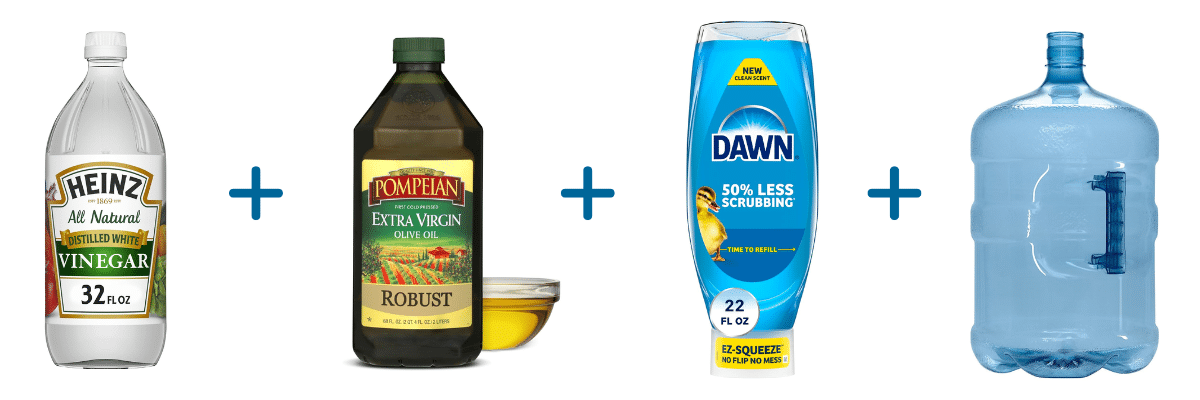
In a 16-oz spray bottle, mix:
- 2 tablespoons olive oil
- 4 tablespoons white vinegar
- 8 drops Dawn dish soap
- Warm water to fill (about 2 cups)
If you’re out of olive oil, a light vegetable oil works fine. If you prefer a milder scent, you can reduce the vinegar slightly and replace with a bit more warm water, but don’t skip the soap. That’s the real workhorse here.
While white vinegar is often avoided for routine hardwood floor cleaning due to long-term finish dulling, it works well in this diluted cabinet recipe when paired with oil and used occasionally. The key is balance: light application, quick wiping, and not overusing it as a daily cleaner.
Shake well before each use. The oil will naturally separate, so a quick shake keeps everything blended.


How to Use This DIY Cabinet Cleaner
This is meant to be simple… not a project that takes over your afternoon.
1. Work in sections
Start with one cabinet door or drawer front. It keeps things manageable and prevents the cleaner from drying before you get to it.
2. Light spray only
You don’t need to soak anything. A light mist is enough to loosen that top layer of grease and residue.
3. Focus on high-touch areas first
Handles, edges, and the areas around knobs usually hold the most buildup. Give those a little extra attention with your cloth in small circular motions.
4. Wipe, don’t scrub
Let the cleaner do the lifting. Your job is to guide it off the surface, not grind it in.
5. Buff for the finish
Once wiped clean, go back over it with a dry microfiber cloth. This is what brings back that soft, clean sheen instead of a streaky look.
Pro Tips (and Mistakes That Sneak Up on You)
These small adjustments make a big difference in how your cabinets turn out.
- Use microfiber, not paper towels. Microfiber cloths grab onto grease instead of pushing it around. Paper towels tend to smear the residue and leave streaks behind. Bonus: microfiber is washable, so you’re not burning through rolls every time the cabinets need attention.
- Work in sections, not the whole kitchen at once. It’s tempting to spray everything and then circle back, but that’s how you end up with uneven drying and extra buffing. One door or drawer at a time keeps things controlled and actually faster in the long run.
- Keep it light… always. Cabinets don’t need to be drenched. A light mist is enough to loosen buildup. Too much liquid can sneak into seams or edges where you don’t want moisture hanging around.
- Let the cleaner do the work. If you find yourself scrubbing hard, something’s off. Either the cleaner hasn’t had a moment to break things down, or it’s time for a second light pass instead of more pressure.
A few habits can undo your hard work or dull the finish over time.
- Using too much water (it can seep into joints)
- Scrubbing with abrasive pads
- Skipping the test spot on older cabinets
- Letting cleaner sit too long before wiping
Think gentle, not aggressive. Cabinets respond better to patience than pressure.
How Often Should You Clean Kitchen Cabinets?

A quick wipe-down every couple of weeks keeps buildup from forming. A deeper clean like this? Every 2–3 months is usually enough, depending on how often you cook.
If your stove gets heavy daily use, you may want to do quick spot cleaning near cooking zones a bit more often.
The nice part is, once cabinets are back to that clean, soft finish, they’re much easier to maintain. It stops being a “big project” and turns into a quick reset you can knock out while you’re already in the kitchen doing something else.

DIY General Wood Cabinet Cleaner
Materials
- 2 tablespoons olive oil
- 4 tablespoons white vinegar
- 8 drops Blue Dawn dish soap
- Warm water enough to fill a 16-oz bottle, about 2 cups
Instructions
- Add olive oil, white vinegar, and dish soap directly into a clean 16-oz spray bottle.
- Fill the rest of the bottle with warm water, leaving a little space at the top.
- Secure the lid and shake gently to combine.
- Lightly spray one cabinet door or drawer front at a time.
- Wipe with a soft microfiber cloth, focusing on handles and high-touch areas.
- Buff dry with a clean cloth for a soft, refreshed finish.
- Shake bottle before each use, since ingredients will naturally separate.
Notes
FAQ: DIY Cabinet Cleaner Questions
Can I use olive oil on my cabinets, or will it make them greasy?
Olive oil is part of this cleaner because it’s used in a very small amount and is balanced with vinegar, soap, and water. On its own, oil can leave residue, but in this mix, it helps lift grime and lightly condition the finish when wiped off properly. The key is using it sparingly and always buffing dry at the end.
Why use vinegar if I’ve heard it can damage wood finishes?
That’s a fair concern. Vinegar can be too strong when used repeatedly or at full strength, especially on floors. In this recipe, it’s heavily diluted and paired with oil and soap, so it’s working more as a gentle degreaser than an acid cleaner. The important part is quick application and wiping it off... not letting it sit.
Can I skip the oil and just use soap and water?
Yes, but you’ll lose some of the finish protection and “soft clean” feel this recipe gives. Soap and water alone will clean surface dirt, but oil and steam residue often need a little more help breaking down.
What if my cabinets still feel dull after cleaning?
That usually means residue is still sitting on the surface, not that the cleaner failed. Try a second light pass and make sure you’re fully buffing dry with a clean microfiber cloth. That final buff is what brings back the finish... not the spray itself.
Is this safe for painted cabinets?
Yes, but use a lighter touch. Spray onto your cloth instead of directly on the surface, and avoid heavy rubbing. Painted finishes just need a gentler approach so you don’t wear down the surface over time.
How often should I use this cleaner?
Think occasional reset, not daily cleaning. Every couple of months works for most kitchens, with light spot cleaning in between if needed. Overuse isn’t necessary, and honestly, cabinets stay happier when they’re not constantly being “deep cleaned.”
Question: What’s the first place in your kitchen that shows grease buildup? Handles, doors, or somewhere else you didn’t expect? Share in the comments below.
EverydayCheapskate™ is reader-supported. We participate in the Amazon Services LLC Associates Program and other affiliate advertising programs, designed to provide a means for us to earn from qualifying purchases, at no cost to you.

More from Everyday Cheapskate
 https://www.everydaycheapskate.com/wp-content/uploads/20260723-budget-homework-station-young-boy-studying-at-kitchen-dining-table.png
800
1200
Mary Hunt
https://www.everydaycheapskate.com/wp-content/uploads/EC-Logo-by-Mary-Hunt-Tagline-Trimmed.png
Mary Hunt2026-07-23 10:53:402026-07-23 10:53:41How to Set Up a Homework Station Your Kids Will Actually Use
https://www.everydaycheapskate.com/wp-content/uploads/20260723-budget-homework-station-young-boy-studying-at-kitchen-dining-table.png
800
1200
Mary Hunt
https://www.everydaycheapskate.com/wp-content/uploads/EC-Logo-by-Mary-Hunt-Tagline-Trimmed.png
Mary Hunt2026-07-23 10:53:402026-07-23 10:53:41How to Set Up a Homework Station Your Kids Will Actually Use https://www.everydaycheapskate.com/wp-content/uploads/20260722-easy-home-repairs-slow-sink-drain-squeaky-hinges-sticky-drawer.png
800
1200
Mary Hunt
https://www.everydaycheapskate.com/wp-content/uploads/EC-Logo-by-Mary-Hunt-Tagline-Trimmed.png
Mary Hunt2026-07-22 13:04:022026-07-22 13:04:0210 Small Home Annoyances You Can Fix in Under 15 Minutes Each
https://www.everydaycheapskate.com/wp-content/uploads/20260722-easy-home-repairs-slow-sink-drain-squeaky-hinges-sticky-drawer.png
800
1200
Mary Hunt
https://www.everydaycheapskate.com/wp-content/uploads/EC-Logo-by-Mary-Hunt-Tagline-Trimmed.png
Mary Hunt2026-07-22 13:04:022026-07-22 13:04:0210 Small Home Annoyances You Can Fix in Under 15 Minutes Each https://www.everydaycheapskate.com/wp-content/uploads/20260717-how-to-read-your-water-bill-sprinklers-on-a-residential-lawn.png
800
1200
Mary Hunt
https://www.everydaycheapskate.com/wp-content/uploads/EC-Logo-by-Mary-Hunt-Tagline-Trimmed.png
Mary Hunt2026-07-18 10:46:312026-07-18 10:46:31How to Read Your Water Bill and Lower Your Monthly Costs Now
https://www.everydaycheapskate.com/wp-content/uploads/20260717-how-to-read-your-water-bill-sprinklers-on-a-residential-lawn.png
800
1200
Mary Hunt
https://www.everydaycheapskate.com/wp-content/uploads/EC-Logo-by-Mary-Hunt-Tagline-Trimmed.png
Mary Hunt2026-07-18 10:46:312026-07-18 10:46:31How to Read Your Water Bill and Lower Your Monthly Costs Now https://www.everydaycheapskate.com/wp-content/uploads/20260716-woman-on-phone-with-flat-tire-spare-roadside-car-emergency-kit.png
800
1200
Mary Hunt
https://www.everydaycheapskate.com/wp-content/uploads/EC-Logo-by-Mary-Hunt-Tagline-Trimmed.png
Mary Hunt2026-07-16 21:10:152026-07-16 21:10:15The 7-Item Emergency Car Kit Every Driver Needs (Cheaper Than One Tow)
https://www.everydaycheapskate.com/wp-content/uploads/20260716-woman-on-phone-with-flat-tire-spare-roadside-car-emergency-kit.png
800
1200
Mary Hunt
https://www.everydaycheapskate.com/wp-content/uploads/EC-Logo-by-Mary-Hunt-Tagline-Trimmed.png
Mary Hunt2026-07-16 21:10:152026-07-16 21:10:15The 7-Item Emergency Car Kit Every Driver Needs (Cheaper Than One Tow) https://www.everydaycheapskate.com/wp-content/uploads/20260714-car-dashboard-diy-car-interior-cleaning-wipes.png
800
1200
Mary Hunt
https://www.everydaycheapskate.com/wp-content/uploads/EC-Logo-by-Mary-Hunt-Tagline-Trimmed.png
Mary Hunt2026-07-14 13:45:172026-07-14 13:45:17DIY Car Interior Cleaning Wipes That Actually Work Well
https://www.everydaycheapskate.com/wp-content/uploads/20260714-car-dashboard-diy-car-interior-cleaning-wipes.png
800
1200
Mary Hunt
https://www.everydaycheapskate.com/wp-content/uploads/EC-Logo-by-Mary-Hunt-Tagline-Trimmed.png
Mary Hunt2026-07-14 13:45:172026-07-14 13:45:17DIY Car Interior Cleaning Wipes That Actually Work Well https://www.everydaycheapskate.com/wp-content/uploads/20260705-Best-Coolers-for-Camping-Road-Trips-and-Beach-Days.png
800
1200
Mary Hunt
https://www.everydaycheapskate.com/wp-content/uploads/EC-Logo-by-Mary-Hunt-Tagline-Trimmed.png
Mary Hunt2026-07-05 13:26:172026-07-05 13:26:17Best Coolers for Camping, Road Trips, and Beach Days
https://www.everydaycheapskate.com/wp-content/uploads/20260705-Best-Coolers-for-Camping-Road-Trips-and-Beach-Days.png
800
1200
Mary Hunt
https://www.everydaycheapskate.com/wp-content/uploads/EC-Logo-by-Mary-Hunt-Tagline-Trimmed.png
Mary Hunt2026-07-05 13:26:172026-07-05 13:26:17Best Coolers for Camping, Road Trips, and Beach Days https://www.everydaycheapskate.com/wp-content/uploads/20260705-how-to-keep-a-cooler-cold.png
800
1200
Mary Hunt
https://www.everydaycheapskate.com/wp-content/uploads/EC-Logo-by-Mary-Hunt-Tagline-Trimmed.png
Mary Hunt2026-07-05 13:19:502026-07-05 13:19:50How to Pack a Cooler That Stays Cold for 48 Hours
https://www.everydaycheapskate.com/wp-content/uploads/20260705-how-to-keep-a-cooler-cold.png
800
1200
Mary Hunt
https://www.everydaycheapskate.com/wp-content/uploads/EC-Logo-by-Mary-Hunt-Tagline-Trimmed.png
Mary Hunt2026-07-05 13:19:502026-07-05 13:19:50How to Pack a Cooler That Stays Cold for 48 Hours https://www.everydaycheapskate.com/wp-content/uploads/20260703-home-decor.png
800
1200
Mary Hunt
https://www.everydaycheapskate.com/wp-content/uploads/EC-Logo-by-Mary-Hunt-Tagline-Trimmed.png
Mary Hunt2026-07-03 20:46:552026-07-03 20:46:5510 Everyday Items You Never Think to Wash (But Should)
https://www.everydaycheapskate.com/wp-content/uploads/20260703-home-decor.png
800
1200
Mary Hunt
https://www.everydaycheapskate.com/wp-content/uploads/EC-Logo-by-Mary-Hunt-Tagline-Trimmed.png
Mary Hunt2026-07-03 20:46:552026-07-03 20:46:5510 Everyday Items You Never Think to Wash (But Should) https://www.everydaycheapskate.com/wp-content/uploads/20260630-a-lit-sparkler-with-an-american-flag-in-the-background-4th-of-july-hacks-tips-and-recipes.png
800
1200
Mary Hunt
https://www.everydaycheapskate.com/wp-content/uploads/EC-Logo-by-Mary-Hunt-Tagline-Trimmed.png
Mary Hunt2026-06-30 21:44:502026-06-30 21:44:5034 Fourth of July Recipes and DIY Hacks for a Stress-Free Holiday
https://www.everydaycheapskate.com/wp-content/uploads/20260630-a-lit-sparkler-with-an-american-flag-in-the-background-4th-of-july-hacks-tips-and-recipes.png
800
1200
Mary Hunt
https://www.everydaycheapskate.com/wp-content/uploads/EC-Logo-by-Mary-Hunt-Tagline-Trimmed.png
Mary Hunt2026-06-30 21:44:502026-06-30 21:44:5034 Fourth of July Recipes and DIY Hacks for a Stress-Free HolidayPlease keep your comments positive, encouraging, helpful, brief,
and on-topic in keeping with EC Commenting Guidelines
Last update on 2026-07-30 / Affiliate links / Images from Amazon Product Advertising API


Leave a Reply
Want to join the discussion?Feel free to contribute!