
Whacky Doodle Ground Beef: The Ultimate Bulk Cooking Hack You’ll Love


Have you ever stared at a giant pack of ground beef wondering, “What am I going to do with all this?” With this genius method of boiling ground beef, you’ll save time, eliminate mess, and have ready-to-use portions for your favorite recipes. Whether you’re meal-prepping or looking to make quick dinners a breeze, this technique is about to become your go-to.

Years ago, I learned a hard lesson in freezer fail. I froze 10 pounds of raw ground beef in one massive block. That frosty brick sat in my freezer for ages, taunting me every time I opened the door. What was I thinking? If I had browned it first and portioned it into usable bags, it wouldn’t have turned into an icy monument to poor planning. But let’s be honest—browning beef can be a splattery, messy ordeal. Lesson learned, right?
Fast forward to about a year ago. I stumbled upon a similar deal: 10 pounds of ground beef, marked down because the expiration clock was ticking. My first instinct? Keep walking. But then inspiration struck. Why not try something unconventional? Something… dare I say, whacky?
I boiled it!
Can You Boil Ground Beef? The Surprising Answer
At first, I thought, “Boiling ground beef? That’s got to be wrong.” After all, who boils meat on purpose? But desperation (and a killer markdown) can be the mother of invention. I decided to give it a shot. Worst case, I’d end up with some sort of meat soup destined for the trash. But spoiler alert—it worked!
Boiling ground beef turned out to be one of those genius hacks that feels almost too good to be true. Not only did it cook evenly, but the process also rendered out most of the fat, leaving behind perfectly tender, crumbly beef. And the best part? No splatters. No grease-streaked stovetop. Just a clean kitchen and perfectly prepped protein.
Since that fateful day, I’ve been a boiling ground beef convert. Now, whenever I spot a great deal or need to meal prep, I boil up a batch, portion it into freezer bags, and stash it away. It’s completely transformed weeknight dinners—tacos, casseroles, and spaghetti sauces come together in minutes, with minimal effort.
So, can you boil ground beef? Absolutely. And once you do, you’ll wonder why you haven’t been doing it all along.
Boiling Ground Beef in 5 Simple Steps
Boiling ground beef might sound unconventional—okay, downright whacky—but stick with me here. I’ve even nicknamed it Whacky Doodle Ground Beef because, let’s be honest, the idea of boiling 10 pounds of raw burger might raise some eyebrows. But trust me, this method is easy, mess-free, and kind of magical.
Here’s how I turned a mountain of raw ground beef into perfectly cooked, ready-to-use portions with minimal effort and zero splatter drama:
Step 1: Start with a Big Pot
Grab your largest stockpot—this is not the time for a dainty saucepan. I dumped all 10 pounds of raw ground beef into mine. Yes, it’s a lot, but this method works just as well with smaller amounts if you’re not feeding an army (or stocking a freezer).
Step 2: Add Water and Heat Things Up
Pour in enough water to cover the beef. No need to measure; just eyeball it. Set the pot over high heat and let it do its thing. No lid, no salt—just patience. The water will start heating and slowly break down the meat as it comes to temperature.
Step 3: Stir and Break It Up
After about 10 minutes, I gave it a stir with a big spoon to break up any clumps. The hot water is doing most of the work for you. Forget the splattering grease or elbow-deep stirring you’d deal with on the stovetop.
Step 4: Cook Until It’s Done
The magic moment happens when all the pink disappears. It doesn’t even need to come to a rolling boil. The beef is cooked when it’s evenly browned and no longer raw-looking—tender, crumbly perfection!
Step 5: Drain the Beef (and Save the Broth!)
Time to drain. I used a large colander set inside a bowl in the sink. Since my colander couldn’t hold all 10 pounds at once, I worked in batches, pouring the beef and water mixture through to separate the cooked meat from the liquid. The result? Uniformly fine-textured ground beef, no clumps, and a bowl of beef broth. Pro tip: chill the broth, skim off the fat, and save it for soups or stews.

How Long to Boil Ground Beef for Perfect Results
Boiling ground beef is incredibly forgiving, so you don’t need a timer or a degree in culinary arts to get it perfect. For most batches, you’ll need about 10-15 minutes to boil ground beef to perfection. If you’re working with smaller portions, it might be closer to 7-10 minutes. Larger amounts, like my 10-pound experiment, might take a bit longer. The key is to let the water do the heavy lifting while you occasionally stir to break up the meat.
Instead of focusing on the clock, keep an eye on the color. Ground beef starts bright pink and gradually turns brown as it cooks. When all the pink is gone, your beef is done. Simple, right? No need to bring it to a vigorous rolling boil. A gentle simmer is enough to cook the meat thoroughly without drying it out.
Storage Tips for Prepped Ground Beef

Once you’ve mastered boiling ground beef, the next step is storing it smartly so it’s ready to rescue dinner at a moment’s notice.
Measure and Bag It
I portion the cooked beef into 2-cup servings—roughly the equivalent of 1 pound of raw ground beef. Each portion goes into a gallon-size zip-top freezer bag. Press out as much air as possible, seal it up, and flatten it thin, like a sheet of paper. Why thin? It stacks beautifully in the freezer and thaws quickly.
Stack and Store
Once all the bags are sealed and flattened, stack them up. Slide the stack into the freezer, and you’re done!
Frozen and Ready to Go
Here’s the real magic: because these bags are so thin, you don’t even need to thaw them before cooking. Simply grab a frozen bag, give it a solid whack against the sink to break it into smaller chunks, unzip, and pour the contents straight into a skillet. The beef heats quickly and is ready to mix into tacos, soups, pasta sauces, or whatever you’re cooking that night.
Want to go the extra mile?
Consider pre-seasoning the beef before freezing it. Divide it into portions seasoned for specific meals—taco seasoning for Mexican night, Italian herbs for pasta dishes, or just a simple salt-and-pepper mix for versatility. You’ll cut down on prep time and have dinner halfway done before you even start.
Easy Weeknight Recipes Using Boiled Ground Beef
Both of these recipes are flexible, fast, and fail-proof. The boiled ground beef makes the process seamless, and you can easily tweak the ingredients to suit your family’s taste. Plus, they’re perfect for doubling up—hello, leftovers!
Quick as a Flash Burrito Filling

This recipe is the ultimate weeknight hero. No mess, no stress, just hearty burritos on the table in 15 minutes flat.
Here’s what you’ll need:
- 2 bags of boiled ground beef (about 2 pounds raw beef)
- 2 packets of burrito seasoning mix (like Lawry’s, but any brand works)
- 2 ½ cups of water
In a large skillet, toss in the frozen ground beef (no thawing needed!) and seasoning mix, then pour in the water. Bring it to a boil, then reduce the heat and let it simmer uncovered for about 10 minutes. The mixture will thicken beautifully while you prep tortillas and toppings like grated cheese, sour cream, and salsa. Boom—burrito night is served! Serves 8-10.
This filling also works great for taco salads, enchiladas, or as a topping for loaded nachos.
Sloppy Joes with a Twist

Sloppy Joes are a classic, but this version sneaks in some veggies for extra flavor and nutrition.
Here’s the lineup:
- 2 bags of boiled ground beef (about 2 pounds raw beef)
- ½ cup chopped onion
- 1 cup chopped celery
- 1 can (10.75 ounces) condensed tomato soup (undiluted)
- ¼ cup ketchup
- 1 tablespoon white vinegar
- ¼ cup packed brown sugar
- 1 ½ teaspoons Worcestershire sauce
- ½ teaspoon salt
- ¼ teaspoon garlic powder
- 8 hamburger buns (toasted if you like)
In a large skillet over medium heat, toss in the frozen ground beef, onions, and celery. Cover and cook for about 5 minutes, stirring occasionally, until the beef thaws and the veggies soften. Next, stir in the tomato soup, ketchup, vinegar, brown sugar, and Worcestershire sauce. Season with salt and garlic powder. Let the mixture simmer gently, stirring frequently, until everything is heated through and saucy perfection is achieved. Spoon the beefy goodness onto buns and serve. Makes 8 sandwiches.
For an extra burst of flavor, add a splash of hot sauce or sprinkle in some smoked paprika.

Whacky Doodle Ground Beef
Ingredients
- 6 pounds ground beef
- Water enough to cover beef
Instructions
- Prep the Beef: Place 6 pounds of raw ground beef into a large stockpot. Add enough water to fully cover the beef.
- Boil: Bring the pot of beef and water to a boil over high heat. No lid necessary, and don't add salt yet.
- Break it up: Once the beef starts to cook, stir it occasionally to break up the larger clumps, about 10 minutes. The hot water will do most of the work, so don’t worry about splattering!
- Check for doneness: When the beef turns from pink to brown and the water is no longer murky, it’s done. You don’t need a rolling boil—just ensure all the meat is fully cooked.
- Drain: Use a large colander to drain the beef in batches. Make sure to save the broth for later! You can use it for soup, gravy, or just to add extra flavor to other dishes.
Notes
Nutrition
Question: Have you tried boiling ground beef instead of frying it? What’s your favorite way to use prepped ground beef? Let me know down in the comments.
EverydayCheapskate™ is reader-supported. We participate in the Amazon Services LLC Associates Program and other affiliate advertising programs, designed to provide a means for us to earn from qualifying purchases, at no cost to you.

More from Everyday Cheapskate
 https://www.everydaycheapskate.com/wp-content/uploads/20260707-creamy-whipped-frozen-coffee-drink-on-balcony-with-whipped-cream.png
800
1200
Mary Hunt
https://www.everydaycheapskate.com/wp-content/uploads/EC-Logo-by-Mary-Hunt-Tagline-Trimmed.png
Mary Hunt2026-07-07 10:09:112026-07-07 10:09:11I Stopped Buying $7 Frappuccinos. Here’s What I Make Now
https://www.everydaycheapskate.com/wp-content/uploads/20260707-creamy-whipped-frozen-coffee-drink-on-balcony-with-whipped-cream.png
800
1200
Mary Hunt
https://www.everydaycheapskate.com/wp-content/uploads/EC-Logo-by-Mary-Hunt-Tagline-Trimmed.png
Mary Hunt2026-07-07 10:09:112026-07-07 10:09:11I Stopped Buying $7 Frappuccinos. Here’s What I Make Now https://www.everydaycheapskate.com/wp-content/uploads/20260630-a-lit-sparkler-with-an-american-flag-in-the-background-4th-of-july-hacks-tips-and-recipes.png
800
1200
Mary Hunt
https://www.everydaycheapskate.com/wp-content/uploads/EC-Logo-by-Mary-Hunt-Tagline-Trimmed.png
Mary Hunt2026-06-30 21:44:502026-06-30 21:44:5034 Fourth of July Recipes and DIY Hacks for a Stress-Free Holiday
https://www.everydaycheapskate.com/wp-content/uploads/20260630-a-lit-sparkler-with-an-american-flag-in-the-background-4th-of-july-hacks-tips-and-recipes.png
800
1200
Mary Hunt
https://www.everydaycheapskate.com/wp-content/uploads/EC-Logo-by-Mary-Hunt-Tagline-Trimmed.png
Mary Hunt2026-06-30 21:44:502026-06-30 21:44:5034 Fourth of July Recipes and DIY Hacks for a Stress-Free Holiday https://www.everydaycheapskate.com/wp-content/uploads/20260628-Grilled-Peaches-with-Balsamic-and-Blue-Cheese-1.png
800
1200
Mary Hunt
https://www.everydaycheapskate.com/wp-content/uploads/EC-Logo-by-Mary-Hunt-Tagline-Trimmed.png
Mary Hunt2026-06-29 09:38:342026-06-29 09:38:34Summer Grilled Peaches with Balsamic and Blue Cheese
https://www.everydaycheapskate.com/wp-content/uploads/20260628-Grilled-Peaches-with-Balsamic-and-Blue-Cheese-1.png
800
1200
Mary Hunt
https://www.everydaycheapskate.com/wp-content/uploads/EC-Logo-by-Mary-Hunt-Tagline-Trimmed.png
Mary Hunt2026-06-29 09:38:342026-06-29 09:38:34Summer Grilled Peaches with Balsamic and Blue Cheese https://www.everydaycheapskate.com/wp-content/uploads/20260620-cheesey-chicken-and-rice-casserole-in-a-baking-dish.png
800
1200
Mary Hunt
https://www.everydaycheapskate.com/wp-content/uploads/EC-Logo-by-Mary-Hunt-Tagline-Trimmed.png
Mary Hunt2026-06-20 13:31:162026-06-20 13:31:16Cheesy Chicken & Rice Bake That Disappears at Family Dinners
https://www.everydaycheapskate.com/wp-content/uploads/20260620-cheesey-chicken-and-rice-casserole-in-a-baking-dish.png
800
1200
Mary Hunt
https://www.everydaycheapskate.com/wp-content/uploads/EC-Logo-by-Mary-Hunt-Tagline-Trimmed.png
Mary Hunt2026-06-20 13:31:162026-06-20 13:31:16Cheesy Chicken & Rice Bake That Disappears at Family Dinners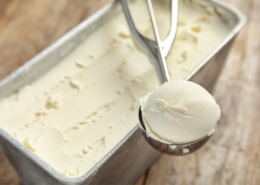 https://www.everydaycheapskate.com/wp-content/uploads/20260619-delicious-creamy-no-churn-vanilla-ice-cream-scoop-and-loaf-pan.png
800
1200
Mary Hunt
https://www.everydaycheapskate.com/wp-content/uploads/EC-Logo-by-Mary-Hunt-Tagline-Trimmed.png
Mary Hunt2026-06-19 18:42:402026-06-19 18:42:413-Ingredient No-Churn Vanilla Ice Cream (No Machine Needed)
https://www.everydaycheapskate.com/wp-content/uploads/20260619-delicious-creamy-no-churn-vanilla-ice-cream-scoop-and-loaf-pan.png
800
1200
Mary Hunt
https://www.everydaycheapskate.com/wp-content/uploads/EC-Logo-by-Mary-Hunt-Tagline-Trimmed.png
Mary Hunt2026-06-19 18:42:402026-06-19 18:42:413-Ingredient No-Churn Vanilla Ice Cream (No Machine Needed)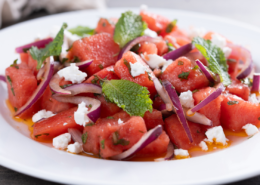 https://www.everydaycheapskate.com/wp-content/uploads/20260616-close-up-of-watermelon-feta-salad-with-mint-and-lime.png
800
1200
Mary Hunt
https://www.everydaycheapskate.com/wp-content/uploads/EC-Logo-by-Mary-Hunt-Tagline-Trimmed.png
Mary Hunt2026-06-16 17:44:142026-06-16 17:44:14Watermelon Feta Salad with Mint for Summer Cookouts
https://www.everydaycheapskate.com/wp-content/uploads/20260616-close-up-of-watermelon-feta-salad-with-mint-and-lime.png
800
1200
Mary Hunt
https://www.everydaycheapskate.com/wp-content/uploads/EC-Logo-by-Mary-Hunt-Tagline-Trimmed.png
Mary Hunt2026-06-16 17:44:142026-06-16 17:44:14Watermelon Feta Salad with Mint for Summer Cookouts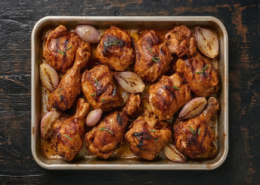 https://www.everydaycheapskate.com/wp-content/uploads/20260613-chicken-a-lorange-recipe-in-roasting-pan-with-shallots-and-orange-marmalade.png
800
1200
Mary Hunt
https://www.everydaycheapskate.com/wp-content/uploads/EC-Logo-by-Mary-Hunt-Tagline-Trimmed.png
Mary Hunt2026-06-13 20:59:292026-06-13 20:59:29Duck à l’Orange Is Fancy. This Chicken Version Is Better.
https://www.everydaycheapskate.com/wp-content/uploads/20260613-chicken-a-lorange-recipe-in-roasting-pan-with-shallots-and-orange-marmalade.png
800
1200
Mary Hunt
https://www.everydaycheapskate.com/wp-content/uploads/EC-Logo-by-Mary-Hunt-Tagline-Trimmed.png
Mary Hunt2026-06-13 20:59:292026-06-13 20:59:29Duck à l’Orange Is Fancy. This Chicken Version Is Better. https://www.everydaycheapskate.com/wp-content/uploads/20260607-woman-grocery-shopping-pushing-cart-with-apples-and-cauliflower.png
800
1200
Mary Hunt
https://www.everydaycheapskate.com/wp-content/uploads/EC-Logo-by-Mary-Hunt-Tagline-Trimmed.png
Mary Hunt2026-06-09 23:20:292026-06-09 23:20:29How to Read a Grocery Store Sale Cycle (And Stop Overpaying)
https://www.everydaycheapskate.com/wp-content/uploads/20260607-woman-grocery-shopping-pushing-cart-with-apples-and-cauliflower.png
800
1200
Mary Hunt
https://www.everydaycheapskate.com/wp-content/uploads/EC-Logo-by-Mary-Hunt-Tagline-Trimmed.png
Mary Hunt2026-06-09 23:20:292026-06-09 23:20:29How to Read a Grocery Store Sale Cycle (And Stop Overpaying)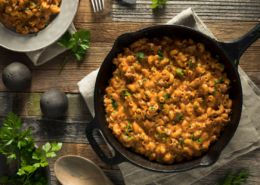 https://www.everydaycheapskate.com/wp-content/uploads/20260608-copycat-hamburger-helper-pasta-recipe-in-a-cast-iron-skillet.png
800
1200
Mary Hunt
https://www.everydaycheapskate.com/wp-content/uploads/EC-Logo-by-Mary-Hunt-Tagline-Trimmed.png
Mary Hunt2026-06-08 23:02:072026-06-08 23:02:07Homemade Hamburger Helper: Cheesy One-Skillet Dinner
https://www.everydaycheapskate.com/wp-content/uploads/20260608-copycat-hamburger-helper-pasta-recipe-in-a-cast-iron-skillet.png
800
1200
Mary Hunt
https://www.everydaycheapskate.com/wp-content/uploads/EC-Logo-by-Mary-Hunt-Tagline-Trimmed.png
Mary Hunt2026-06-08 23:02:072026-06-08 23:02:07Homemade Hamburger Helper: Cheesy One-Skillet Dinner

I do something similar, but I cook it in the crockpot. I use my large crockpot, whatever size I need to get all that meat in, and cook for 3-4 hours on high. I let it cool, then portion in 1 cup portions, putting each in a foldover sandwich bag. I stack the sandwich bags in a larger freezer bag and lay it flat to freeze. It amazes me the uses I can find for this already-cooked meat!!
Mary, I tried your method tonight for boiling the ground beef. It worked just as you said: quick, no messy stove top to clean, and no having to constantly stir! Bonus was the broth.
Please clarify where the drained water and grease go. You said you drain it in the sink.
From the post:
Step 5: Drain the Beef (and Save the Broth!)
Time to drain. I used a large colander set inside a bowl in the sink. Since my colander couldn’t hold all 10 pounds at once, I worked in batches, pouring the beef and water mixture [through the colander and into the bowl] to separate the cooked meat from the liquid. The result? Uniformly fine-textured ground beef, no clumps, and a bowl of beef broth. Pro tip: chill the broth, skim off the fat, and save it for soups or stews.
I dosomething similar. However, I just put it in the crock pot with some water. So easy!!I save the broth for other recipes
After you boil the meat in a large pot put it in the fridge and let the fat rise to the top and when it is hard break it off and put it in baggies then into the garbage. Then drain the water and package in serving size zip locks and store in freezer. Been doing this for over 45 years
Time saver, love it!
I am going to try this today!
Empty nesters now, so I am going to even vacuum seal some into smaller batches.
Love this idea, Mary! Thanks for yet another fabulous tip!
I first heard about boiling beef on a utube channel called Homade Wanderlust. She boiled beef in order to dehydrate it to make a camping meal called unstuffed peppers. Works great. Will try this recipe and dehydrate some of it and freeze the re.
I tried microwave cooking beef in a colander, per a recipe. Since this drain off all the fat we found it fairly tasteless, even in chili.
I dumped various frozen meats into the Insta Pot to cook it for chili. Hamburger, sausage, ground turkey.
Drained it and then diced it before throwing it all together for a great chili.
I’m a great proponent of prepped food. However, doesn’t boiling take out all the flavor?
Great question! There’s a common myth that boiling ground beef strips all the flavor, but that’s not really the case. The key is to stop boiling once it’s fully cooked—no need to overdo it!
While boiling doesn’t give you that nice browning (or Maillard reaction) that deepens flavor, you can always take it a step further. After boiling, toss the beef into a skillet to brown it a little before serving—this adds flavor without much effort.
And you’re right—there aren’t any seasonings during the boiling process, but you can easily add those in later. For example, simmer the beef in a flavorful sauce, or brown it with aromatics like onions and garlic to infuse even more taste.
Hope that helps!
Thx for the flavorful/flavorless explanation.
have been doing it for many years that way. easy and time saving. another hint is to cook hamburger patties on a tray in the oven. i cover a cookie sheet with foil to save on clean-up. 6 will fit on each sheet and bake at 350o til brown thru. bag 2 or 3 in a sandwich zip loc to freeze. if u run out of the cooked bulk just thaw and put 2 thru a food processor for 8oz (1/2lb) of meat. also patties can be frozen with a bun. i sometimes add bacon onion, mushroom and swiss cheese to the hamb and bun. make up super burgers or cheese burgers also. they thaw and heat to eat in 30 to 60 sec in microwave.
I’ve been doing this for decades. It’s a real time saver. An extra advantage to boiling verses frying is not having to worry about a greasy mess on your stove.
I don’t boil ground beef, but I do something very similar that has better flavor and is just as time saving. I brown a huge batch at one time, drain it well with very hot water over the top to be sure all the grease is out, and then divide it into zip loc bags once it is cool.
Aren’t you washing the grease down the drain?
No