Start Seeds Indoors Now for a Better Garden Later

March is when gardeners start getting restless. The sun lingers a little longer, seed packets appear on store racks, and suddenly that empty windowsill looks like prime real estate. Starting seedlings indoors is one of the easiest ways to grow more food for less money. With a handful of seeds, a little light, and a bit of patience, you can raise strong plants ready for the garden long before the outdoor soil warms.
With spring starting to peek around the corner, I’m reminded of a question I received from EC reader Emily last spring.
Dear Mary: I tried starting seedlings indoors for the first time this year, and they sprouted quickly, but now they’re tall, thin, and kind of floppy. My husband says they look like tiny green giraffes. Did I do something wrong?
–Emily
Dear Emily: Your plants are reaching for light like teenagers reaching for the last slice of pizza. Translation? They don’t have enough light.
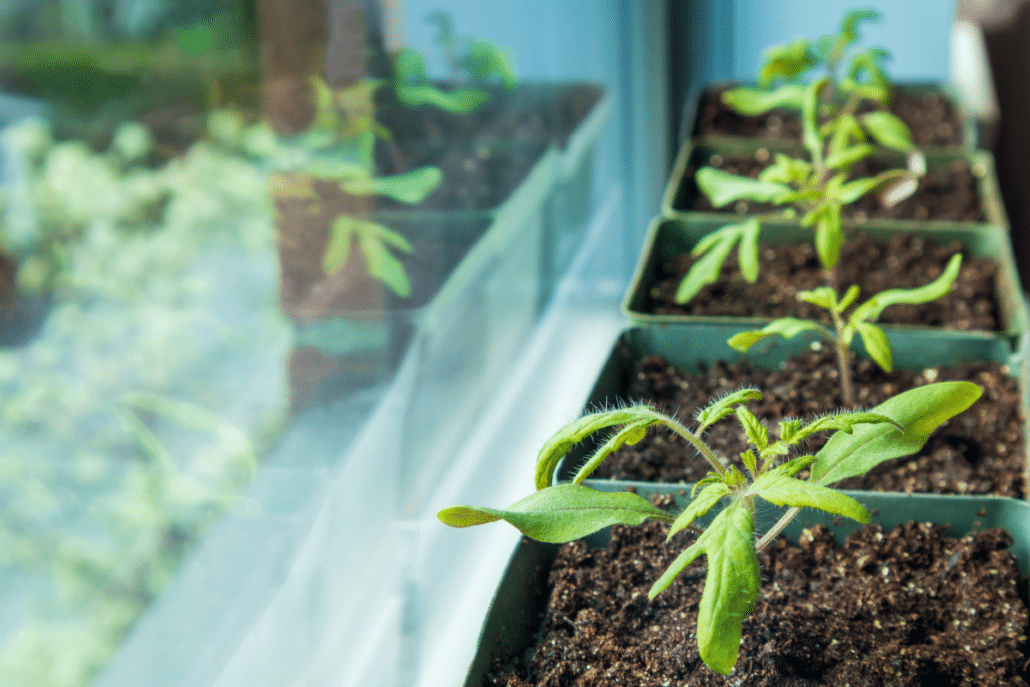
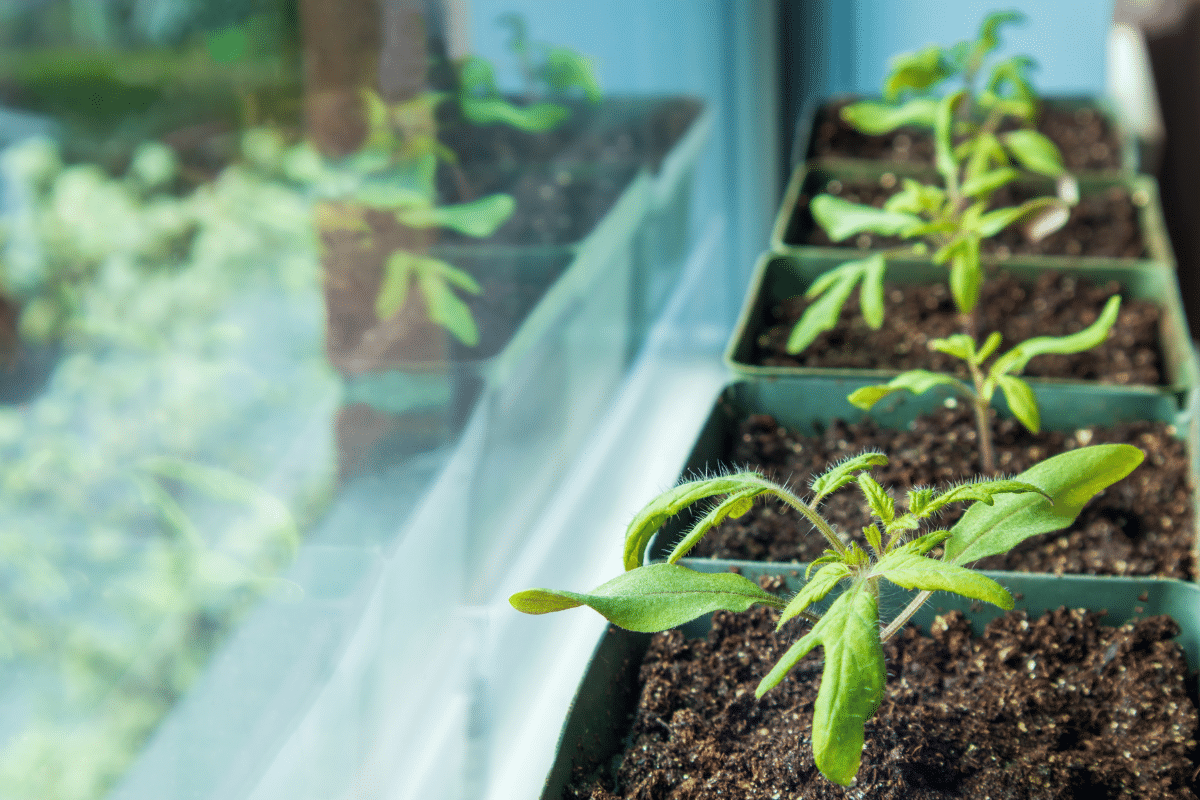
Plants are surprisingly determined when it comes to finding sunshine. If the light source is too weak or too far away, they’ll keep stretching higher and higher trying to get closer to it. That’s how you end up with those tall, wobbly seedlings that look more like green noodles than future tomato plants.
The fix is easy. Give your seedlings stronger light and keep it close… just a few inches above the plants. Once they have enough light, they’ll stop stretching and start growing the way they’re supposed to: short, sturdy, and ready for the garden.
And here’s the encouraging part. Starting seedlings indoors doesn’t require a greenhouse, fancy equipment, or a backyard full of gardening gear. With the right timing and a few simple tricks, anyone can do it successfully, even if your “garden headquarters” is just a sunny kitchen window.
Why Starting Seeds Indoors Is Worth the Effort
If you’ve ever stood in the garden center staring at those neat little “pony packs” of seedlings, you know how tempting they are. Everything is already sprouted, labeled, and ready to plant. The problem? By the time you load up a few trays of tomatoes, peppers, and herbs, you’ve spent far more than you planned.
Starting seeds indoors solves that problem quickly.
A single seed packet often contains dozens of plants for the price of one store-bought seedling. But the real payoff isn’t just saving money. When you start seedlings indoors, you suddenly have access to varieties you’ll rarely see in stores: heirloom tomatoes, unusual herbs, and vegetables grown for flavor rather than how well they travel in a truck.
And there’s something deeply satisfying about it. Watching a seed crack open and push up that first tiny green leaf feels like witnessing a small miracle on your windowsill. It’s a small beginning, but it’s the first step toward a garden that started with your own two hands.
The Best Time to Start Seeds Indoors
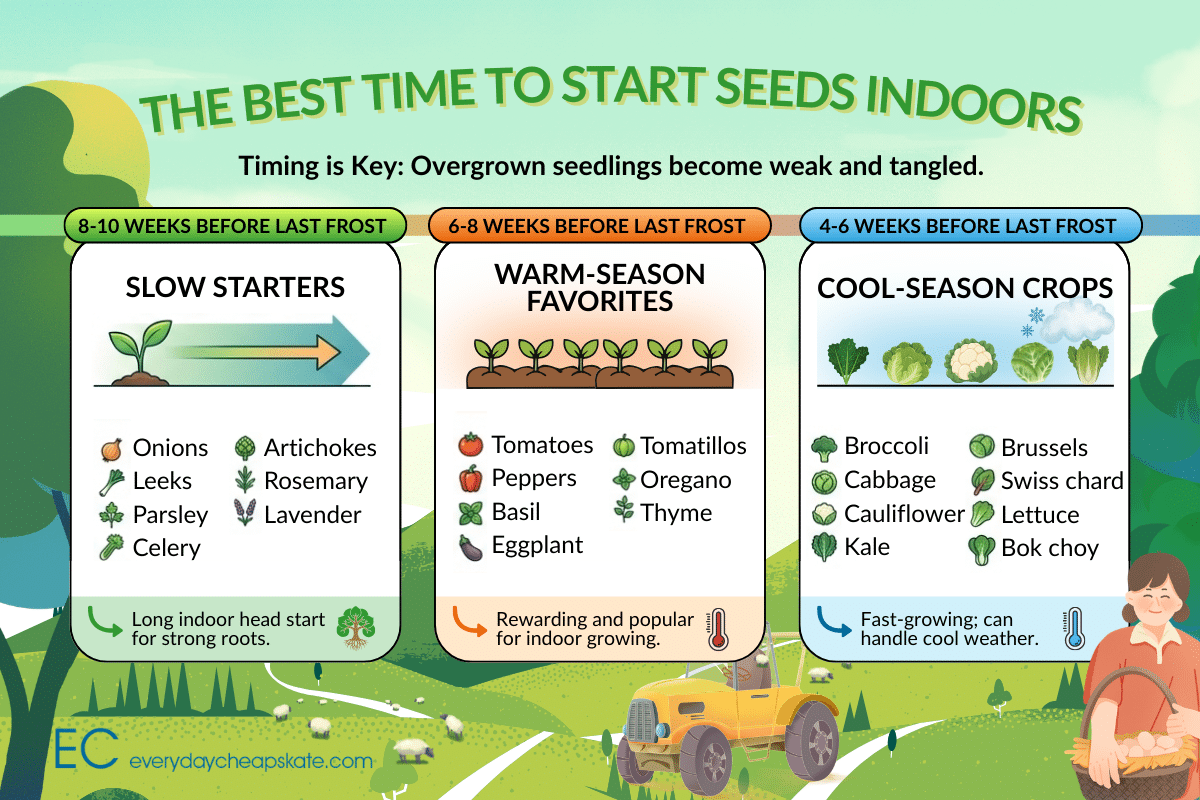
Timing is the secret ingredient to successful seed starting. Starting too early is actually one of the most common mistakes. Overgrown seedlings can become weak, tangled, and difficult to transplant. Think of it like baking bread. Timing matters. Start too late and you miss dinner. Start too early and you end up with dough climbing out of the bowl.
Most plants should be started indoors six to eight weeks before your last expected spring frost. That gives the seedlings time to grow strong without becoming oversized or leggy before they move outside.
Here’s a quick guideline:
Start 8–10 Weeks Before Your Last Frost
These slow starters benefit from a longer indoor head start.
- Onions
- Leeks
- Parsley
- Celery
- Artichokes
- Rosemary
- Lavender
These plants take their time getting established, so starting them earlier gives them a better chance to develop strong roots before transplanting.
Start 6–8 Weeks Before Your Last Frost
These warm-season favorites grow quickly but still appreciate a head start indoors.
- Tomatoes
- Peppers (sweet and hot)
- Basil
- Eggplant
- Tomatillos
- Ground cherries
- Oregano
- Thyme
These are some of the most rewarding plants to start from seed and the ones many gardeners get hooked on growing themselves.
Start 4–6 Weeks Before Your Last Frost
Cool-season crops that grow quickly and can handle cooler spring weather.
- Broccoli
- Cabbage
- Cauliflower
- Kale
- Brussels sprouts
- Swiss chard
- Lettuce
- Pak choi (bok choy)
Many of these can even tolerate a light frost once established, which makes them excellent early-season garden plants.
How to Find Your Last Frost Date
If there’s one number gardeners should know, it’s their average last spring frost date. This date gives you the best estimate of when freezing temperatures are likely to end in your area. Once you know that date, simply count backward to decide when to start seedlings indoors.
A reliable place to look it up is the frost date tool from the National Gardening Association: Frost Dates: First and Last Frost Dates by Zip Code.
Just enter your zip code or city and state, and the tool will show your typical frost window along with simple charts explaining when frost is most likely to occur. The data comes from the NOAA National Centers for Environmental Information, so it’s based on long-term weather records rather than guesswork.
One helpful reminder from seasoned gardeners: hardiness zones are not the same as frost dates. Two areas in the same zone can have very different planting schedules. Always check your local frost date first.
Simple Supplies for Starting Seedlings at Home
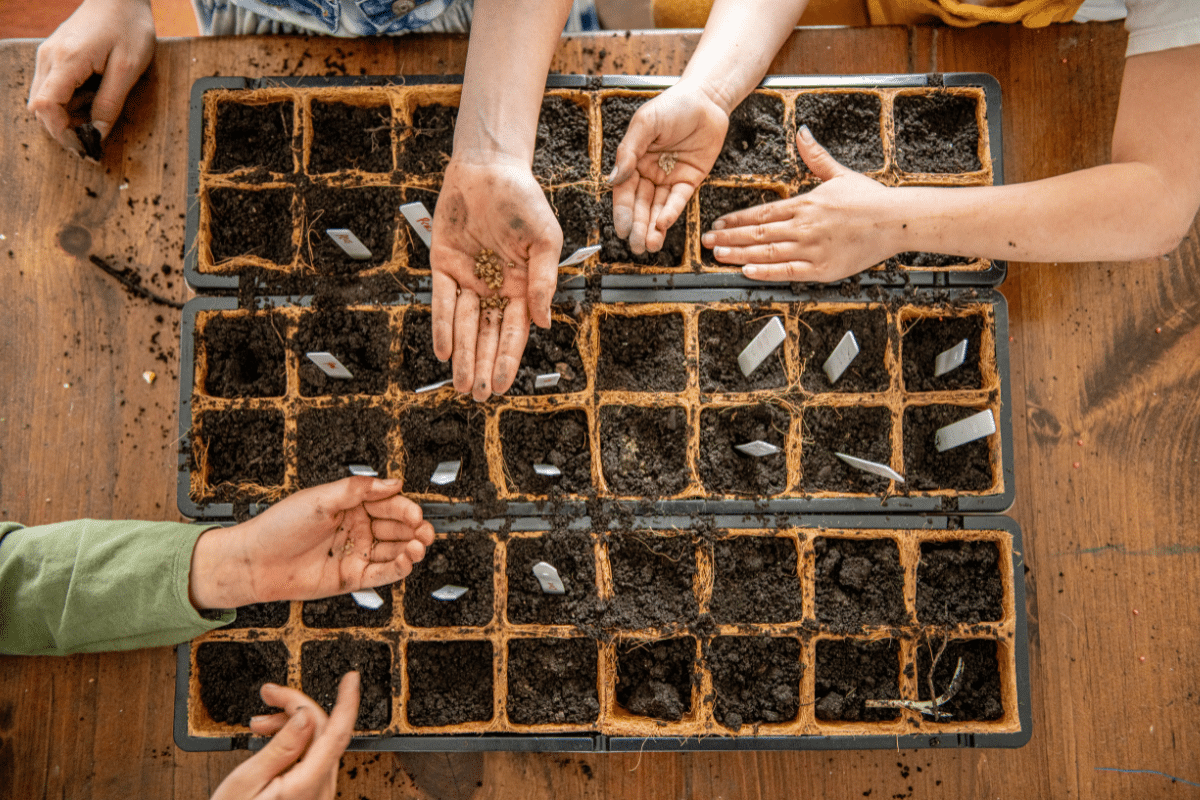
You can start seedlings indoors with surprisingly little equipment. At its most basic, you’ll need:
That’s it.
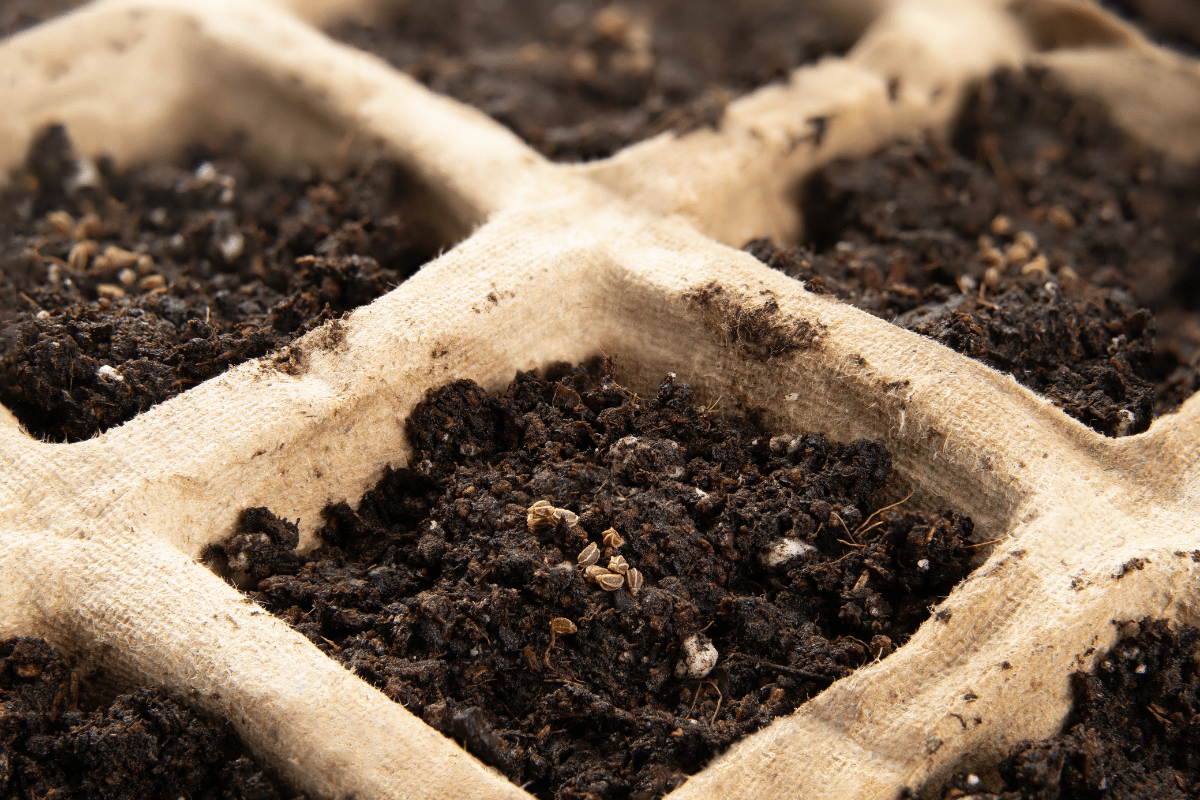
Seed-starting mix is important because it’s lighter and drains better than regular garden soil. This helps prevent tiny seedlings from rotting before they even get started. Everything else is flexible.
Some gardeners use elaborate seed starter trays with lighting systems. Others start their entire garden on one sunny windowsill. Both approaches work just fine.
Skip the Fancy Containers
Before you buy seed-starting trays, take a quick look around your kitchen. Many everyday items work perfectly well for starting seedlings.
Try using:
- Egg cartons
- Yogurt cups
- Paper coffee cups
- Takeout containers
- Toilet paper tubes
Just poke a few drainage holes in the bottom before filling them with seed-starting mix.
One of my favorite tricks is using toilet paper tubes as biodegradable seed pots. Cut several small slits around one end, fold them inward to create a base, and fill with soil.
When it’s time to transplant, the whole tube goes straight into the ground. The cardboard naturally breaks down and becomes part of the soil.
Light, Warmth, and Water: What Seeds Really Need
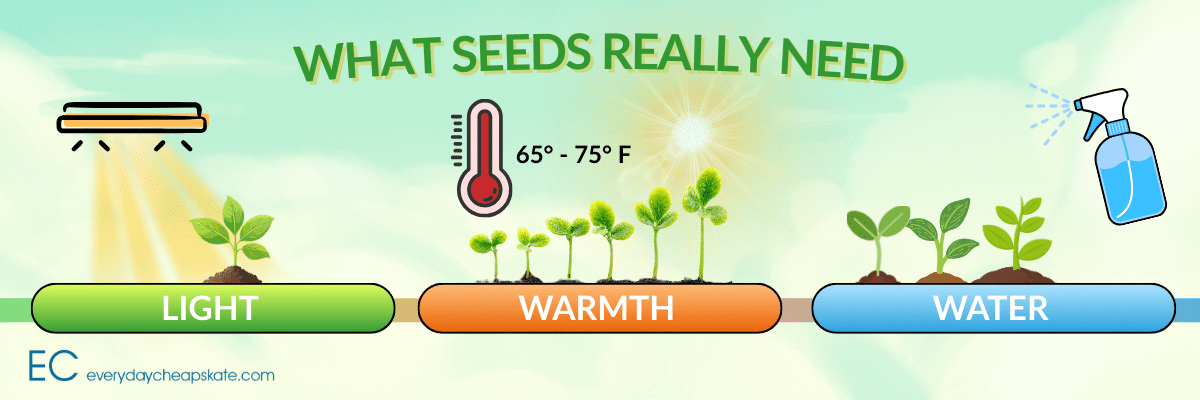
Seeds don’t ask for much, but they do insist on three things:
1. Light
Seedlings need far more light than most people expect. In fact, the most common mistake people make when they start seedlings indoors is simply not giving them enough light. When the light source is too weak or too far away, plants stretch upward searching for it. That’s how you end up with those tiny green giraffes!
Place lights 2–4 inches above the plants, or use the brightest window you have. Many gardeners also use inexpensive shop lights from the hardware store, which work surprisingly well for growing sturdy seedlings indoors.
2. Warmth
Most seeds germinate best between 65°F and 75°F. A warm room usually works fine, though some gardeners use inexpensive heat mats to speed things up.
3. Water
Keep soil lightly moist but never soggy. Overwatering is a fast track to mold and root rot. A gentle watering can or spray bottle works well for tiny seedlings.
How to Harden Off Seedlings Before Planting Outside
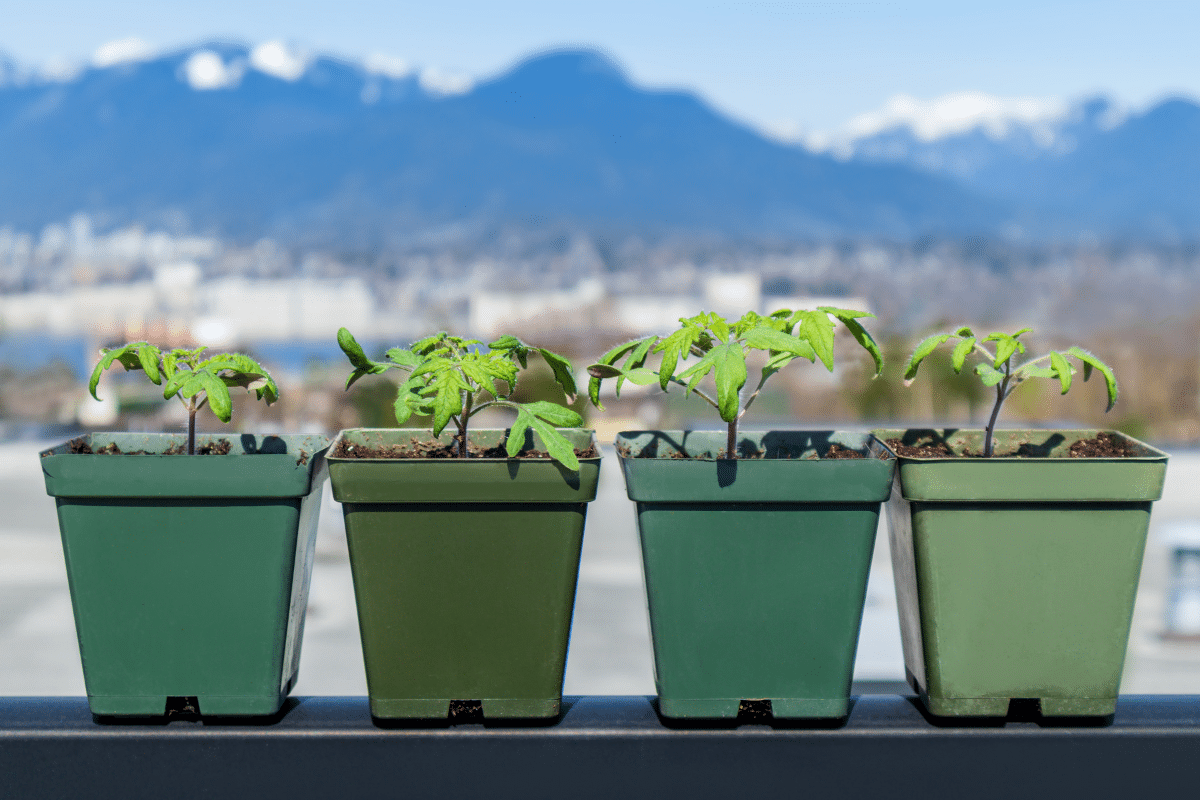
Seedlings raised indoors live a pretty comfortable life. No wind. No temperature swings. No blazing afternoon sun. So when it’s time to move them outdoors, they need a gradual transition. This process is called hardening off.
About two weeks before planting day, begin placing seedlings outside for a few hours in a sheltered, shady location. Each day increase their outdoor time, give them a little more sunlight, and be sure to protect them from strong wind.
By the end of the two weeks, the plants will be tough enough to handle full outdoor conditions. Skipping this step can shock the plants and stunt their growth.
Moving Seedlings to the Garden Successfully
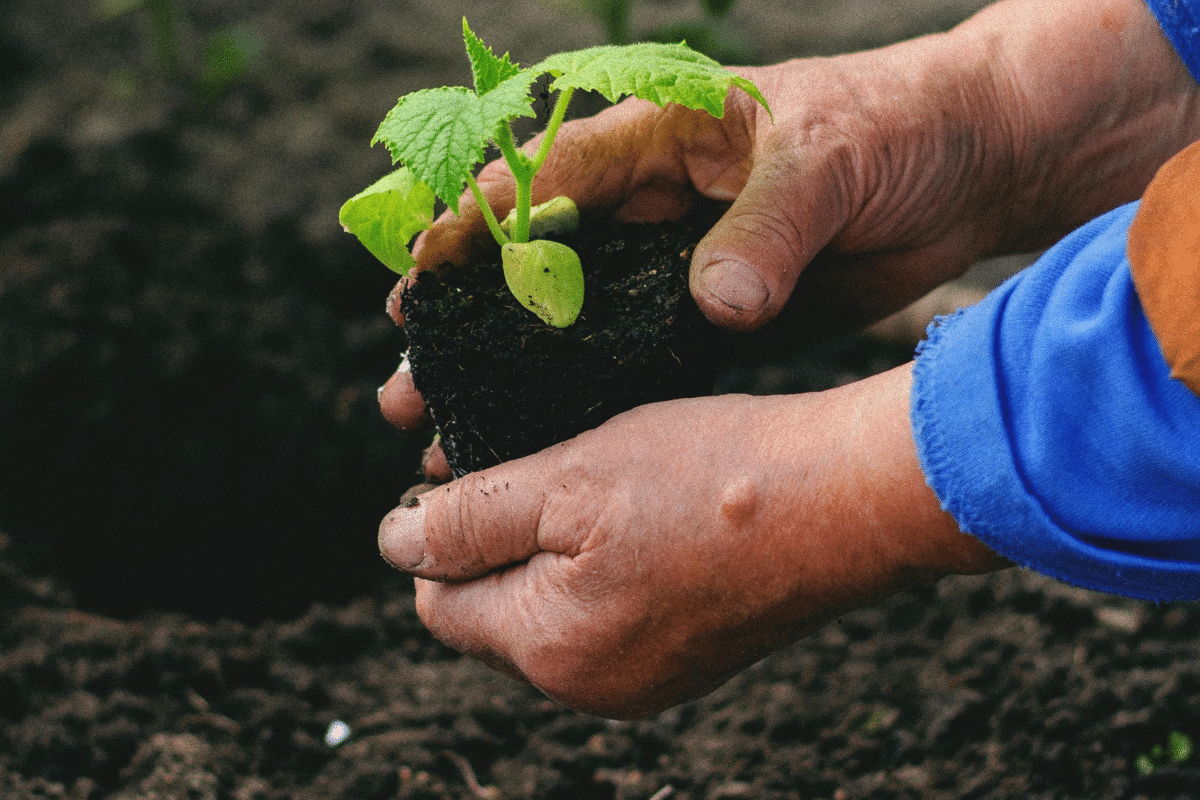
Once frost danger has passed and your seedlings are hardened off, it’s time for the big move. Choose a mild, cloudy day if possible. That reduces transplant stress.
When planting:
- Dig a hole slightly larger than the seedling’s root ball.
- Gently loosen the roots if they’re crowded.
- Set the plant into the soil at the same depth it was growing before.
- Water thoroughly.
For tomatoes, you can even plant them slightly deeper. They’ll develop additional roots along the buried stem, which helps produce stronger plants.
Start Small and Enjoy the Process
If this is your first time starting seeds indoors, here’s the best advice I can give: Don’t try to grow everything. Pick three or four plants you really enjoy eating and start there. Tomatoes, peppers, lettuce, and herbs are excellent beginner choices.
Gardening isn’t about perfection. Some seeds will sprout beautifully. Others may refuse to cooperate. That’s part of the learning process. But when those first seedlings stretch toward the sun and eventually produce something you can harvest for dinner, the effort feels incredibly worthwhile.
You’ll look at that plate of fresh food and think: I grew this from a seed.
And that’s a pretty satisfying way to start the season.
Question: What’s the first thing you plant when gardening season starts? Tomatoes, herbs, flowers, or something else? Share in the comments below.
EverydayCheapskate™ is reader-supported. We participate in the Amazon Services LLC Associates Program and other affiliate advertising programs, designed to provide a means for us to earn from qualifying purchases, at no cost to you.

More from Everyday Cheapskate
 https://www.everydaycheapskate.com/wp-content/uploads/20260717-a-woman-holding-a-crate-of-cucumbers.png
800
1200
Mary Hunt
https://www.everydaycheapskate.com/wp-content/uploads/EC-Logo-by-Mary-Hunt-Tagline-Trimmed.png
Mary Hunt2026-07-17 10:11:072026-07-17 10:13:44Cucumbers Galore? Here’s What to Do With Every Single One
https://www.everydaycheapskate.com/wp-content/uploads/20260717-a-woman-holding-a-crate-of-cucumbers.png
800
1200
Mary Hunt
https://www.everydaycheapskate.com/wp-content/uploads/EC-Logo-by-Mary-Hunt-Tagline-Trimmed.png
Mary Hunt2026-07-17 10:11:072026-07-17 10:13:44Cucumbers Galore? Here’s What to Do With Every Single One https://www.everydaycheapskate.com/wp-content/uploads/20260714-car-dashboard-diy-car-interior-cleaning-wipes.png
800
1200
Mary Hunt
https://www.everydaycheapskate.com/wp-content/uploads/EC-Logo-by-Mary-Hunt-Tagline-Trimmed.png
Mary Hunt2026-07-14 13:45:172026-07-14 13:45:17DIY Car Interior Cleaning Wipes That Actually Work Well
https://www.everydaycheapskate.com/wp-content/uploads/20260714-car-dashboard-diy-car-interior-cleaning-wipes.png
800
1200
Mary Hunt
https://www.everydaycheapskate.com/wp-content/uploads/EC-Logo-by-Mary-Hunt-Tagline-Trimmed.png
Mary Hunt2026-07-14 13:45:172026-07-14 13:45:17DIY Car Interior Cleaning Wipes That Actually Work Well https://www.everydaycheapskate.com/wp-content/uploads/20260705-Best-Coolers-for-Camping-Road-Trips-and-Beach-Days.png
800
1200
Mary Hunt
https://www.everydaycheapskate.com/wp-content/uploads/EC-Logo-by-Mary-Hunt-Tagline-Trimmed.png
Mary Hunt2026-07-05 13:26:172026-07-05 13:26:17Best Coolers for Camping, Road Trips, and Beach Days
https://www.everydaycheapskate.com/wp-content/uploads/20260705-Best-Coolers-for-Camping-Road-Trips-and-Beach-Days.png
800
1200
Mary Hunt
https://www.everydaycheapskate.com/wp-content/uploads/EC-Logo-by-Mary-Hunt-Tagline-Trimmed.png
Mary Hunt2026-07-05 13:26:172026-07-05 13:26:17Best Coolers for Camping, Road Trips, and Beach Days https://www.everydaycheapskate.com/wp-content/uploads/20260705-how-to-keep-a-cooler-cold.png
800
1200
Mary Hunt
https://www.everydaycheapskate.com/wp-content/uploads/EC-Logo-by-Mary-Hunt-Tagline-Trimmed.png
Mary Hunt2026-07-05 13:19:502026-07-05 13:19:50How to Pack a Cooler That Stays Cold for 48 Hours
https://www.everydaycheapskate.com/wp-content/uploads/20260705-how-to-keep-a-cooler-cold.png
800
1200
Mary Hunt
https://www.everydaycheapskate.com/wp-content/uploads/EC-Logo-by-Mary-Hunt-Tagline-Trimmed.png
Mary Hunt2026-07-05 13:19:502026-07-05 13:19:50How to Pack a Cooler That Stays Cold for 48 Hours https://www.everydaycheapskate.com/wp-content/uploads/20260630-a-lit-sparkler-with-an-american-flag-in-the-background-4th-of-july-hacks-tips-and-recipes.png
800
1200
Mary Hunt
https://www.everydaycheapskate.com/wp-content/uploads/EC-Logo-by-Mary-Hunt-Tagline-Trimmed.png
Mary Hunt2026-06-30 21:44:502026-06-30 21:44:5034 Fourth of July Recipes and DIY Hacks for a Stress-Free Holiday
https://www.everydaycheapskate.com/wp-content/uploads/20260630-a-lit-sparkler-with-an-american-flag-in-the-background-4th-of-july-hacks-tips-and-recipes.png
800
1200
Mary Hunt
https://www.everydaycheapskate.com/wp-content/uploads/EC-Logo-by-Mary-Hunt-Tagline-Trimmed.png
Mary Hunt2026-06-30 21:44:502026-06-30 21:44:5034 Fourth of July Recipes and DIY Hacks for a Stress-Free Holiday https://www.everydaycheapskate.com/wp-content/uploads/20260628-close-up-photo-a-woman-wearing-a-swimsuit-with-a-mild-sunburn.png
800
1200
Mary Hunt
https://www.everydaycheapskate.com/wp-content/uploads/EC-Logo-by-Mary-Hunt-Tagline-Trimmed.png
Mary Hunt2026-06-28 21:40:042026-06-28 21:40:04DIY After-Sun Spray That Cools and Soothes Skin
https://www.everydaycheapskate.com/wp-content/uploads/20260628-close-up-photo-a-woman-wearing-a-swimsuit-with-a-mild-sunburn.png
800
1200
Mary Hunt
https://www.everydaycheapskate.com/wp-content/uploads/EC-Logo-by-Mary-Hunt-Tagline-Trimmed.png
Mary Hunt2026-06-28 21:40:042026-06-28 21:40:04DIY After-Sun Spray That Cools and Soothes Skin https://www.everydaycheapskate.com/wp-content/uploads/20260626-homemade-stain-paste-sitting-on-wooden-countertop-in-laundry-room-with-washer-and-dryer.png
800
1200
Mary Hunt
https://www.everydaycheapskate.com/wp-content/uploads/EC-Logo-by-Mary-Hunt-Tagline-Trimmed.png
Mary Hunt2026-06-26 17:41:192026-06-26 17:41:19Homemade Laundry Stain Paste That Works for Pennies
https://www.everydaycheapskate.com/wp-content/uploads/20260626-homemade-stain-paste-sitting-on-wooden-countertop-in-laundry-room-with-washer-and-dryer.png
800
1200
Mary Hunt
https://www.everydaycheapskate.com/wp-content/uploads/EC-Logo-by-Mary-Hunt-Tagline-Trimmed.png
Mary Hunt2026-06-26 17:41:192026-06-26 17:41:19Homemade Laundry Stain Paste That Works for Pennies https://www.everydaycheapskate.com/wp-content/uploads/20260618-retriever-labrador-on-white-rug-in-bright-contemporary-living-room-pet-stains-and-odors.png
800
1200
Mary Hunt
https://www.everydaycheapskate.com/wp-content/uploads/EC-Logo-by-Mary-Hunt-Tagline-Trimmed.png
Mary Hunt2026-06-18 23:08:332026-06-18 23:08:33Homemade Pet Stain Remover That Stops Repeat Accidents
https://www.everydaycheapskate.com/wp-content/uploads/20260618-retriever-labrador-on-white-rug-in-bright-contemporary-living-room-pet-stains-and-odors.png
800
1200
Mary Hunt
https://www.everydaycheapskate.com/wp-content/uploads/EC-Logo-by-Mary-Hunt-Tagline-Trimmed.png
Mary Hunt2026-06-18 23:08:332026-06-18 23:08:33Homemade Pet Stain Remover That Stops Repeat Accidents https://www.everydaycheapskate.com/wp-content/uploads/20260615-how-to-get-rid-of-the-smell-in-the-ice-cooler-chest.png
800
1200
Mary Hunt
https://www.everydaycheapskate.com/wp-content/uploads/EC-Logo-by-Mary-Hunt-Tagline-Trimmed.png
Mary Hunt2026-06-15 20:59:282026-06-15 20:59:28How to Clean and Deodorize Your Cooler So It Doesn’t Stink
https://www.everydaycheapskate.com/wp-content/uploads/20260615-how-to-get-rid-of-the-smell-in-the-ice-cooler-chest.png
800
1200
Mary Hunt
https://www.everydaycheapskate.com/wp-content/uploads/EC-Logo-by-Mary-Hunt-Tagline-Trimmed.png
Mary Hunt2026-06-15 20:59:282026-06-15 20:59:28How to Clean and Deodorize Your Cooler So It Doesn’t Stink

Hi, do these same directions apply to flower seeds as well?
Thanks.
Absolutely! Flower seeding schedules match vegetable times based on the last spring frost date. Start seeding the slow-growing flowers (e.g., petunias, pansies) 8–12 weeks before, mid-speed flowers (e.g., marigolds, zinnias) 4–6 weeks before, and fast-growing, tender flowers (e.g., sunflowers) 2–4 weeks before. Enjoy!