
Homemade Beef Jerky Recipe: Cheaper and Healthier Snack

Ever notice how a tiny bag of beef jerky can cost as much as a full steak dinner? That’s exactly why I started making my own. This homemade beef jerky recipe isn’t just cheaper… it’s better too. You control the ingredients, the flavor, and the portion sizes, without all the mystery additives. Plus, it’s a snack everyone can agree on. Try my simple recipe and see why I’ll never go back to store-bought again.

Store-bought jerky may be convenient, but it comes at a steep price, both for your wallet and your health. A single bag can run close to $20, and most are packed with sodium, added sugars, and ingredients you can’t even pronounce. Making jerky at home flips that script. You’re in charge of what goes in, from the cut of meat to the seasonings, so you end up with a snack that’s not only more affordable but also tailored to your taste and lifestyle.
When you make your own jerky, you can keep it clean and simple: lean beef, a few pantry staples, and time. Want grass-fed beef? Done. Need to cut back on sodium or sugar? You decide how much goes in. Prefer to branch out with turkey or venison? That’s on the table too. Homemade jerky lets you skip the filler and focus on real food that fuels you.
And let’s not forget the savings. At my local store, name-brand jerky runs anywhere from $2 to $3 per ounce. By comparison, making your own comes in closer to 60–80 cents per ounce when you buy beef on sale. That’s a massive difference, especially if jerky is a regular snack in your house. Better quality, lower cost, and full control. It just makes sense.
Ingredients for the Best Homemade Beef Jerky Recipe
The secret to great jerky is all about starting with the right ingredients. Here’s what you’ll need and why it matters:
- Very lean beef (chuck, round, or flank): The leaner, the better. Fat doesn’t dry well and can turn rancid, so trim off every bit you see before slicing. Round steak is budget-friendly, flank makes a flavorful choice, and chuck works well if you catch it on sale. If you’re adventurous, turkey or venison are excellent substitutes for a leaner protein punch.
- Worcestershire sauce (or steak sauce): This gives jerky its deep, savory “umami” flavor. No Worcestershire? A mix of soy sauce and a splash of balsamic vinegar gets you close.
- Soy sauce: Adds saltiness and flavor. If you’re watching sodium, choose a low-sodium soy sauce or swap in coconut aminos or tamari for a gluten-free option.
- Tomato sauce: This adds a little sweetness and body to the marinade without overpowering the beef. In a pinch, ketchup will do (just cut back the sugar elsewhere), or skip it if you want a drier, saltier style of jerky.
- Vinegar (white or apple cider): Vinegar helps tenderize the meat and brightens up the flavor. Apple cider vinegar gives a slightly sweeter note, while white vinegar keeps it sharp and simple.
- Sugar: Just a touch balances the salt and tang. You can use brown sugar, honey, or even maple syrup if you want a hint of natural sweetness.
- Dried onion flakes: These add texture and flavor without extra moisture.
- Salt: Essential for flavor and preservation. If you’re already using soy sauce, go light on extra salt to avoid ending up with jerky that’s too salty.
- Garlic powder: Because garlic makes everything better. Fresh garlic won’t dry well, so stick with powdered here.
Step-by-Step: How to Make Beef Jerky at Home
1. Prep the meat.
Start by trimming every bit of visible fat off your beef. Fat doesn’t dehydrate well, and it can make your jerky spoil faster, so this is one time to be picky. Pop the trimmed beef in the freezer until it’s firm (not frozen solid), which makes it much easier to slice into nice thin strips. Aim for about 1/8-inch thick, and always slice across the grain for chewy-but-tender jerky.
2. Make the marinade.
In a small bowl, stir together the Worcestershire sauce, soy sauce, tomato sauce, vinegar, sugar, onion flakes, salt, and garlic powder. This blend hits all the flavor notes… savory, tangy, a little sweet. Pour it over your sliced beef in a medium bowl, pop a lid on, and let it marinate in the fridge for at least 8 hours (overnight is even better).
3. Dry it out.
Preheat your oven to its lowest setting. About 140°F is ideal. Place the marinated beef strips on a cooling rack set over a cookie sheet (this lets the air circulate so the jerky dries evenly).
4. Bake low and slow.
Slide it into the oven and let time do its thing. Depending on your oven and the thickness of your slices, it’ll take anywhere from 18 to 24 hours. You’ll know it’s ready when the jerky is very dry, edges are a little splintery, and it bends and cracks instead of feeling soft.
5. Cool and store.
Patience is key. Let the jerky cool completely before wrapping it up. Store it lightly wrapped in plastic or in a covered container. And here’s the best part: this recipe multiplies beautifully. Double or triple it, because jerky disappears fast once people know it’s in the house.
Is Homemade Beef Jerky Healthy?

The short answer: yes. When you make it yourself, it can be a much healthier snack than most store-bought options. You’re in control of the ingredients, which means you can keep the sodium and sugar in check, skip the artificial additives, and start with quality meat. Grass-fed beef is the gold standard, but lean turkey or venison make great high-protein, lower-fat alternatives, too.
The key is moderation. Jerky is a snack, not dinner, so think of it as part of a balanced diet. Pair a few pieces with fruit, veggies, or whole grains, and you’ve got a filling, protein-packed boost without the junk.
Cost Comparison: Store-Bought vs. Homemade Jerky
If you’ve ever picked up a bag of jerky at the grocery store, you know the sticker shock is real. Here’s a peek at what I found at my local supermarket:
- Jack Link’s Original (8 oz): $15.99 → about $2.00/oz
- Old Trapper Old Fashioned (8 oz): $17.99 → about $2.24/oz
- Country Archer® Grass-Fed (2.5 oz): $7.99 → about $3.20/oz
Now let’s compare that to the cost of making jerky at home, starting with lean cuts of beef:
- Choice Chuck Steak: $9.99/lb → about $0.62/oz
- Boneless Flank Steak: $12.99/lb → about $0.81/oz
- Top Round Steak: $9.99/lb → about $0.62/oz
Even after trimming and marinating, homemade jerky comes out miles cheaper per ounce and you get to control the flavor, quality, and ingredients. Brands like Country Archer or Chomps may offer cleaner options than the big names, but ounce for ounce, nothing beats homemade when it comes to stretching your dollar.

Beef Jerky
Ingredients
- 1 pound very lean beef chuck, flank, or round; see Notes
- ¼ cup Worcestershire sauce or steak sauce
- ¼ cup soy sauce or substitute coconut aminos for lower sodium or gluten-free
- 1 tbsp tomato sauce ketchup works in a pinch
- 1 tbsp vinegar white or apple cider vinegar
- 1 tsp sugar or honey for a natural sweetener
- ¼ tsp dried onion flakes or 1 tsp finely chopped fresh onion
- 1 tsp salt reduce slightly if watching sodium
- ¼ tsp garlic powder
Instructions
- Trim all visible fat (fat won’t dry properly). Freeze until firm but not rock solid—this makes slicing easier. Slice across the grain into thin strips, about ⅛-inch thick. Place strips in a medium bowl with a lid.
- In a small bowl, whisk together Worcestershire, soy sauce, tomato sauce, vinegar, sugar, onion, salt, and garlic powder. Pour over beef, cover, and refrigerate at least 8 hours or overnight for best flavor.
- Preheat oven to 140°F (or the lowest possible setting). Place beef strips on a cooling rack set over a baking sheet.
- Dry in the oven for 18–24 hours, until the jerky is very dry, slightly splintery at the edges, and cracks when bent.
- Allow jerky to cool completely. Wrap lightly in plastic wrap or store in an airtight container.
Notes
Nutrition
Question: What’s your go-to road trip snack? Jerky, trail mix, or something sweet? Share in the comments below.
EverydayCheapskate™ is reader-supported. We participate in the Amazon Services LLC Associates Program and other affiliate advertising programs, designed to provide a means for us to earn from qualifying purchases, at no cost to you.

More from Everyday Cheapskate
 https://www.everydaycheapskate.com/wp-content/uploads/20260609-refreshing-glasses-of-iced-tea-with-fresh-lemon-slices-and-ice-best-way-to-make-tea.png
800
1200
Mary Hunt
https://www.everydaycheapskate.com/wp-content/uploads/EC-Logo-by-Mary-Hunt-Tagline-Trimmed.png
Mary Hunt2026-07-09 18:30:102026-07-09 18:30:10The Best Way to Make Iced Tea? Depends What You’re After
https://www.everydaycheapskate.com/wp-content/uploads/20260609-refreshing-glasses-of-iced-tea-with-fresh-lemon-slices-and-ice-best-way-to-make-tea.png
800
1200
Mary Hunt
https://www.everydaycheapskate.com/wp-content/uploads/EC-Logo-by-Mary-Hunt-Tagline-Trimmed.png
Mary Hunt2026-07-09 18:30:102026-07-09 18:30:10The Best Way to Make Iced Tea? Depends What You’re After https://www.everydaycheapskate.com/wp-content/uploads/20260707-creamy-whipped-frozen-coffee-drink-on-balcony-with-whipped-cream.png
800
1200
Mary Hunt
https://www.everydaycheapskate.com/wp-content/uploads/EC-Logo-by-Mary-Hunt-Tagline-Trimmed.png
Mary Hunt2026-07-07 10:09:112026-07-07 10:09:11I Stopped Buying $7 Frappuccinos. Here’s What I Make Now
https://www.everydaycheapskate.com/wp-content/uploads/20260707-creamy-whipped-frozen-coffee-drink-on-balcony-with-whipped-cream.png
800
1200
Mary Hunt
https://www.everydaycheapskate.com/wp-content/uploads/EC-Logo-by-Mary-Hunt-Tagline-Trimmed.png
Mary Hunt2026-07-07 10:09:112026-07-07 10:09:11I Stopped Buying $7 Frappuccinos. Here’s What I Make Now https://www.everydaycheapskate.com/wp-content/uploads/20260630-a-lit-sparkler-with-an-american-flag-in-the-background-4th-of-july-hacks-tips-and-recipes.png
800
1200
Mary Hunt
https://www.everydaycheapskate.com/wp-content/uploads/EC-Logo-by-Mary-Hunt-Tagline-Trimmed.png
Mary Hunt2026-06-30 21:44:502026-06-30 21:44:5034 Fourth of July Recipes and DIY Hacks for a Stress-Free Holiday
https://www.everydaycheapskate.com/wp-content/uploads/20260630-a-lit-sparkler-with-an-american-flag-in-the-background-4th-of-july-hacks-tips-and-recipes.png
800
1200
Mary Hunt
https://www.everydaycheapskate.com/wp-content/uploads/EC-Logo-by-Mary-Hunt-Tagline-Trimmed.png
Mary Hunt2026-06-30 21:44:502026-06-30 21:44:5034 Fourth of July Recipes and DIY Hacks for a Stress-Free Holiday https://www.everydaycheapskate.com/wp-content/uploads/20260628-Grilled-Peaches-with-Balsamic-and-Blue-Cheese-1.png
800
1200
Mary Hunt
https://www.everydaycheapskate.com/wp-content/uploads/EC-Logo-by-Mary-Hunt-Tagline-Trimmed.png
Mary Hunt2026-06-29 09:38:342026-06-29 09:38:34Summer Grilled Peaches with Balsamic and Blue Cheese
https://www.everydaycheapskate.com/wp-content/uploads/20260628-Grilled-Peaches-with-Balsamic-and-Blue-Cheese-1.png
800
1200
Mary Hunt
https://www.everydaycheapskate.com/wp-content/uploads/EC-Logo-by-Mary-Hunt-Tagline-Trimmed.png
Mary Hunt2026-06-29 09:38:342026-06-29 09:38:34Summer Grilled Peaches with Balsamic and Blue Cheese https://www.everydaycheapskate.com/wp-content/uploads/20260620-cheesey-chicken-and-rice-casserole-in-a-baking-dish.png
800
1200
Mary Hunt
https://www.everydaycheapskate.com/wp-content/uploads/EC-Logo-by-Mary-Hunt-Tagline-Trimmed.png
Mary Hunt2026-06-20 13:31:162026-06-20 13:31:16Cheesy Chicken & Rice Bake That Disappears at Family Dinners
https://www.everydaycheapskate.com/wp-content/uploads/20260620-cheesey-chicken-and-rice-casserole-in-a-baking-dish.png
800
1200
Mary Hunt
https://www.everydaycheapskate.com/wp-content/uploads/EC-Logo-by-Mary-Hunt-Tagline-Trimmed.png
Mary Hunt2026-06-20 13:31:162026-06-20 13:31:16Cheesy Chicken & Rice Bake That Disappears at Family Dinners https://www.everydaycheapskate.com/wp-content/uploads/20260619-delicious-creamy-no-churn-vanilla-ice-cream-scoop-and-loaf-pan.png
800
1200
Mary Hunt
https://www.everydaycheapskate.com/wp-content/uploads/EC-Logo-by-Mary-Hunt-Tagline-Trimmed.png
Mary Hunt2026-06-19 18:42:402026-06-19 18:42:413-Ingredient No-Churn Vanilla Ice Cream (No Machine Needed)
https://www.everydaycheapskate.com/wp-content/uploads/20260619-delicious-creamy-no-churn-vanilla-ice-cream-scoop-and-loaf-pan.png
800
1200
Mary Hunt
https://www.everydaycheapskate.com/wp-content/uploads/EC-Logo-by-Mary-Hunt-Tagline-Trimmed.png
Mary Hunt2026-06-19 18:42:402026-06-19 18:42:413-Ingredient No-Churn Vanilla Ice Cream (No Machine Needed) https://www.everydaycheapskate.com/wp-content/uploads/20260616-close-up-of-watermelon-feta-salad-with-mint-and-lime.png
800
1200
Mary Hunt
https://www.everydaycheapskate.com/wp-content/uploads/EC-Logo-by-Mary-Hunt-Tagline-Trimmed.png
Mary Hunt2026-06-16 17:44:142026-06-16 17:44:14Watermelon Feta Salad with Mint for Summer Cookouts
https://www.everydaycheapskate.com/wp-content/uploads/20260616-close-up-of-watermelon-feta-salad-with-mint-and-lime.png
800
1200
Mary Hunt
https://www.everydaycheapskate.com/wp-content/uploads/EC-Logo-by-Mary-Hunt-Tagline-Trimmed.png
Mary Hunt2026-06-16 17:44:142026-06-16 17:44:14Watermelon Feta Salad with Mint for Summer Cookouts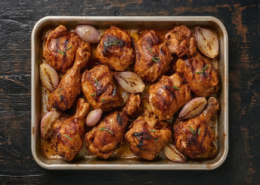 https://www.everydaycheapskate.com/wp-content/uploads/20260613-chicken-a-lorange-recipe-in-roasting-pan-with-shallots-and-orange-marmalade.png
800
1200
Mary Hunt
https://www.everydaycheapskate.com/wp-content/uploads/EC-Logo-by-Mary-Hunt-Tagline-Trimmed.png
Mary Hunt2026-06-13 20:59:292026-06-13 20:59:29Duck à l’Orange Is Fancy. This Chicken Version Is Better.
https://www.everydaycheapskate.com/wp-content/uploads/20260613-chicken-a-lorange-recipe-in-roasting-pan-with-shallots-and-orange-marmalade.png
800
1200
Mary Hunt
https://www.everydaycheapskate.com/wp-content/uploads/EC-Logo-by-Mary-Hunt-Tagline-Trimmed.png
Mary Hunt2026-06-13 20:59:292026-06-13 20:59:29Duck à l’Orange Is Fancy. This Chicken Version Is Better. https://www.everydaycheapskate.com/wp-content/uploads/20260607-woman-grocery-shopping-pushing-cart-with-apples-and-cauliflower.png
800
1200
Mary Hunt
https://www.everydaycheapskate.com/wp-content/uploads/EC-Logo-by-Mary-Hunt-Tagline-Trimmed.png
Mary Hunt2026-06-09 23:20:292026-06-09 23:20:29How to Read a Grocery Store Sale Cycle (And Stop Overpaying)
https://www.everydaycheapskate.com/wp-content/uploads/20260607-woman-grocery-shopping-pushing-cart-with-apples-and-cauliflower.png
800
1200
Mary Hunt
https://www.everydaycheapskate.com/wp-content/uploads/EC-Logo-by-Mary-Hunt-Tagline-Trimmed.png
Mary Hunt2026-06-09 23:20:292026-06-09 23:20:29How to Read a Grocery Store Sale Cycle (And Stop Overpaying)

What temp and time would you use for an air fryer?
I would not use an air fryer for this purpose.
Hi Mary,
I have a question about the time involved in making the beef jerky. In one section of the recipe, it says to marinade for 3 days. In another it says 8 hours. Can you clarify this please?
Thank you.
8 hours marinating in the refrigerator, followed by up to 24 hrs. in the 140℉ oven. Sorry that was not clear!
i tried to sign in to get your free book, make your own mixes. is it only available to new subscribers?
I am definitely going to try this recipe for beef jerky; we have one that we usually used and that I’ve tweaked to get the taste we like but this sounds really good. We have 2 dehydrators that we’ve picked up at yard sales for $5 and $3, plus 4 extra trays that cost us $1 (I love a good yard sale!). On one we make our beef jerky and the other we use for fruits and vegetables. I don’t know who can afford a whole pound of beef jerky at the store and making our own just tastes better too. We usually let it marinade for at least 24 hours to be sure to get the best taste possible. I love this column and look forward to my daily email – thanks for doing this Mary!
A tartar sauce recipe, please
Thousand Island dressing
Chili-Lime sauce.
A few years ago, El Pollo Loco came out with a Chicken Chili-Lime special that was outstanding! It was for a very short time, and to my knowledge, was never repeated, even though I have requested it many times.
I recall that they would serve the regular flame BBQ’d chicken pieces and simply baste the pieces with the sauce before serving. If you could duplicate this recipe, I’d be one happy camper!
I would like a copycat recipe for Heinz Chili sauce,not make as needed but a canning recipe that would make enough to last for a year.
The answer to “crabbyoldlady’s” question is – most assuredly. Historically, a low, smokey fire was used to make jerky. Ancient man didn’t have gas ovens. So, a low, smokey fire did the work. The smoke has three benefits. It keeps away flies, it adds a preservative, and (with the right woods) it adds the best of flavors. Smokey fires in our kitchens are not feasible, or desireable.
Interestingly enough, jerky dries well on a screen rack, with ambient air blowing up through it, no heat needed at all. Lay one of those square, window fans up on 4 bricks or blocks so the bottom is up off the floor a few inches. It should freely take in air on the bottom, and be blowing air straight up. Lay a screen rack across the top of the fan. Place the marinated meat strips onto screen. Several such racks can be stacked up like this.
Turn the fan onto a lower or mecium setting, letting a free flow of air to pass upwards through the layer/s of meat. In a day, check the meat, and rearrange pieces that seem to be drying slowly so they are assured good air flow. At two days, the meat will be nearly all done, some pieces probably will be done, and can be removed. Make sure that each piece is brittle dry and leathery before removing.
I would like to make a protein rich diet. Mixing grains (corn, rice, etc.) with legumes (beans, peas, peanuts, etc.) forms protein as we digest them. My question is, in what proprtions is this the most effective. Realizing that with various combinations of different grains with different legumes, the proportions will be different, it complicates my trying to solve this set of problems. So, I ask an expert for assistance.
When the oven must be running for hours, is it really saving that much? Just a thought.
One thing I would like to make is the WHITE french dressing we had in most cafes in Paris…