
Holiday Fudge Made Easy: The Ultimate Christmas Treat Recipe


The holidays are all about traditions, and few treats say “Christmas” quite like homemade fudge. This easy holiday fudge recipe brings together chocolate chips, marshmallows, and just the right amount of magic for a smooth, creamy dessert. Whether you’re gifting it or serving it at gatherings, this recipe will have everyone asking for seconds—and the recipe! Best of all? It’s fuss-free and perfect for busy holiday schedules.
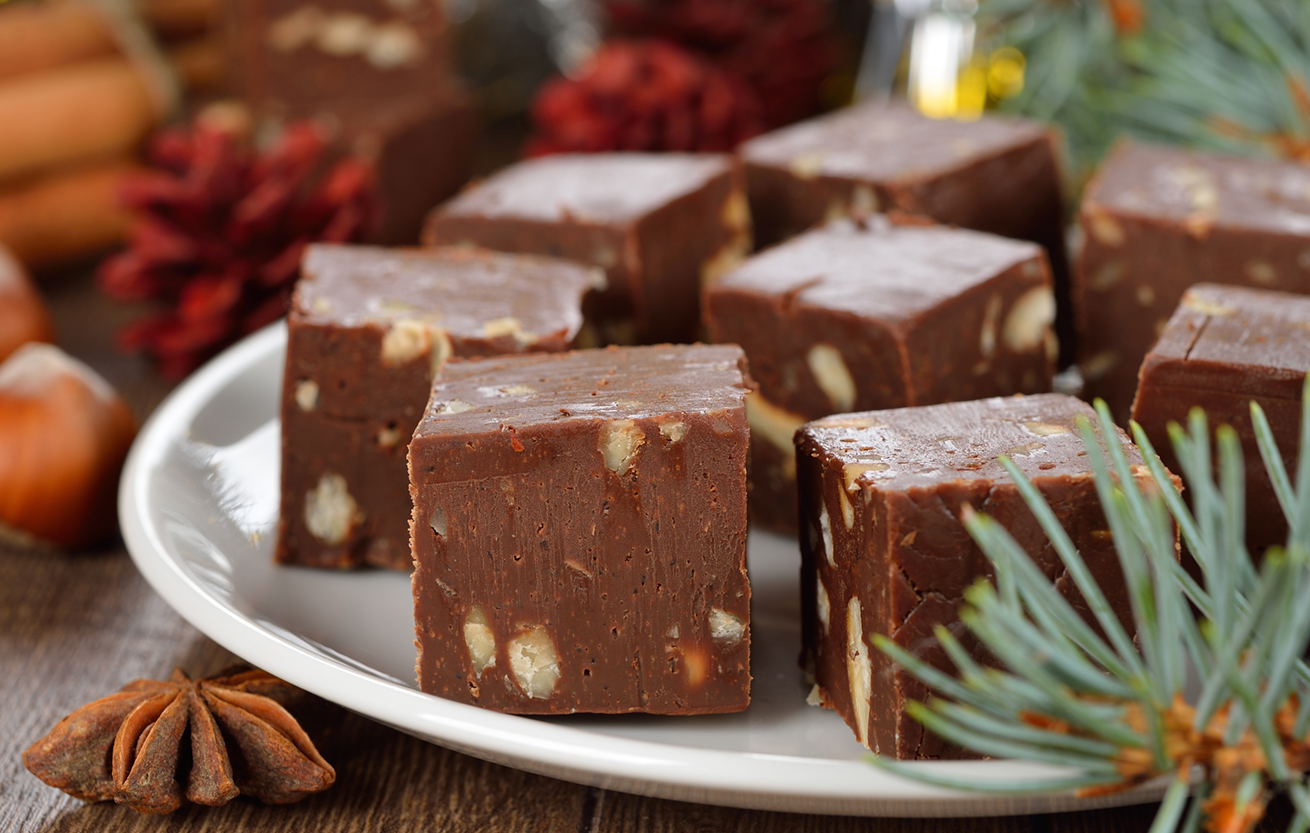
Chocolate fudge always conjures up two distinct memories: The intoxicating smell coming from the small fudge shop in the town where I grew up and opening the box of homemade treats my grandparents always sent us for Christmas.
It’s hard to go wrong with a delicious, consumable gift for any occasion, but especially Christmas. Perfect homemade fudge that’s neither complicated nor fussy marks off all the boxes for both giver and recipient.
This easy chocolate fudge, made with chocolate chips and marshmallows, is done in 25 minutes. A classic holiday staple! Grab your kitchen timer because it is the key to making this Holiday Fudge turn out perfectly—smooth and creamy, never crumbly, dry, or too “soupy” to cut into squares.
Simple Ingredients for Perfect Christmas Fudge
Here’s what you’ll need, along with some helpful tips to make it foolproof:
- Regular-Size Marshmallows: Skip the minis—regular-size marshmallows melt down just right, ensuring a creamy consistency without lumps.
- Granulated Sugar: The backbone of any good fudge.
- Evaporated Milk: This rich, creamy milk gives fudge its luxurious texture. Don’t substitute with regular milk—it just won’t set the same!
- Semi-Sweet Chocolate Chips: Semi-sweet is the perfect middle ground between sweet and rich. Want to mix it up? Try dark chocolate chips for a deeper flavor or white chocolate chips for a festive twist.
- Butter (1 Stick): Butter makes everything better—especially fudge! It adds creaminess and a hint of richness that’s simply irresistible.
- Vanilla Extract: A small but mighty ingredient!
- Chopped Walnuts (Optional): Nuts add a delightful crunch and nutty flavor to your fudge. Not a fan? Swap walnuts for pecans, almonds, or leave them out altogether for a smoother treat.
You’ll also need a few tools:
- 8 x 8 Square Baking Dish: Perfect for creating thick, even squares of fudge. Lightly grease it to ensure easy removal.
- Large Mixing Bowl: This is where the magic happens—combining all those tasty ingredients into a decadent fudge batter.
- Large Saucepan: Essential for boiling the sugar, milk, and marshmallows to perfection.
- Electric Mixer (Optional): While beating by hand works just fine, a mixer makes the job easier and ensures a creamy, lump-free texture.
Step-by-Step Guide to Making Holiday Fudge
Follow these steps carefully, and you’ll have a batch of creamy, perfectly sweet fudge that’ll have everyone asking for your secret recipe.
- Prepare Your Baking Dish
Start by lightly greasing an 8 x 8-inch square baking dish. This step ensures your fudge will release cleanly and cut beautifully. - Set Up Your Mixing Bowl
In a large mixing bowl, combine your chocolate chips, butter, and walnuts (if using). Having this ready to go is essential—once the hot mixture is poured in, you’ll need to move quickly! - Cook the Sweet Base
In a large saucepan, stir together the marshmallows, sugar, and evaporated milk over medium heat. Stir constantly and watch for that magical moment when it starts to boil. Once boiling, grab your timer and boil for exactly 6 minutes—no more, no less. Precision is everything here for the perfect texture! - Combine the Mixtures
Carefully pour the hot marshmallow mixture into the bowl of chocolate chips and butter. Stir to combine, then prepare for the workout: beat the mixture by hand or with an electric mixer on low speed for exactly 20 minutes. Yes, 20 minutes—this is the secret to fudge that’s smooth, creamy, and perfectly set. - Add the Finishing Touch
Stir in the vanilla extract, which gives your fudge that warm, holiday aroma. This little step is what ties all the flavors together. - Pour, Cool, and Set
Spread the fudge mixture into your greased dish, smoothing it out evenly. Now, let it cool and set. Be patient. - Slice and Enjoy
Once the fudge has set, cut it into squares. Whether you prefer bite-sized pieces or more generous portions, this is your chance to make it your own.
Tips for Perfectly Creamy and Smooth Fudge Every Time
Making fudge is both an art and a science, and getting it perfectly smooth and creamy comes down to a few key tricks. These tips will help you nail it every single time—no grainy textures or crumbly disasters here!
- Timing is Everything: When I say timing is crucial, I mean it. Boil the sugar, marshmallows, and evaporated milk for exactly six minutes. Set a timer—don’t eyeball it! Too short, and your fudge might not set; too long, and you risk a grainy texture. The same goes for the 20 minutes of mixing. Precision makes all the difference!
- Use High-Quality Ingredients: With so few ingredients, quality really shines through. Choose semi-sweet chocolate chips that melt smoothly, fresh marshmallows for the perfect consistency, and real vanilla extract for that warm, rich flavor. Trust me, it’s worth the little extra effort to avoid any shortcuts here.
- Prep Like a Pro: Have everything measured and ready to go before you start cooking. Fudge-making moves quickly, and you won’t have time to hunt for the butter while your sugar mixture is boiling. Being prepared makes the process seamless—and a lot less stressful.
- Keep It Cool: Don’t rush the cooling process. Let the fudge set at room temperature before cutting it into squares. Popping it in the fridge might seem like a shortcut, but it can lead to a texture that’s too firm or slightly gritty. Patience pays off!
- Mix with Muscle (or a Mixer): That 20 minutes of mixing? It’s a workout, but it’s essential for creating that silky smooth finish. Use a stand mixer on low speed if you can, or enlist some elbow grease. Either way, don’t skip or skimp!
- Customize Wisely: Walnuts are a classic addition, but you can swap them for pecans or skip nuts altogether for a nut-free treat. Just remember: too many add-ins can disrupt the texture, so keep it simple and balanced.
- Practice Makes Perfect: If your first batch isn’t picture-perfect, don’t give up. Fudge is forgiving, and even a slightly imperfect batch tastes amazing. Use the opportunity to fine-tune your technique.
- Store it Smart: To keep your fudge creamy and delicious, store it in an airtight container at room temperature for up to a week. For longer storage, freeze it. Just wrap the squares individually in wax paper before sealing them in a freezer-safe bag or container.
With these tips in your back pocket, you’re set to make fudge that’s not only holiday-worthy but also gift-worthy. Smooth, creamy, and utterly indulgent—your holiday treats are about to become legendary!
Creative Ways to Package Fudge for Gifting
Homemade fudge isn’t just delicious—it’s a heartfelt, personal gift that’s perfect for spreading holiday cheer. But let’s be honest, presentation matters! A beautifully packaged treat not only feels more special but also makes your gift stand out. Here are some easy, creative, and budget-friendly ways to package your fudge like a pro:
- Classic Tin Charm: You can’t go wrong with a festive tin. Line it with parchment paper or a doily for a polished touch. Tins are reusable, durable, and come in endless holiday designs, making them a gift in themselves. Check dollar stores or grab a set online to stock up for the season.
- Mason Jar Magic: Layer fudge squares in a mason jar, separated by parchment rounds. Tie a holiday ribbon around the jar’s neck and add a cute tag with the flavor and a personal note. Bonus points for including the recipe!
- Customized Treat Bags: Use clear cellophane bags to showcase your fudge. Seal them with a decorative twist tie or ribbon, and add a holiday sticker or hand-drawn label. These are perfect for small, thoughtful gifts to coworkers, teachers, or neighbors.
- Eco-Friendly Wrap: For a sustainable option, wrap fudge pieces in parchment paper and place them in a small cardboard box. Decorate the box with a sprig of greenery or cinnamon sticks tied on with twine. It’s rustic and chic.
- Holiday Mugs or Bowls: Pair your fudge with a cute holiday mug or bowl. Arrange the fudge inside and wrap the entire thing in cellophane, tied with a big bow. This doubles as a sweet treat and a keepsake your recipient can use long after the fudge is gone.
- Mini Loaf Pans: Use decorative mini loaf pans. Fill them with fudge squares and cover with clear wrap, tied off with a festive ribbon.
With a little creativity, you can turn this homemade treat into a professional-looking holiday gift that’s as delightful to open as it is to eat!
Holiday Chocolate Fudge
Ingredients
- 12 regular-size marshmallows not mini, trust me on this
- 2 cups granulated sugar
- 1 6 oz. can evaporated milk
- 1 12 oz. package semi-sweet chocolate chips
- 1/2 cup butter 1 stick at room temp, cut into chunks; unsalted is best
- 1 teaspoon vanilla extract
- 1 cup chopped walnuts optional, but adds a delightful crunch
Instructions
- Prepare Your Dish: Lightly grease an 8 x 8 square baking dish and set it aside.
- Mix the Base Ingredients: In a large mixing bowl, combine the chocolate chips, butter, and walnuts (if using). Set this aside for later.
- Cook the Fudge Base: In a large saucepan over medium heat, combine the marshmallows, sugar, and evaporated milk. Stir constantly until the mixture comes to a boil.
- Precise Boiling: Once boiling, continue to stir and let it boil for exactly 6 minutes. Use your timer—no guesswork allowed!
- Combine and Beat: Pour the hot mixture over the ingredients in your bowl. Stir to combine, then beat by hand or on low speed with an electric mixer for exactly 20 minutes without stopping. Yes, a full 20 minutes—set that timer again!
- Add the Vanilla: Stir in the vanilla extract.
- Set the Fudge: Pour the mixture into your prepared baking dish and spread it evenly. Let it cool and set completely.
- Cut and Serve: Once set, cut into 36 (1.3"x1.3") squares, 64 (1"x1") squares, or any size you fancy.
Notes
Nutrition
Question: What’s your favorite holiday treat to make or receive? Let’s swap recipes and inspiration.
EverydayCheapskate™ is reader-supported. We participate in the Amazon Services LLC Associates Program and other affiliate advertising programs, designed to provide a means for us to earn from qualifying purchases, at no cost to you.

More from Everyday Cheapskate
 https://www.everydaycheapskate.com/wp-content/uploads/20260720-slow-cooker-hot-weather-meals-salads-plus-pico-de-gallo-recipes.png
800
1200
Mary Hunt
https://www.everydaycheapskate.com/wp-content/uploads/EC-Logo-by-Mary-Hunt-Tagline-Trimmed.png
Mary Hunt2026-07-20 21:12:192026-07-20 21:15:463 Slow Cooker Summer Salads for Hot Weather Dinners
https://www.everydaycheapskate.com/wp-content/uploads/20260720-slow-cooker-hot-weather-meals-salads-plus-pico-de-gallo-recipes.png
800
1200
Mary Hunt
https://www.everydaycheapskate.com/wp-content/uploads/EC-Logo-by-Mary-Hunt-Tagline-Trimmed.png
Mary Hunt2026-07-20 21:12:192026-07-20 21:15:463 Slow Cooker Summer Salads for Hot Weather Dinners https://www.everydaycheapskate.com/wp-content/uploads/20260717-a-woman-holding-a-crate-of-cucumbers.png
800
1200
Mary Hunt
https://www.everydaycheapskate.com/wp-content/uploads/EC-Logo-by-Mary-Hunt-Tagline-Trimmed.png
Mary Hunt2026-07-17 10:11:072026-07-17 10:13:44Cucumbers Galore? Here’s What to Do With Every Single One
https://www.everydaycheapskate.com/wp-content/uploads/20260717-a-woman-holding-a-crate-of-cucumbers.png
800
1200
Mary Hunt
https://www.everydaycheapskate.com/wp-content/uploads/EC-Logo-by-Mary-Hunt-Tagline-Trimmed.png
Mary Hunt2026-07-17 10:11:072026-07-17 10:13:44Cucumbers Galore? Here’s What to Do With Every Single One https://www.everydaycheapskate.com/wp-content/uploads/20260713-what-to-pack-for-kids-lunchboxes-young-boy-and-girl-eating-a-banana-and-a-sandwich.png
800
1200
Mary Hunt
https://www.everydaycheapskate.com/wp-content/uploads/EC-Logo-by-Mary-Hunt-Tagline-Trimmed.png
Mary Hunt2026-07-13 21:54:132026-07-13 21:54:13Back-to-School Lunch Ideas for a Week (No Boring Sandwiches)
https://www.everydaycheapskate.com/wp-content/uploads/20260713-what-to-pack-for-kids-lunchboxes-young-boy-and-girl-eating-a-banana-and-a-sandwich.png
800
1200
Mary Hunt
https://www.everydaycheapskate.com/wp-content/uploads/EC-Logo-by-Mary-Hunt-Tagline-Trimmed.png
Mary Hunt2026-07-13 21:54:132026-07-13 21:54:13Back-to-School Lunch Ideas for a Week (No Boring Sandwiches) https://www.everydaycheapskate.com/wp-content/uploads/20260609-refreshing-glasses-of-iced-tea-with-fresh-lemon-slices-and-ice-best-way-to-make-tea.png
800
1200
Mary Hunt
https://www.everydaycheapskate.com/wp-content/uploads/EC-Logo-by-Mary-Hunt-Tagline-Trimmed.png
Mary Hunt2026-07-09 18:30:102026-07-09 18:30:10The Best Way to Make Iced Tea? Depends What You’re After
https://www.everydaycheapskate.com/wp-content/uploads/20260609-refreshing-glasses-of-iced-tea-with-fresh-lemon-slices-and-ice-best-way-to-make-tea.png
800
1200
Mary Hunt
https://www.everydaycheapskate.com/wp-content/uploads/EC-Logo-by-Mary-Hunt-Tagline-Trimmed.png
Mary Hunt2026-07-09 18:30:102026-07-09 18:30:10The Best Way to Make Iced Tea? Depends What You’re After https://www.everydaycheapskate.com/wp-content/uploads/20260707-creamy-whipped-frozen-coffee-drink-on-balcony-with-whipped-cream.png
800
1200
Mary Hunt
https://www.everydaycheapskate.com/wp-content/uploads/EC-Logo-by-Mary-Hunt-Tagline-Trimmed.png
Mary Hunt2026-07-07 10:09:112026-07-07 10:09:11I Stopped Buying $7 Frappuccinos. Here’s What I Make Now
https://www.everydaycheapskate.com/wp-content/uploads/20260707-creamy-whipped-frozen-coffee-drink-on-balcony-with-whipped-cream.png
800
1200
Mary Hunt
https://www.everydaycheapskate.com/wp-content/uploads/EC-Logo-by-Mary-Hunt-Tagline-Trimmed.png
Mary Hunt2026-07-07 10:09:112026-07-07 10:09:11I Stopped Buying $7 Frappuccinos. Here’s What I Make Now https://www.everydaycheapskate.com/wp-content/uploads/20260704-financial-independence-sparkler-and-american-flag-in-night-sky.png
800
1200
Mary Hunt
https://www.everydaycheapskate.com/wp-content/uploads/EC-Logo-by-Mary-Hunt-Tagline-Trimmed.png
Mary Hunt2026-07-04 11:57:492026-07-04 11:57:49What My Debt Taught Me About Real Freedom
https://www.everydaycheapskate.com/wp-content/uploads/20260704-financial-independence-sparkler-and-american-flag-in-night-sky.png
800
1200
Mary Hunt
https://www.everydaycheapskate.com/wp-content/uploads/EC-Logo-by-Mary-Hunt-Tagline-Trimmed.png
Mary Hunt2026-07-04 11:57:492026-07-04 11:57:49What My Debt Taught Me About Real Freedom https://www.everydaycheapskate.com/wp-content/uploads/20260630-a-lit-sparkler-with-an-american-flag-in-the-background-4th-of-july-hacks-tips-and-recipes.png
800
1200
Mary Hunt
https://www.everydaycheapskate.com/wp-content/uploads/EC-Logo-by-Mary-Hunt-Tagline-Trimmed.png
Mary Hunt2026-06-30 21:44:502026-06-30 21:44:5034 Fourth of July Recipes and DIY Hacks for a Stress-Free Holiday
https://www.everydaycheapskate.com/wp-content/uploads/20260630-a-lit-sparkler-with-an-american-flag-in-the-background-4th-of-july-hacks-tips-and-recipes.png
800
1200
Mary Hunt
https://www.everydaycheapskate.com/wp-content/uploads/EC-Logo-by-Mary-Hunt-Tagline-Trimmed.png
Mary Hunt2026-06-30 21:44:502026-06-30 21:44:5034 Fourth of July Recipes and DIY Hacks for a Stress-Free Holiday https://www.everydaycheapskate.com/wp-content/uploads/20260628-Grilled-Peaches-with-Balsamic-and-Blue-Cheese-1.png
800
1200
Mary Hunt
https://www.everydaycheapskate.com/wp-content/uploads/EC-Logo-by-Mary-Hunt-Tagline-Trimmed.png
Mary Hunt2026-06-29 09:38:342026-06-29 09:38:34Summer Grilled Peaches with Balsamic and Blue Cheese
https://www.everydaycheapskate.com/wp-content/uploads/20260628-Grilled-Peaches-with-Balsamic-and-Blue-Cheese-1.png
800
1200
Mary Hunt
https://www.everydaycheapskate.com/wp-content/uploads/EC-Logo-by-Mary-Hunt-Tagline-Trimmed.png
Mary Hunt2026-06-29 09:38:342026-06-29 09:38:34Summer Grilled Peaches with Balsamic and Blue Cheese https://www.everydaycheapskate.com/wp-content/uploads/20260620-cheesey-chicken-and-rice-casserole-in-a-baking-dish.png
800
1200
Mary Hunt
https://www.everydaycheapskate.com/wp-content/uploads/EC-Logo-by-Mary-Hunt-Tagline-Trimmed.png
Mary Hunt2026-06-20 13:31:162026-06-20 13:31:16Cheesy Chicken & Rice Bake That Disappears at Family Dinners
https://www.everydaycheapskate.com/wp-content/uploads/20260620-cheesey-chicken-and-rice-casserole-in-a-baking-dish.png
800
1200
Mary Hunt
https://www.everydaycheapskate.com/wp-content/uploads/EC-Logo-by-Mary-Hunt-Tagline-Trimmed.png
Mary Hunt2026-06-20 13:31:162026-06-20 13:31:16Cheesy Chicken & Rice Bake That Disappears at Family Dinners

Just wanted to confirm….that’s 6 oz of evaporated milk and 6 oz of chocolate chips, correct? And not 16 oz each? Thank you!
The recipe calls for 6 oz evaporated milk and 12 oz. chocolate chips. Not sure I understand your question, but the recipe as written is correct.
Recipe doesn’t say whether the butter should be cut into small pieces, melted, or what. Please explain.
1 stick butter (1/2 cup) at room temp, cut into chunks
I use a microwave fudge recipe that’s even simpler and tastes great! No more gritty fudge from undissolved sugar…and customize as you’d like (dark chocolate chips, part butterscotch chips, leave out the nuts and add marshmallows, etc.)
And you in mine, Donna!