
Easy Homemade Ice Melt for Driveways, Steps, and Frozen Locks


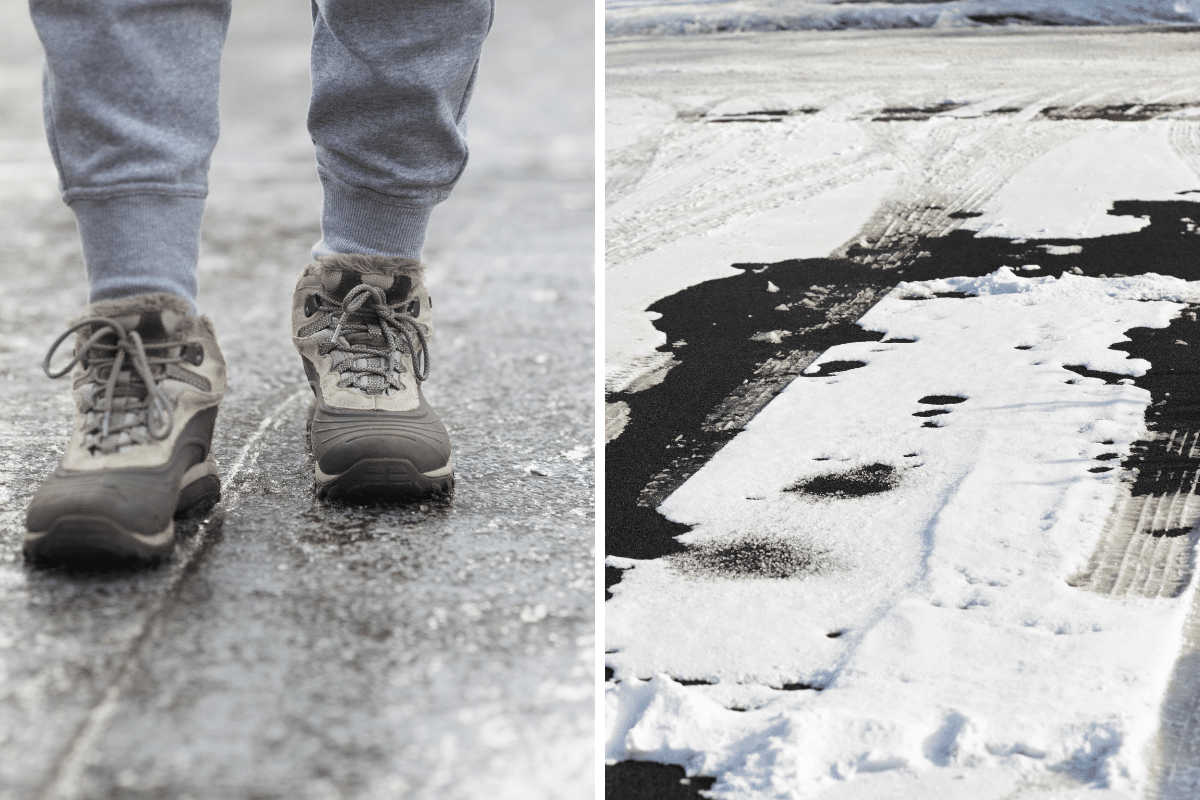
Winter ice has a way of sneaking up on us. One minute everything looks fine, the next you’re skating across the driveway like it’s an Olympic sport. Before you spend money on commercial ice melt (and wonder what it’s doing to your concrete, plants, or pets), there’s a smarter option. These homemade ice melt solutions use simple ingredients you probably already have and work when you need them most. Some melt ice fast. Others add traction. A few do both. Pick what fits your situation, your temperature, and your tolerance for fuss and stay upright this winter.

Winter ice has a way of turning driveways, walkways, and steps into genuine slip hazards, sometimes overnight. And this winter has been especially unpredictable. Some regions are seeing mild stretches followed by sudden cold snaps, while others are dealing with repeated snow and refreeze cycles that turn cleared paths slick again by morning. That’s exactly when having a few reliable, low-cost homemade ice melt options on hand really pays off.
One reader, Jennifer, wrote in asking if there’s a simple way to handle ice and snow on walkways, driveways, steps, windshields, and even frozen locks. When winter weather refuses to settle into a pattern, store-bought solutions can feel like an expensive guessing game. The good news? You don’t need anything fancy or special to stay ahead of the ice.
These homemade ice melt methods use everyday ingredients and focus on doing the job without unnecessary damage to concrete, plants, or pets. Some work best for bitter cold. Others shine during light freezes or refreeze conditions. A few don’t melt ice at all, but make it safer to walk immediately. Pick the option that fits your conditions, your surfaces, and how much effort you want to spend, and you’ll be far better prepared for whatever winter throws your way next.
How to Choose the Right Homemade Ice Melt (It Depends on the Cold)
Not all ice is created equal and neither are ice melt solutions. What works beautifully on a lightly frosted walkway may do absolutely nothing during a deep freeze.
Before you grab the nearest ingredient, it helps to think through three simple factors:
- Temperature: Some homemade ice melt solutions stop pulling their weight once the thermometer drops too low.
- Surface: Concrete, asphalt, glass, and soil don’t all respond the same way to moisture, salt, or acids.
- Goal: Are you trying to melt ice completely, add traction so you don’t slip, or just make things safer for now?
For bitter cold, alcohol-based solutions tend to work best. For light ice or frost, vinegar or saltwater may be all you need. And when walking safely is the priority, adding grit can be the smartest first step.
Matching the method to the conditions saves time, saves ingredients, and keeps you from overdoing it when a lighter touch will do just fine.
Jump to:
- Basic Deicer Recipe
- Saltwater: The Classic Ice Melter
- The Vinegar Method
- The Grit Method
- The Salt Solution
- The Baking Soda Method
- The Isopropyl (Rubbing) Alcohol Solution
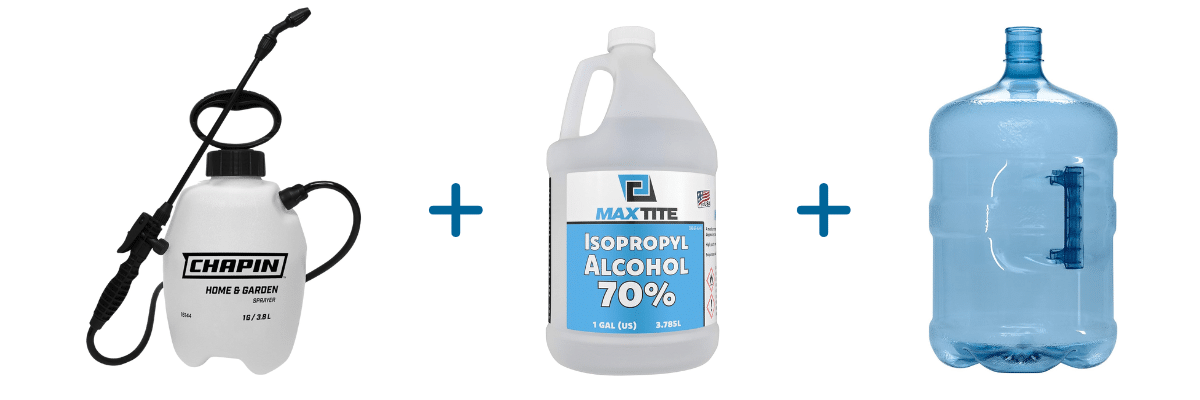
1. Basic Deicer Recipe
Best For
Walkways, steps, driveways, and windshields
This is a good all-around option when ice shows up unexpectedly and you want something fast, effective, and low-drama.
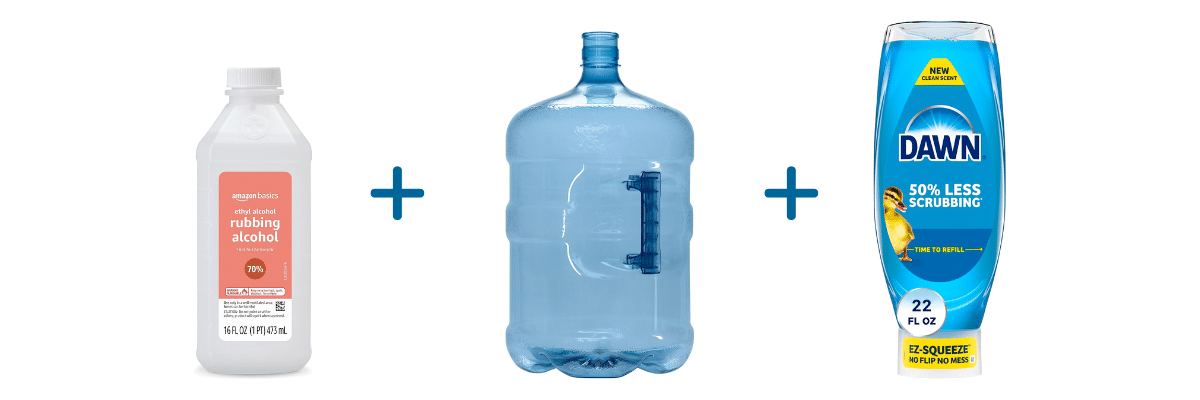
What You’ll Need
- Large container or bucket
- Spray bottle
- 2 quarts (½ gallon) water
- 6 drops dishwashing liquid (a grease-cutting formula like Blue Dawn works best)
- 2 tablespoons rubbing (isopropyl) alcohol, 70% or 91%
Basic Instructions
- Combine all ingredients in a bucket or large container.
- Pour the mixture into a spray bottle for easier, more targeted application.
- Spray directly onto icy surfaces and give it a minute or two to work.
You should see ice and packed snow start to loosen fairly quickly, making it easier to shovel, scrape, or walk safely.
Why This Works
Rubbing alcohol has an extremely low freezing point (around -97°F) so even when diluted, it stays effective well below zero. In fact, this mixture can continue working in temperatures down to about -50°F.
The dishwashing liquid does more than you might expect. It breaks the surface tension on the ice, helping the solution spread out and seep in instead of beading up and rolling away.
Used as directed, this homemade ice melt is relatively gentle on concrete, plants, and pets, especially compared to heavy salt applications. As always, focus on problem areas rather than soaking everything in sight.
2. Saltwater: The Classic Ice Melter
Best For
Driveways, steps, walkways, and frozen patches of ice or frost
This is the old standby for a reason. When temperatures aren’t brutally cold and you want fast results with minimal effort, saltwater gets the job done.
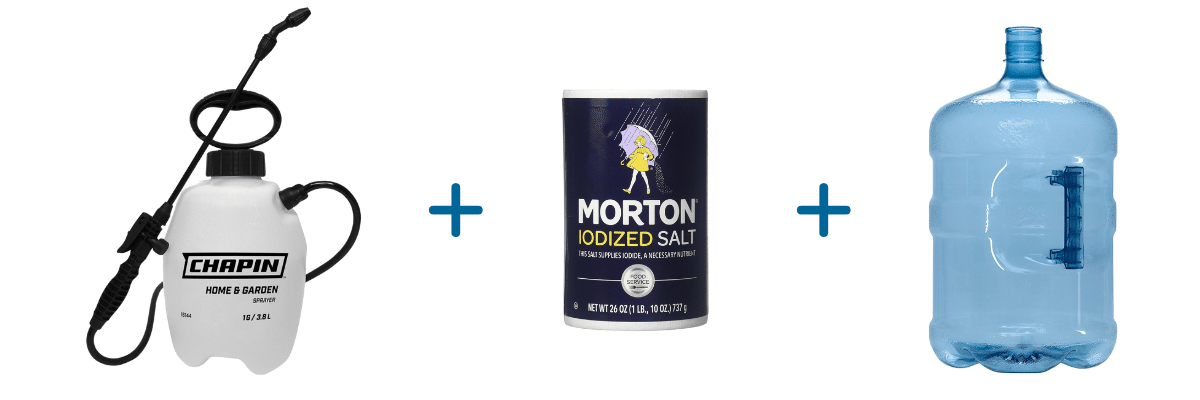
What You’ll Need
- Bucket
- Salt (table salt dissolves faster, but rock salt works fine)
- Warm water
- Sprayer (optional, but helpful)
Basic Instructions
- Fill a bucket with warm water.
- Add salt, starting with about ½ cup per gallon of water. Stir until fully dissolved. If the ice is thick or stubborn, you can increase the amount slightly to create a more concentrated solution.
- Pour the mixture into a sprayer if you have one, or apply it directly from the bucket.
- Pour or spray onto icy areas, focusing on the worst spots.
If you’re dealing with packed snow or layered ice, a sprayer helps push the solution deeper so it can work faster.
Why This Works
Salt lowers the freezing point of water from 32°F to roughly 15°F, which is why it’s been used for decades as a dependable ice melter.
When saltwater hits ice, melting starts almost immediately, loosening the surface and turning solid ice into manageable slush. The added pressure from spraying helps break through compacted snow and refrozen layers.
This method is simple, affordable, and easy to mix on the fly using supplies most households already have. Just keep in mind that salt works best in milder winter conditions. When temperatures dip well below that range, it’s time to switch strategies.
3. The Vinegar Method
Best For
Driveways, walkways, steps, and thin layers of ice (think slick, not glacier)
This one’s for those moments when you look outside, spot a thin glaze of ice, and realize you’re out of salt or just don’t want to use it.
What You’ll Need
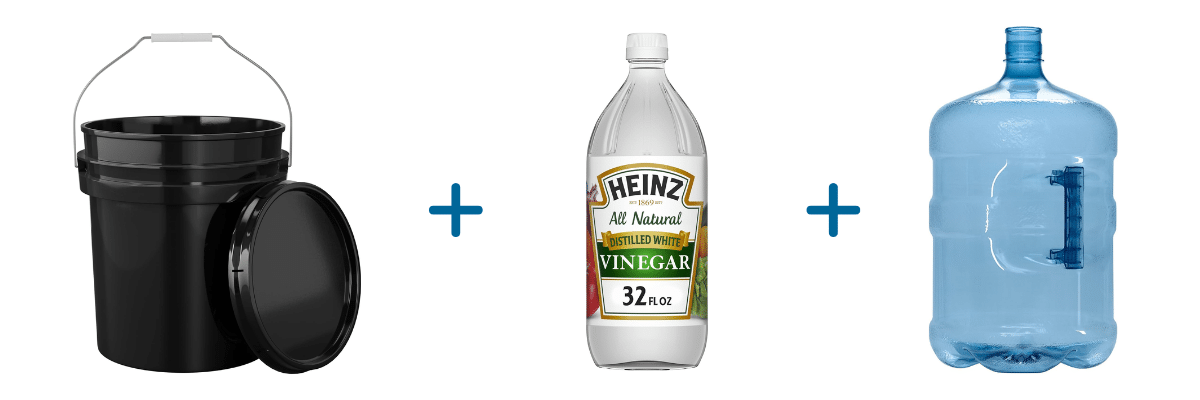
- Large container or bucket
- Plain white vinegar (5% acidity; the everyday kind from the grocery store)
- Water
Basic Instructions
- In a large container, mix equal parts vinegar and water.
- Dealing with thicker ice? Bump it up to 60% vinegar and 40% water (for example, 6 cups vinegar to 4 cups water).
- Stir to combine.
- Pour directly onto icy areas and give it time to work. The ice will slowly loosen and turn slushy, making it easier and safer to walk on or remove.
Why This Works
White vinegar freezes at about 28°F, lower than plain water. When you pour it on ice, that lower freezing point helps disrupt the ice’s structure so it starts to melt instead of refreezing. It’s not the fastest option on the planet, but it’s dependable for light ice, especially when temperatures are hovering near freezing.
A few things worth knowing:
- This works best before ice thickens or as a follow-up after scraping.
- Vinegar is easy to find, inexpensive, and already sitting in most kitchens.
- In small amounts, it’s generally safer for pets and plants than harsh chemical deicers, but avoid repeated use on concrete, which can be sensitive to acids over time.
Think of vinegar as the “good enough, right now” solution. It won’t win races, but it gets the job done when conditions are right and sometimes that’s exactly what you need.
4. The Grit Method
Best For
Walkways, driveways, steps, and any spot where slipping is the real danger
This is the don’t overthink it option. When melting ice isn’t realistic or fast enough, traction is what keeps you upright and out of trouble.
What You’ll Need
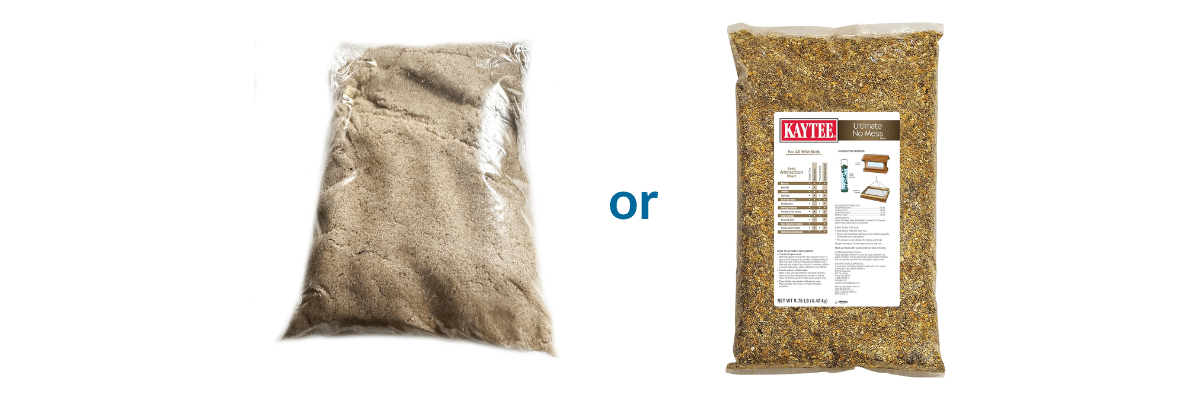
- Sand, or
- Birdseed
Basic Instructions
- Choose your grit: sand or birdseed.
- Sprinkle a light, even layer over icy or snowy areas.
- Use just enough to create grip. More isn’t better. It just means more to sweep up later.
Why This Works
Grit doesn’t melt ice and that’s actually the advantage. It adds texture on top of slick surfaces so shoes and tires have something to grab onto. This makes it especially useful when temperatures are too low for deicers to work well or when you need an immediate, no-wait solution.
A few smart notes:
- This is one of the safest options for pets, plants, and concrete.
- It works instantly.
- Birdseed can be a bonus in low-traffic areas, where nature may help with cleanup once things thaw.
One Important Clarification
You’ll often hear suggestions to use cat litter for ice. While it can add temporary traction, it does not melt ice, and many types turn into a slick, muddy mess once wet. Sand and birdseed do the same job… better, cleaner, and with fewer downsides.
This method won’t win any beauty contests, but it’s dependable, fast, and practical. And on icy mornings, that’s exactly what matters.
5. The Salt Solution

Best For
Driveways, sidewalks, steps, and porches
Stick to hard surfaces. Salt and plants are not friends. This is the classic, no-frills option.
What You’ll Need
- Rock salt, or
- Table salt (works faster, but doesn’t last as long)
Basic Instructions
- Grab your salt—rock salt works best, but table salt will do in a pinch.
- Sprinkle the salt evenly across icy areas, much like scattering seeds in a garden.
- Let the salt work its magic, breaking down the ice into slush that can be shoveled or cleared away.
Why This Works
Salt (sodium chloride) lowers water’s freezing point, effectively turning solid ice into a manageable slush. It’s affordable and simple to use, making it one of the most accessible ice-melting solutions. However, it’s most effective at temperatures above 15°F; for colder days, consider an alternative method.
Caution: Salt can damage plants and soil, temporarily sterilizing areas where it seeps into the ground. Use sparingly and keep salt applications limited to hardscaped areas where vegetation isn’t a concern. Overuse can also reduce its effectiveness, so less is truly more in this case.
6. The Baking Soda Method

Best For
Steps, walkways, driveways, and porches
A gentle, safe way to tackle thin layers of ice, especially when you’re worried about pets, plants, or delicate surfaces.
What You’ll Need
Basic Instructions
- Grab a handful (or two) of baking soda.
- Sprinkle generously over the icy or snow-covered area.
- Give it time to work. This method is slower than salt, so avoid walking on the treated area until the ice has softened.
Why This Works
Baking soda contains sodium bicarbonate, which lowers the freezing point of water. It won’t act as quickly as rock salt or commercial deicers, but that’s the trade-off for a pet- and plant-friendly solution that won’t harm concrete or landscaping.
A few extra tips:
- Best for light ice or frost, not deep, compacted layers.
- Works quietly and cleanly. No gritty residue or mess to sweep up.
- Keep a box in your pantry or garage: it’s cheap, handy, and doubles as a baking essential.
7. The Isopropyl (Rubbing) Alcohol Solution
Best For
Windshields, keylocks, driveways, walkways, and steps
A fast, reliable way to tackle ice when you need results.
What You’ll Need
- Rubbing (isopropyl) alcohol (70% or 91%)
- Water
- Sprayer
Basic Instructions
- Mix equal parts rubbing alcohol and water in a container.
- Pour the solution into a sprayer for easy application.
- Lightly spray icy areas. For stubborn frozen spots, you can apply alcohol straight. Just use sparingly.
This works especially well on windshields and keylocks. No scraping required!
Why This Works
Rubbing alcohol has a freezing point far lower than water, so it melts ice quickly even in frigid temperatures. It won’t freeze unless it’s extremely cold, making it a go-to solution for fast, targeted ice removal.
Extra tips for smooth winter mornings:
- Keep a small spray bottle in your car for icy windshields and locks.
- Combine with other deicers for walkways when temperatures drop extremely low.
- Always apply lightly. Alcohol is effective in small amounts, and a little goes a long way.
Three Easy Ways to Keep Your Windshield Ice-Free Overnight
- Park Facing East: The sun rises in the east. If your windshield catches those first rays, ice that formed overnight may melt before you even reach for your keys.
- Spray a Vinegar Solution: Mix three parts vinegar to one part water and lightly spray your windshield the night before. Vinegar lowers the freezing point, helping prevent frost from forming while you sleep.
- Cover Your Windshield: A simple cover works wonders. You can buy a windshield-specific cover or improvise with items you already have (i.e., blankets, tablecloths, shower curtains, or even old carpet remnants.) Tuck the edges under your wipers, and in the morning, remove the cover for an ice-free start.
Pro Tip: Combine these strategies for the best results. Parking east, a quick vinegar spray, and a cover can save you from scrapers, cold hands, and a frosty morning rush.
Best Homemade Ice Melt for Driveways vs. Walkways
Driveways and walkways may look alike, but they need different approaches for safe, hassle-free results.
Driveways
- Can handle saltwater or straight salt better than more delicate surfaces.
- Grit is a big help for traction on slopes or when a vehicle needs grip.
- Less is more. Too much salt can pit concrete over time.
Walkways & Steps
- Alcohol-based sprays work fast and leave minimal residue.
- Baking soda is slower, but safe for nearby plants and pets.
- Grit adds instant traction without chemical runoff, keeping everyone upright.
Using the wrong method isn’t just ineffective. It can leave extra work for you later. Pick the right solution for each surface, and winter mornings get a lot less stressful.
What Not to Use as Ice Melt (Even If You’ve Heard Otherwise)
Some “clever” winter hacks are more trouble than they’re worth:
- Sugar or soda: Sticky, messy, and a magnet for pests. Plus, it barely melts ice.
- Clay kitty litter: Turns into slick sludge when wet, making slips more likely.
- Hot water: Sure, it melts ice fast, but it can refreeze into a dangerously smooth layer.
If it sounds too easy, too cheap, or too strange, it probably is. Stick with solutions that combine basic chemistry and common sense.
Safety Tips for Using Ice Melt Solutions
Homemade ice melt solutions are handy, but a little caution goes a long way. Some ingredients can damage paint, harm plants, pollute water sources, or even stain carpets if tracked inside. Using them wisely protects your property and your mornings from unnecessary headaches.
Focus only on the spots that matter: the center of walkways, steps, driveways, or your windshield. Avoid spraying flowerbeds, decks, or areas that don’t need treatment. A targeted approach keeps surfaces safe and prevents overuse, which can actually reduce effectiveness.
A little discretion goes a long way. By applying ice melt sparingly and thoughtfully, you can stay safe on slippery surfaces while keeping your property and the environment intact. Winter mornings just got a little smarter.
Question: What’s your favorite winter hack for preventing slips on icy steps or driveways? Have you experimented with any homemade ice melt solutions that actually work? Share your tips in the comments. We’d love to hear what’s worked for you!
EverydayCheapskate™ is reader-supported. We participate in the Amazon Services LLC Associates Program and other affiliate advertising programs, designed to provide a means for us to earn from qualifying purchases, at no cost to you.

More from Everyday Cheapskate
 https://www.everydaycheapskate.com/wp-content/uploads/20260705-how-to-keep-a-cooler-cold.png
800
1200
Mary Hunt
https://www.everydaycheapskate.com/wp-content/uploads/EC-Logo-by-Mary-Hunt-Tagline-Trimmed.png
Mary Hunt2026-07-05 13:19:502026-07-05 13:19:50How to Pack a Cooler That Stays Cold for 48 Hours
https://www.everydaycheapskate.com/wp-content/uploads/20260705-how-to-keep-a-cooler-cold.png
800
1200
Mary Hunt
https://www.everydaycheapskate.com/wp-content/uploads/EC-Logo-by-Mary-Hunt-Tagline-Trimmed.png
Mary Hunt2026-07-05 13:19:502026-07-05 13:19:50How to Pack a Cooler That Stays Cold for 48 Hours https://www.everydaycheapskate.com/wp-content/uploads/20260703-home-decor.png
800
1200
Mary Hunt
https://www.everydaycheapskate.com/wp-content/uploads/EC-Logo-by-Mary-Hunt-Tagline-Trimmed.png
Mary Hunt2026-07-03 20:46:552026-07-03 20:46:5510 Everyday Items You Never Think to Wash (But Should)
https://www.everydaycheapskate.com/wp-content/uploads/20260703-home-decor.png
800
1200
Mary Hunt
https://www.everydaycheapskate.com/wp-content/uploads/EC-Logo-by-Mary-Hunt-Tagline-Trimmed.png
Mary Hunt2026-07-03 20:46:552026-07-03 20:46:5510 Everyday Items You Never Think to Wash (But Should) https://www.everydaycheapskate.com/wp-content/uploads/20260630-a-lit-sparkler-with-an-american-flag-in-the-background-4th-of-july-hacks-tips-and-recipes.png
800
1200
Mary Hunt
https://www.everydaycheapskate.com/wp-content/uploads/EC-Logo-by-Mary-Hunt-Tagline-Trimmed.png
Mary Hunt2026-06-30 21:44:502026-06-30 21:44:5034 Fourth of July Recipes and DIY Hacks for a Stress-Free Holiday
https://www.everydaycheapskate.com/wp-content/uploads/20260630-a-lit-sparkler-with-an-american-flag-in-the-background-4th-of-july-hacks-tips-and-recipes.png
800
1200
Mary Hunt
https://www.everydaycheapskate.com/wp-content/uploads/EC-Logo-by-Mary-Hunt-Tagline-Trimmed.png
Mary Hunt2026-06-30 21:44:502026-06-30 21:44:5034 Fourth of July Recipes and DIY Hacks for a Stress-Free Holiday https://www.everydaycheapskate.com/wp-content/uploads/20260629-wooden-die-spell-july-with-patriotic-decor-in-background.png
800
1200
Mary Hunt
https://www.everydaycheapskate.com/wp-content/uploads/EC-Logo-by-Mary-Hunt-Tagline-Trimmed.png
Mary Hunt2026-06-29 21:07:092026-06-29 21:10:297 Best Things to Buy in July for Huge Summer Savings
https://www.everydaycheapskate.com/wp-content/uploads/20260629-wooden-die-spell-july-with-patriotic-decor-in-background.png
800
1200
Mary Hunt
https://www.everydaycheapskate.com/wp-content/uploads/EC-Logo-by-Mary-Hunt-Tagline-Trimmed.png
Mary Hunt2026-06-29 21:07:092026-06-29 21:10:297 Best Things to Buy in July for Huge Summer Savings https://www.everydaycheapskate.com/wp-content/uploads/20260628-Grilled-Peaches-with-Balsamic-and-Blue-Cheese-1.png
800
1200
Mary Hunt
https://www.everydaycheapskate.com/wp-content/uploads/EC-Logo-by-Mary-Hunt-Tagline-Trimmed.png
Mary Hunt2026-06-29 09:38:342026-06-29 09:38:34Summer Grilled Peaches with Balsamic and Blue Cheese
https://www.everydaycheapskate.com/wp-content/uploads/20260628-Grilled-Peaches-with-Balsamic-and-Blue-Cheese-1.png
800
1200
Mary Hunt
https://www.everydaycheapskate.com/wp-content/uploads/EC-Logo-by-Mary-Hunt-Tagline-Trimmed.png
Mary Hunt2026-06-29 09:38:342026-06-29 09:38:34Summer Grilled Peaches with Balsamic and Blue Cheese https://www.everydaycheapskate.com/wp-content/uploads/20260628-close-up-photo-a-woman-wearing-a-swimsuit-with-a-mild-sunburn.png
800
1200
Mary Hunt
https://www.everydaycheapskate.com/wp-content/uploads/EC-Logo-by-Mary-Hunt-Tagline-Trimmed.png
Mary Hunt2026-06-28 21:40:042026-06-28 21:40:04DIY After-Sun Spray That Cools and Soothes Skin
https://www.everydaycheapskate.com/wp-content/uploads/20260628-close-up-photo-a-woman-wearing-a-swimsuit-with-a-mild-sunburn.png
800
1200
Mary Hunt
https://www.everydaycheapskate.com/wp-content/uploads/EC-Logo-by-Mary-Hunt-Tagline-Trimmed.png
Mary Hunt2026-06-28 21:40:042026-06-28 21:40:04DIY After-Sun Spray That Cools and Soothes Skin https://www.everydaycheapskate.com/wp-content/uploads/20260626-homemade-stain-paste-sitting-on-wooden-countertop-in-laundry-room-with-washer-and-dryer.png
800
1200
Mary Hunt
https://www.everydaycheapskate.com/wp-content/uploads/EC-Logo-by-Mary-Hunt-Tagline-Trimmed.png
Mary Hunt2026-06-26 17:41:192026-06-26 17:41:19Homemade Laundry Stain Paste That Works for Pennies
https://www.everydaycheapskate.com/wp-content/uploads/20260626-homemade-stain-paste-sitting-on-wooden-countertop-in-laundry-room-with-washer-and-dryer.png
800
1200
Mary Hunt
https://www.everydaycheapskate.com/wp-content/uploads/EC-Logo-by-Mary-Hunt-Tagline-Trimmed.png
Mary Hunt2026-06-26 17:41:192026-06-26 17:41:19Homemade Laundry Stain Paste That Works for Pennies https://www.everydaycheapskate.com/wp-content/uploads/20260625-a-rustic-wooden-christmas-tree-in-the-sand-on-the-beach.png
800
1200
Mary Hunt
https://www.everydaycheapskate.com/wp-content/uploads/EC-Logo-by-Mary-Hunt-Tagline-Trimmed.png
Mary Hunt2026-06-26 11:34:132026-06-26 11:36:44Christmas in June? Try This Amazon Prime Day Gift Guide
https://www.everydaycheapskate.com/wp-content/uploads/20260625-a-rustic-wooden-christmas-tree-in-the-sand-on-the-beach.png
800
1200
Mary Hunt
https://www.everydaycheapskate.com/wp-content/uploads/EC-Logo-by-Mary-Hunt-Tagline-Trimmed.png
Mary Hunt2026-06-26 11:34:132026-06-26 11:36:44Christmas in June? Try This Amazon Prime Day Gift Guide https://www.everydaycheapskate.com/wp-content/uploads/20260624-why-does-my-ice-taste-weird-soda-tea-lemonade-juice.png
800
1200
Mary Hunt
https://www.everydaycheapskate.com/wp-content/uploads/EC-Logo-by-Mary-Hunt-Tagline-Trimmed.png
Mary Hunt2026-06-24 17:10:532026-06-24 17:10:53Why Does My Ice Taste Weird? Here’s the Answer
https://www.everydaycheapskate.com/wp-content/uploads/20260624-why-does-my-ice-taste-weird-soda-tea-lemonade-juice.png
800
1200
Mary Hunt
https://www.everydaycheapskate.com/wp-content/uploads/EC-Logo-by-Mary-Hunt-Tagline-Trimmed.png
Mary Hunt2026-06-24 17:10:532026-06-24 17:10:53Why Does My Ice Taste Weird? Here’s the Answer

We use chicken grit. Someone I worked with told me about it years ago. I live in Minnesota and it won’t melt ice but will keep you from slipping. I get it from a farm and garden supply store. Our driveway is icy all winter but it really helps.
Hi Mar!! I love all of your articles that hep all of your followers! I have to admit that here at the New Jersey shore, I go to Tractior Supply and buyt Ice Melt that is PET FRIENDLY. I have a walkway (not very long) and a porch, so I am lucky for a small area! I am always aware of animals that come around to eat on my porch and so that is why I use this ice melt and it is only $9.99 and we don’t really get a lot of snow and keep these interestinng articles coming!! PS the Diantaneous Earth you wrote about I use evert spring because my three season porch that is enclosed was an add on the ants love coming in but not any more thanks to you!! Member since 1998!! xxoo
AFTER SPRAYING THE WINDSHIELD WITH WATER AND WATER ,DO YOU WIPE IT OFF OR JUST LEAVE IT OVER NIGHT.
I think you meant “vinegar and water” and yes, just leave it over night to help prevent ice. No need to wipe off.
This fall we purchased aluminum stair treads for our deck and porch. They have round raised areas with a hole in the center. One would think they would collect ice, but they don’t. Instead they provide traction. There work great and are well worth the cost. We live in the northeast with much snow and ice.
I thought this was going to be recipes for milkshakes, but having grown up in New Hampshire, I can relate and will forward this to my still living in New England relatives. You are my everyday without fail read, and I appreciate you and your column greatly.
Pat now from San Gabriel, CA
When we used to live up North in the frigid heartland including our favorite, Colorado, we used cat litter regularly. No clay and not clumping. Safe for grass, concrete and the feet of our furred friends. Highly recommend it. Once doesn’t realize how cold and frigid things can get and then, when it does, you’re stuck sometimes literally. A hint for pickup drivers: if you have no weight in the bed of your truck you’re liable to lose traction and slide around. Put some sandbags in the pickup bed as a few bags or large sized kitty litter. It’ll also help placing the litter without the bag under the stuck wheels in case you need traction. Happy Holidays. stay safe and wishing every one love, best wishes and kindness to you and yours, especially you Mary! Thanks for all the valuable info!
The salt & vinegar WILL damage travertine (our front sidewalk, steps, and porch are made of this). I’m in Minnesota, so ice is always an issue. Wondering if your Basic De-icer would damage travertine w/the dilute amount of alcohol…?
Alcohol does not damage natural stone, which I assume your pavers are (rather than cultured travertine.)? Two cups rubbing (isopropyl) alcohol to one gallon of water would be a good formula. You’ll be amazed how well that works.
Can you any of these ingredients on your gutters?
My first reaction is yes, but then I’m wondering how you’d get it into your gutters?
Do any of these solutions harm driveways? Thanks!
I have researched and am satisfied that nothing here will harm concrete, wood. The only ingredient that might be suspect is salt and even then we are not recommending flooding any area. So don’t fret, use your common sense and enjoy the super cheap ice melt!
As always, I love all of your practical and inexpensive suggestions. However, I had to write and let you know that the kitty litter idea can have an unwanted consequence. Many years ago our next door neighbor used it on her back steps and walkway to her garage. A plethora of neighborhood cats decided to visit her. Just saying. . . .
Ha! Did I mention to use this sparingly? Sounds like she laid down a crusher-base amount!
I could have used these tips when I lived in the north. Stay warm and safe, Mary!
Come back, Gina! The north misses you 😉
I think people should be aware that salt and vinegar will retard or kill growth in areas where they leach. The alcohol approach would seem safer.
There is no need to de-ice “growth areas.” Use these deicers on wood, concrete, and other outdoor hardscape.