
Poor Man’s Prime Rib: Chuck Roast Done Right

Is it really possible to make a chuck roast taste like prime rib? Absolutely. And I’ve got the foolproof method to prove it. This poor man’s prime rib chuck roast technique transforms a humble, budget-friendly cut of beef into something worthy of your holiday table—or just a Wednesday night. With the right timing, tools, and a generous hand with salt, you’ll be slicing into a roast that tastes like a splurge but costs more like a steal.

I first shared this method for turning chuck roast into what I lovingly call “poor man’s prime rib” years ago, and it struck a chord with readers. Not long after, I received a message from faithful reader Mary B.—the kind of message that reminds me why I do what I do.
Dear Mary:
Having guests tomorrow so hope you can answer quickly! I am planning to make a chuck roast using the method you describe in your article—but wondering if you can give me a ballpark figure on how long this may take for a 3-pound chuck roast? I need to make the rest of the meal to finish at about the same time! Roasting it at 250℉, will it take approximately two hours? Four hours?Thank you for your wonderful newsletter, posts and columns—I am a faithful reader!
—Mary B.
Mary B. wasn’t alone in wondering how a modest chuck roast could deliver such impressive results. There’s something downright magical about turning a tough, affordable cut of meat into something worthy of the holiday table or Tuesday night. Chuck roast has a rich beefy flavor and just enough marbling to shine with the low-and-slow treatment. Paired with a few tools and a bit of timing know-how, it transforms into a roast so tender and juicy, even your most discerning guests will think you splurged.
Essential Tools for the Perfect Roast
Before you even think about preheating the oven, let’s talk tools. This method doesn’t require anything fancy, but it does depend on a few reliable kitchen tools and a little bit of prep.
Two Thermometers
This is not the time to trust your oven’s built-in thermometer. You’ll need two things:
- A good oven thermometer to verify your oven is truly holding at 250℉ (many ovens run hot or cold—sometimes wildly so).
- A dependable ovenproof meat thermometer that stays in the roast from start to finish. Skip the instant-read ones for this method; we’re looking for real-time updates without opening the oven door.
Trust me. These two tools are the gatekeepers to prime rib perfection on a chuck roast budget.
White Cotton Butcher’s Twine
Chuck roast often comes in an awkward, uneven shape. Tying it up with cotton kitchen twine helps it roast evenly, giving you that compact, uniform look you want when slicing later. Just a few loops and knots will do it.
A Generous Hand with Salt
If you’re ever going to go bold with seasoning, this is the time. Don’t be shy. Salt that roast like you mean it. Rub it in well so it gets deep into the meat. This not only seasons the roast but starts breaking down the tough connective tissue while it rests.
Plastic Wrap
After you’ve salted the roast, wrap it tightly in plastic wrap. Tuck it into the fridge for a full 24 hours. This is key. No shortcuts here. That salt needs time to do its work, and patience pays off in tender, flavorful results.
A Roasting Pan
Choose a heavy-duty roasting pan that allows air to circulate around the roast. You want the meat exposed, not stewing in its own juices. No lid, no foil at this stage—just open roasting at a low, steady temperature.
Aluminum Foil (For the End)
Once it’s roasted to perfection, you’ll need foil to wrap it tightly and let it rest for 20 minutes. That rest is essential. It allows the juices to redistribute so every slice is juicy and tender. Don’t skip it!


(Disclosure: This post includes an Amazon Creator Connections product. I may earn a small commission if you purchase through the link, at no additional cost to you.)
Step-by-Step: Poor Man’s Prime Rib Chuck Roast

Here’s how to transform that humble hunk of meat into something truly special, step by step.
1. Tie It Up and Salt Like You Mean It
Tie your chuck roast with white cotton kitchen string so it’s compact and even. This helps it cook uniformly and slice like a dream later on.
Now, grab the salt and don’t be shy. This is not the time for a dainty sprinkle. You want a generous, rub-it-in kind of salt layer. The salt will draw out moisture, break down tough tissue, and infuse the roast with incredible flavor. You can add pepper or your favorite dry rub here too, but salt is the real star of the show.
2. Wrap It and Chill
Wrap the roast tightly in plastic wrap and place it in the coldest part of your fridge. Leave it there for at least 24 hours. No fudging here. This step is key. That rest time allows the salt to begin tenderizing the meat from the inside out.
4. Let It Warm Up
Take the roast out of the fridge about two hours before you plan to cook. Letting it come to room temperature helps it cook evenly from edge to center.
5. Get the Oven Just Right
Place your oven thermometer in the center of the oven and preheat to 250℉. Don’t rely on your oven’s display. Use the thermometer. Once it reads exactly 250℉, adjust the dial to maintain that temp. Low and slow is the name of the game.
6. Roast, Don’t Peek
Unwrap the roast and place it in a roasting pan, uncovered. Insert your meat thermometer into the thickest part of the roast, making sure the tip is centered. Now into the oven it goes!
Leave it undisturbed until the meat thermometer reads 130℉ for rare, 150℉ for medium, or 160℉ for well done. For a 3-pound roast, this usually takes 2 to 2.5 hours, but don’t go by time alone. Go by temperature.
7. Wrap and Rest
Once it hits your target temp, take the roast out immediately. Wrap it tightly in foil and let it rest for 20 minutes. This step locks in the juices and finishes the cooking process gently. Don’t skip it!
8. Carve and Enjoy!
After resting, snip the string and slice against the grain. You should be looking at juicy, tender slices with that classic roast beef texture—only better, because you pulled it off for a fraction of the cost.
Tips for Nailing the Perfect Temperature
When it comes to this chuck roast–turned–prime rib, temperature isn’t just important. It’s everything.
- Start by letting the roast sit on the counter for about two hours before roasting. Skipping this step means uneven cooking, with an overdone exterior and a tough center.
- Tie the roast with butcher’s twine so it cooks evenly and slices up beautifully.
- Now for the real secret weapons: two thermometers. Use an oven thermometer (I like the ThermoPro Analog Oven Thermometer) to make sure your oven holds steady at 250°F. Don’t trust the dial. It lies.
- Then insert a leave-in meat thermometer like the ThermoPro Wireless Bluetooth Meat Thermometer so you’ll know the exact moment your roast hits perfection.
- And finally: let it rest. Wrap the roast tightly in foil for 20 minutes before slicing. It’s the last little step that makes all the difference.
Bottom line? Cook by temperature, not by time. Every roast is different, and your thermometer is your best kitchen ally.
A Feast Without the Splurge

There’s something especially satisfying about pulling off a meal that looks and tastes like a luxury, but didn’t blow your grocery budget to get there.
And as for Mary B.? She nailed it.
Mary B.:
Thanks again for your help on the prep for the meat. It turned out fabulous! I will definitely use this method again and again. And thanks for your column. I have read it for years and love my daily newsletters from Everyday Cheapskate!
Mary, I’m so happy to hear it was a hit. (And seriously, if you ever want to extend that dinner invite, I’ll bring the dessert.)
If you try this method, I’d love to hear how it goes. Leave a comment below or tag @EverydayCheapskate on social.

Poor Man's Prime Rib Chuck Roast
Ingredients
- 3 lb chuck roast
- 1 tablespoon kosher salt or more, depending on roast size
- Optional: black pepper or seasoning blend of your choice
Instructions
- Tie the chuck roast tightly with kitchen twine so it’s compact and evenly shaped. Salt it generously. Rub the salt deep into all sides. Add pepper or other seasonings if desired.
- Wrap the roast tightly in plastic wrap and place it in the fridge for 24 hours. This step is essential for tenderizing the meat.
- About 2 hours before cooking, remove the roast from the fridge and let it sit, still wrapped, at room temperature.
- Place an oven thermometer in the center of your oven and preheat to exactly 250°F. Adjust your dial to keep the internal temp steady. Don’t rely on the oven’s built-in reading.
- Unwrap the roast and place it in a roasting pan, uncovered. Insert the meat thermometer into the thickest part of the roast (make sure the tip is centered).
- Roast until the internal temp reaches: 130°F for rare, 150°F for medium, or 160°F for well done. This will take approximately 2 to 2.5 hours for a 3-pound roast, but monitor the thermometer, not the clock.
- Once your target temp is reached, remove the roast and wrap it tightly in foil. Let it rest for 20 minutes. Then, remove the twine and carve against the grain.
Notes
- The 24-hour salt rub is critical. It acts as a natural tenderizer, breaking down the connective tissue in this tougher cut of beef.
- Tying the roast gives you an even shape and helps it cook evenly.
- Never rely solely on oven or cook time—always cook by internal temperature for best results.
- A wireless meat thermometer (like the ThermoPro) makes this nearly foolproof, especially if you’re juggling other dishes at the same time.
Nutrition
Question: What’s your secret go-to meal that looks fancy but doesn’t break the bank? Let’s swap dinner party tricks in the comments below.
EverydayCheapskate™ is reader-supported. We participate in the Amazon Services LLC Associates Program and other affiliate advertising programs, designed to provide a means for us to earn from qualifying purchases, at no cost to you.

More from Everyday Cheapskate
 https://www.everydaycheapskate.com/wp-content/uploads/20260630-a-lit-sparkler-with-an-american-flag-in-the-background-4th-of-july-hacks-tips-and-recipes.png
800
1200
Mary Hunt
https://www.everydaycheapskate.com/wp-content/uploads/EC-Logo-by-Mary-Hunt-Tagline-Trimmed.png
Mary Hunt2026-06-30 21:44:502026-06-30 21:44:5034 Fourth of July Recipes and DIY Hacks for a Stress-Free Holiday
https://www.everydaycheapskate.com/wp-content/uploads/20260630-a-lit-sparkler-with-an-american-flag-in-the-background-4th-of-july-hacks-tips-and-recipes.png
800
1200
Mary Hunt
https://www.everydaycheapskate.com/wp-content/uploads/EC-Logo-by-Mary-Hunt-Tagline-Trimmed.png
Mary Hunt2026-06-30 21:44:502026-06-30 21:44:5034 Fourth of July Recipes and DIY Hacks for a Stress-Free Holiday https://www.everydaycheapskate.com/wp-content/uploads/20260628-Grilled-Peaches-with-Balsamic-and-Blue-Cheese-1.png
800
1200
Mary Hunt
https://www.everydaycheapskate.com/wp-content/uploads/EC-Logo-by-Mary-Hunt-Tagline-Trimmed.png
Mary Hunt2026-06-29 09:38:342026-06-29 09:38:34Summer Grilled Peaches with Balsamic and Blue Cheese
https://www.everydaycheapskate.com/wp-content/uploads/20260628-Grilled-Peaches-with-Balsamic-and-Blue-Cheese-1.png
800
1200
Mary Hunt
https://www.everydaycheapskate.com/wp-content/uploads/EC-Logo-by-Mary-Hunt-Tagline-Trimmed.png
Mary Hunt2026-06-29 09:38:342026-06-29 09:38:34Summer Grilled Peaches with Balsamic and Blue Cheese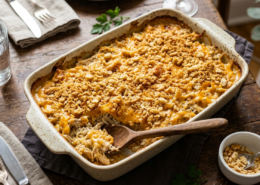 https://www.everydaycheapskate.com/wp-content/uploads/20260620-cheesey-chicken-and-rice-casserole-in-a-baking-dish.png
800
1200
Mary Hunt
https://www.everydaycheapskate.com/wp-content/uploads/EC-Logo-by-Mary-Hunt-Tagline-Trimmed.png
Mary Hunt2026-06-20 13:31:162026-06-20 13:31:16Cheesy Chicken & Rice Bake That Disappears at Family Dinners
https://www.everydaycheapskate.com/wp-content/uploads/20260620-cheesey-chicken-and-rice-casserole-in-a-baking-dish.png
800
1200
Mary Hunt
https://www.everydaycheapskate.com/wp-content/uploads/EC-Logo-by-Mary-Hunt-Tagline-Trimmed.png
Mary Hunt2026-06-20 13:31:162026-06-20 13:31:16Cheesy Chicken & Rice Bake That Disappears at Family Dinners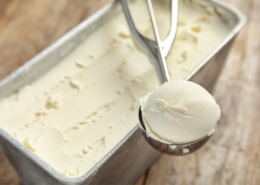 https://www.everydaycheapskate.com/wp-content/uploads/20260619-delicious-creamy-no-churn-vanilla-ice-cream-scoop-and-loaf-pan.png
800
1200
Mary Hunt
https://www.everydaycheapskate.com/wp-content/uploads/EC-Logo-by-Mary-Hunt-Tagline-Trimmed.png
Mary Hunt2026-06-19 18:42:402026-06-19 18:42:413-Ingredient No-Churn Vanilla Ice Cream (No Machine Needed)
https://www.everydaycheapskate.com/wp-content/uploads/20260619-delicious-creamy-no-churn-vanilla-ice-cream-scoop-and-loaf-pan.png
800
1200
Mary Hunt
https://www.everydaycheapskate.com/wp-content/uploads/EC-Logo-by-Mary-Hunt-Tagline-Trimmed.png
Mary Hunt2026-06-19 18:42:402026-06-19 18:42:413-Ingredient No-Churn Vanilla Ice Cream (No Machine Needed)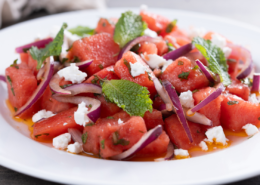 https://www.everydaycheapskate.com/wp-content/uploads/20260616-close-up-of-watermelon-feta-salad-with-mint-and-lime.png
800
1200
Mary Hunt
https://www.everydaycheapskate.com/wp-content/uploads/EC-Logo-by-Mary-Hunt-Tagline-Trimmed.png
Mary Hunt2026-06-16 17:44:142026-06-16 17:44:14Watermelon Feta Salad with Mint for Summer Cookouts
https://www.everydaycheapskate.com/wp-content/uploads/20260616-close-up-of-watermelon-feta-salad-with-mint-and-lime.png
800
1200
Mary Hunt
https://www.everydaycheapskate.com/wp-content/uploads/EC-Logo-by-Mary-Hunt-Tagline-Trimmed.png
Mary Hunt2026-06-16 17:44:142026-06-16 17:44:14Watermelon Feta Salad with Mint for Summer Cookouts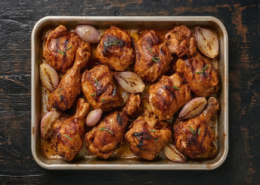 https://www.everydaycheapskate.com/wp-content/uploads/20260613-chicken-a-lorange-recipe-in-roasting-pan-with-shallots-and-orange-marmalade.png
800
1200
Mary Hunt
https://www.everydaycheapskate.com/wp-content/uploads/EC-Logo-by-Mary-Hunt-Tagline-Trimmed.png
Mary Hunt2026-06-13 20:59:292026-06-13 20:59:29Duck à l’Orange Is Fancy. This Chicken Version Is Better.
https://www.everydaycheapskate.com/wp-content/uploads/20260613-chicken-a-lorange-recipe-in-roasting-pan-with-shallots-and-orange-marmalade.png
800
1200
Mary Hunt
https://www.everydaycheapskate.com/wp-content/uploads/EC-Logo-by-Mary-Hunt-Tagline-Trimmed.png
Mary Hunt2026-06-13 20:59:292026-06-13 20:59:29Duck à l’Orange Is Fancy. This Chicken Version Is Better. https://www.everydaycheapskate.com/wp-content/uploads/20260607-woman-grocery-shopping-pushing-cart-with-apples-and-cauliflower.png
800
1200
Mary Hunt
https://www.everydaycheapskate.com/wp-content/uploads/EC-Logo-by-Mary-Hunt-Tagline-Trimmed.png
Mary Hunt2026-06-09 23:20:292026-06-09 23:20:29How to Read a Grocery Store Sale Cycle (And Stop Overpaying)
https://www.everydaycheapskate.com/wp-content/uploads/20260607-woman-grocery-shopping-pushing-cart-with-apples-and-cauliflower.png
800
1200
Mary Hunt
https://www.everydaycheapskate.com/wp-content/uploads/EC-Logo-by-Mary-Hunt-Tagline-Trimmed.png
Mary Hunt2026-06-09 23:20:292026-06-09 23:20:29How to Read a Grocery Store Sale Cycle (And Stop Overpaying)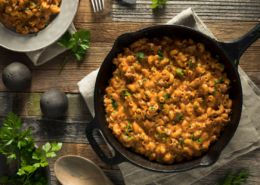 https://www.everydaycheapskate.com/wp-content/uploads/20260608-copycat-hamburger-helper-pasta-recipe-in-a-cast-iron-skillet.png
800
1200
Mary Hunt
https://www.everydaycheapskate.com/wp-content/uploads/EC-Logo-by-Mary-Hunt-Tagline-Trimmed.png
Mary Hunt2026-06-08 23:02:072026-06-08 23:02:07Homemade Hamburger Helper: Cheesy One-Skillet Dinner
https://www.everydaycheapskate.com/wp-content/uploads/20260608-copycat-hamburger-helper-pasta-recipe-in-a-cast-iron-skillet.png
800
1200
Mary Hunt
https://www.everydaycheapskate.com/wp-content/uploads/EC-Logo-by-Mary-Hunt-Tagline-Trimmed.png
Mary Hunt2026-06-08 23:02:072026-06-08 23:02:07Homemade Hamburger Helper: Cheesy One-Skillet Dinner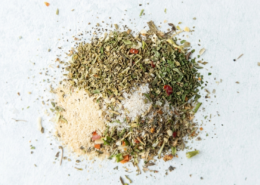 https://www.everydaycheapskate.com/wp-content/uploads/20260606-dried-italian-dressing-seasoning-garlic-powder-onion-powder-1.png
800
1200
Mary Hunt
https://www.everydaycheapskate.com/wp-content/uploads/EC-Logo-by-Mary-Hunt-Tagline-Trimmed.png
Mary Hunt2026-06-05 23:19:342026-06-05 23:19:34Homemade Italian Dressing Mix: Cheaper, Better, Faster
https://www.everydaycheapskate.com/wp-content/uploads/20260606-dried-italian-dressing-seasoning-garlic-powder-onion-powder-1.png
800
1200
Mary Hunt
https://www.everydaycheapskate.com/wp-content/uploads/EC-Logo-by-Mary-Hunt-Tagline-Trimmed.png
Mary Hunt2026-06-05 23:19:342026-06-05 23:19:34Homemade Italian Dressing Mix: Cheaper, Better, FasterPlease keep your comments positive, encouraging, helpful, brief,
and on-topic in keeping with EC Commenting Guidelines
Last update on 2026-07-04 / Affiliate links / Images from Amazon Product Advertising API


Perfect. I used Kosher salt, but I used a lot more, so to crust the entire roast. After coming to room temp, after 36 hours, I unwrapped and brushed all the salt off prior to roasting. Not too salty this way. Unfortunately the price of chuck roast here, on sale, is $11.99 lb. It still is a good value. NY steak is $24.99 lb, rib eye steak is $27.99, Filet is $41.99, chuck burger is $8.58lb.
Mary, at $7.00 to $9.00 a pound, even at Walmart, chuck is not affordable. :(. I’d love to be able to eat beef again, but…
Hi Cate! I hear you and you’re absolutely right. Chuck roast prices have crept up, and at $7 to $9 a pound, it doesn’t feel like the budget buy it once was. That said, in the world of beef, it’s still one of the more affordable options when you compare it to ribeye ($12–$15/lb) or filet mignon (around $20/lb).
Compared to chicken or pork? Chuck definitely costs more. But if you’re craving the taste and texture of a fancy roast without paying premium steak prices, this method can still stretch your dollar a bit farther. One roast can go a long way, especially with leftovers.
Thanks for chiming in. It’s a tough time for meat lovers on a budget, and you’re not alone.
Hi Mary! This sounds delicious and frugal. We have a large family. Can two roasts be cooked at the same time? Would I need two leave in thermometers?
Also, smoking is slow and steady… could this be cooked in a smoker as well?
Thanks for always being my “go-to” for information and recipes!
yes, you could do two roasts as long as there is room for enough air circulation between the roasts. You’ll want to use two thermometers as hitting the correct temp is the key. As for smoking, I’ve never tried it but I dont see why not. If you give it a try, let us know how it turns out. Enjoy!
I actually grabbed two at 2.5 lbs and I’m gonna tie them together into one more uniform shape for a large dinner. Will report back. It will also give me the opportunity to season the “inside”
Sodium: 4576mg
WOW Mary, not sure I can use this brine due to the sodium content!
Do we use regular table salt or kosher salt?
Either! Whatever you have on hand 🙂
Recipe sounds great. However, any Chuck Roast I’ve ever seen is flat, so not sure how to tie it.
There are tutorials with photos online to show you how to use butcher’s twine to tie up any cut of roast including a chuck roast.