This 5 Minute Self-Checkup to Find iPhone Subscriptions Saved Me a Lot of Money
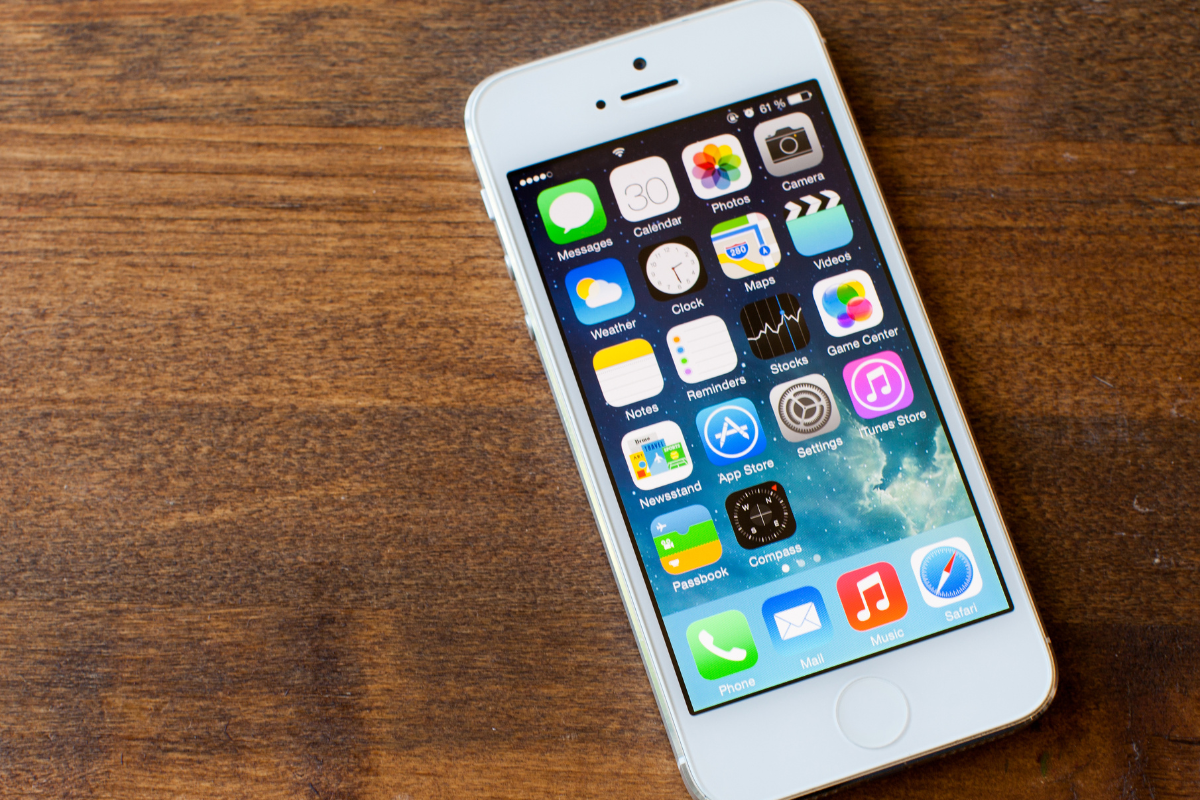
Calling all iPhone users! After so many upgrades over years of using an iPhone, I thought I knew it all. Only recently, I discovered a feature to find iPhone subscriptions that’s been there all along but I’d never noticed—much less thought about. It took about 5 minutes for me to change that and— ta-da!—save a lot of money. I bet we can put some moolah back into your pocket, too. And don’t worry. I have a link below for Android users, too.
These days nearly everything out there that’s any good requires some kind of subscription, from television to newspapers, music to games, and on it goes. Can you account for the subscriptions you’re paying for and use regularly? See what I mean? It’s easy to lose track. And it’s super easy to find iPhone subscriptions, too.
Huh? What?!
I’m going to wager that you, like me, are paying for subscriptions you’ve totally forgotten but are auto-renewing every month, quarter, or annually. You may not have even realized you agreed to that auto-renew.
Sure, it shows up on your bank or credit card statement. But staying on top of them means you must routinely go through every item every accounting period to verify what it is and why you’re still paying for it.
So Easy a 5-Year-Old …
Sure, a simple $.99 charge doesn’t seem like much, so why bother digging through files you can’t find to try to figure out a mystery you can’t solve?
It could be (and I only know this from experience) that your 5-year-old grandson somehow, even though he can’t tie his shoes, knows how to use an iPhone and where to find a fun game to play while sitting quietly in his car seat. He clicks on an “in-app purchase” and then magically reads “Subscribe,” “Upload,” and “Play” because he also knows how to access grandma’s Apple ID. Yep.
Zap Unwanted Subscriptions
But let’s not go blaming others for every infraction. You may have legitimately signed up for iTunes, Apple Music, or any number of paid subscriptions that you don’t recall and wouldn’t know where to find if you could.
It may have been the 7-Day Trial Offer that got you because you totally forgot to cancel 24 hours before the end of the trial period.
In these days of top-notch streaming services and endless in-app purchases, don’t feel like the Lone Ranger when you end up with a bunch of mysterious monthly or annual billing charges. Keeping track of all of them can be overwhelming.
Well, hang onto your data plan ’cause that’s exactly what we’re about the figure out. It’s time to zap unwanted subscriptions.
How to Find iPhone Subscriptions
Step 1: Open Settings
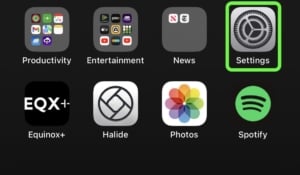
Step 2. Tap on Apple ID at the Top
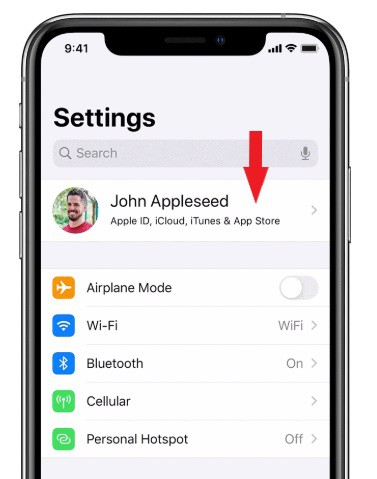
Step 3. Tap Subscriptions
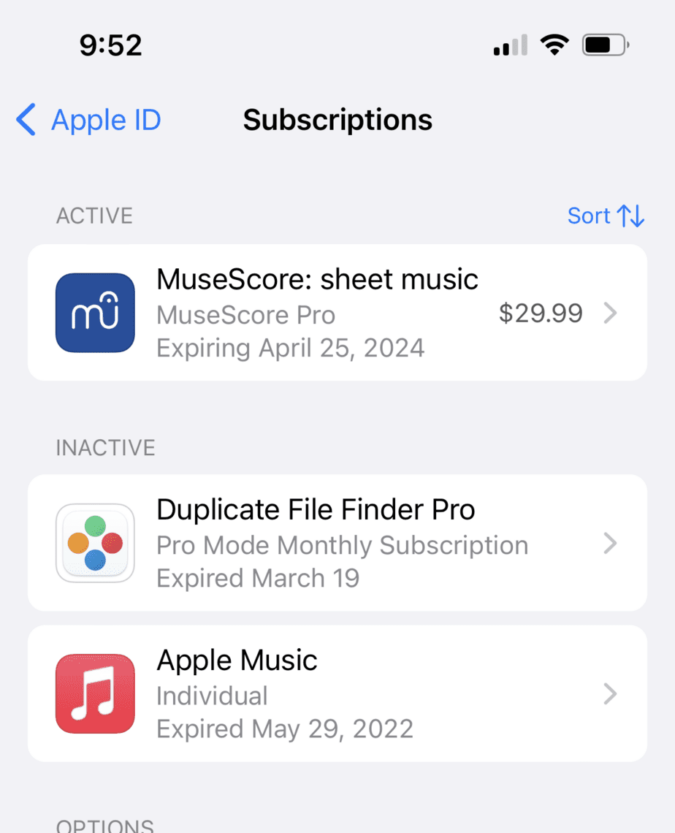
![]()
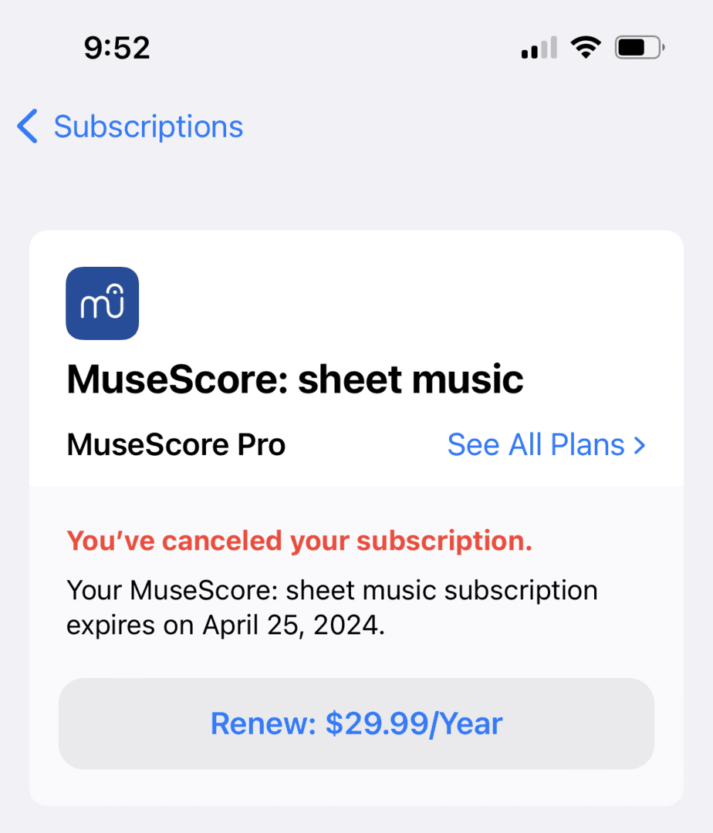
Step 4. Tap a Subscription
In my case here, I clicked on MuseScore: sheet music. That opens another screen.
Step 5. Tap Cancel Subscription
You might need to scroll down to find the Cancel Subscription button. If there is no Cancel button or you see an expiration message in red text, the subscription is already canceled.
In the case of a subscription, you have already paid for (see MuseScore: sheet music in the image below), canceling the subscription will actually cancel the automatic renewal. With MuseScore, I intentionally paid for a one-year subscription. I was not aware I had also agreed to auto-renew at the end of the subscription period. You can see that I immediately canceled that subscription’s auto-renew. My [non-refundable] initial subscription is still in effect, and trust me, I use it endlessly!
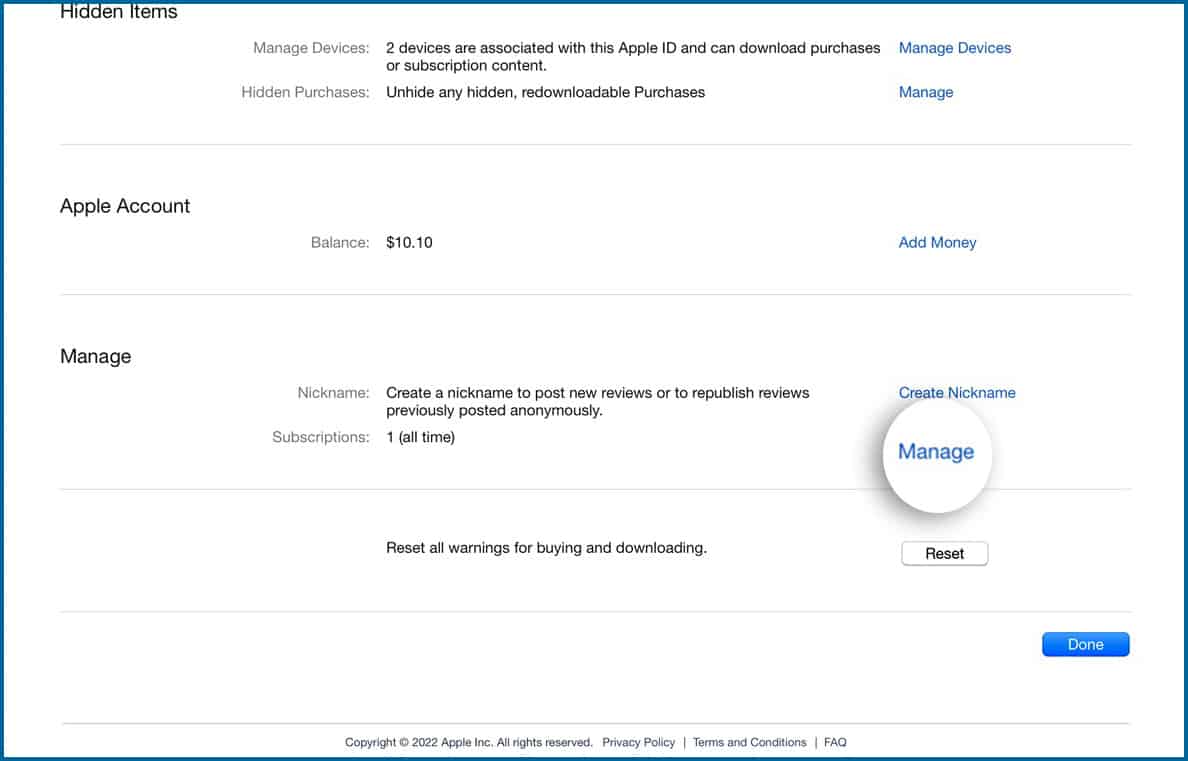
Cancel a Subscription on Your Mac
If you can’t find the subscription that you want to cancel on your iPhone, don’t fret. Follow these steps:
On your Mac:
-
- Open the App Store app.
- Click your name. If you can’t find your name, click Sign In.
- Click Account Settings.
- Scroll to Subscriptions, then click Manage.
- Next to the subscription, click Edit.
- Click Cancel Subscription. If there is no Cancel or Cancel Subscription button, the subscription is already canceled.
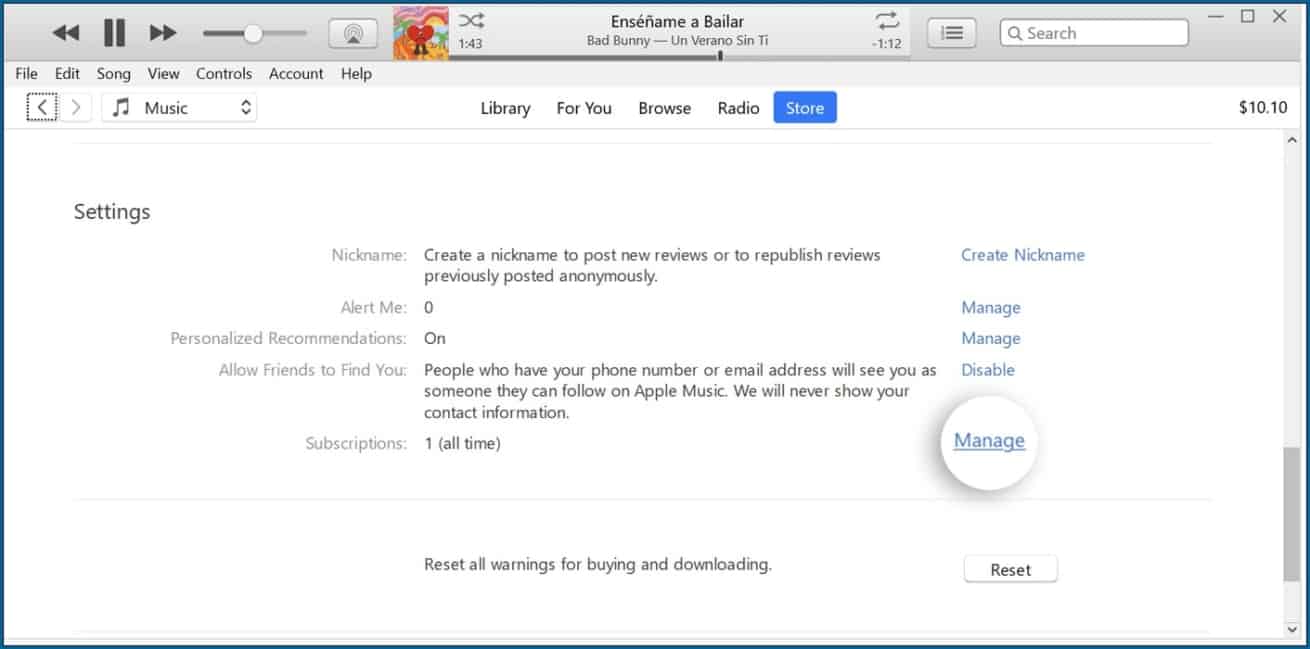
Cancel a Subscription on Your Windows PC
On your PC:
-
- On your PC, open iTunes. If you don’t have iTunes, learn how to download iTunes for Windows.
- From the menu bar at the top of the iTunes window, choose Account, then choose View My Account.
- Scroll to the Settings section. Next to Subscriptions, click Manage.
- Find the subscription that you want to cancel, then click Edit.
- Click Cancel Subscription. If there is no Cancel or Cancel Subscription button, the subscription is already canceled.
That should do it. And if you are still having difficulty canceling a subscription, don’t throw in the towel. Instead, contact Apple support.
Got Android?
You can accomplish this same kind of hunt for subscriptions by going to Find Your Purchases, Reservations & Subscriptions and following the steps.
Images Credit: iPhone Life
Question: How much do you estimate you’ll be saving next month? Share your anticipated savings in the comments below! Let’s celebrate those extra dollars back in your pocket.

More from Everyday Cheapskate
 https://www.everydaycheapskate.com/wp-content/uploads/20260715-high-yield-savings-account-man-dropping-quarter-into-mason-jar.png
800
1200
Mary Hunt
https://www.everydaycheapskate.com/wp-content/uploads/EC-Logo-by-Mary-Hunt-Tagline-Trimmed.png
Mary Hunt2026-07-15 18:01:312026-07-15 18:01:31The Boring Money Move That Earns You $400 to $2,000 a Year (High-Yield Savings Explained)
https://www.everydaycheapskate.com/wp-content/uploads/20260715-high-yield-savings-account-man-dropping-quarter-into-mason-jar.png
800
1200
Mary Hunt
https://www.everydaycheapskate.com/wp-content/uploads/EC-Logo-by-Mary-Hunt-Tagline-Trimmed.png
Mary Hunt2026-07-15 18:01:312026-07-15 18:01:31The Boring Money Move That Earns You $400 to $2,000 a Year (High-Yield Savings Explained) https://www.everydaycheapskate.com/wp-content/uploads/20260711-estate-sale-what-to-buy-used-and-what-to-avoid.png
800
1200
Mary Hunt
https://www.everydaycheapskate.com/wp-content/uploads/EC-Logo-by-Mary-Hunt-Tagline-Trimmed.png
Mary Hunt2026-07-11 22:54:052026-07-11 22:54:057 Things to Always Buy Used (And 5 You Never Should)
https://www.everydaycheapskate.com/wp-content/uploads/20260711-estate-sale-what-to-buy-used-and-what-to-avoid.png
800
1200
Mary Hunt
https://www.everydaycheapskate.com/wp-content/uploads/EC-Logo-by-Mary-Hunt-Tagline-Trimmed.png
Mary Hunt2026-07-11 22:54:052026-07-11 22:54:057 Things to Always Buy Used (And 5 You Never Should) https://www.everydaycheapskate.com/wp-content/uploads/20260710-luxury-car-driving-down-mountain-highway-how-to-lower-car-insurance-premium-.png
800
1200
Mary Hunt
https://www.everydaycheapskate.com/wp-content/uploads/EC-Logo-by-Mary-Hunt-Tagline-Trimmed.png
Mary Hunt2026-07-10 17:46:132026-07-10 17:46:13How to Knock $200+ Off Your Car Insurance Bill (Without Switching Companies)
https://www.everydaycheapskate.com/wp-content/uploads/20260710-luxury-car-driving-down-mountain-highway-how-to-lower-car-insurance-premium-.png
800
1200
Mary Hunt
https://www.everydaycheapskate.com/wp-content/uploads/EC-Logo-by-Mary-Hunt-Tagline-Trimmed.png
Mary Hunt2026-07-10 17:46:132026-07-10 17:46:13How to Knock $200+ Off Your Car Insurance Bill (Without Switching Companies) https://www.everydaycheapskate.com/wp-content/uploads/20260706-negotiate-medical-bills-female-nurse-with-calculator-and-ipad-negotiating-a-bill.png
800
1200
Mary Hunt
https://www.everydaycheapskate.com/wp-content/uploads/EC-Logo-by-Mary-Hunt-Tagline-Trimmed.png
Mary Hunt2026-07-06 21:19:252026-07-06 21:19:25How to Negotiate Medical Bills and Cut Costs 30-50%
https://www.everydaycheapskate.com/wp-content/uploads/20260706-negotiate-medical-bills-female-nurse-with-calculator-and-ipad-negotiating-a-bill.png
800
1200
Mary Hunt
https://www.everydaycheapskate.com/wp-content/uploads/EC-Logo-by-Mary-Hunt-Tagline-Trimmed.png
Mary Hunt2026-07-06 21:19:252026-07-06 21:19:25How to Negotiate Medical Bills and Cut Costs 30-50% https://www.everydaycheapskate.com/wp-content/uploads/20260704-financial-independence-sparkler-and-american-flag-in-night-sky.png
800
1200
Mary Hunt
https://www.everydaycheapskate.com/wp-content/uploads/EC-Logo-by-Mary-Hunt-Tagline-Trimmed.png
Mary Hunt2026-07-04 11:57:492026-07-04 11:57:49What My Debt Taught Me About Real Freedom
https://www.everydaycheapskate.com/wp-content/uploads/20260704-financial-independence-sparkler-and-american-flag-in-night-sky.png
800
1200
Mary Hunt
https://www.everydaycheapskate.com/wp-content/uploads/EC-Logo-by-Mary-Hunt-Tagline-Trimmed.png
Mary Hunt2026-07-04 11:57:492026-07-04 11:57:49What My Debt Taught Me About Real Freedom https://www.everydaycheapskate.com/wp-content/uploads/20260617-how-to-build-a-1000-emergency-fund-jar-with-coins-and-plant.png
800
1200
Mary Hunt
https://www.everydaycheapskate.com/wp-content/uploads/EC-Logo-by-Mary-Hunt-Tagline-Trimmed.png
Mary Hunt2026-06-17 18:34:002026-06-17 18:34:00How to Build a $1,000 Emergency Fund When Money Is Already Tight
https://www.everydaycheapskate.com/wp-content/uploads/20260617-how-to-build-a-1000-emergency-fund-jar-with-coins-and-plant.png
800
1200
Mary Hunt
https://www.everydaycheapskate.com/wp-content/uploads/EC-Logo-by-Mary-Hunt-Tagline-Trimmed.png
Mary Hunt2026-06-17 18:34:002026-06-17 18:34:00How to Build a $1,000 Emergency Fund When Money Is Already Tight https://www.everydaycheapskate.com/wp-content/uploads/20260614-how-to-splurge-on-a-budget-woman-drinking-fancy-coffee-luxury-treat-smiling.png
800
1200
Mary Hunt
https://www.everydaycheapskate.com/wp-content/uploads/EC-Logo-by-Mary-Hunt-Tagline-Trimmed.png
Mary Hunt2026-06-14 20:10:232026-06-14 20:12:40How to Splurge on a Budget Without the Guilt
https://www.everydaycheapskate.com/wp-content/uploads/20260614-how-to-splurge-on-a-budget-woman-drinking-fancy-coffee-luxury-treat-smiling.png
800
1200
Mary Hunt
https://www.everydaycheapskate.com/wp-content/uploads/EC-Logo-by-Mary-Hunt-Tagline-Trimmed.png
Mary Hunt2026-06-14 20:10:232026-06-14 20:12:40How to Splurge on a Budget Without the Guilt https://www.everydaycheapskate.com/wp-content/uploads/20260607-woman-grocery-shopping-pushing-cart-with-apples-and-cauliflower.png
800
1200
Mary Hunt
https://www.everydaycheapskate.com/wp-content/uploads/EC-Logo-by-Mary-Hunt-Tagline-Trimmed.png
Mary Hunt2026-06-09 23:20:292026-06-09 23:20:29How to Read a Grocery Store Sale Cycle (And Stop Overpaying)
https://www.everydaycheapskate.com/wp-content/uploads/20260607-woman-grocery-shopping-pushing-cart-with-apples-and-cauliflower.png
800
1200
Mary Hunt
https://www.everydaycheapskate.com/wp-content/uploads/EC-Logo-by-Mary-Hunt-Tagline-Trimmed.png
Mary Hunt2026-06-09 23:20:292026-06-09 23:20:29How to Read a Grocery Store Sale Cycle (And Stop Overpaying)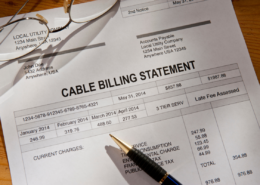 https://www.everydaycheapskate.com/wp-content/uploads/20260605-bill-glasses-and-pen-how-to-negotiate-your-cable-and-internet-bill.png
800
1200
Mary Hunt
https://www.everydaycheapskate.com/wp-content/uploads/EC-Logo-by-Mary-Hunt-Tagline-Trimmed.png
Mary Hunt2026-06-05 10:07:222026-06-05 10:07:22The Word-For-Word Script That Cuts Your Bills by $600 a Year
https://www.everydaycheapskate.com/wp-content/uploads/20260605-bill-glasses-and-pen-how-to-negotiate-your-cable-and-internet-bill.png
800
1200
Mary Hunt
https://www.everydaycheapskate.com/wp-content/uploads/EC-Logo-by-Mary-Hunt-Tagline-Trimmed.png
Mary Hunt2026-06-05 10:07:222026-06-05 10:07:22The Word-For-Word Script That Cuts Your Bills by $600 a Year
Under Got Android? there’s only one sentence, which ends with a colon. Is there supposed to be more info?
From the post:
Got Android? You can accomplish this same kind of hunt for subscriptions by going to Find Your Purchases, Reservations & Subscriptions and following the steps.
I have an Android cell phone.
From the post:
Got Android? You can accomplish this same kind of hunt for subscriptions by going to Find Your Purchases, Reservations & Subscriptions and following the steps.
Got Android? You can accomplish this same kind of hunt for subscriptions by going to Find Your Purchases, Reservations & Subscriptions and following the steps.
Another way to save money in subscriptions is to not always subscribe and sign up through the App Store(Disney+,Hulu)You can subscribe directly from Hulu and bundle these at a cheaper rate for 2 services!!Also check with your cell phone carrier,as Tmobike has Netflix on them and see what else is out there!
Fantastic! I’ve tried to keep track of subscription renewals on a paper calendar but that wasn’t working for me. Quick checks here will be so much better. Thank you!
Thanks so much for this info. You just saveed me at least $50 a year at least. My husband is going to be so happy when I tell him. Thanks for walking us through it. I would never have figured it out without your help.
Great news, Sherie and it is always my pleasure to be of service to my dear EC Readers! Stick close … lots more out there to be discovered and shared.