
4 Brilliant Ways to Cook Corn on the Cob for Perfect Summer Flavor


Summer just isn’t summer without sweet, buttery corn on the cob. Whether you’re firing up the grill or using the microwave, there are plenty of brilliant ways to cook this classic treat. In this post, I’ll share four fantastic methods that are sure to bring out the best in your corn, making every bite a delicious celebration of summer flavors.
Corn on the cob is a must-have for every summer celebration and backyard cookout. It’s not only a seasonal treat that’s budget-friendly, but it’s also quick and easy to prepare. Before we dive into the fun part—how to cook corn on the cob—let’s make sure you’re starting with the best ears of corn. Fresh, sweet corn is the secret to a truly delicious summer side dish!
How to Choose the Best Corn on the Cob
When you’re selecting corn on the cob, aim for these key characteristics to ensure you’re getting the freshest, sweetest corn:
- Bright Green Husks: Look for husks that are bright green, tightly wrapped, and mostly intact.
- Moist Stem: The stem where the corn was cut from the stalk should be sticky and moist. A dry stem means the corn is past its prime.
- Silky Tassels: The tassels at the top should be slightly sticky, moist, and silky, indicating freshness.
- Check for Damage: Gently peel back a small part of the husk to check for any wormholes or brown spots. Fresh corn should be free from these imperfections.
Choosing the best corn on the cob is the first step to mastering how to cook corn on the cob perfectly every time!
Best Ways to Prepare Fresh Corn
There are countless ways to cook corn on the cob, each as unique as the people who love it. To help you find your new favorite method, here are my top picks for how to cook corn on the cob, each offering a delicious twist on this classic summer treat:
How to Cook Corn on the Cob on the Stovetop

You have to try this. Just let me warn you—it sounds insane, but once you prepare corn on the stovetop this way, you’ll never go back. It’s a family heritage recipe I got from a self-avowed corn snob who grew up on a farm in Iowa.
The Microwave Method: Quick and Easy Corn on the Cob

Some time ago, the following great reader tip showed up in my mail, complete with photos! I tried Dick’s method right then and there and wow, it is so slick!
I have demonstrated this to friends and family many times since, and always to rave reviews not only for the surprising finale but for the perfectly cooked corn, too!
“I wish to share a sweet corn trick with you and your readers that allows one to cook fresh corn in the husk, in the microwave. I am including a few photos to demonstrate.” Dick
Here’s the step-by-step:
- Prep the Corn: Cut through the husk around the stem end of the corn (not through the cob), making a full circle. This will make it easier to remove later.
- Microwave: Place the corn in the microwave and cook on high for 3 minutes per ear. So, if you’re cooking two ears, zap them for 6 minutes.
- Remove and Enjoy: Carefully take the corn out of the microwave. Grasp the end and pull the corn right out of the husks. Voilà—no mess, no corn silk!
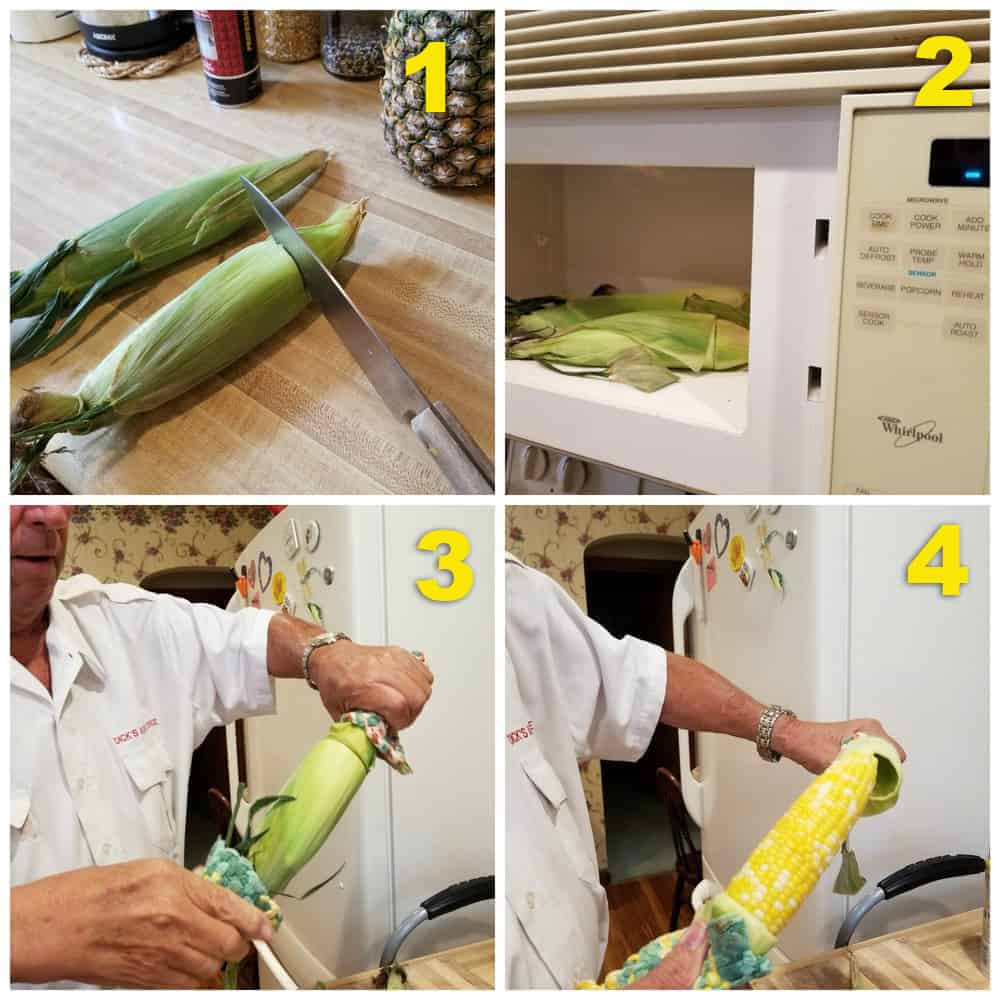
NOTE: In photo #3 above , Dick has the “cut end” of the corn in his left hand, and in #4 he has turned the ear of corn around putting the “cut end” into his right hand, pulling the husks off with his left hand.
This method is a real crowd-pleaser and will have you cooking corn on the cob with ease and speed, making it a perfect addition to your summer meal lineup!
Easy Corn Handles
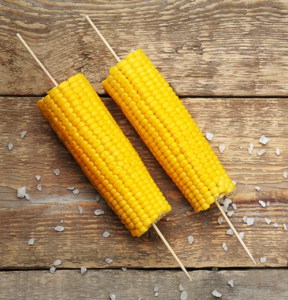
Instead of scurrying about to locate a pair of corn “handles” for every person at the table, use 3.5″ or longer bamboo skewers or candy apple sticks—one or two per ear, depending on the cob size. Insert into the flat, cut end, kinda’ like a lollipop. There! So much easier for you and your guests, too.
Roasting Corn on the Cob: A Flavorful Grilled Delight

If you haven’t tried roasting corn on the cob in the husks, you’re in for a treat! This method is incredibly easy and requires no prep or soaking. Roasting in the husks imparts a subtly smoky flavor that’s simply irresistible.
Here’s how to roast corn on the cob to perfection:
- Preheat the Grill: Set your grill to medium heat or 350°F.
- Prepare the Corn: Place the corn with husks still intact directly on the grill grate. Leave a little space between each cob for even heat distribution.
- Grill: Close the grill cover. Using tongs, turn the corn every five minutes.
- Roast: Cook for 25-30 minutes, turning every 5 minutes until the corn is hot and tender. Make sure to close the cover each time you turn the corn.
- Cool and Peel: Remove the corn from the grill and let it cool slightly. Then, peel away the charred husks to reveal your perfectly roasted corn.
This method enhances the natural sweetness of the corn and adds a delightful depth of flavor. It’s an easy way to make your summer BBQs even more delicious!
Grilling Corn on the Cob: The Ultimate BBQ Side Dish

If you’re looking for the perfect BBQ side dish, look no further than grilled corn on the cob. Nagi from RecipeTinEats.com swears by this method, calling it “the most effortless BBQ side dish ever.” Here’s how to make it:
- Preheat the Grill: Get your grill blazing hot.
- Prep the Corn: Peel off the husks and silk from the corn.
- Grill: Place the corn directly on the open grill—no oil needed. Cook for about 10 minutes, turning every couple of minutes. Look for those little charred bits and make sure the kernels are tender but still juicy.
- Finish with Butter: In the last minute of grilling, brush the corn with melted butter and give it a quick roll around the grill.
- Serve: Serve the corn with additional softened butter, a sprinkle of salt, and fresh parsley if you like.
This grilling method gives your corn on the cob a smoky, charred flavor that’s the perfect complement to any summer BBQ. Enjoy the ease and flavor of this ultimate side dish.
Creative Toppings for Corn on the Cob
Once you’ve mastered how to cook corn on the cob, the fun really begins with adding delicious toppings. Here are some creative ideas to elevate your corn game:
- Classic Butter and Salt: Sometimes, you can’t beat the classics. Spread softened butter over your hot corn and sprinkle with a generous amount of salt.
- Garlic Parmesan: Mix melted butter with minced garlic and grated Parmesan cheese. Brush this mixture over your corn for a savory treat.
- Mexican Street Corn (Elote): Slather the corn with a mix of mayonnaise, sour cream, lime juice, and chili powder. Sprinkle with cotija cheese and chopped cilantro for a vibrant flavor boost.
- Herb Infusion: Combine softened butter with finely chopped fresh herbs like basil, rosemary, or thyme. Spread over the corn for a fragrant and flavorful finish.
These toppings can transform your corn on the cob from a simple side into a gourmet experience!
How to Store and Reheat Leftover Corn on the Cob
If you have leftover corn on the cob, here’s how to store and reheat it without losing that just-cooked flavor:
- Storing: Allow the corn to cool completely, then wrap it tightly in plastic wrap or aluminum foil. Store in the refrigerator for up to 3-4 days.
- Freezing: For longer storage, wrap the cooled corn in plastic wrap and then foil. Place in a freezer-safe bag and freeze for up to 6 months.
- Reheating: To reheat, you can use several methods:
- Microwave: Wrap the corn in a damp paper towel and microwave on high for 1-2 minutes.
- Oven: Preheat your oven to 350°F (175°C). Wrap the corn in foil and bake for 10-15 minutes.
- Grill: Reheat on the grill for a few minutes until warmed through, turning occasionally to avoid burning.
With these tips, you can enjoy your delicious corn on the cob even after it’s been cooked.
Question: What’s your go-to method for cooking corn on the cob? Do you swear by the grill, the stovetop, or something totally different? Share your secrets with us.
EverydayCheapskate™ is reader-supported. We participate in the Amazon Services LLC Associates Program and other affiliate advertising programs, designed to provide a means for us to earn from qualifying purchases, at no cost to you.

More from Everyday Cheapskate
 https://www.everydaycheapskate.com/wp-content/uploads/20260720-slow-cooker-hot-weather-meals-salads-plus-pico-de-gallo-recipes.png
800
1200
Mary Hunt
https://www.everydaycheapskate.com/wp-content/uploads/EC-Logo-by-Mary-Hunt-Tagline-Trimmed.png
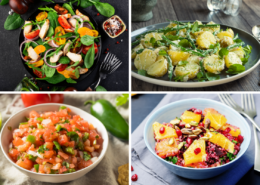
Mary Hunt2026-07-20 21:12:192026-07-20 21:15:463 Slow Cooker Summer Salads for Hot Weather Dinners
https://www.everydaycheapskate.com/wp-content/uploads/20260720-slow-cooker-hot-weather-meals-salads-plus-pico-de-gallo-recipes.png
800
1200
Mary Hunt
https://www.everydaycheapskate.com/wp-content/uploads/EC-Logo-by-Mary-Hunt-Tagline-Trimmed.png
Mary Hunt2026-07-20 21:12:192026-07-20 21:15:463 Slow Cooker Summer Salads for Hot Weather Dinners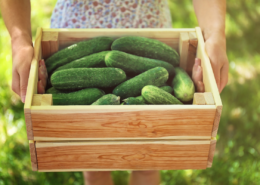 https://www.everydaycheapskate.com/wp-content/uploads/20260717-a-woman-holding-a-crate-of-cucumbers.png
800
1200
Mary Hunt
https://www.everydaycheapskate.com/wp-content/uploads/EC-Logo-by-Mary-Hunt-Tagline-Trimmed.png
Mary Hunt2026-07-17 10:11:072026-07-17 10:13:44Cucumbers Galore? Here’s What to Do With Every Single One
https://www.everydaycheapskate.com/wp-content/uploads/20260717-a-woman-holding-a-crate-of-cucumbers.png
800
1200
Mary Hunt
https://www.everydaycheapskate.com/wp-content/uploads/EC-Logo-by-Mary-Hunt-Tagline-Trimmed.png
Mary Hunt2026-07-17 10:11:072026-07-17 10:13:44Cucumbers Galore? Here’s What to Do With Every Single One https://www.everydaycheapskate.com/wp-content/uploads/20260713-what-to-pack-for-kids-lunchboxes-young-boy-and-girl-eating-a-banana-and-a-sandwich.png
800
1200
Mary Hunt
https://www.everydaycheapskate.com/wp-content/uploads/EC-Logo-by-Mary-Hunt-Tagline-Trimmed.png
Mary Hunt2026-07-13 21:54:132026-07-13 21:54:13Back-to-School Lunch Ideas for a Week (No Boring Sandwiches)
https://www.everydaycheapskate.com/wp-content/uploads/20260713-what-to-pack-for-kids-lunchboxes-young-boy-and-girl-eating-a-banana-and-a-sandwich.png
800
1200
Mary Hunt
https://www.everydaycheapskate.com/wp-content/uploads/EC-Logo-by-Mary-Hunt-Tagline-Trimmed.png
Mary Hunt2026-07-13 21:54:132026-07-13 21:54:13Back-to-School Lunch Ideas for a Week (No Boring Sandwiches) https://www.everydaycheapskate.com/wp-content/uploads/20260609-refreshing-glasses-of-iced-tea-with-fresh-lemon-slices-and-ice-best-way-to-make-tea.png
800
1200
Mary Hunt
https://www.everydaycheapskate.com/wp-content/uploads/EC-Logo-by-Mary-Hunt-Tagline-Trimmed.png
Mary Hunt2026-07-09 18:30:102026-07-09 18:30:10The Best Way to Make Iced Tea? Depends What You’re After
https://www.everydaycheapskate.com/wp-content/uploads/20260609-refreshing-glasses-of-iced-tea-with-fresh-lemon-slices-and-ice-best-way-to-make-tea.png
800
1200
Mary Hunt
https://www.everydaycheapskate.com/wp-content/uploads/EC-Logo-by-Mary-Hunt-Tagline-Trimmed.png
Mary Hunt2026-07-09 18:30:102026-07-09 18:30:10The Best Way to Make Iced Tea? Depends What You’re After https://www.everydaycheapskate.com/wp-content/uploads/20260707-creamy-whipped-frozen-coffee-drink-on-balcony-with-whipped-cream.png
800
1200
Mary Hunt
https://www.everydaycheapskate.com/wp-content/uploads/EC-Logo-by-Mary-Hunt-Tagline-Trimmed.png
Mary Hunt2026-07-07 10:09:112026-07-07 10:09:11I Stopped Buying $7 Frappuccinos. Here’s What I Make Now
https://www.everydaycheapskate.com/wp-content/uploads/20260707-creamy-whipped-frozen-coffee-drink-on-balcony-with-whipped-cream.png
800
1200
Mary Hunt
https://www.everydaycheapskate.com/wp-content/uploads/EC-Logo-by-Mary-Hunt-Tagline-Trimmed.png
Mary Hunt2026-07-07 10:09:112026-07-07 10:09:11I Stopped Buying $7 Frappuccinos. Here’s What I Make Now https://www.everydaycheapskate.com/wp-content/uploads/20260705-Best-Coolers-for-Camping-Road-Trips-and-Beach-Days.png
800
1200
Mary Hunt
https://www.everydaycheapskate.com/wp-content/uploads/EC-Logo-by-Mary-Hunt-Tagline-Trimmed.png
Mary Hunt2026-07-05 13:26:172026-07-05 13:26:17Best Coolers for Camping, Road Trips, and Beach Days
https://www.everydaycheapskate.com/wp-content/uploads/20260705-Best-Coolers-for-Camping-Road-Trips-and-Beach-Days.png
800
1200
Mary Hunt
https://www.everydaycheapskate.com/wp-content/uploads/EC-Logo-by-Mary-Hunt-Tagline-Trimmed.png
Mary Hunt2026-07-05 13:26:172026-07-05 13:26:17Best Coolers for Camping, Road Trips, and Beach Days https://www.everydaycheapskate.com/wp-content/uploads/20260705-how-to-keep-a-cooler-cold.png
800
1200
Mary Hunt
https://www.everydaycheapskate.com/wp-content/uploads/EC-Logo-by-Mary-Hunt-Tagline-Trimmed.png
Mary Hunt2026-07-05 13:19:502026-07-05 13:19:50How to Pack a Cooler That Stays Cold for 48 Hours
https://www.everydaycheapskate.com/wp-content/uploads/20260705-how-to-keep-a-cooler-cold.png
800
1200
Mary Hunt
https://www.everydaycheapskate.com/wp-content/uploads/EC-Logo-by-Mary-Hunt-Tagline-Trimmed.png
Mary Hunt2026-07-05 13:19:502026-07-05 13:19:50How to Pack a Cooler That Stays Cold for 48 Hours https://www.everydaycheapskate.com/wp-content/uploads/20260630-a-lit-sparkler-with-an-american-flag-in-the-background-4th-of-july-hacks-tips-and-recipes.png
800
1200
Mary Hunt
https://www.everydaycheapskate.com/wp-content/uploads/EC-Logo-by-Mary-Hunt-Tagline-Trimmed.png
Mary Hunt2026-06-30 21:44:502026-06-30 21:44:5034 Fourth of July Recipes and DIY Hacks for a Stress-Free Holiday
https://www.everydaycheapskate.com/wp-content/uploads/20260630-a-lit-sparkler-with-an-american-flag-in-the-background-4th-of-july-hacks-tips-and-recipes.png
800
1200
Mary Hunt
https://www.everydaycheapskate.com/wp-content/uploads/EC-Logo-by-Mary-Hunt-Tagline-Trimmed.png
Mary Hunt2026-06-30 21:44:502026-06-30 21:44:5034 Fourth of July Recipes and DIY Hacks for a Stress-Free Holiday https://www.everydaycheapskate.com/wp-content/uploads/20260628-Grilled-Peaches-with-Balsamic-and-Blue-Cheese-1.png
800
1200
Mary Hunt
https://www.everydaycheapskate.com/wp-content/uploads/EC-Logo-by-Mary-Hunt-Tagline-Trimmed.png
Mary Hunt2026-06-29 09:38:342026-06-29 09:38:34Summer Grilled Peaches with Balsamic and Blue Cheese
https://www.everydaycheapskate.com/wp-content/uploads/20260628-Grilled-Peaches-with-Balsamic-and-Blue-Cheese-1.png
800
1200
Mary Hunt
https://www.everydaycheapskate.com/wp-content/uploads/EC-Logo-by-Mary-Hunt-Tagline-Trimmed.png
Mary Hunt2026-06-29 09:38:342026-06-29 09:38:34Summer Grilled Peaches with Balsamic and Blue Cheese

I bought 5 ears of corn and tried the microwave method described above. Oh my goodness, I could not believe how easily and perfectly cooked this corn was, not to mention delicious! Wow! Corn on the cob all ready in just 3 minutes! Genius!
I haven’t tried this yet, but recently I read If your sweet corn is past its prime, you can soak the cobs in sugar water (1/2 cup of white sugar per gallon of water) for a couple of hours to plump them back up.
Yep, that micromethod is the best I’ve ever found and it works sooo well! Thanks for posting it for everyone. I won’t cook it another way again.
My go to method is to steam! I have a collapsible steamer basket that fits full size cobs. A big pot, some water and then just let them go. The kernels are still firm but let go of the cob so easily.
Since I’m a widow, I don’t eat a lot of sweet corn at one time. So I use the potato pouch. I have been able to put up to 4 smaller ears in it, microwave for 6 minutes. Usually it’s only 3 larger ears for 5 minutes. My husband taught me to use a piece of bread to butter the corn. You put a lot of butter in the middle part of the bread and rub the corn in it.
Ever since the funny guy on YouTube microwaved the corn and slid the ear out clean, we haven’t gone back to shucking and boiling water.
When I was a kid, we’d start the water heating before going out to pick the corn. We never overcooked it. It doesn’t take long: kinda like shrimp! LOL
We received our first corn of the season in our Carolina Crate from Lowe’s Foods. We couldn’t find an existing CSA in our area, but this is the next best thing. We pick up a box of fresh, local produce at the store, and it includes items from several varied farms.
Here’s to Good Eatin’ Y’all!
For microwave corn, Here’s an easy way: 1) Throw the whole ear in the microwave at 6 minutes per ear.(Trim the tassel end if needed to fit microwave). 2) When done, throw it on the plate. (The husks will keep it warm until time to eat.) 3) Fold the husks and tassel back to make a handle for holding the corncob. 4) Spritz with “Can’t Believe Its Not Butter” spray. Salt, and eat.
Cooking in the husk is easy, convenient and a good way to remove all the silk. Unless…there is a worm inside! Icky.
My only way to cook our corn! Best way to husk and de-silk corn is to cut the end of the corn off – just as the widest part begins to narrow. Cook in a pressure cooker for 3 minutes. Remove corn and shake the ear from the tassel end, wearing some gloves or wrap it in a towel. The husk and all silk will come off in your hand and the corn will be clean as a whistle! Found this trick on YouTube and it REALLY works!!
Wonderful ideas! Think I will try Mary’s stove top version!
I remove the husk and silk, rub some butter on them, wrap in foil and put on the grill. Love them, and they stay warm for a long time.
We use the microwave method, but now I’m going to use my InstantPot. one year, for a large family gathering we used a small “ice chest”. we stripped the corn and cleaned it, then poured boiling water over it in the cooler, close the lid and it cooks and stays warm for quite a while.
Does anyone have a suggestion for removing the silk before cooking? I’ve tried just about everything and still spend too much time trying with poor results. I’ve bought special brushes, tried different ways of removing the husk, etc., and nothing has worked.
The microwave method is the best for removing silk. It comes off with the rest of the husk.
I totally agree with Barb.
In fact that’s the way the farmer from which we buy corn does it. There is no mess and it is fast, easy and the corn is perfect every time.
Totally agree – I am so glad that I found this way to cook corn several years ago. The husk and silk comes off like magic. Just make sure you cut off the stem at the right place. Also if cooking more than one at a time (2 – 6 min, 3 – 7 min) in an 1100 micro. BTW I cook one for 4 minutes not 3.
Once I learned about the microwave method, I have never done it any other way!! It is so easy and no silk just so easy to have the best corn ever!!
My favorite way is to sous-vide husked corn. Place it in a vacuum seal bag, add some butter and salt, seal and cook. It’s delicious! Anova has a perfect recipe on their website for self-buttering corn.
Sous vide
184 degrees 35 minutes
Husk removed
Butter salt pepper in bag
I husk 2 ears of corn & put it in an 8×8 Pyrex dish, with about 1/2 inch of water or a little less, cover with plastic wrap & microwave for 7 minutes. I leave it covered for about 3 minutes to continue cooking. Super easy & yummy!
put on a latex or rubber glove, rub and it will come off easily.
The absolute BEST way to cook corn on the stove is by steaming! It cuts down on the heat and the time and the corn turns out perfectly every time. Simply…get a kettle or pan big enough to hold your corn in 1 or 2 layers, husk and clean your corn of the silk, fill your pan with a few inches of water and add one of those collapsible steamer inserts to the bottom and place your corn on top and cover with a lid. Let the water come to a boil and then steam your corn for about 7 minutes, depending on how many ears you are doing. When it’s done, if you’re not ready to eat, you can move the pan off the heat and keep covered until ready. It will stay hot and (not get mushy) for quite some time. My sister-in-law taught me and my husband (both stubborn “cover-with-water-and-boil” believers) how to steam corn and we are now total converts!!! Try it, you will be amazed how fast it is and how good the corn will taste!
Mary – I was surprised that I did not see the Instant Pot method of preparing corn on the cob? Prepare the ears of corn just like the stovetop method. Put 1-1/2 cups of water (optional: I add 2 tsp sugar) in the bottom of the Instant Pot. Put the trivet in place, and place up to 6 ears of corn into the IP. The original instructions I have say to cook at high pressure for 2 minutes, but I prefer them a little more cooked – so I pressure cook on high for 5 minutes. If you use the “stay warm” feature, you don’t have to worry about the timing quite so much. This is the easiest way I have found to have corn on the cob for summer meals: no heating up the kitchen or competing with space on the grill!
You’re right! Nothing is tastier in August than fresh corn and backyard-grown tomatoes! Thanks!
Since air fryers are now a common kitchen appliance, including a recipe for that woud have been really useful. We cut the corn ears in half, spray them with a bit of olive oil and salt, stand them up in the air fryer and cook them for 10 minutes on high (400F).
Buy Bi-Color corn, it has higher sugar content- avoid ears with dented kernels- to mature.
I always cook my corn in the InstantPot. I cut off both ends without removing the husk (just go by feel for where the corn ends). The husk and silk easily slips off once cooked. I use a rack and put 1.5 cups of water in the pot, then cook on high for 4 or 5 minutes.