

3 Homemade Dog Treats Recipes Your Dog Will Love Most

Store-bought dog treats can be surprisingly expensive. Ten dollars for a bag of dog treats that’s gone in a week. Fifteen for the “premium” bag that lasts maybe two. And your dog doesn’t care one bit that it said premium on the label. If you’re handing out treats every day, that little expense can add up to a whole lot over the course of a year.

Here’s the fix: you can make simple, dog-safe treats at home with stuff that’s probably already in your kitchen. These three recipes are cheap, easy, and freeze beautifully. Make a batch now, and you’ll have treats on hand the next time your dog gives you that look.
And let’s be honest: Dogs don’t care if their treats look like tiny works of art. They care about taste, texture and whether the person holding the treat is about to hand it over.
All three recipes below check the same boxes: simple, affordable, made with ingredients you already recognize, freezer-friendly, easy to portion. No special equipment. Just a baking sheet and a little patience.
Safety first… read this before you start
Dogs can eat a lot of the same simple foods we do. But a few common kitchen ingredients have no business in a dog treat, ever.
Skip these completely:
- Xylitol (sometimes labeled birch sugar)
- Chocolate
- Coffee or anything caffeinated
- Grapes and raisins
- Onions
- Garlic
- Chives
- Leeks
- Macadamia nuts
- Alcohol, and
- Raw yeast dough.
Go easy on anything heavily salted, sugary, or fatty, too.
Using peanut butter? Check the label every single time. Xylitol shows up in “healthier” peanut butters more than you’d think, and it can cause a rapid and potentially life-threatening drop in a dog’s blood sugar.
And never, ever give a dog a cooked bone. They can splinter and cause serious injury or intestinal blockage.
These recipes are intended as occasional treats, not as a replacement for a complete and balanced dog food. If your dog has diabetes, pancreatitis, kidney disease, food allergies, is overweight or eats a prescription diet, check with your veterinarian before adding homemade treats.
Recipe 1: Peanut butter oat bites
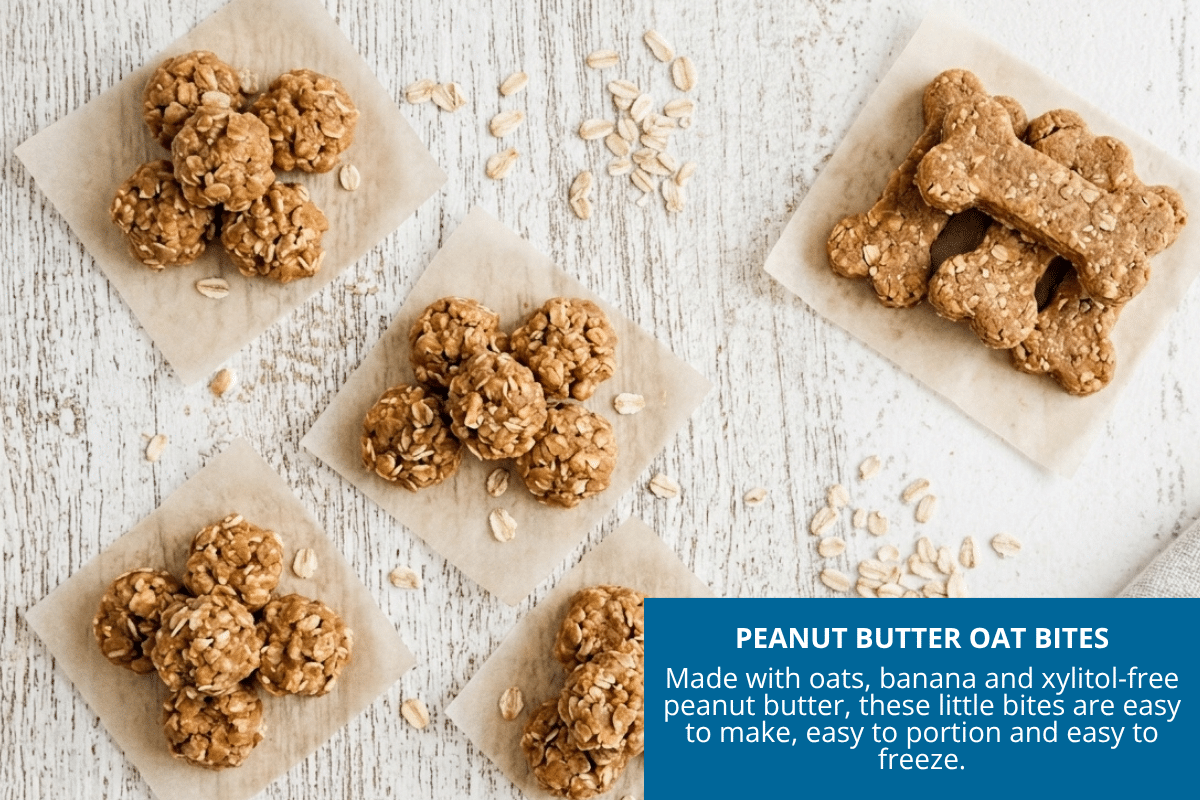
The all-purpose treat. Simple, chewy and a favorite with many dogs.
Ingredients
- 1 cup rolled oats
- 1/4 cup natural peanut butter (no xylitol)
- 1 ripe banana, mashed
- 1 to 2 tablespoons water, as needed
Instructions
Preheat your oven to 350°F and line a baking sheet with parchment.
Mix the oats, peanut butter, and mashed banana in a bowl. If the dough feels too dry to hold together, add water a tablespoon at a time until it’s soft and workable.
Roll into balls about a teaspoon each (dog-treat size, not cookie size.) Flatten slightly and set them on the baking sheet.
Bake 12 to 15 minutes, until the edges turn lightly golden and the treats have set. Let them cool completely before you serve or store them.
Yield: About 30 small treats
Calories: Roughly 25 per treat, depending on your banana and peanut butter
Storage: Fridge, airtight, up to a week. Freezer, up to 3 months for best quality.
Freeze them in a single layer on a sheet pan first, then dump them into a freezer bag. They won’t clump together into one giant treat popsicle, and you can grab exactly as many as you need without a wrestling match.
Recipe 2: Sweet potato chews
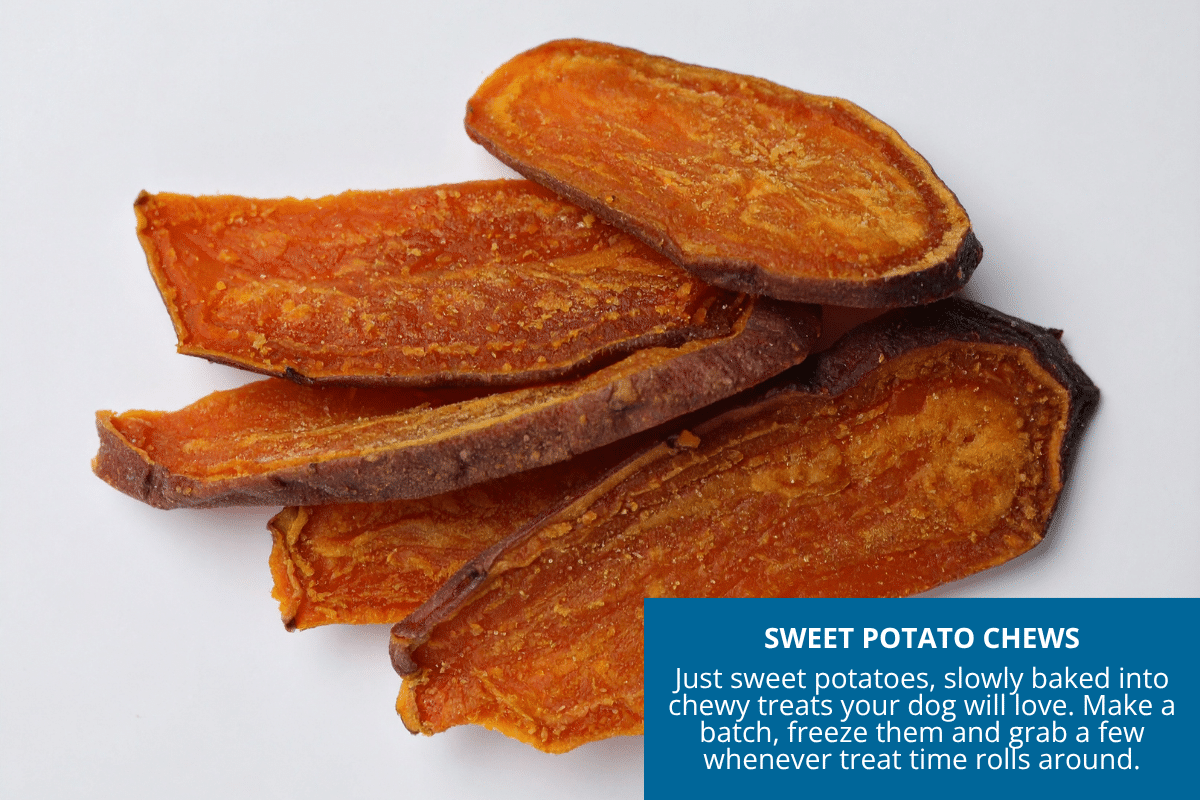
The one-ingredient wonder. Basically like homemade jerky for dogs, minus the ingredients you can’t pronounce.
Ingredients
- 2 medium sweet potatoes
That’s the whole list. I told you it was simple.
Instructions
Preheat your oven to 250°F and line two baking sheets with parchment.
Wash and peel the sweet potatoes, then slice lengthwise into strips about 1/4 inch thick. Rounds work fine too, if that’s easier for you.
Lay the pieces in a single layer, leaving a little breathing room between them.
Bake 2 1/2 to 3 hours, flipping once halfway through, until the pieces are dried out and a little leathery. Want a firmer chew? Keep going until they feel dry all the way through. Cool completely before storing.
Yield: 30 to 40 pieces, depending on the size of your potatoes
Storage: Fridge, airtight, up to a week. Freezer, up to 3 months for best quality.
Sweet potatoes bring fiber and other good stuff to the table, and most dogs do fine with them. First time trying it with your dog? Start with one small piece and watch how he does before you go all in.
Cut these to a size that fits your dog, and stick around while he eats them. If your dog is a gulper rather than a chewer, go smaller. Big leathery strips and gulpers are not a good combination.
Keep these in the freezer. Pull out a few, let them thaw, done.
Recipe 3: Frozen yogurt paw pops
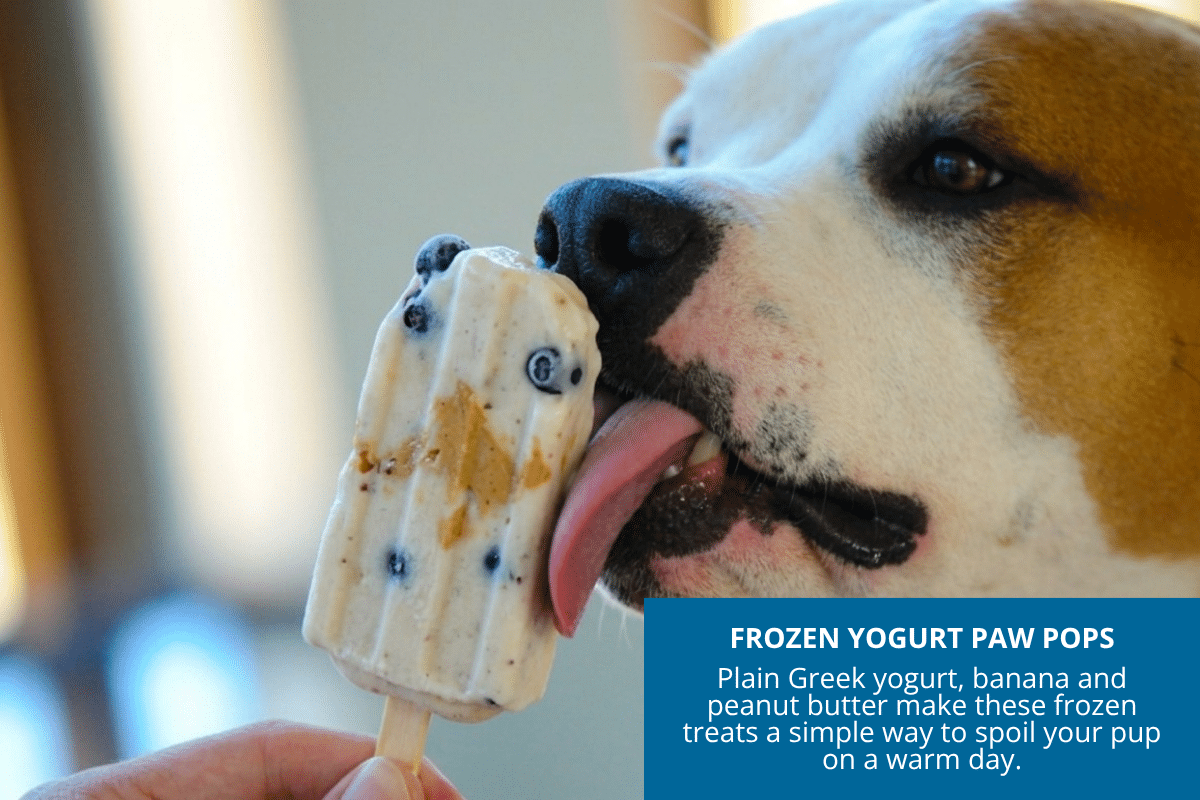
The summer treat and hot-weather favorite. Great for a warm afternoon or any dog who likes a lickable snack.
Ingredients
- 2 cups plain, unsweetened Greek yogurt
- 1/4 cup natural peanut butter (no xylitol)
- 1 ripe banana
- 1/4 cup blueberries, optional
Pick plain yogurt with no added sugar or sweeteners of any kind. If your dog doesn’t do well with dairy, this one’s not for him.
Instructions
Blend the yogurt, peanut butter, and banana until smooth. Tossing in blueberries? Pulse them in briefly, or fold them in whole for a little texture.
Spoon the mixture into silicone molds, ice cube trays, or small silicone cupcake liners. Freeze at least 4 hours, or overnight if you can wait that long.
Pop them out of the molds and store in a labeled freezer bag or airtight container.
Yield: About 24 small pops, depending on your mold
Storage: Freezer, up to 3 months for best quality.
These are a treat, not a water substitute. Don’t let a hot dog fill up on frozen yogurt instead of drinking. If your dog gulps his food, let the pop soften a minute before handing it over, and keep an eye on him while he enjoys it.
A note about portions: These treats contain yogurt, peanut butter and banana, so their calories can add up quickly. The appropriate serving depends on the size of the mold and the individual dog’s calorie needs.
How many homemade treats can your dog actually have?
Veterinary nutrition guidance generally recommends keeping treats and other extras to no more than about 10% of your dog’s daily calories. The remaining 90% should come from a complete and balanced diet.
Because homemade treats vary so much in size, don’t count them by the piece. Count them by the calorie. For example, if your dog is allowed 50 calories a day in treats, two 25-calorie Peanut Butter Oat Bites would use that entire allowance.
And remember: smaller treats aren’t a disappointment to a dog. In fact, when you’re rewarding behavior, the frequency of the reward often matters more than the size.
If you’re unsure how many calories your dog should eat each day, or your dog needs to lose weight, ask your veterinarian for an appropriate daily calorie target.
Bonus: Frozen broth cubes
Want an even easier summer treat? Freeze small amounts of dog-safe, low-sodium broth in ice cube trays. Read the label carefully. Choose broth with no onion, garlic or added seasonings. Remember that ingredients such as onion and garlic can be harmful to dogs.
If you make your own broth, use plain meat and dog-safe vegetables, avoid onions and garlic, and remove every bone before serving. After cooking, chill the broth and skim off excess fat before freezing.
For dogs that tend to gulp, let a frozen cube soften slightly before serving.
These little cubes add some extra moisture to a hot day and give your dog something to look forward to. Just remember: they’re a treat, though, not a substitute for fresh drinking water.
Storage tips for homemade dog treats
Homemade treats skip the preservatives that make store-bought bags last forever on a shelf. That means you’ve got to treat them like the fresh food they are.
- Refrigerator: Store softer homemade treats in airtight containers and use within about a week.
- Freezer: For best quality, freeze treats in airtight freezer bags or containers and use within about 3 months.
- Label everything: Write the recipe and date on the freezer bag. Future-you will appreciate not having to play “What on earth is this?” with the contents of the freezer.
For convenience, freeze treats in small portions. That way you can take out a few at a time instead of repeatedly opening and closing one large container.
If a treat develops an unusual smell, mold, discoloration or other signs of spoilage, throw it out. When in doubt, don’t feed it to your dog.
Getting started
Never made a dog treat before? Start with the peanut butter oat bites. They’re cheap, they’re fast, and they come together quick enough that you won’t have time to talk yourself out of it.
Once you see how simple it is, and how excited your dog gets when you open the freezer, you may wonder why you ever paid $15 for a bag of treats.
But here’s the real trick: make them small. Your dog doesn’t need a giant cookie to know he’s loved. Sometimes one little bite is enough to make his whole day.
Question: What’s your dog’s go-to homemade treat? Tell me the recipe, the secret ingredient, or the story behind it in the comments.
EverydayCheapskate™ is reader-supported. We participate in the Amazon Services LLC Associates Program and other affiliate advertising programs, designed to provide a means for us to earn from qualifying purchases, at no cost to you.

More from Everyday Cheapskate
 https://www.everydaycheapskate.com/wp-content/uploads/20260830-homemade-sloppy-joe-mix-recipe.png
800
1200
Mary Hunt
https://www.everydaycheapskate.com/wp-content/uploads/EC-Logo-by-Mary-Hunt-Tagline-Trimmed.png
Mary Hunt2026-08-30 13:34:482026-08-30 13:34:48Homemade Sloppy Joe Mix: Skip the Store-Bought Packets
https://www.everydaycheapskate.com/wp-content/uploads/20260830-homemade-sloppy-joe-mix-recipe.png
800
1200
Mary Hunt
https://www.everydaycheapskate.com/wp-content/uploads/EC-Logo-by-Mary-Hunt-Tagline-Trimmed.png
Mary Hunt2026-08-30 13:34:482026-08-30 13:34:48Homemade Sloppy Joe Mix: Skip the Store-Bought Packets https://www.everydaycheapskate.com/wp-content/uploads/20260826-DIY-cat-litter-deodorizer-kitten-looking-up-at-camera-from-box.png
800
1200
Mary Hunt
https://www.everydaycheapskate.com/wp-content/uploads/EC-Logo-by-Mary-Hunt-Tagline-Trimmed.png
Mary Hunt2026-08-25 21:17:362026-08-25 21:17:36The One-Ingredient Litter Box Trick That Costs Pennies
https://www.everydaycheapskate.com/wp-content/uploads/20260826-DIY-cat-litter-deodorizer-kitten-looking-up-at-camera-from-box.png
800
1200
Mary Hunt
https://www.everydaycheapskate.com/wp-content/uploads/EC-Logo-by-Mary-Hunt-Tagline-Trimmed.png
Mary Hunt2026-08-25 21:17:362026-08-25 21:17:36The One-Ingredient Litter Box Trick That Costs Pennies https://www.everydaycheapskate.com/wp-content/uploads/20260822-central-AC-maintenance-air-condenser-outdoors.png
800
1200
Mary Hunt
https://www.everydaycheapskate.com/wp-content/uploads/EC-Logo-by-Mary-Hunt-Tagline-Trimmed.png
Mary Hunt2026-08-22 14:19:562026-08-22 14:19:59How to Extend the Life of Your Central AC (5 Late-Summer Tune-Up Tips)
https://www.everydaycheapskate.com/wp-content/uploads/20260822-central-AC-maintenance-air-condenser-outdoors.png
800
1200
Mary Hunt
https://www.everydaycheapskate.com/wp-content/uploads/EC-Logo-by-Mary-Hunt-Tagline-Trimmed.png
Mary Hunt2026-08-22 14:19:562026-08-22 14:19:59How to Extend the Life of Your Central AC (5 Late-Summer Tune-Up Tips) https://www.everydaycheapskate.com/wp-content/uploads/20260814-Slow-Cooker-Peach-Cobbler.png
800
1200
Mary Hunt
https://www.everydaycheapskate.com/wp-content/uploads/EC-Logo-by-Mary-Hunt-Tagline-Trimmed.png
Mary Hunt2026-08-14 22:48:112026-08-14 22:48:11Easy Slow Cooker Peach Cobbler with Boxed Cake Mix
https://www.everydaycheapskate.com/wp-content/uploads/20260814-Slow-Cooker-Peach-Cobbler.png
800
1200
Mary Hunt
https://www.everydaycheapskate.com/wp-content/uploads/EC-Logo-by-Mary-Hunt-Tagline-Trimmed.png
Mary Hunt2026-08-14 22:48:112026-08-14 22:48:11Easy Slow Cooker Peach Cobbler with Boxed Cake Mix https://www.everydaycheapskate.com/wp-content/uploads/20260812-zucchini-overload-what-to-do-with-a-bunch-of-zucchini.png
800
1200
Mary Hunt
https://www.everydaycheapskate.com/wp-content/uploads/EC-Logo-by-Mary-Hunt-Tagline-Trimmed.png
Mary Hunt2026-08-12 17:48:312026-08-12 17:48:31Zucchini Overload? 10 Ways to Use Up Your Garden Surplus
https://www.everydaycheapskate.com/wp-content/uploads/20260812-zucchini-overload-what-to-do-with-a-bunch-of-zucchini.png
800
1200
Mary Hunt
https://www.everydaycheapskate.com/wp-content/uploads/EC-Logo-by-Mary-Hunt-Tagline-Trimmed.png
Mary Hunt2026-08-12 17:48:312026-08-12 17:48:31Zucchini Overload? 10 Ways to Use Up Your Garden Surplus https://www.everydaycheapskate.com/wp-content/uploads/20260811-homemade-applesauce-recipe-in-a-bowl-with-apples-on-countertop.png
800
1200
Mary Hunt
https://www.everydaycheapskate.com/wp-content/uploads/EC-Logo-by-Mary-Hunt-Tagline-Trimmed.png
Mary Hunt2026-08-11 10:17:332026-08-11 10:17:35The Easiest Way to Turn Fall Apples Into Applesauce
https://www.everydaycheapskate.com/wp-content/uploads/20260811-homemade-applesauce-recipe-in-a-bowl-with-apples-on-countertop.png
800
1200
Mary Hunt
https://www.everydaycheapskate.com/wp-content/uploads/EC-Logo-by-Mary-Hunt-Tagline-Trimmed.png
Mary Hunt2026-08-11 10:17:332026-08-11 10:17:35The Easiest Way to Turn Fall Apples Into Applesauce https://www.everydaycheapskate.com/wp-content/uploads/20260806-leftover-pizza.png
800
1200
Mary Hunt
https://www.everydaycheapskate.com/wp-content/uploads/EC-Logo-by-Mary-Hunt-Tagline-Trimmed.png
Mary Hunt2026-08-05 21:11:162026-08-05 21:13:4134 Leftover Recipes That Use Up Every Last Bit of Food
https://www.everydaycheapskate.com/wp-content/uploads/20260806-leftover-pizza.png
800
1200
Mary Hunt
https://www.everydaycheapskate.com/wp-content/uploads/EC-Logo-by-Mary-Hunt-Tagline-Trimmed.png
Mary Hunt2026-08-05 21:11:162026-08-05 21:13:4134 Leftover Recipes That Use Up Every Last Bit of Food https://www.everydaycheapskate.com/wp-content/uploads/20260802-sweet-onion-salad-dressing.png
800
1200
Mary Hunt
https://www.everydaycheapskate.com/wp-content/uploads/EC-Logo-by-Mary-Hunt-Tagline-Trimmed.png
Mary Hunt2026-08-01 20:14:362026-08-01 20:16:30Sweet Onion Salad Dressing (You’ll Never Buy Bottled Again)
https://www.everydaycheapskate.com/wp-content/uploads/20260802-sweet-onion-salad-dressing.png
800
1200
Mary Hunt
https://www.everydaycheapskate.com/wp-content/uploads/EC-Logo-by-Mary-Hunt-Tagline-Trimmed.png
Mary Hunt2026-08-01 20:14:362026-08-01 20:16:30Sweet Onion Salad Dressing (You’ll Never Buy Bottled Again) https://www.everydaycheapskate.com/wp-content/uploads/20260731-young-girl-holding-brand-new-bulldog-puppy.png
800
1200
Mary Hunt
https://www.everydaycheapskate.com/wp-content/uploads/EC-Logo-by-Mary-Hunt-Tagline-Trimmed.png
Mary Hunt2026-07-31 17:40:122026-07-31 17:40:12How Much Does It Really Cost to Adopt a Pet Today?
https://www.everydaycheapskate.com/wp-content/uploads/20260731-young-girl-holding-brand-new-bulldog-puppy.png
800
1200
Mary Hunt
https://www.everydaycheapskate.com/wp-content/uploads/EC-Logo-by-Mary-Hunt-Tagline-Trimmed.png
Mary Hunt2026-07-31 17:40:122026-07-31 17:40:12How Much Does It Really Cost to Adopt a Pet Today?
Leave a Reply
Want to join the discussion?Feel free to contribute!