

DIY Dirt? How to Make Compost in Your Own Backyard

Composting is a fantastic way to recycle organic waste into nutrient-rich soil for your garden. This guide will show you how to make compost and create a DIY compost container. With these simple steps, you can turn kitchen scraps and yard waste into valuable compost, reducing waste and enriching your garden.
There is no doubt that this whole “cheapskate” thing can be taken too far. Matters of time, if not personal dignity, dictate to each of us to what extent we are willing to go to maximize our resources. That can change from time to time, given the personal challenges that we face.
Take dumpster diving, for example. I draw the line at any activity that requires me to climb into and root around containers filled with trash destined for the landfill. I don’t go there.
However, if my children were starving, I have no doubt that I would experience a miraculous change of heart. All that to say that, generally, I am not one who could easily be convinced to make dirt. The earth seems to be well endowed.
Generally, I’m not someone who could easily be convinced to make dirt. The earth seems to have plenty of it already. But a recent trip to Home Depot changed my mind. I needed soil for planting vegetables, so I bought a bag of dirt. Ten dollars later (dirt is no longer dirt-cheap), I became a much bigger fan of making it myself—otherwise known as composting.
Now, before you think, “Is this really necessary?” keep in mind that some states have recently enacted laws to divert organic waste from landfills to composting facilities. Composting requirements and opportunities for residents and businesses vary by state, but it’s becoming more important to consider composting as a practical and environmentally friendly option. So, let’s get started on turning your kitchen scraps and yard waste into garden gold!
What is Composting?
There is a law of nature that dictates all organic matter eventually dies, decomposes, and returns to the earth in the form of dirt. It is a fascinating process—one that generates its own heat and can be controlled almost to the point of perfection. Composting is like nature’s own recycling program, turning kitchen scraps and yard waste into something incredibly valuable for our gardens.
Think about all those grass clippings, leaves, and other yard waste that usually end up in the trash. Then there are the potato peelings, coffee grounds, and other kitchen scraps you throw away. Instead of sending all this potential goodness to the landfill, you can turn it into something wonderful for your garden. Plus, it’s surprisingly easy and incredibly rewarding.
Benefits of Composting
By learning how to compost, you can turn everyday waste into rich, nutritious, and odor-free soil that will regenerate and enrich your garden and other landscapes—for free.
Instead of contributing to growing waste problems, you’re recycling organic matter right in your own backyard. This process not only helps the environment by cutting down on methane emissions from landfills but also reduces the need for chemical fertilizers, which can be harsh on your garden and the planet.
Composting also creates a natural, nutrient-dense fertilizer that improves soil structure, enhances moisture retention, and promotes healthier plant growth. Plants fed with compost are stronger, more resilient to diseases, and yield better fruits and vegetables. Imagine having a lush, vibrant garden without spending a dime on store-bought fertilizers!
And let’s not forget, composting is an excellent way to teach kids about sustainability and the natural cycles of life. It’s a hands-on, practical activity that can instill a sense of responsibility and appreciation for nature. Not to mention, there’s a certain satisfaction in creating your own compost. Watching kitchen scraps and yard waste transform into something valuable for your garden is incredibly rewarding.
Creating Your DIY Compost Container
Making a DIY compost container is cheap, easy, and a fantastic way to recycle grass clippings, dry leaves, and kitchen scraps. There are several methods to create a DIY compost container, but one of the simplest starts with an outdoor trash can. Here’s how you can get started:
What You Need:
- An outdoor trash can with a lid (30-40 gallon size), preferably with wheels to make it easy to move around the garden and UV tolerant to ensure it holds up to sunlight
- A power drill
- A paddle drill bit
Instructions:
- Prepare the Bin: If you’re reusing an old trash bin for your DIY compost container, give it a thorough cleaning to remove any leftover residue.
- Drill Holes: Using a power drill equipped with a paddle drill bit, start drilling holes into the sides of the trash can. Begin a few inches below the lid and space the holes about 3 inches apart. Continue drilling until you have rows of holes that extend the width and length of the trash bin. Repeat this process on all four sides. These holes are crucial as they ensure plenty of air, helping the compost to break down quickly.
- Rinse the Trash Can: After drilling, rinse out the trash can to remove any plastic shavings and non-biodegradable materials that might have collected inside.
- Place It in a Convenient Spot: Find a suitable spot in your yard to place your new compost bin. Ideally, it should be easily accessible so you can add materials without hassle.
- Start Adding Organic Material: Begin filling your compost container with organic materials like grass clippings, dry leaves, and kitchen scraps. Avoid adding meat, dairy, or oily foods as they can attract pests and create odors.
Best Inexpensive Storebought Composter

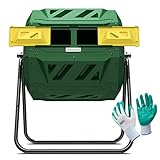
Dual Chamber 43 Gallon Compost Tumbler
Running low on time or not in the mood for a DIY project? Affordable premade compost containers are readily available online or at most hardware stores. One excellent option is the Dual Chamber 43 Gallon Compost Tumbler.
This composter is constructed from durable plastic and galvanized steel, designed to speed up the composting process efficiently. It’s simple to use—just load it with a mix of green and brown waste from your yard or kitchen, give it time to heat up, and let it work its magic. In just 4-6 weeks, you’ll have fertile compost ready to nourish your garden.
How to Make Compost: Step-by-Step Guide
Step 1: Load it up
Start by chopping plant debris and other organic materials into small pieces and placing them inside your compost container. Aim for a balance of 50% green material (like fruit and vegetable scraps) and 50% dry material (like shredded newspaper or small pieces of cardboard without labels and tape). Don’t worry about filling the container all at once—just add compostable materials as you have them.
Step 2: Water it
Spray water over the chopped plant material inside the container until the material is damp but not soggy.
Step 3: Close it
Put the lid loosely on your compost container and place it in a sunny spot in your yard. The sunlight will help heat things up and speed along the composting process.
Step 4: Turn it
Turn your compost as often as daily or at least once a week. Lay the container on its side and roll it around to mix the materials inside. You can also stir the contents with a stick, shovel, or cultivator to ensure everything decomposes evenly.
Step 5: Keep adding to it
Continue adding plant and kitchen scraps to your compost bin. Just avoid adding proteins like meat or dairy—they can attract pests and create odors. A good rule of thumb is that if it grows in the ground, it’s good for compost, though there are a few exceptions.
Step 6: Keep it wet
Spray your compost with water whenever the materials start to feel dry. Aim to keep it as moist as a wrung-out sponge to maintain the ideal conditions for decomposition.
Step 7: Use it
Your compost is ready when it looks like rich, dark soil rather than the original materials. This can take anywhere from a few months to nine months. Use a wire screen or piece of chicken wire to strain out any unfinished compost. You can then work the finished compost into the soil around your garden plants, use it to fill holes when planting new seedlings, spread it on your lawn, or even add it to your houseplants. Congratulations—you’re now a successful dirt farmer!
Feeding Your Compost: What to Add and What to Avoid
When you’re just starting out with composting, it’s crucial to know what materials are compost-friendly and which ones to avoid. Here’s a handy guide to help you feed your compost container the right way.
What to Compost: The Put-In List
These items decompose quickly and easily, making them perfect for your compost container:
- Cardboard rolls
- Clean paper
- Coffee grounds and filters
- Cotton rags
- Dryer and vacuum cleaner lint
- Eggshells
- Fireplace ashes
- Fruits and vegetables
- Grass clippings
- Hair and fur
- Hay and straw
- Houseplants
- Leaves
- Nutshells
- Sawdust
- Shredded newspaper
- Teabags
- Wood chips
- Wool rags
- Yard trimmings
What Not to Compost: The Keep-Out List
Avoid adding these items to your compost pile. They can contaminate your compost, create unpleasant odors, or attract unwanted pests:
- Black walnut tree leaves or twigs
- Coal or charcoal ash
- Dairy products (e.g., butter, egg yolks, milk, sour cream, yogurt)
- Diseased or insect-ridden plants
- Fats, grease, lard, or oils
- Meat or fish bones and scraps
- Pet wastes (e.g., dog or cat feces, soiled cat litter)
- Yard trimmings treated with chemical pesticides
Additional Resource
Ready to dive into composting? Check out this handy eBook, How To Compost: Everything You Need To Know To Start Composting, And Nothing You Don’t! It’s a fantastic resource for composting novices, packed with practical tips and expert advice to help you turn waste into garden gold. Whether you’re just starting out or looking to refine your composting skills, this guide has everything you need to get the most out of your composting journey.

Question: Have you tried making your own compost? What tips do you have for creating a DIY compost container? Let’s share ideas and help each other out.
EverydayCheapskate™ is reader-supported. We participate in the Amazon Services LLC Associates Program and other affiliate advertising programs, designed to provide a means for us to earn from qualifying purchases, at no cost to you.

More from Everyday Cheapskate
 https://www.everydaycheapskate.com/wp-content/uploads/20261006-prime-big-deal-days-have-landed.png
800
1200
Mary Hunt
https://www.everydaycheapskate.com/wp-content/uploads/EC-Logo-by-Mary-Hunt-Tagline-Trimmed.png
Mary Hunt2026-10-05 11:01:432026-10-07 09:02:53EC’s Top Picks from Amazon Prime Big Deal Days 2026
https://www.everydaycheapskate.com/wp-content/uploads/20261006-prime-big-deal-days-have-landed.png
800
1200
Mary Hunt
https://www.everydaycheapskate.com/wp-content/uploads/EC-Logo-by-Mary-Hunt-Tagline-Trimmed.png
Mary Hunt2026-10-05 11:01:432026-10-07 09:02:53EC’s Top Picks from Amazon Prime Big Deal Days 2026 https://www.everydaycheapskate.com/wp-content/uploads/20261004-reduce-healthcare-costs-with-three-habits-healthy-couple-walking-in-autumn-leaves.png
800
1200
Mary Hunt
https://www.everydaycheapskate.com/wp-content/uploads/EC-Logo-by-Mary-Hunt-Tagline-Trimmed.png
Mary Hunt2026-10-04 23:08:572026-10-04 23:09:47How to Reduce Healthcare Costs With 3 Free Daily Habits
https://www.everydaycheapskate.com/wp-content/uploads/20261004-reduce-healthcare-costs-with-three-habits-healthy-couple-walking-in-autumn-leaves.png
800
1200
Mary Hunt
https://www.everydaycheapskate.com/wp-content/uploads/EC-Logo-by-Mary-Hunt-Tagline-Trimmed.png
Mary Hunt2026-10-04 23:08:572026-10-04 23:09:47How to Reduce Healthcare Costs With 3 Free Daily Habits https://www.everydaycheapskate.com/wp-content/uploads/20241004-news-you-can-use-october-everyday-cheapskate-top-news-articles.png
800
1200
Mary Hunt
https://www.everydaycheapskate.com/wp-content/uploads/EC-Logo-by-Mary-Hunt-Tagline-Trimmed.png
Mary Hunt2026-10-04 01:04:052026-10-04 22:10:11News You Can Use • October 2026
https://www.everydaycheapskate.com/wp-content/uploads/20241004-news-you-can-use-october-everyday-cheapskate-top-news-articles.png
800
1200
Mary Hunt
https://www.everydaycheapskate.com/wp-content/uploads/EC-Logo-by-Mary-Hunt-Tagline-Trimmed.png
Mary Hunt2026-10-04 01:04:052026-10-04 22:10:11News You Can Use • October 2026 https://www.everydaycheapskate.com/wp-content/uploads/20261003-woman-hugging-elderly-mother-sandwich-generation-caring-for-aging-parents.png
800
1200
Mary Hunt
https://www.everydaycheapskate.com/wp-content/uploads/EC-Logo-by-Mary-Hunt-Tagline-Trimmed.png
Mary Hunt2026-10-03 10:47:222026-10-03 10:47:25Sandwiched Between Aging Parents and Adult Children
https://www.everydaycheapskate.com/wp-content/uploads/20261003-woman-hugging-elderly-mother-sandwich-generation-caring-for-aging-parents.png
800
1200
Mary Hunt
https://www.everydaycheapskate.com/wp-content/uploads/EC-Logo-by-Mary-Hunt-Tagline-Trimmed.png
Mary Hunt2026-10-03 10:47:222026-10-03 10:47:25Sandwiched Between Aging Parents and Adult Children https://www.everydaycheapskate.com/wp-content/uploads/20260927-impossible-lasagna-pie-recipe-with-wooden-serving-spoon-in-white-casserole-dish.png
800
1200
Mary Hunt
https://www.everydaycheapskate.com/wp-content/uploads/EC-Logo-by-Mary-Hunt-Tagline-Trimmed.png
Mary Hunt2026-09-28 09:38:592026-09-28 22:48:34Impossible Lasagna Pie: All the Flavor, None of the Noodles
https://www.everydaycheapskate.com/wp-content/uploads/20260927-impossible-lasagna-pie-recipe-with-wooden-serving-spoon-in-white-casserole-dish.png
800
1200
Mary Hunt
https://www.everydaycheapskate.com/wp-content/uploads/EC-Logo-by-Mary-Hunt-Tagline-Trimmed.png
Mary Hunt2026-09-28 09:38:592026-09-28 22:48:34Impossible Lasagna Pie: All the Flavor, None of the Noodles https://www.everydaycheapskate.com/wp-content/uploads/20260925-best-inexpensive-coffee-grinders-burr-manual-and-electric.png
800
1200
Mary Hunt
https://www.everydaycheapskate.com/wp-content/uploads/EC-Logo-by-Mary-Hunt-Tagline-Trimmed.png
Mary Hunt2026-09-25 11:06:342026-09-28 22:48:36The Coffee Grinder Upgrade That’s Actually Worth It
https://www.everydaycheapskate.com/wp-content/uploads/20260925-best-inexpensive-coffee-grinders-burr-manual-and-electric.png
800
1200
Mary Hunt
https://www.everydaycheapskate.com/wp-content/uploads/EC-Logo-by-Mary-Hunt-Tagline-Trimmed.png
Mary Hunt2026-09-25 11:06:342026-09-28 22:48:36The Coffee Grinder Upgrade That’s Actually Worth It https://www.everydaycheapskate.com/wp-content/uploads/20260918-man-and-woman-signing-an-extended-warranty-in-a-car-dealership.png
800
1200
Mary Hunt
https://www.everydaycheapskate.com/wp-content/uploads/EC-Logo-by-Mary-Hunt-Tagline-Trimmed.png
Mary Hunt2026-09-18 15:23:432026-09-18 15:25:43Is an Extended Warranty Ever Worth It? The Truth for 2026
https://www.everydaycheapskate.com/wp-content/uploads/20260918-man-and-woman-signing-an-extended-warranty-in-a-car-dealership.png
800
1200
Mary Hunt
https://www.everydaycheapskate.com/wp-content/uploads/EC-Logo-by-Mary-Hunt-Tagline-Trimmed.png
Mary Hunt2026-09-18 15:23:432026-09-18 15:25:43Is an Extended Warranty Ever Worth It? The Truth for 2026 https://www.everydaycheapskate.com/wp-content/uploads/20260917-fall-cleaning-checklist.png
800
1200
Mary Hunt
https://www.everydaycheapskate.com/wp-content/uploads/EC-Logo-by-Mary-Hunt-Tagline-Trimmed.png
Mary Hunt2026-09-17 17:11:012026-09-28 22:48:45Fall Cleaning Checklist: 15 Overlooked Spots to Clean
https://www.everydaycheapskate.com/wp-content/uploads/20260917-fall-cleaning-checklist.png
800
1200
Mary Hunt
https://www.everydaycheapskate.com/wp-content/uploads/EC-Logo-by-Mary-Hunt-Tagline-Trimmed.png
Mary Hunt2026-09-17 17:11:012026-09-28 22:48:45Fall Cleaning Checklist: 15 Overlooked Spots to Clean https://www.everydaycheapskate.com/wp-content/uploads/20260913-how-to-winterize-your-home-snowy-driveway-suburban-home.png
800
1200
Mary Hunt
https://www.everydaycheapskate.com/wp-content/uploads/EC-Logo-by-Mary-Hunt-Tagline-Trimmed.png
Mary Hunt2026-09-13 15:32:142026-09-28 22:48:55The Complete Guide to Winterizing Your Home This Fall
https://www.everydaycheapskate.com/wp-content/uploads/20260913-how-to-winterize-your-home-snowy-driveway-suburban-home.png
800
1200
Mary Hunt
https://www.everydaycheapskate.com/wp-content/uploads/EC-Logo-by-Mary-Hunt-Tagline-Trimmed.png
Mary Hunt2026-09-13 15:32:142026-09-28 22:48:55The Complete Guide to Winterizing Your Home This FallPlease keep your comments positive, encouraging, helpful, brief,
and on-topic in keeping with EC Commenting Guidelines
Last update on 2026-10-08 / Affiliate links / Images from Amazon Product Advertising API


Be sure not to use grass clippings if you use any weed killing chemicals on your lawn.
If you plan on canning this summer, don’t put peach pits in your compost pile-they don’t compost
well.
as a master gardener, i learned that DIRT is what you track into your house. SOIL is what your plants grow in and COMPOST helps improve the health of your soil.
Hi Mary,
I have been composting for quite a few years. I use a vermicomposting system with red composting worms. It is a cool system. I let the worms do all the work for me. I add leaves, kitchen scraps, and garden debris. It takes a bit longer than hot compost, but since I toss all the items in my straw bins at the end of a season I have compost by spring. After I remove the compost I reset using straw and composted manure in layers, and add water until damp. There is no need to add more worms since they are already in the soil. They come up as the weather warms and during warmer summer days I can get more compost before fall. It does require some space, so it isn’t for everyone. Also, wood chips and egg shells don’t decompose in this system. Anyway, I thought I should just mention this in case someone might want to give it a try. Lots of information online.