
Worst & Best Ways to Grill Chicken, Plus The Marinade Recipe You Need

Grilling chicken shouldn’t feel like a roll of the dice. Yet we’ve all been there—cutting in to find it raw in the middle or so dry it could double as jerky. Chicken can be tricky, but it doesn’t have to be. If you’ve ever wondered how to grill chicken properly without second-guessing yourself the whole time, you’re in the right place. I’ve rounded up the most common mistakes (yes, even the sneaky ones that fool seasoned grillers) and paired them with foolproof tips to help you nail flavor and tenderness every single time. And yes—I’m including my favorite all-purpose marinade and a simple brine that makes even budget chicken taste like a splurge.

In a previous post, I asked readers to share their funniest (and most frustrating) BBQ fails—the kind that could’ve been avoided with a decent instant-read thermometer. Your responses? Hilarious, heartfelt, and very enlightening. Turns out, most grilling disasters happen when chicken enters the chat.
The good news is that grilled chicken can be everything we dream it to be—juicy, flavorful, and tender enough to cut with a fork. But it takes more than guesswork and good intentions. Whether you’re a seasoned pro or still figuring out which end of the tongs to use, there are a few key things that make all the difference—starting with temperature, timing, and the right tools.
So if you’ve ever wrestled with undercooked thighs or overcooked breasts, you’re in the right place. Let’s get that grill working for you this summer—not against you.
The Worst Mistakes You Can Make When Grilling Chicken
Grilling chicken might seem simple, but a few missteps can turn dinner into disappointment. Here’s how to steer clear of the most common pitfalls so your chicken turns out juicy, flavorful, and grilled to perfection—not charred on the outside and raw in the middle.
1. Putting Cold, Damp Chicken on the Grill
Cold chicken straight from the fridge cooks unevenly and tends to steam instead of sear. The fix? Let it rest at room temperature for 20–30 minutes before grilling. And always pat it dry with paper towels—moisture is the enemy of good browning. Dry chicken equals delicious grill marks.
2. Slathering on Barbecue Sauce Too Soon
It’s tempting, but don’t brush on barbecue sauce at the beginning. Most sauces are sugar-packed, which means they’ll burn long before the chicken is done cooking. Instead, wait until the last 5–7 minutes of grilling to baste. That way, you’ll get sticky, caramelized flavor—without the charred bitterness.
3. Forgetting the Salt (and Seasoning in General)
Chicken is a blank canvas—but without salt, it’s more bland than brilliant. If you didn’t have time to marinate or brine, don’t skip seasoning! Generously salt both the skin and the cavity if you’re grilling a whole bird. For parts, season evenly just before they hit the grill. Salt helps lock in moisture and enhances every bite.
4. Grilling Without a Thermometer
Eyeballing doneness is a risky game. A reliable instant-read thermometer is your best friend on grill day. Chicken is safe and perfectly juicy at 165°F for white meat, and 170–175°F for dark meat. No guesswork needed—just perfect results every time.
Pro tip: The ThermoWorks ThermoPop is fast, easy to use, and a go-to for many home cooks.
5. Skipping the Resting Period
If you slice into your chicken the moment it’s off the grill, all those flavorful juices will spill out onto the cutting board. Give grilled parts a 5–10 minute rest before serving. If you’re grilling a whole chicken, let it rest for 20–30 minutes—tented loosely with foil—to lock in moisture and flavor.
Best Practices for Juicy, Flavorful Chicken
If you want chicken that’s juicy, tender, and loaded with flavor (without having to drown it in sauce), these are the techniques that make all the difference.
Bone-In, Skin-On = Built-In Moisture
If you’re after maximum flavor and moisture, bone-in, skin-on pieces are your best bet. The bone helps retain heat and moisture, while the skin acts as a natural barrier to keep juices in. Not a fan of eating skin? No problem—just peel it off after grilling. You’ll still get the juicy benefit without the bite.
Pound Those Breasts (Gently)
Boneless chicken breasts are notoriously tricky on the grill—they’re uneven and dry out fast. Even them out by placing the breast in a resealable plastic bag and giving it a few whacks with a meat mallet or heavy skillet. Aim for a consistent ¾-inch thickness so everything cooks at the same speed. No need to pulverize—just enough to even the playing field.
Clean and Oiled Grates Are a Must
Chicken doesn’t have much fat, especially if it’s skinless, which makes it a prime candidate for sticking. A clean grill helps, but so does a quick oil treatment: grab some tongs and a paper towel soaked in cooking oil, then rub down the grates just before adding the chicken. You’ll get better grill marks and way less frustration.
Temperature: Start Right to Finish Right
Preheat your grill to 375°F before the chicken hits the grates. That sweet spot gives you enough heat to sear and cook through without burning the outside. Skipping the preheat step is like baking a cake in a cold oven—not ideal.
Know When It’s Done (Don’t Just Wing It)
This is where a good instant-read thermometer earns its keep. Chicken is done when it reaches 165°F, but here’s the trick: take it off the grill a few degrees early (around 160°F), then let it rest. The temp will rise as it sits, giving you juicy results without overcooking.
Insert the probe into the thickest part of the chicken, steering clear of bones. Boneless breasts will be done faster than bone-in thighs or drumsticks, so keep an eye on each piece.
The All-Purpose Simple Marinade or Brine That Work Every Time
Want next-level flavor and tenderness? Give your chicken a soak. A marinade or brine can work wonders—even just an hour makes a noticeable difference.
Simple All-Purpose Marinade:
- ½ cup olive oil
- ¼ cup lemon juice
- 3 cloves garlic, crushed
- ½ teaspoon kosher salt
Place chicken in a zipper bag, pour in the marinade, seal, and refrigerate for at least 1 hour (up to 8 hours). After marinading, be sure to drain well and pat the chicken dry with paper towels before grilling.
Easy Overnight Brine:
- 1 gallon warm water
- ¾ cup kosher salt
- ⅔ cup sugar
- ¾ cup soy sauce
- ¼ cup olive oil
Mix in a large pot or clean bucket. Soak chicken for up to 24 hours in the fridge. After soaking, always drain well and pat completely dry with paper towels before grilling.
Brine or Marinade? Here’s How to Choose
Both brining and marinating can take your grilled chicken from meh to magnificent—but they do different jobs. The trick is knowing which one to use and when.
Brine = Moisture Insurance
A saltwater brine works by loosening up the muscle fibers in the chicken so they retain more liquid during cooking. Brining is especially helpful for:
- Boneless, skinless breasts (because they dry out faster)
- Whole chickens or larger bone-in pieces
- Any time you want tenderness without overpowering the natural chicken flavor
Marinade = Flavor Party
A marinade brings the flavor, plain and simple. It won’t keep your chicken as moist as a brine, but it will add a punch of taste. Think citrus, herbs, spices, oils—basically, whatever flavor profile you’re going for. Marinating is best when:
- You want bold flavor (think lemon-garlic, spicy chipotle, honey-mustard)
- You’re short on time—some marinades work in just 30 minutes!
- You’re working with chicken thighs or drumsticks that already have a bit more fat and flavor
Avoid sugary marinades if you’re grilling over direct heat. That sugar will burn before your chicken is cooked through. Either go for lower-sugar blends, or save the sweet stuff for the final few minutes of grilling.
Question: What’s your “well, that didn’t go as planned” grilling moment? Let’s swap stories in the comments!
EverydayCheapskate™ is reader-supported. We participate in the Amazon Services LLC Associates Program and other affiliate advertising programs, designed to provide a means for us to earn from qualifying purchases, at no cost to you.

More from Everyday Cheapskate
 https://www.everydaycheapskate.com/wp-content/uploads/20260628-Grilled-Peaches-with-Balsamic-and-Blue-Cheese-1.png
800
1200
Mary Hunt
https://www.everydaycheapskate.com/wp-content/uploads/EC-Logo-by-Mary-Hunt-Tagline-Trimmed.png
Mary Hunt2026-06-29 09:38:342026-06-29 09:38:34Summer Grilled Peaches with Balsamic and Blue Cheese
https://www.everydaycheapskate.com/wp-content/uploads/20260628-Grilled-Peaches-with-Balsamic-and-Blue-Cheese-1.png
800
1200
Mary Hunt
https://www.everydaycheapskate.com/wp-content/uploads/EC-Logo-by-Mary-Hunt-Tagline-Trimmed.png
Mary Hunt2026-06-29 09:38:342026-06-29 09:38:34Summer Grilled Peaches with Balsamic and Blue Cheese https://www.everydaycheapskate.com/wp-content/uploads/20260620-cheesey-chicken-and-rice-casserole-in-a-baking-dish.png
800
1200
Mary Hunt
https://www.everydaycheapskate.com/wp-content/uploads/EC-Logo-by-Mary-Hunt-Tagline-Trimmed.png
Mary Hunt2026-06-20 13:31:162026-06-20 13:31:16Cheesy Chicken & Rice Bake That Disappears at Family Dinners
https://www.everydaycheapskate.com/wp-content/uploads/20260620-cheesey-chicken-and-rice-casserole-in-a-baking-dish.png
800
1200
Mary Hunt
https://www.everydaycheapskate.com/wp-content/uploads/EC-Logo-by-Mary-Hunt-Tagline-Trimmed.png
Mary Hunt2026-06-20 13:31:162026-06-20 13:31:16Cheesy Chicken & Rice Bake That Disappears at Family Dinners https://www.everydaycheapskate.com/wp-content/uploads/20260619-delicious-creamy-no-churn-vanilla-ice-cream-scoop-and-loaf-pan.png
800
1200
Mary Hunt
https://www.everydaycheapskate.com/wp-content/uploads/EC-Logo-by-Mary-Hunt-Tagline-Trimmed.png
Mary Hunt2026-06-19 18:42:402026-06-19 18:42:413-Ingredient No-Churn Vanilla Ice Cream (No Machine Needed)
https://www.everydaycheapskate.com/wp-content/uploads/20260619-delicious-creamy-no-churn-vanilla-ice-cream-scoop-and-loaf-pan.png
800
1200
Mary Hunt
https://www.everydaycheapskate.com/wp-content/uploads/EC-Logo-by-Mary-Hunt-Tagline-Trimmed.png
Mary Hunt2026-06-19 18:42:402026-06-19 18:42:413-Ingredient No-Churn Vanilla Ice Cream (No Machine Needed) https://www.everydaycheapskate.com/wp-content/uploads/20260616-close-up-of-watermelon-feta-salad-with-mint-and-lime.png
800
1200
Mary Hunt
https://www.everydaycheapskate.com/wp-content/uploads/EC-Logo-by-Mary-Hunt-Tagline-Trimmed.png
Mary Hunt2026-06-16 17:44:142026-06-16 17:44:14Watermelon Feta Salad with Mint for Summer Cookouts
https://www.everydaycheapskate.com/wp-content/uploads/20260616-close-up-of-watermelon-feta-salad-with-mint-and-lime.png
800
1200
Mary Hunt
https://www.everydaycheapskate.com/wp-content/uploads/EC-Logo-by-Mary-Hunt-Tagline-Trimmed.png
Mary Hunt2026-06-16 17:44:142026-06-16 17:44:14Watermelon Feta Salad with Mint for Summer Cookouts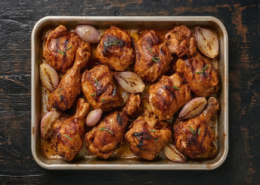 https://www.everydaycheapskate.com/wp-content/uploads/20260613-chicken-a-lorange-recipe-in-roasting-pan-with-shallots-and-orange-marmalade.png
800
1200
Mary Hunt
https://www.everydaycheapskate.com/wp-content/uploads/EC-Logo-by-Mary-Hunt-Tagline-Trimmed.png
Mary Hunt2026-06-13 20:59:292026-06-13 20:59:29Duck à l’Orange Is Fancy. This Chicken Version Is Better.
https://www.everydaycheapskate.com/wp-content/uploads/20260613-chicken-a-lorange-recipe-in-roasting-pan-with-shallots-and-orange-marmalade.png
800
1200
Mary Hunt
https://www.everydaycheapskate.com/wp-content/uploads/EC-Logo-by-Mary-Hunt-Tagline-Trimmed.png
Mary Hunt2026-06-13 20:59:292026-06-13 20:59:29Duck à l’Orange Is Fancy. This Chicken Version Is Better. https://www.everydaycheapskate.com/wp-content/uploads/20260607-woman-grocery-shopping-pushing-cart-with-apples-and-cauliflower.png
800
1200
Mary Hunt
https://www.everydaycheapskate.com/wp-content/uploads/EC-Logo-by-Mary-Hunt-Tagline-Trimmed.png
Mary Hunt2026-06-09 23:20:292026-06-09 23:20:29How to Read a Grocery Store Sale Cycle (And Stop Overpaying)
https://www.everydaycheapskate.com/wp-content/uploads/20260607-woman-grocery-shopping-pushing-cart-with-apples-and-cauliflower.png
800
1200
Mary Hunt
https://www.everydaycheapskate.com/wp-content/uploads/EC-Logo-by-Mary-Hunt-Tagline-Trimmed.png
Mary Hunt2026-06-09 23:20:292026-06-09 23:20:29How to Read a Grocery Store Sale Cycle (And Stop Overpaying) https://www.everydaycheapskate.com/wp-content/uploads/20260608-copycat-hamburger-helper-pasta-recipe-in-a-cast-iron-skillet.png
800
1200
Mary Hunt
https://www.everydaycheapskate.com/wp-content/uploads/EC-Logo-by-Mary-Hunt-Tagline-Trimmed.png
Mary Hunt2026-06-08 23:02:072026-06-08 23:02:07Homemade Hamburger Helper: Cheesy One-Skillet Dinner
https://www.everydaycheapskate.com/wp-content/uploads/20260608-copycat-hamburger-helper-pasta-recipe-in-a-cast-iron-skillet.png
800
1200
Mary Hunt
https://www.everydaycheapskate.com/wp-content/uploads/EC-Logo-by-Mary-Hunt-Tagline-Trimmed.png
Mary Hunt2026-06-08 23:02:072026-06-08 23:02:07Homemade Hamburger Helper: Cheesy One-Skillet Dinner https://www.everydaycheapskate.com/wp-content/uploads/20260607-hamburger-patties-on-hot-grill-how-to-clean-a-bbq-grill-without-using-a-metal-brush.png
800
1200
Mary Hunt
https://www.everydaycheapskate.com/wp-content/uploads/EC-Logo-by-Mary-Hunt-Tagline-Trimmed.png
Mary Hunt2026-06-07 16:44:022026-06-07 16:44:025 No-Brush Ways to Clean Your Grill (Using Stuff You Already Have)
https://www.everydaycheapskate.com/wp-content/uploads/20260607-hamburger-patties-on-hot-grill-how-to-clean-a-bbq-grill-without-using-a-metal-brush.png
800
1200
Mary Hunt
https://www.everydaycheapskate.com/wp-content/uploads/EC-Logo-by-Mary-Hunt-Tagline-Trimmed.png
Mary Hunt2026-06-07 16:44:022026-06-07 16:44:025 No-Brush Ways to Clean Your Grill (Using Stuff You Already Have)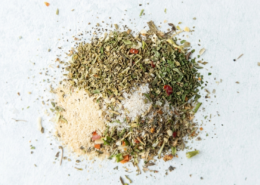 https://www.everydaycheapskate.com/wp-content/uploads/20260606-dried-italian-dressing-seasoning-garlic-powder-onion-powder-1.png
800
1200
Mary Hunt
https://www.everydaycheapskate.com/wp-content/uploads/EC-Logo-by-Mary-Hunt-Tagline-Trimmed.png
Mary Hunt2026-06-05 23:19:342026-06-05 23:19:34Homemade Italian Dressing Mix: Cheaper, Better, Faster
https://www.everydaycheapskate.com/wp-content/uploads/20260606-dried-italian-dressing-seasoning-garlic-powder-onion-powder-1.png
800
1200
Mary Hunt
https://www.everydaycheapskate.com/wp-content/uploads/EC-Logo-by-Mary-Hunt-Tagline-Trimmed.png
Mary Hunt2026-06-05 23:19:342026-06-05 23:19:34Homemade Italian Dressing Mix: Cheaper, Better, Faster

Can a brine be done the night before, then marinade the day of cooking?
As mentioned in the post it’s either brine or marinade. However you bring up an interesting idea—both brine and marinade. If you’re willing to give that a shot, let us know how it turns out!
Wow, these wings look so amazing! Definitely pinned this for later!
We made the Greek-lemon rice and garlic-dijon chicken last night- as written and they were so easy and so flavorful!! Dinner got rave reviews from everyone. We will definitely be making these again. Thank you!
Mollitia aute anim repudiandae minima numquam ullam asperiores est ipsa excepturi ipsa nisi sed nesciunt sed et
Thank you so much, Mary!
My adult son and I are going to be moving from this apt that we have lived in for 28yrs. To a different place. I have a BBQ in the carport and we don’t even know how to BBQ. Until now I will be able to BBQ chicken!