
The Best Easy Refrigerator Dill Pickles—No Canning Needed!

If the thought of making pickles brings up images of giant pots, special tools, and the fear of doing it wrong—you’re not alone. I’ve been there. That’s exactly why I love these easy refrigerator dill pickles. No boiling, no sealing, no stress. Just a handful of simple ingredients, a few clean jars, and a fridge that takes care of the rest. Crisp, tangy, homemade pickles—without the fuss.

Is a cucumber a fruit or a vegetable? Ask a scientist and they’ll say fruit. Ask a chef and they’ll say vegetable. Ask me, and I’ll say: it doesn’t matter—it makes a darn good pickle either way.
While you can find cucumbers year-round, peak season is May through August when they’re freshest, firmest, and often cheapest. If you’ve got a garden bursting with cukes or your local market is practically giving them away, now’s the perfect time to put them to good use. A fresh, ripe cucumber makes all the difference when you want a crisp bite and that unmistakable pickle-y zing.
The Best Cucumbers for Refrigerator Pickles
Not all cucumbers are created equal—especially when you’re turning them into pickles. Some go mushy. Others stay crisp. And a few just weren’t meant for the brine life.
Kirby cucumbers are the gold standard here. They’re short, sturdy, and have that signature bumpy skin. But the real magic is their firm, crunchy texture that holds up in the fridge. If you see them labeled as “pickling cucumbers,” that’s your cue. Grab ‘em.
That said, you’ve got options:
- English cucumbers (you know, the ones in plastic sleeves) are long and tender, great in salads but a bit too delicate for long-term soaking.
- Garden cucumbers are the grocery store default, and they’ll work in a pinch—but you’ll probably want to peel them, since the skin can get tough and bitter.
- Gherkins are tiny and adorable, and yes—they’re great for pickling if you like your pickles bite-sized.
- Persian cucumbers are a solid backup plan. They’re crisp, mildly sweet, and their thin skin means no peeling required.
Bottom line: go for Kirby if you can. If not, opt for a cucumber that’s firm, fresh, and not too watery. The crunch factor matters more than looks—especially when you’re after that satisfying pickle snap.
Ingredients You’ll Need for Easy Refrigerator Dill Pickles
You’ll find the full recipe at the bottom of this post, but let’s walk through the ingredients and why they matter.
Small canning jars with lids
Grab a few clean jars with tight-fitting lids. Mason jars are perfect, but any glass container that seals well will work.
Cucumbers
Kirby cucumbers are ideal (see above), but if you can’t find them, Persian cucumbers are a close second. Avoid anything too watery (like English cucumbers), unless you like limp pickles—which I’m guessing you don’t.
Apple cider vinegar
This gives your pickles a slightly sweet, tangy bite and is the backbone of that classic dill flavor. I recommend using a good-quality ACV, like Bragg Organic Apple Cider Vinegar. You can sub in plain white vinegar if needed, but steer clear of anything fancy like balsamic or red wine vinegar—they’ll overpower the dill and garlic.
Water
It’s just here to dilute the vinegar a bit so you don’t pickle your tastebuds along with the cucumbers. Use filtered water if your tap water tastes funky.
Pickling salt
Also called canning salt, it’s pure salt with no additives—no anti-caking agents, no iodine, just clean salty flavor. In a pinch, you can use kosher salt, but avoid table salt unless you enjoy cloudy brine and possible off-flavors.
Peeled garlic cloves
Garlic gives these pickles their bold, savory flavor. Don’t skip it—unless you’re allergic, in which case… safe travels, and maybe try adding a bay leaf or a few mustard seeds for backup flavor.
Crushed red pepper flakes
Totally optional, but if you like a hint of heat, toss them in. Adjust the amount to suit your spice tolerance (or skip it entirely for a more classic deli-style pickle).
Dill seed
Dill seed (not to be confused with fresh dill) packs a punchy, earthy flavor that defines a true dill pickle. You’ll usually find it in the spice aisle near the mustard seeds and coriander.
Black peppercorns
They add a nice background note of warmth and depth. You don’t need a lot—just a few per jar will do.
Red pepper slices (optional)
These don’t add much in terms of flavor, but they do make your pickles look Instagram-ready. Use them if you want to add a pop of color—or if you have half a pepper lounging in your crisper drawer, begging to be used.
Sprigs of fresh dill weed (optional)
Totally optional, but if you’ve got some on hand, it adds that fresh dill aroma and gives your jars a farmer’s market vibe. Just don’t sub this for dill seed—they do different jobs in the flavor department.
Step-by-Step Instructions for Refrigerator Pickle Success
Follow these simple steps and you’ll have crunchy, flavorful pickles chilling in the fridge in no time.
1. Start clean.
Wash and dry three pint-size canning jars (or whatever jars you’ve got with tight-fitting lids). You don’t need to sterilize them like you would for canning, but they should be squeaky clean and fully dry.
2. Add the flavor base.
Drop 2 garlic cloves, ¼ teaspoon crushed red pepper flakes, 1 teaspoon dill seed, and ½ teaspoon black peppercorns into each jar. If you’re feeling fancy, add a few slices of red bell pepper and a stem of fresh dill for good looks and a little extra oomph.
3. Prep the cucumbers.
Trim off the ends (especially the blossom end—it can cause soft pickles) and slice however you like: spears, chips, chunks… there’s no wrong answer.
4. Pack it in.
Load up those jars with cucumbers, packing them in fairly tightly but without smashing them. A snug fit keeps everything submerged once the brine goes in.
5. Make the brine.
In a saucepan, bring the vinegar, water, and pickling salt to a full rolling boil. This is your flavor bath—simple, tangy, and just the right amount of salty.
6. Pour it on.
Carefully pour the hot brine into each jar, leaving about ¼ inch of space at the top.
7. Seal and cool.
Screw the lids on as tightly as you can (you’re not canning, but a good seal keeps things crisp). Let the jars cool at room temperature before moving them to the fridge.
8. The waiting game begins.
Hands off for two days. I know it’s tempting, but give them at least 48 hours to develop their full pickle personality. Then, dive in.
These aren’t shelf-stable, so keep them in the refrigerator. They’ll stay fresh for up to two months—but let’s be honest, they probably won’t last that long.

Easy Refrigerator Dill Pickles
Ingredients
- 2 pounds pickling cucumbers well washed
- 1 ½ cups apple cider vinegar I love Bragg Organic for flavor and quality
- 1 ½ cups water
- 2 tablespoons pickling salt or kosher salt, no iodine
- 6 garlic cloves peeled
- ¾ teaspoon crushed red pepper flakes
- 3 teaspoons dill seed
- 1 ½ teaspoons black peppercorns
- 1 red pepper sliced (optional)
- 3 sprigs fresh dill weed optional
Instructions
- Thoroughly wash and dry your jars and lids.
- Into each jar, add 2 garlic cloves, ¼ teaspoon crushed red pepper, 1 teaspoon dill seed, ½ teaspoon black peppercorns, plus optional red pepper slices and fresh dill sprigs.
- Trim the cucumber ends and slice to your preferred shape—spears, chips, or chunks all work.
- Pack the cucumbers snugly into each jar.
- In a pot, combine vinegar, water, and pickling salt. Bring to a rolling boil, stirring to dissolve the salt.
- Pour the hot brine over the cucumbers in the jars, leaving about ¼ inch headspace at the top.
- Seal jars tightly with lids and rings. Let them cool to room temperature before placing in the refrigerator.
- Refrigerate for at least 2 days before tasting, and enjoy within 2 months.
Notes
- Pickling cucumbers are your best bet here—they have thinner, less bitter skins than slicing cucumbers. If you’re buying at the store, look for small, firm cucumbers labeled for pickling, or ask your farmer.
- Apple cider vinegar adds a nice mild tang—go for a quality brand like Bragg Organic Apple Cider Vinegar for depth of flavor.
- Pickling salt is pure and free of additives that can cloud your brine. If unavailable, kosher salt without iodine is a good substitute.
- Feel free to customize your spices. More garlic for a bold punch, extra crushed red pepper for heat, or a touch of sugar if you like your pickles a bit sweeter.
- These pickles develop best after chilling at least 48 hours, but the flavor deepens over the next several days.
Nutrition
Question: What’s your favorite way to eat a dill pickle—straight from the jar, on a sandwich, or fried to crispy perfection? Share in the comments below.
EverydayCheapskate™ is reader-supported. We participate in the Amazon Services LLC Associates Program and other affiliate advertising programs, designed to provide a means for us to earn from qualifying purchases, at no cost to you.

More from Everyday Cheapskate
 https://www.everydaycheapskate.com/wp-content/uploads/20260609-refreshing-glasses-of-iced-tea-with-fresh-lemon-slices-and-ice-best-way-to-make-tea.png
800
1200
Mary Hunt
https://www.everydaycheapskate.com/wp-content/uploads/EC-Logo-by-Mary-Hunt-Tagline-Trimmed.png
Mary Hunt2026-07-09 18:30:102026-07-09 18:30:10The Best Way to Make Iced Tea? Depends What You’re After
https://www.everydaycheapskate.com/wp-content/uploads/20260609-refreshing-glasses-of-iced-tea-with-fresh-lemon-slices-and-ice-best-way-to-make-tea.png
800
1200
Mary Hunt
https://www.everydaycheapskate.com/wp-content/uploads/EC-Logo-by-Mary-Hunt-Tagline-Trimmed.png
Mary Hunt2026-07-09 18:30:102026-07-09 18:30:10The Best Way to Make Iced Tea? Depends What You’re After https://www.everydaycheapskate.com/wp-content/uploads/20260707-creamy-whipped-frozen-coffee-drink-on-balcony-with-whipped-cream.png
800
1200
Mary Hunt
https://www.everydaycheapskate.com/wp-content/uploads/EC-Logo-by-Mary-Hunt-Tagline-Trimmed.png
Mary Hunt2026-07-07 10:09:112026-07-07 10:09:11I Stopped Buying $7 Frappuccinos. Here’s What I Make Now
https://www.everydaycheapskate.com/wp-content/uploads/20260707-creamy-whipped-frozen-coffee-drink-on-balcony-with-whipped-cream.png
800
1200
Mary Hunt
https://www.everydaycheapskate.com/wp-content/uploads/EC-Logo-by-Mary-Hunt-Tagline-Trimmed.png
Mary Hunt2026-07-07 10:09:112026-07-07 10:09:11I Stopped Buying $7 Frappuccinos. Here’s What I Make Now https://www.everydaycheapskate.com/wp-content/uploads/20260630-a-lit-sparkler-with-an-american-flag-in-the-background-4th-of-july-hacks-tips-and-recipes.png
800
1200
Mary Hunt
https://www.everydaycheapskate.com/wp-content/uploads/EC-Logo-by-Mary-Hunt-Tagline-Trimmed.png
Mary Hunt2026-06-30 21:44:502026-06-30 21:44:5034 Fourth of July Recipes and DIY Hacks for a Stress-Free Holiday
https://www.everydaycheapskate.com/wp-content/uploads/20260630-a-lit-sparkler-with-an-american-flag-in-the-background-4th-of-july-hacks-tips-and-recipes.png
800
1200
Mary Hunt
https://www.everydaycheapskate.com/wp-content/uploads/EC-Logo-by-Mary-Hunt-Tagline-Trimmed.png
Mary Hunt2026-06-30 21:44:502026-06-30 21:44:5034 Fourth of July Recipes and DIY Hacks for a Stress-Free Holiday https://www.everydaycheapskate.com/wp-content/uploads/20260628-Grilled-Peaches-with-Balsamic-and-Blue-Cheese-1.png
800
1200
Mary Hunt
https://www.everydaycheapskate.com/wp-content/uploads/EC-Logo-by-Mary-Hunt-Tagline-Trimmed.png
Mary Hunt2026-06-29 09:38:342026-06-29 09:38:34Summer Grilled Peaches with Balsamic and Blue Cheese
https://www.everydaycheapskate.com/wp-content/uploads/20260628-Grilled-Peaches-with-Balsamic-and-Blue-Cheese-1.png
800
1200
Mary Hunt
https://www.everydaycheapskate.com/wp-content/uploads/EC-Logo-by-Mary-Hunt-Tagline-Trimmed.png
Mary Hunt2026-06-29 09:38:342026-06-29 09:38:34Summer Grilled Peaches with Balsamic and Blue Cheese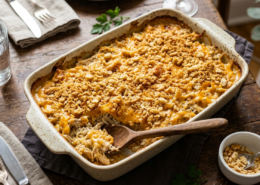 https://www.everydaycheapskate.com/wp-content/uploads/20260620-cheesey-chicken-and-rice-casserole-in-a-baking-dish.png
800
1200
Mary Hunt
https://www.everydaycheapskate.com/wp-content/uploads/EC-Logo-by-Mary-Hunt-Tagline-Trimmed.png
Mary Hunt2026-06-20 13:31:162026-06-20 13:31:16Cheesy Chicken & Rice Bake That Disappears at Family Dinners
https://www.everydaycheapskate.com/wp-content/uploads/20260620-cheesey-chicken-and-rice-casserole-in-a-baking-dish.png
800
1200
Mary Hunt
https://www.everydaycheapskate.com/wp-content/uploads/EC-Logo-by-Mary-Hunt-Tagline-Trimmed.png
Mary Hunt2026-06-20 13:31:162026-06-20 13:31:16Cheesy Chicken & Rice Bake That Disappears at Family Dinners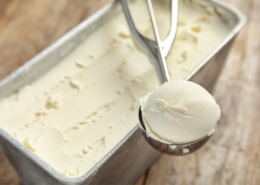 https://www.everydaycheapskate.com/wp-content/uploads/20260619-delicious-creamy-no-churn-vanilla-ice-cream-scoop-and-loaf-pan.png
800
1200
Mary Hunt
https://www.everydaycheapskate.com/wp-content/uploads/EC-Logo-by-Mary-Hunt-Tagline-Trimmed.png
Mary Hunt2026-06-19 18:42:402026-06-19 18:42:413-Ingredient No-Churn Vanilla Ice Cream (No Machine Needed)
https://www.everydaycheapskate.com/wp-content/uploads/20260619-delicious-creamy-no-churn-vanilla-ice-cream-scoop-and-loaf-pan.png
800
1200
Mary Hunt
https://www.everydaycheapskate.com/wp-content/uploads/EC-Logo-by-Mary-Hunt-Tagline-Trimmed.png
Mary Hunt2026-06-19 18:42:402026-06-19 18:42:413-Ingredient No-Churn Vanilla Ice Cream (No Machine Needed)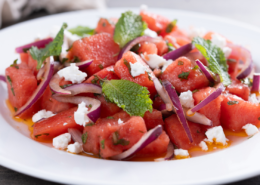 https://www.everydaycheapskate.com/wp-content/uploads/20260616-close-up-of-watermelon-feta-salad-with-mint-and-lime.png
800
1200
Mary Hunt
https://www.everydaycheapskate.com/wp-content/uploads/EC-Logo-by-Mary-Hunt-Tagline-Trimmed.png
Mary Hunt2026-06-16 17:44:142026-06-16 17:44:14Watermelon Feta Salad with Mint for Summer Cookouts
https://www.everydaycheapskate.com/wp-content/uploads/20260616-close-up-of-watermelon-feta-salad-with-mint-and-lime.png
800
1200
Mary Hunt
https://www.everydaycheapskate.com/wp-content/uploads/EC-Logo-by-Mary-Hunt-Tagline-Trimmed.png
Mary Hunt2026-06-16 17:44:142026-06-16 17:44:14Watermelon Feta Salad with Mint for Summer Cookouts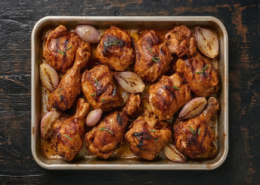 https://www.everydaycheapskate.com/wp-content/uploads/20260613-chicken-a-lorange-recipe-in-roasting-pan-with-shallots-and-orange-marmalade.png
800
1200
Mary Hunt
https://www.everydaycheapskate.com/wp-content/uploads/EC-Logo-by-Mary-Hunt-Tagline-Trimmed.png
Mary Hunt2026-06-13 20:59:292026-06-13 20:59:29Duck à l’Orange Is Fancy. This Chicken Version Is Better.
https://www.everydaycheapskate.com/wp-content/uploads/20260613-chicken-a-lorange-recipe-in-roasting-pan-with-shallots-and-orange-marmalade.png
800
1200
Mary Hunt
https://www.everydaycheapskate.com/wp-content/uploads/EC-Logo-by-Mary-Hunt-Tagline-Trimmed.png
Mary Hunt2026-06-13 20:59:292026-06-13 20:59:29Duck à l’Orange Is Fancy. This Chicken Version Is Better. https://www.everydaycheapskate.com/wp-content/uploads/20260607-woman-grocery-shopping-pushing-cart-with-apples-and-cauliflower.png
800
1200
Mary Hunt
https://www.everydaycheapskate.com/wp-content/uploads/EC-Logo-by-Mary-Hunt-Tagline-Trimmed.png
Mary Hunt2026-06-09 23:20:292026-06-09 23:20:29How to Read a Grocery Store Sale Cycle (And Stop Overpaying)
https://www.everydaycheapskate.com/wp-content/uploads/20260607-woman-grocery-shopping-pushing-cart-with-apples-and-cauliflower.png
800
1200
Mary Hunt
https://www.everydaycheapskate.com/wp-content/uploads/EC-Logo-by-Mary-Hunt-Tagline-Trimmed.png
Mary Hunt2026-06-09 23:20:292026-06-09 23:20:29How to Read a Grocery Store Sale Cycle (And Stop Overpaying)

Leave a Reply
Want to join the discussion?Feel free to contribute!