DIY Beeswax Wood Polish
This rich, conditioning wood polish deeply nourishes and protects furniture, leaving a lasting shine. The combination of beeswax and jojoba oil creates a natural barrier against moisture and dust, making it perfect for high-use surfaces.
Servings: 3.5 cups
Cost: $18-$20 for the batch
Equipment
- Double boiler (or a disposable coffee can over a pan of boiling water)
- Heat-resistant stirrer (wooden or silicone)
- Measuring cups
- Glass jar or airtight container
- Soft cloths
Ingredients
- ⅔ cup beeswax see notes
- 3 cups jojoba oil
- A few drops of essential oil for fragrance lavender, lemon, or orange work well (optional)
Instructions
- In a double boiler over medium heat, combine the beeswax and jojoba oil. Stir occasionally until the beeswax is fully melted and incorporated.
- If using, stir in a few drops of essential oil once the mixture is fully melted.
- Carefully pour the liquid into a jar or airtight container and let it cool for about 2 hours. The polish will solidify into a soft, creamy consistency.
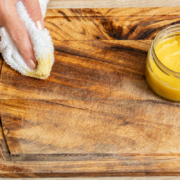
- Scoop a small amount onto a clean cloth and rub it into the wood, working in the direction of the grain.
- Wipe away excess polish immediately or allow it to soak in for a few hours before buffing with a dry cloth for a deep, lasting shine.
Notes
- Beeswax is tough to remove from cookware. Use a disposable container (like a coffee can) over boiling water to create a makeshift double boiler. Keep that can for future beeswax projects.
- Storage: Keep in a cool, dry place to maintain consistency. If it hardens too much, gently warm the jar to soften the polish before use.
- Application Tip: Letting the polish sit on the wood for a few hours before buffing provides extra nourishment and protection, perfect for high-use furniture.
