Update! Kitchen Junk Drawer from Chaos to Calm in 3 Easy Steps (It Works Every Time)
I’m going to go on a limb and assume that you have a junk drawer. We all have one, and I don’t know about you, but I’m not about to get rid of mine. After all, where else would we put our … junk?
Recently, a reader wrote asking how to conquer his junk drawer. “I can’t find anything in there, so I keep re-buying all the stuff I bought already!”
Having never thought much about junk drawers, I decided to see what the experts have to say. Emilie Barnes, author of More Hours in My Day, says the secret to junk drawer organization is proper “dividing containers.” But wait! Don’t run out to the mall to buy all kinds of pricey dividing containers. Emilie says you already have what you need: muffin tins, silverware tray, ice cube tray, coffee can, small box, even (hold on!) egg cartons. I stopped short on the egg carton. Seemed a little gross to me.
Next, I checked with Marla Cilley (aka “The FlyLady” and author of Sink Reflections). Marla says you cannot organize clutter. The only way, she says, to get control of any space is to empty it and clean it and then put things back, each in its own place. Sounds simple enough.
Step 1: Dump, Clean
Knowing I couldn‘t advise my readers if I’d not experienced this myself, I took the plunge. I approached my junk drawer with intention, determination, and resolve. I dumped that sucker right onto the kitchen rug. Boy, was I shocked to see the drawer was lined with lovely vinyl paper. Believe me, it’s been years since I’ve seen the bottom of that drawer!
Now empty, I cleaned that vinyl drawer lining (it’s very pretty) and slid the drawer it back into its compartment.
Step 2: Divide, Conquer
Next, I went in search of dividing containers. I found a muffin tin I haven’t used in years, a desk drawer organizer, and a silverware tray. And just to be fair, I did empty an egg carton. I hit it with a coat of spray paint, and you know it didn’t look half bad.
I opted for the desk drawer organizer because it was larger than my other choices. I have no idea where this thing came from. It was stashed I mean hidden in my junk … cupboard! Oh dear, yes I do have one of those, too.
Anyway, I cut the egg carton into shapes to fit around the divider and managed to fill the entire junk drawer with a series of small compartments. And now for the challenge: facing that pile on the floor.
Step 3: Categorize, Tidy Up
First, I pulled out anything with a cord, wound each one, and secured it with a rubber band. Next, I began to segregate: screws in one pile and nails in another. Pencils, pens,and small tools fit neatly into the long, narrow compartments.
Tacks, washers. and small round things were perfect in the egg compartments. I kept putting like-things together into the remaining compartments until all that remained was authentic junk destined for the trashcan.
You wouldn’t believe all the neat stuff I found —things I really, truly need and, like my reader-friend, items I’d repurchased because I forgot I already had them. Well, no more! And finding the missing top for my beverage vacuum pump was worth the entire effort.
It took me the better part of two hours to wrestle back control of our kitchen junk drawer. Thanks to Emilie and Marla, now it is so useful and so beautiful I’ve decided to rename it. I don’t have a junk drawer anymore. I have a brand new Help Drawer!
The American Junk Drawer
A junk drawer w is a drawer used for storing small, miscellaneous, occasionally useful objects of little to no (or unclear) monetary value, and possibly significant sentimental value. Junk drawers are often located in residential kitchens, but they may exist anywhere with cabinetry or furniture used for storage, including home offices or workshops, and even commercial workplaces and businesses. The phrase “junk drawer” appears to be an Americanism dating to the early 1900s.
Maintenance
I don’t know if it is possible for any junk drawer to stay organized. Perhaps it is for a one-person household whose said person is on permanent vacation. Abroad. Any busy household’s junk drawer is bound to need routine freshening. That means right back to the Steps above—1-2-3. Done.
Ever after …
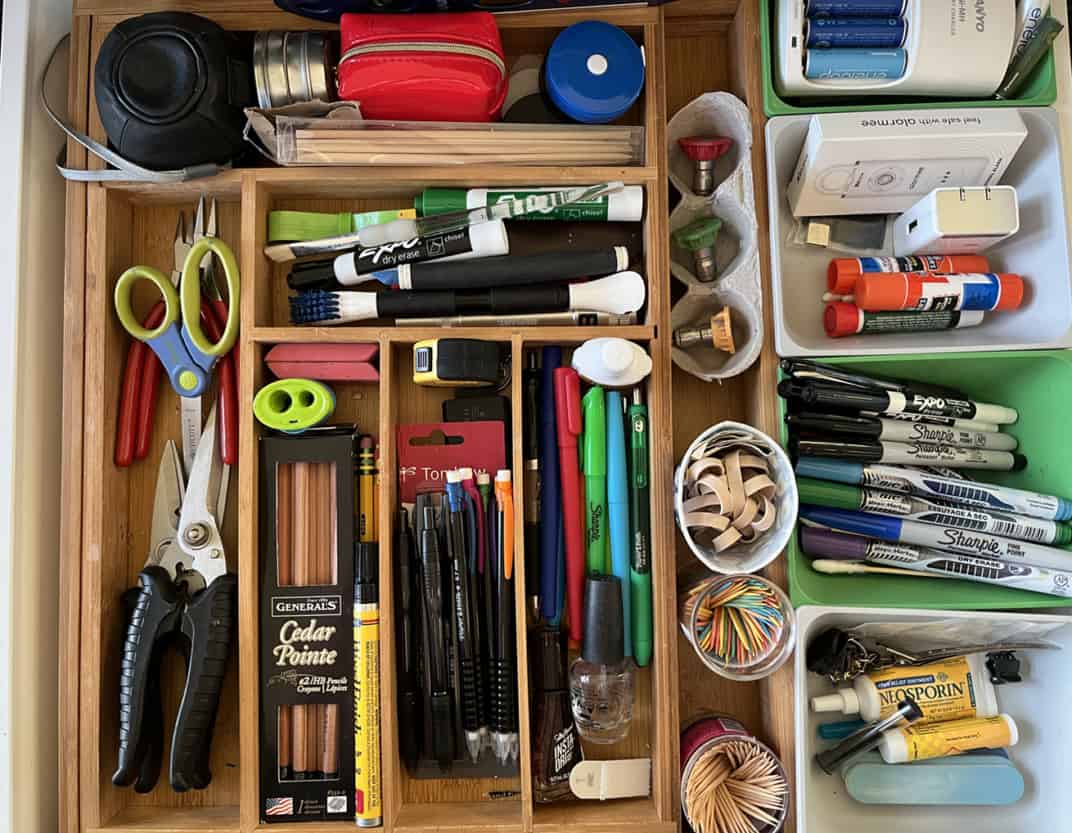
It’s been a year or more since I first approached my junk drawer, as you read above. Take a before photo was the absolute last thing on my mind. While writing is my life, I don’t approach every moment with that in mind. In fact, I was hoping no one would ever in a million years take a look at the mess known as our kitchen junk drawer. That would have been right up there with The Chair as measured in embarrassment.
Upon publishing this post, my email inbox experienced an outpouring (tsunami might be a better description) of requests, pleas, and even demands to see before and after pictures. Here is my response:
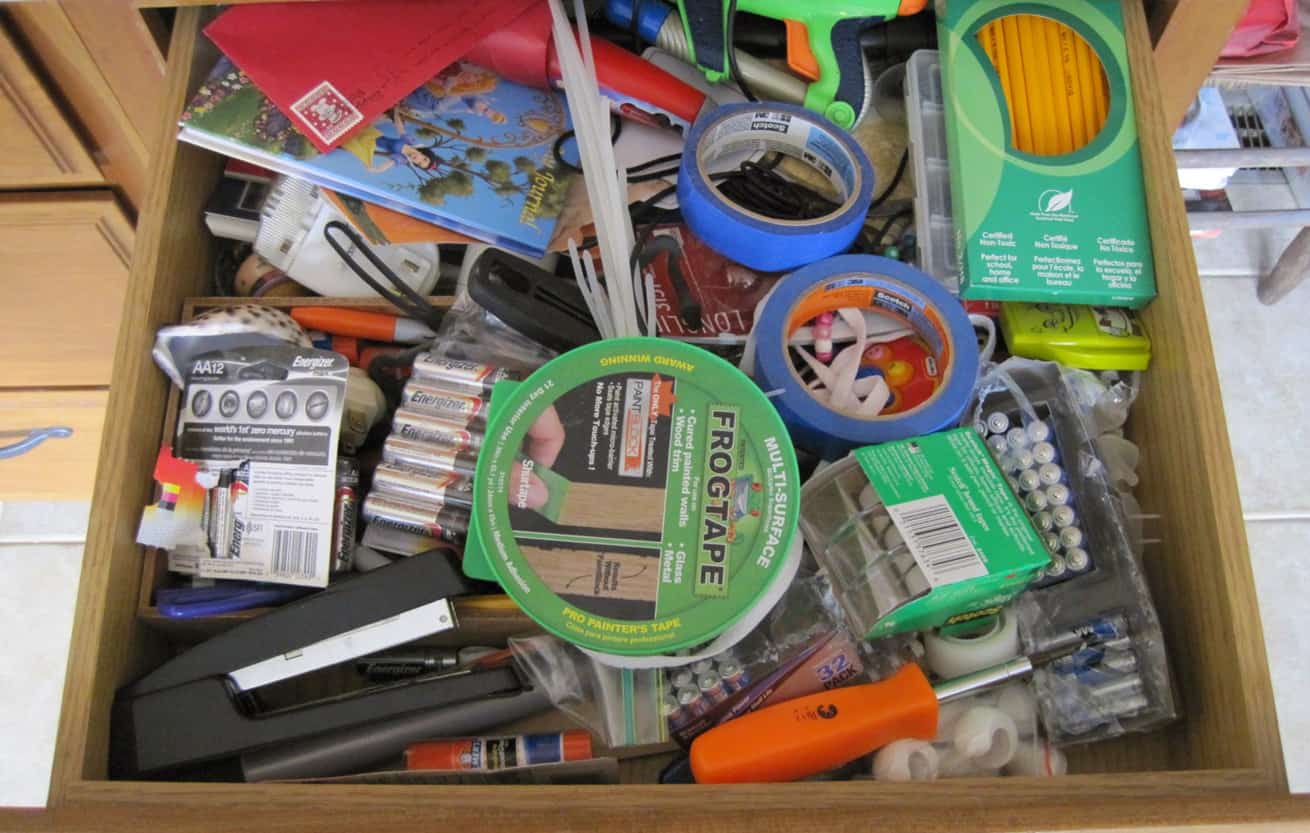
The photo in this post above is a stock photo. That means it’s not my actual before drawer, albeit, a very apt illustration. Recreating a “before” photo would not have been on my radar, and even if I’d thought about it … nope.
Below is my junk drawer as of 10 minutes ago. Taking camera-to-drawer, even I was surprised to realize I didn’t have to do anything to get it ready for a photo shoot. Much like my closet, once organized, where everything has a place, and everything is in its place, it’s easy to keep it that way.
Everyday Cheapskate participates in the Amazon Services LLC Associates Program, an affiliate advertising program and other affiliate programs as well, designed to provide a means for us to earn from qualifying purchases at no cost to you. If you click through some links in this post and make a purchase, we may receive a small commission at no additional cost to you. Thanks!

More from Everyday Cheapskate
 https://www.everydaycheapskate.com/wp-content/uploads/20240418-mothers-day-brunch-overhead-view-scones-bread-fruit-coffee.png
800
1200
Mary Hunt
https://www.everydaycheapskate.com/wp-content/uploads/EC-Logo-by-Mary-Hunt-Tagline-Trimmed.png
Mary Hunt2024-04-18 00:39:222024-04-18 13:57:47How to Plan, Prepare, and Host the Perfect Mother’s Day Brunch at Home
https://www.everydaycheapskate.com/wp-content/uploads/20240418-mothers-day-brunch-overhead-view-scones-bread-fruit-coffee.png
800
1200
Mary Hunt
https://www.everydaycheapskate.com/wp-content/uploads/EC-Logo-by-Mary-Hunt-Tagline-Trimmed.png
Mary Hunt2024-04-18 00:39:222024-04-18 13:57:47How to Plan, Prepare, and Host the Perfect Mother’s Day Brunch at Home https://www.everydaycheapskate.com/wp-content/uploads/20240414-a-fiddle-leaf-fig-whose-leaves-are-made-out-of-dollar-bills-in-a-midcentury-home-low-risk-investment.png
800
1200
Mary Hunt
https://www.everydaycheapskate.com/wp-content/uploads/EC-Logo-by-Mary-Hunt-Tagline-Trimmed.png
Mary Hunt2024-04-14 00:05:112024-04-13 14:58:27The Ultimate High-Yield, Guaranteed, Risk-Free Investment
https://www.everydaycheapskate.com/wp-content/uploads/20240414-a-fiddle-leaf-fig-whose-leaves-are-made-out-of-dollar-bills-in-a-midcentury-home-low-risk-investment.png
800
1200
Mary Hunt
https://www.everydaycheapskate.com/wp-content/uploads/EC-Logo-by-Mary-Hunt-Tagline-Trimmed.png
Mary Hunt2024-04-14 00:05:112024-04-13 14:58:27The Ultimate High-Yield, Guaranteed, Risk-Free Investment https://www.everydaycheapskate.com/wp-content/uploads/20240409-companion-planting-calendula-and-tomato-plants.png
800
1200
Mary Hunt
https://www.everydaycheapskate.com/wp-content/uploads/EC-Logo-by-Mary-Hunt-Tagline-Trimmed.png
Mary Hunt2024-04-09 00:33:482024-04-06 12:55:08Natural Pest Control: Companion Planting Strategies for Your Frugal Garden
https://www.everydaycheapskate.com/wp-content/uploads/20240409-companion-planting-calendula-and-tomato-plants.png
800
1200
Mary Hunt
https://www.everydaycheapskate.com/wp-content/uploads/EC-Logo-by-Mary-Hunt-Tagline-Trimmed.png
Mary Hunt2024-04-09 00:33:482024-04-06 12:55:08Natural Pest Control: Companion Planting Strategies for Your Frugal Garden https://www.everydaycheapskate.com/wp-content/uploads/20240404-midcentury-modern-bathroom-clean-bathroom.png
800
1200
Mary Hunt
https://www.everydaycheapskate.com/wp-content/uploads/EC-Logo-by-Mary-Hunt-Tagline-Trimmed.png
Mary Hunt2024-04-04 00:42:322024-03-26 22:52:43The Ultimate Step By Step Guide to a Clean Bathroom in 15 Minutes
https://www.everydaycheapskate.com/wp-content/uploads/20240404-midcentury-modern-bathroom-clean-bathroom.png
800
1200
Mary Hunt
https://www.everydaycheapskate.com/wp-content/uploads/EC-Logo-by-Mary-Hunt-Tagline-Trimmed.png
Mary Hunt2024-04-04 00:42:322024-03-26 22:52:43The Ultimate Step By Step Guide to a Clean Bathroom in 15 Minutes https://www.everydaycheapskate.com/wp-content/uploads/20240401-laptop-with-chalkboard-with-hot-deals-april-2024-piece-of-chalk-best-deals.png
800
1200
Mary Hunt
https://www.everydaycheapskate.com/wp-content/uploads/EC-Logo-by-Mary-Hunt-Tagline-Trimmed.png
Mary Hunt2024-04-01 00:48:282024-04-18 14:23:54Hot Deals • April 2024
https://www.everydaycheapskate.com/wp-content/uploads/20240401-laptop-with-chalkboard-with-hot-deals-april-2024-piece-of-chalk-best-deals.png
800
1200
Mary Hunt
https://www.everydaycheapskate.com/wp-content/uploads/EC-Logo-by-Mary-Hunt-Tagline-Trimmed.png
Mary Hunt2024-04-01 00:48:282024-04-18 14:23:54Hot Deals • April 2024 https://www.everydaycheapskate.com/wp-content/uploads/20240401-news-you-can-use-top-news-articles-april-2024.png
800
1200
Mary Hunt
https://www.everydaycheapskate.com/wp-content/uploads/EC-Logo-by-Mary-Hunt-Tagline-Trimmed.png
Mary Hunt2024-04-01 00:21:552024-04-18 13:43:05News You Can Use • April 2024
https://www.everydaycheapskate.com/wp-content/uploads/20240401-news-you-can-use-top-news-articles-april-2024.png
800
1200
Mary Hunt
https://www.everydaycheapskate.com/wp-content/uploads/EC-Logo-by-Mary-Hunt-Tagline-Trimmed.png
Mary Hunt2024-04-01 00:21:552024-04-18 13:43:05News You Can Use • April 2024 https://www.everydaycheapskate.com/wp-content/uploads/20240325-wild-rabbit-in-backyard-garden-pest-repel-rabbits.png
800
1200
Mary Hunt
https://www.everydaycheapskate.com/wp-content/uploads/EC-Logo-by-Mary-Hunt-Tagline-Trimmed.png
Mary Hunt2024-03-26 21:18:382024-03-26 21:52:0610 Natural Ways to Repel Rascally Rabbits to Protect Your Yard and Garden
https://www.everydaycheapskate.com/wp-content/uploads/20240325-wild-rabbit-in-backyard-garden-pest-repel-rabbits.png
800
1200
Mary Hunt
https://www.everydaycheapskate.com/wp-content/uploads/EC-Logo-by-Mary-Hunt-Tagline-Trimmed.png
Mary Hunt2024-03-26 21:18:382024-03-26 21:52:0610 Natural Ways to Repel Rascally Rabbits to Protect Your Yard and Garden https://www.everydaycheapskate.com/wp-content/uploads/Amazon-Big-Spring-Sale-Teaser-with-Question-Marks-1.png
800
1200
Mary Hunt
https://www.everydaycheapskate.com/wp-content/uploads/EC-Logo-by-Mary-Hunt-Tagline-Trimmed.png
Mary Hunt2024-03-18 21:46:212024-03-24 14:11:44Amazon’s Big Spring Sale: Everything You Need to Know
https://www.everydaycheapskate.com/wp-content/uploads/Amazon-Big-Spring-Sale-Teaser-with-Question-Marks-1.png
800
1200
Mary Hunt
https://www.everydaycheapskate.com/wp-content/uploads/EC-Logo-by-Mary-Hunt-Tagline-Trimmed.png
Mary Hunt2024-03-18 21:46:212024-03-24 14:11:44Amazon’s Big Spring Sale: Everything You Need to Know https://www.everydaycheapskate.com/wp-content/uploads/20240316-important-documents-every-family-should-keep-stack-desk-bright-home-office.png
800
1200
Mary Hunt
https://www.everydaycheapskate.com/wp-content/uploads/EC-Logo-by-Mary-Hunt-Tagline-Trimmed.png
Mary Hunt2024-03-16 11:01:372024-03-16 11:00:00Important Documents Every Family Should Keep to Be Safe Not Sorry
https://www.everydaycheapskate.com/wp-content/uploads/20240316-important-documents-every-family-should-keep-stack-desk-bright-home-office.png
800
1200
Mary Hunt
https://www.everydaycheapskate.com/wp-content/uploads/EC-Logo-by-Mary-Hunt-Tagline-Trimmed.png
Mary Hunt2024-03-16 11:01:372024-03-16 11:00:00Important Documents Every Family Should Keep to Be Safe Not Sorry

What did you do with the rolls of tape & stapler?
Hello EC! I wanted to contribute to your Junk Drawer article by saying we moved to a place that didn’t have a junk drawer so after numerous attempts I went to Harbor Freight and purchased a small tool box. It has dividers in it for nails and any other small hardware. That has totally kept the junk drawer dilemma from EVER happening. A basket for tools and tape etc is next to that. Just an idea for the readers.