
How to Roast Coffee at Home to Save Money and Enjoy Really Great Coffee

Would you pay $7 for a coffee? Neither would I. But that’s what multitudes of our fellow coffee lovers will be looking at very soon. Today, I have both good news and bad news.
First, the bad news: The price of raw coffee has skyrocketed and does not look to be slowing down anytime soon. We could soon see coffee prices of $7 a cup at local coffee shops. The good news is coffee will continue to be available. And that’s really good news for folks like me who skip all the middlemen, purchase raw green coffee beans, and roast them. At home.
How it all started
About 15 years ago I had a conversation with Dax Wilson, who’d recently taken up this home roasting hobby. The motivation? First, quality and taste, but also to cut the high cost of quality coffee by at least half. That was enough to get my attention and all I needed to become equally enthusiastic.
Where to roast
Because the coffee beans must get hot enough to burn off the chaff, producing a lot of smoke. While some people roast coffee in their kitchens, I do not recommend roasting indoors because it will make your smoke alarms into a tizzy and smoke up the house. Outdoors on the porch, patio, or driveway is ideal for roasting coffee.
What you’ll need
- Air popcorn popper. You want an older model like West Bend Poppery or Poppery II that run 1400 watts. I found mine on eBay. Check yard sales, thrift stores, even your garage. The machine needs to run at 1200-1500 watts. While you can still buy air poppers, newer models don’t get hot enough to roast the beans evenly.
- Two metal mesh colanders
- Bowl or another container to place in front of the popper
- Oven mitt
- Airtight container
- 1/2 cup raw green coffee beans.
Step 1
Measure out 1/2 cup of green coffee beans and pour them into the popper where you would normally pour the popcorn kernels.
Step 2
Turn on the air popper. Place the bowl in front of the machine where the popped popcorn would exit, to catch the chaff. Watch the beans swirling around in the machine. They are not going to pop out the way popcorn would.
As the machine heats up, you’ll see the beans turning brown in a few minutes. Next, you’ll hear the beans starting to make a cracking sound. At the first crack, you will have reached City Roast, which is a light roast.
The longer you let the beans roast from this point on, the darker the roast you will achieve. You will hear the beans pop like popcorn for several seconds. Then the sound will taper off.
The next stage is when the beans start to sound more like Rice Krispies crackling in milk. This is called the “second crack” and signals that you have reached what is called a Full City or dark roast. While the beans are roasting, you’ll see chaff flying off either into the bowl or box or into the air. This is normal and another reason you want to roast outdoors.
Step 3
The minute you have reached your desired roast, turn off the air popper very quickly and pour the beans out of the popper into one of the colanders. Careful! The beans and the popper will be very hot. At this point, you just cool them quickly or they will continue to roast.
Step 4
To cool the beans fast, you can pour them into one colander, shake them around, and then pour them into a second colander. Continue to toss the beans back and forth from one colander to the other until the beans are just warm to the touch.
Step 5
Place the beans in a container that has a tight-fitting lid. However, do not apply the lid at this time. Freshly roasted beans must be allowed to “de-gas” for at least two hours, up to overnight, to achieve their full coffee flavor. If you were to grind and brew beans immediately upon roasting, you would be very disappointed. The beans are not ready to be ground and brewed until they have rested for at least a few hours, to allow them to de-gas and develop to their peak of flavor.
Resources
Education
SweetMarias.com offers tons of help and valuable information for home roasters. While I’m not into “cupping” and some of the more advanced aspects of creating fabulous coffee, I highly recommend this as the go-to place to learn. You’ll soon discover at what level you want to set your goal as a home roaster.
Book
I recommend Home Coffee Roasting: Romance & Revival for detailed information on every possible question.
Raw green coffee beans
Go easy initially, buying just a few pounds of green coffee so you can try different varieties. Remember, I didn’t invest in 150 pounds of one variety at a time until many years after starting out with my old air popper. Amazon offers lots of green coffee beans, some with Prime shipping.
U-Roast-Em.com offers a large variety of raw green beans at very competitive rates, starting at about $7 per pound depending on current growing and harvesting conditions. You can buy a single pound at a time, up to 25 pounds or more. Prices vary.
Whirley-Pop
You’ll soon outgrow your air popper as it roasts only 2 to 3 ounces of roasted coffee beans at a time. That’s the time to upgrade to a Whirley-Pop popcorn maker. This stovetop machine will allow you to roast more coffee per batch, using a slightly different technique.
Behmor 2000AB Plus
Say hello to my current home coffee roaster. It’s a dream come true. Complete with a smoke suppressor (I now roast in the basement), I can roast up to one pound of coffee at a time and I do, a couple of times each week.
La Minita Tarrazu, Costa Rica
I did not take long to identify our favorite coffee, La Minita Tarrazu. It’s smooth, mild, and absolutely the best. And it’s pricey in all its forms—green beans, roasted whole beans or pre-ground. By purchasing directly from the plantation in Costa Rica (minimum purchase is one full bag, which nets around 150 pounds), we cut the cost by more than half.
My last shipment worked out to $4.91 per pound, including shipping, to give you an idea. Just know that market prices go up and down dependent on market conditions and the unknowns growers face.
Epilogue
I roast coffee for two reasons—to save money and to enjoy really good coffee. I’m not into formal tasting, “cupping” or any other advanced areas of serious coffee enjoyment.
As I started home roasting, I went through more than a few old, suitable air poppers. I don’t think air poppers were ever intended to be used for roasting coffee, requiring them to run longer and hotter than for popping corn. The poppers would eventually just melt down from the pain of it all, only to be replaced by my next victim.
After a few years of nearly daily roasting, I graduated to a stovetop Whirley-Pop popcorn popper. I used it outdoors on the side burner of our outdoor gas grill. I cut a hole in the aluminum top to accommodate a thermometer.
The temperature is critical when using a Whirley-Pop as the beans are on a hot surface and fully enclosed. They can catch fire so quickly! My hack worked OK. The best part was that I could roast 1/2 pound of raw beans at a time. But the roast was often very uneven (some beans light roast, other really dark or nearly burned—in the same batch, which is unacceptable). Still, Whirley-Pop filled the gap, allowing me to increase my roasting knowledge and hone my skills.
Once I completely burned up Whirley-Pop (did I mention roasting coffee requires very high heat, for which popcorn poppers were never created to endure?), I bit the bullet and bought a small coffee roaster—designed specifically for home roasting coffee.
FreshRoast SR500 Automatic Coffee Bean Roaster was a sweet little roaster. But it meant downgrading the amount of coffee I could produce per batch—from 6 ounces to 3.5 ounces. I could go through that myself in a single day without much trouble. I enjoyed the “automatic” feature, a little thing that got me hooked and not anxious to return to a more manual method. After a couple of years, it succumbed to the rigors of home roasting on the scale I’d achieved by that time.
This brings me to today, where I remain wholly hooked on my fabulous Behmor drum coffee roaster. Behmor is an ingenious piece of equipment created for home roasters who need a more robust, reliable machine. While the learning curve was somewhat challenging, Behmor and I are getting along well these days—exceptionally well.
Bonus
Last, there have been a few unintended if not beautiful consequences of this hobby of mine, not the least of which is that I am never at a loss when it comes to gifting. Anyone who enjoys coffee loves a bag of fresh, home-roasted La Minita Whole Bean Coffee!
I love that I am known for this thing that I do—something quite unique in our social circles.

How to Roast Green Coffee Beans
Ingredients
- 1/2 cup raw, green coffee beans
Instructions
Roast
- Measure out 1/2 cup green coffee beans and pour into the popper where you would normally pour the popcorn kernels.
- Turn on the air popper. Place the bowl in front of the machine where the popped popcorn would exit, to catch the chaff. Watch the beans swirling around in the machine. They are not going to pop out the way popcorn would.In a few minutes, as the machine heats up, you’ll see the beans turning brown. Next, you’ll hear the beans starting to making a cracking sound. At the first crack, you will have reached City Roast, which is a light roast.The longer you let the beans roast from this point on, the darker the roast you will achieve. You will hear the beans pop like popcorn for several seconds. Then the sound will taper off.The next stage is when the beans start to sound more like Rice Krispies crackling in milk. This is called the “second crack” and signals that you have reached what is called a Full City” or dark roast. While the beans are roasting you'll see chaff flying off either into the bowl or box or into the air. This is normal and another reason you want to roast outdoors.
- The minute you have reached your desired roast, turn off the air popper very quickly and pour the beans out of the popper into one of the colanders. Careful! The beans and the popper will be very hot. At this point, you just cool them quickly or they will continue to roast.
- To cool the beans fast, you can pour them into one colander, shake them around, and then pour them into a second colander. Continue to toss the beans back and forth from one colander to the other until the beans are just warm to the touch.
- Place the beans in a container that has a tight-fitting lid. However, do not apply the lid at this time. Freshly roasted beans must be allowed to “de-gas” for at least two hours, up to overnight, to achieve their full coffee flavor. If you were to grind and brew beans immediately upon roasting, you would be very disappointed. The beans are not ready to be ground and brewed until they have rested for at least a few hours, to allow them to de-gas and develop to their peak of flavor.
Resources
- BOOKFor detailed information on every possible question I recommend Home Coffee Roasting: Romance & Revival.
- RAW GREEN COFFEE BEANSGo easy in the beginning, buying just a few pounds of green coffee so you can try different varieties. Remember, I didn’t invest in 150 pounds of one variety at a time until many years after starting out with my old air popper. Amazon offers lots of green coffee beans, some with Prime shipping.U-Roast-Em.com offers a large variety of raw green beans at very competitive rates, starting at about $5 per pound. You can buy a single pound at a time, up to 25 pounds or more. Prices vary.
- WHIRLEY-POPYou’ll soon outgrow your air popper as it roasts only 2 to 3 ounces of roasted coffee beans at a time. The next method is to upgrade to a Whirley-Pop popcorn maker. This stovetop machine will allow you to roast more coffee per batch, using a slightly different technique.
- BEHMOR 1600 PLUSSay hello to my current home coffee roaster. It’s a dream come true. Complete with a smoke suppressor (I still opt to roast outdoors), I can roast up to one pound of coffee at a time, and I do at least a couple of times each week.
- LA MINITA TARRAZU, COSTA RICAIt did not take long for me to identify our favorite coffee, La Minita Tarrazu. It’s smooth, mild and absolutely the best. And it’s pricey in all its forms—green beans, roasted whole beans or pre-ground. By purchasing directly from the plantation in Costa Rica (minimum purchase is one full bag, which nets t 150-200 pounds), we cut the cost by more than half.To give you an idea, my last shipment worked out to $4.91 per pound, including shipping. Just know that market prices go up and down dependent on market conditions and the unknowns growers face.When you are interested in this kind of investment (if not now, down the road) I invite you to contact La Minita Coffee, 110 Riggs Rd., Ste A, Hinesburg, VT 05461-4453. They will take care of all of the issues of customs, import fees and delivery to your front door—all for one easy payment you will make in advance of delivery. Very easy.
- EPILOGUEI roast coffee for two reasons—to save money and to enjoy really good coffee. I’m not into formal tasting and “cupping” or any other advanced areas of serious coffee enjoyment. I love that I am known for this thing that I do—something quite unique in our social circles.
Everyday Cheapskate participates in the Amazon Services LLC Associates Program, an affiliate advertising program designed to provide a means for us to earn from qualifying purchases, at no cost to you.

More from Everyday Cheapskate
 https://www.everydaycheapskate.com/wp-content/uploads/20240319-garden-seed-starting-table-scape-succulents-tools-gardener.png
800
1200
Mary Hunt
https://www.everydaycheapskate.com/wp-content/uploads/EC-Logo-by-Mary-Hunt-Tagline-Trimmed.png
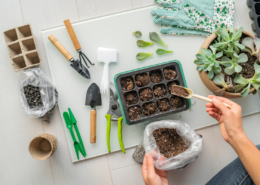
Mary Hunt2024-03-19 00:16:222024-03-18 22:53:3323 Genius Gardening Hacks I Wish I’d Known Sooner, Approved by Experts
https://www.everydaycheapskate.com/wp-content/uploads/20240319-garden-seed-starting-table-scape-succulents-tools-gardener.png
800
1200
Mary Hunt
https://www.everydaycheapskate.com/wp-content/uploads/EC-Logo-by-Mary-Hunt-Tagline-Trimmed.png
Mary Hunt2024-03-19 00:16:222024-03-18 22:53:3323 Genius Gardening Hacks I Wish I’d Known Sooner, Approved by Experts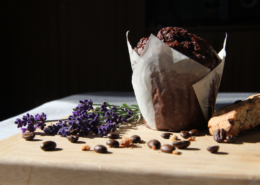 https://www.everydaycheapskate.com/wp-content/uploads/20240314-DIY-muffin-liner-homemade-tulip-baking.png
800
1200
Mary Hunt
https://www.everydaycheapskate.com/wp-content/uploads/EC-Logo-by-Mary-Hunt-Tagline-Trimmed.png
Mary Hunt2024-03-13 17:45:362024-03-13 18:40:12DIY Tulip Muffin Liners: A Genius Hack for Perfect Muffins Every Time
https://www.everydaycheapskate.com/wp-content/uploads/20240314-DIY-muffin-liner-homemade-tulip-baking.png
800
1200
Mary Hunt
https://www.everydaycheapskate.com/wp-content/uploads/EC-Logo-by-Mary-Hunt-Tagline-Trimmed.png
Mary Hunt2024-03-13 17:45:362024-03-13 18:40:12DIY Tulip Muffin Liners: A Genius Hack for Perfect Muffins Every Time https://www.everydaycheapskate.com/wp-content/uploads/20240313-a-traditional-st-patrick-s-day-meal-of-corned-bee-2023-11-27-04-56-49-utc-scaled.jpg
1707
2560
Mary Hunt
https://www.everydaycheapskate.com/wp-content/uploads/EC-Logo-by-Mary-Hunt-Tagline-Trimmed.png
Mary Hunt2024-03-10 17:08:102024-03-10 17:05:35Corned Beef and Cabbage: A Classic Irish Dish Made Simple
https://www.everydaycheapskate.com/wp-content/uploads/20240313-a-traditional-st-patrick-s-day-meal-of-corned-bee-2023-11-27-04-56-49-utc-scaled.jpg
1707
2560
Mary Hunt
https://www.everydaycheapskate.com/wp-content/uploads/EC-Logo-by-Mary-Hunt-Tagline-Trimmed.png
Mary Hunt2024-03-10 17:08:102024-03-10 17:05:35Corned Beef and Cabbage: A Classic Irish Dish Made Simple https://www.everydaycheapskate.com/wp-content/uploads/20240308-quick-dinner-recipe-italian-cheesy-meatball-bake-casserole-dish.png
800
1200
Mary Hunt
https://www.everydaycheapskate.com/wp-content/uploads/EC-Logo-by-Mary-Hunt-Tagline-Trimmed.png
Mary Hunt2024-03-09 00:11:482020-08-28 16:03:12Quick Dinner Recipe: Italian Cheesy Meatball Bake for Busy Cooks
https://www.everydaycheapskate.com/wp-content/uploads/20240308-quick-dinner-recipe-italian-cheesy-meatball-bake-casserole-dish.png
800
1200
Mary Hunt
https://www.everydaycheapskate.com/wp-content/uploads/EC-Logo-by-Mary-Hunt-Tagline-Trimmed.png
Mary Hunt2024-03-09 00:11:482020-08-28 16:03:12Quick Dinner Recipe: Italian Cheesy Meatball Bake for Busy Cooks https://www.everydaycheapskate.com/wp-content/uploads/20240308-spa-day-at-home-mother-daughter-manicure-hot-rollers-on-couch.png
800
1200
Mary Hunt
https://www.everydaycheapskate.com/wp-content/uploads/EC-Logo-by-Mary-Hunt-Tagline-Trimmed.png
Mary Hunt2024-03-08 00:14:402023-11-10 16:40:32DIY Spa Day at Home: 6 Easy Treatments to Pamper Yourself
https://www.everydaycheapskate.com/wp-content/uploads/20240308-spa-day-at-home-mother-daughter-manicure-hot-rollers-on-couch.png
800
1200
Mary Hunt
https://www.everydaycheapskate.com/wp-content/uploads/EC-Logo-by-Mary-Hunt-Tagline-Trimmed.png
Mary Hunt2024-03-08 00:14:402023-11-10 16:40:32DIY Spa Day at Home: 6 Easy Treatments to Pamper Yourself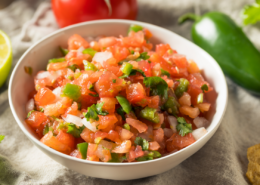 https://www.everydaycheapskate.com/wp-content/uploads/20240307-spicy-homemade-pico-de-gallo-vegetable-chopper-tomato-onion-jalapeno-cilantro.png
800
1200
Mary Hunt
https://www.everydaycheapskate.com/wp-content/uploads/EC-Logo-by-Mary-Hunt-Tagline-Trimmed.png
Mary Hunt2024-03-07 00:01:592024-03-26 08:40:04Confessions of a Compulsive Chopper (Shopper)
https://www.everydaycheapskate.com/wp-content/uploads/20240307-spicy-homemade-pico-de-gallo-vegetable-chopper-tomato-onion-jalapeno-cilantro.png
800
1200
Mary Hunt
https://www.everydaycheapskate.com/wp-content/uploads/EC-Logo-by-Mary-Hunt-Tagline-Trimmed.png
Mary Hunt2024-03-07 00:01:592024-03-26 08:40:04Confessions of a Compulsive Chopper (Shopper)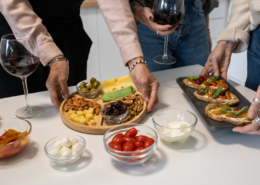 https://www.everydaycheapskate.com/wp-content/uploads/20240305-women-serving-small-bites-for-appetizers-party.png
800
1200
Mary Hunt
https://www.everydaycheapskate.com/wp-content/uploads/EC-Logo-by-Mary-Hunt-Tagline-Trimmed.png
Mary Hunt2024-03-05 02:30:042024-03-02 11:48:03Skip the Dinner, Bring on the Appetizer Party!
https://www.everydaycheapskate.com/wp-content/uploads/20240305-women-serving-small-bites-for-appetizers-party.png
800
1200
Mary Hunt
https://www.everydaycheapskate.com/wp-content/uploads/EC-Logo-by-Mary-Hunt-Tagline-Trimmed.png
Mary Hunt2024-03-05 02:30:042024-03-02 11:48:03Skip the Dinner, Bring on the Appetizer Party! https://www.everydaycheapskate.com/wp-content/uploads/20240302-spring-cleaning-creative-bright-concept.-tools-bottles-flowers-chalkboard-with-words-hello-spring.png
800
1200
Mary Hunt
https://www.everydaycheapskate.com/wp-content/uploads/EC-Logo-by-Mary-Hunt-Tagline-Trimmed.png
Mary Hunt2024-03-02 00:14:012024-03-01 13:34:55The Best Spring Cleaning Products & Tools to Make Your Home Shine
https://www.everydaycheapskate.com/wp-content/uploads/20240302-spring-cleaning-creative-bright-concept.-tools-bottles-flowers-chalkboard-with-words-hello-spring.png
800
1200
Mary Hunt
https://www.everydaycheapskate.com/wp-content/uploads/EC-Logo-by-Mary-Hunt-Tagline-Trimmed.png
Mary Hunt2024-03-02 00:14:012024-03-01 13:34:55The Best Spring Cleaning Products & Tools to Make Your Home Shine https://www.everydaycheapskate.com/wp-content/uploads/homemade-pizza-challenge.jpg
833
1310
Mary Hunt
https://www.everydaycheapskate.com/wp-content/uploads/EC-Logo-by-Mary-Hunt-Tagline-Trimmed.png
Mary Hunt2024-02-26 00:29:372024-02-26 08:44:42I Challenged Dominos to a Pizza Bake-Off and This is What Happened
https://www.everydaycheapskate.com/wp-content/uploads/homemade-pizza-challenge.jpg
833
1310
Mary Hunt
https://www.everydaycheapskate.com/wp-content/uploads/EC-Logo-by-Mary-Hunt-Tagline-Trimmed.png
Mary Hunt2024-02-26 00:29:372024-02-26 08:44:42I Challenged Dominos to a Pizza Bake-Off and This is What Happened

11 minutes in a wok. Spoon in hand, stir non stop. My heat about 200C. 1st crack merged into #2. Smoke, yes.
Threw beans into a rice chaff sorter/woven basket for separating chaff. Handled every bean, rubbing between my hands, blowing away burnt skins.
Sorted and threw out beans that didn’t look perfect. Hand ground my 1st serving, kept the other 900g.
One serving into my espresso cup n machine n hey presto. A smooth, tasty, creamy black coffee that was worth the wait.
I bought a Nesco machine form sweet Marias. It works fine. but I prefer to use a large open skillet. I roast on my stove and stir the beans often. when the beans are brown I take it off heat and put it outside for a few minutes. I wait about 4 hours to drink. and purchase beans from Bodhi leaf in orange, ca. purchase $49 and shipping is free
I started roasting about 3 years ago, after reading one of your emails, Mary! I love to roast and could not go back to purchasing roasted coffee beans! It is such fun to explore the various green bean options. I especially notice the difference in quality for the decaffeinated green beans. For extra savings without resorting to purchasing the whole 150 pound bag of green beans, I buy from Burman Coffee Traders, who always has discounted prices on several types of beans every month. They also offer 6 pounds of free green beans when you buy your Behmor roaster from them (and their price for the roaster is the same as the seller in your link).
Mary, you got me started roasting coffee years ago and my life hasn’t been the same since! This has saved so much money over the years, even with investing in a proper roaster. My husband and I both bring our thermoses to work every day. I haven’t even mentioned taste. The worst home roasted beans far surpass the best store bought beans every single time. This is the best tip you’ve ever posted…IMO. Thank you!!
I’m on my third batch and loving it. Thanks for posting this. I bought my air popper from a thrift store and my beans from Amazon. Definitely do this outside as it is smoky, and the chaff flies everywhere. Sometimes a bean or two flies out, so I keep the colander in front of the spout and just throw the escaped beans back in the popper.